Utilitech Pro UC1051-AL3-09LF0-U User manual

ITEM #0774382
MODEL #UC1051-AL3-09LF0-U
LED PLUG IN
UNDER CABINET BAR
Français p. 7
Español p. 13
Questions, problems, missing parts? Contact the customer service department at
1-866-994-4148, 8 a.m. - 6 p.m., EST, Monday - Thursday, 8 a.m. - 5 p.m., EST, Friday.
ATTACH YOUR RECEIPT HERE
Serial Number: Purchase Date:
AB15827 Lowes.com
1

C
AA
B
A
PACKAGE CONTENTS
HARDWARE CONTENTS (shown actual size)
Qty. 2
Wood
Screw
A Fixture 1
PART DESCRIPTION QUANTITY
B
C
Power Cord
Linking Cord
1
1
This unit has a grounded plug as a safety feature. This plug will fit in a grounded outlet only one way.
If it still does not fit, contact a qualified electrician. Never use with an extension cord unless the plug
can be fully inserted. Do NOT attempt to override this feature.
Please note that the 9 in. size of this fixture cannot be direct wired due to space constraints inside the
wiring compartment. The 9 in. size can only be plugged in using the included power cord, or
connected to another fixture using the linking cord.
WARNING: To reduce the risk of FIRE, ELECTRIC SHOCK, OR INJURY TO PERSONS:
1. For INDOOR USE ONLY.
2. Not intended for installation in plastic cabinets.
3. The mounting surface should be flat and sturdy enough to support the fixture.
4. Do NOT mount the fixture to cabinets having a material thickness less than 1/4 in.
5. Not intended for recessed installation in ceilings or soffits.
6. Do NOT use in wet locations.
7. Do NOT use for illumination of aquariums.
8. Do NOT mount over sinks or stoves.
9. Do NOT touch, operate, or install fixture while in contact with water.
10. Do not remove the protective LED lens or touch the LEDs at any time.
11. Use a soft cloth to clean the diffuser and/or fixture.
PLUG-IN/LINKING SAFETY INFORMATION:
12. Do NOT attempt to install while plugged in.
13. Use only insulated staples or plastic ties to secure the power or linking cords.
14. The National Electrical Code (NEC) does not permit cords to be concealed where damage to
insulation may go unnoticed. To prevent fire danger, do not run cord behind walls, ceilings, soffits,
cabinets, or similar permanent structures where it may be inaccessible for examination. Cords
should be visually examined periodically and immediately replaced when any damage is noted.
15. Do not use an extension cord. Use power strip with integral overcurrent protection to supply
power to the fixture.
16. The total wattage of ALL the fixtures linked together in one chain should NOT exceed 360 watts.
Exceeding the total wattage will result in a hazardous situation. Fixture wattage can be found on
back of fixture.
IMPORTANT: These LED light heads use light emitting diodes to provide light. LEDs are electronic
semiconductors and do not have a filament that can burn out like an ordinary light bulb. As such, the
LED light heads can last up to 50,000 hours when used intermittently, and therefore, never need
replacing.
SAVE THESE INSTRUCTIONS IN A LOCATION CLOSE TO THE LIGHT FIXTURE TO REFER TO
THEM AT A LATER TIME. Before installation, plug in fixture to a 120 V, 60 Hz electrical outlet to check
for proper operation. Then, unplug and begin the installation.
IMPORTANT SAFETY INSTRUCTIONS
SAFETY INFORMATION
WARNING
• Please read and understand this entire manual before attempting to assemble, operate
or install the product.
CAUTION
• This fixture is dimmable with a forward phase electronic dimmer. Dimmers tested to be
compatible with this fixture are the Lutron: Diva® C•L™: DVWCL-153P or DVCL-153P,
Lumea® C•L™: LGCL-153P, and Toggler® C•L™: TGCL-153P8. If unfamiliar with electrical
installations, it is recommended a qualified electrician do the installation.
• This device complies with Part 15 of the FCC rules. Operation is subject to the following two
conditions: (1) This device may not cause harmful interference, and (2) this device must accept
any interference received, including interference that may cause undesired operation.
Lowes.com
2

1.
The fixture (A) can be mounted without utilizing pilot holes.
Firmly hold the fixture against the mounting surface and begin
turning the mounting screws until they are fully driven in and the
fixture is firmly attached to the mounting surface. NOTE: DO
NOT overtighten the screws, as it may result in damage to the
fixture or the mounting surface.
EASY MOUNTING INSTALLATION
MOUNTING OPTIONS
1
There are two methods to mount the fixture to a cabinet. The first is the EASY MOUNTING
INSTALLATION method that uses the pre-installed screws located at both ends of the fixture. The
second is the TRADITIONAL MOUNTING INSTALLATION method, which utilizes the keyhole slots
located on the backside of the fixture.
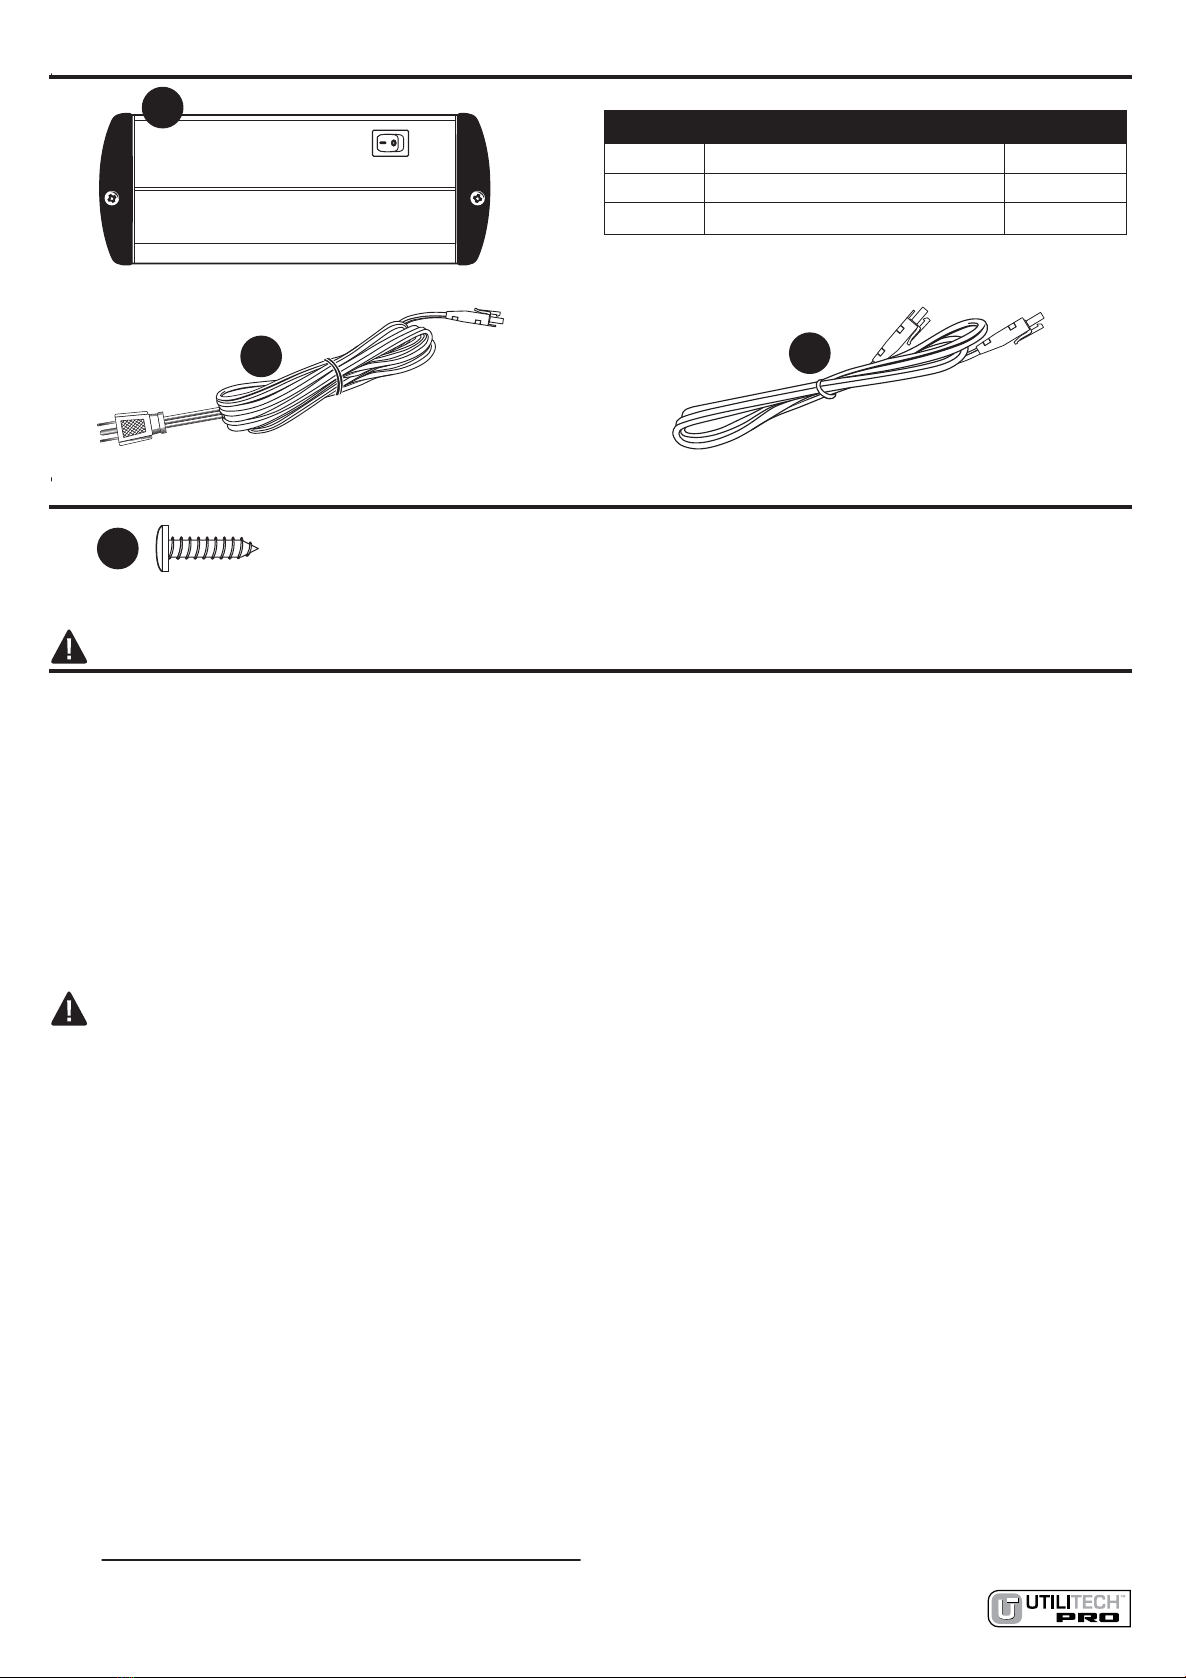
Before mounting, find a suitable location to mount the fixture that
will reach the power supply (within 5 feet) or to reach adjoining
fixture (within 18 inches). The fixture has two power ports located
at each end of the fixture. The “Power-In” port is located on the
end next to the on/off switch and is used to connect the fixture to
a power supply. The “Power-Out” port is located at the opposite
end and is used to link power to additional fixtures connected
together.
WARNING: To reduce the risk of FIRE, ELECTRIC SHOCK, OR INJURY TO PERSONS:
1. For INDOOR USE ONLY.
2. Not intended for installation in plastic cabinets.
3. The mounting surface should be flat and sturdy enough to support the fixture.
4. Do NOT mount the fixture to cabinets having a material thickness less than 1/4 in.
5. Not intended for recessed installation in ceilings or soffits.
6. Do NOT use in wet locations.
7. Do NOT use for illumination of aquariums.
8. Do NOT mount over sinks or stoves.
9. Do NOT touch, operate, or install fixture while in contact with water.
10. Do not remove the protective LED lens or touch the LEDs at any time.
11. Use a soft cloth to clean the diffuser and/or fixture.
PLUG-IN/LINKING SAFETY INFORMATION:
12. Do NOT attempt to install while plugged in.
13. Use only insulated staples or plastic ties to secure the power or linking cords.
14. The National Electrical Code (NEC) does not permit cords to be concealed where damage to
insulation may go unnoticed. To prevent fire danger, do not run cord behind walls, ceilings, soffits,
cabinets, or similar permanent structures where it may be inaccessible for examination. Cords
should be visually examined periodically and immediately replaced when any damage is noted.
15. Do not use an extension cord. Use power strip with integral overcurrent protection to supply
power to the fixture.
16. The total wattage of ALL the fixtures linked together in one chain should NOT exceed 360 watts.
Exceeding the total wattage will result in a hazardous situation. Fixture wattage can be found on
back of fixture.
IMPORTANT: These LED light heads use light emitting diodes to provide light. LEDs are electronic
semiconductors and do not have a filament that can burn out like an ordinary light bulb. As such, the
LED light heads can last up to 50,000 hours when used intermittently, and therefore, never need
replacing.
SAVE THESE INSTRUCTIONS IN A LOCATION CLOSE TO THE LIGHT FIXTURE TO REFER TO
THEM AT A LATER TIME. Before installation, plug in fixture to a 120 V, 60 Hz electrical outlet to check
for proper operation. Then, unplug and begin the installation.
SAFETY INFORMATION
Power-Out
Port
Power-In
Port
A
PREPARATION
Before beginning assembly of product, make sure all parts are present. Compare parts with
package contents list and hardware contents list. If any part is missing or damaged, do not
attempt to assemble the product.
Estimated Assembly Time: 25 minutes
Tools required for assembly (not included): Phillips screwdriver and flathead screwdriver.
WARNING
• Please read and understand this entire manual before attempting to assemble, operate
or install the product.
CAUTION
• This fixture is dimmable with a forward phase electronic dimmer. Dimmers tested to be
compatible with this fixture are the Lutron: Diva® C•L™: DVWCL-153P or DVCL-153P,
Lumea® C•L™: LGCL-153P, and Toggler® C•L™: TGCL-153P8. If unfamiliar with electrical
installations, it is recommended a qualified electrician do the installation.
• This device complies with Part 15 of the FCC rules. Operation is subject to the following two
conditions: (1) This device may not cause harmful interference, and (2) this device must accept
any interference received, including interference that may cause undesired operation.
Lowes.com
3

2.
Use a nail or awl to dimple the surface to help guide the
screws. Either drive the wood screws (AA) directly into the
surface or drill two 1/16 in. pilot holes to make installing the
screws easier. The screws must be driven in straight. Tighten
until 3/8 in. of the screws is protruding below the surface.
3.
Position mounting keyholes over the screws. Slide the fixture
until the smaller end of the slot engages the screws. The light
fixture should fit tightly against the mounting surface. If the fit is
loose, tighten both screws a little more for a secure fit.
PLUG-IN INSTRUCTIONS
Hardware Used
Wood Screw x 2
AA
13. Use only insulated staples or plastic ties to secure the power or linking cords.
14. The National Electrical Code (NEC) does not permit cords to be concealed where damage to
insulation may go unnoticed. To prevent fire danger, do not run cord behind walls, ceilings, soffits,
cabinets, or similar permanent structures where it may be inaccessible for examination. Cords
should be visually examined periodically and immediately replaced when any damage is noted.
15. Do not use an extension cord. Use power strip with integral overcurrent protection to supply
power to the fixture.
16. The total wattage of ALL the fixtures linked together in one chain should NOT exceed 360 watts.
Exceeding the total wattage will result in a hazardous situation. Fixture wattage can be found on
back of fixture.
IMPORTANT: These LED light heads use light emitting diodes to provide light. LEDs are electronic
semiconductors and do not have a filament that can burn out like an ordinary light bulb. As such, the
LED light heads can last up to 50,000 hours when used intermittently, and therefore, never need
replacing.
SAVE THESE INSTRUCTIONS IN A LOCATION CLOSE TO THE LIGHT FIXTURE TO REFER TO
THEM AT A LATER TIME. Before installation, plug in fixture to a 120 V, 60 Hz electrical outlet to check
for proper operation. Then, unplug and begin the installation.
6-3/8 in. (163 mm.)
1. To install the fixture using keyhole slots, place the fixture firmly
against the mounting surface and mark the location with a pencil.
Measure the distance from the front edge of the fixture to center of
the keyhole slots and run a line parallel to the front edge of the
cabinet. Mark the desired location of the mounting screws. The
center of the screws need to be 6-3/8 in. apart. Use a 1/16 in.
drill bit to drill the pilot holes to aid in the installation of the screws.
TRADITIONAL MOUNTING INSTALLATION
1
2
3
1
2
AA
A
B
1.
Using a flathead screwdriver (not included), carefully pry off the
plastic cap that covers the “Power-In” port on the end of the
fixture.
2.
WARNING: DO NOT plug the power cord into the power supply
before completing the installation. The power cord (B) has a
grounded plug at one end and a connector plug at the other
end. FIRST: Insert the connector plug into the power port
located near the on/off switch at the end of the fixture (A). The
cord connector plug will ONLY fit into this power port. When
fully inserted, the catch on the top of the connector plug will
click into the power port. SECOND: Plug in the power cord into
an outlet. Installation is complete.
Lowes.com
4

The first fixture is now fully installed and powered. It is now possible to link additional fixtures to this
first unit. An 18 inch linking cord (C) has been provided with each fixture. Ensure that the distance
between additional fixtures does not exceed the length of the connector cord (18 inches).
Shut off the power to the first fixture, either direct wired or plugged-in to house electrical system,
prior to installing the linking cord.
LINKING INSTRUCTIONS
Periodically clean the fixture using a mild, non-abrasive glass cleaner and soft cloth. Do NOT use
solvents or cleaners containing abrasive agents. When cleaning the fixture, make sure the power is
turned off. Do not spray liquid cleaner directly onto the LEDs, fixture, diffuser, or wiring.
CARE AND MAINTENANCE
1
C
C
3.
NOTE: The linking cord (C) is fitted with a distinct connector
plug at each end. The cord can only connect one way. Try
inserting one end of the linking cord into the “Power-Out” port
on the fixture installed ahead of the this one. If that fails, try the
other end. DO NOT force the plugs into either port. When
correctly inserted, the plug will insert smoothly and the catch
on top of the connector plug will click and lock into place.
2. Using the same mounting installation method used on the
previous fixture, mount the fixture being linked.
1. Using a flathead screwdriver, carefully pry off the plastic cover
that protects the “Power-In” port on the the fixture being added.
Carefully pry off the plastic cover that protects the “Power-Out”
port on the the fixture it is being linked to.
4.
Insert the opposite end of the linking
cord into the “Power-In” port of the
additional unit. NOTE: Each light
can be individually operated by the
on/off switch located on each fixture.
5.
Restore power to the powered unit.
3
4
Lowes.com
5

Minor problems often can be fixed without the help of an electrician. Before doing any work on the
fixture, shut off power supply at the circuit breaker panel to avoid electrical shock.
TROUBLESHOOTING
WARRANTY
Fixture doesn’t light.
Fuse blows or circuit
breaker trips when
light is turned on.
1. Power is off.
2. Bad plug connection.
3. Bad switch.
1. Discontinue use.
1. Check if power supply is on.
2. Check power cord.
3. Test or replace switch.
1. Call customer service.
PROBLEM POSSIBLE CAUSE CORRECTIVE ACTION
Utilitech & UT Design® and Grounded in Quality® are
registered trademarks of LF, LLC. All Rights Reserved.
Other identified trademarks are registered by their
respective owners.
The manufacturer warrants this lighting fixture to be free from defects in materials and workmanship for
a period of (5) years from the date of original purchase by the consumer. The fixture is not warrantied for
use in a commercial or retail application. The warranty is limited to use in a residential environment. We
will repair or replace (at our option) the unit in the original color, and style if available, or in a similar color
and style if the original item has been discontinued, without charge. Defective units must be properly
packed and returned to the manufacturer with a letter of explanation and your original purchase receipt
showing date of purchase. Call 1-866-994-4148 to obtain a Return Authorization number and an
address where to ship your defective product. Note: C.O.D. shipments will NOT be accepted. The
liability of the manufacturer is in any case limited to replacement of the defective light fixture product.
The manufacturer will not be liable for any other loss, damage, labor costs or injury which is caused by
the product. This limitation upon the liability of the manufacturer includes any loss, damage, or injury
which is (I) to person or property or otherwise; (II) incidental or consequential in nature; (III) based upon
theories of warranty, contract, negligence, strict liability, tort, or otherwise; or (IV) directly, or indirectly
related to the sale, use, or repair of the product. This warranty gives you specific rights, and you may
also have other rights which vary from state to state.
Printed in China
Lowes.com
6
Table of contents
Other Utilitech Pro Lighting Equipment manuals
Popular Lighting Equipment manuals by other brands

Satco
Satco NUVO 67-132 Installation and safety instructions

DARAY
DARAY X350LED operating manual

Intermatic
Intermatic EL100 Installation and user instructions

Atlas Copco
Atlas Copco HiLight H5+ Hd ESF instruction manual

ML Accessories
ML Accessories E27PR Installation & maintenance manual

Clevertronics
Clevertronics LP Argonaut PLUS Installation & maintenance instructions