Vaisala Humicap HM40 User manual

User’s Guide
www.vaisala.com
M211088EN-A
Vaisala HUMICAP®Hand-Held
Humidity and Temperature Meter
HM40


User’s Guide ________________________________________________ HM40
1
Table of Contents
First Startup....................................................................................3
Initial Settings ............................................................................3
Product Overview ........................................................................4
The HM40 Meter - Front ............................................................ 5
The HM40 Meter – Back.............................................................6
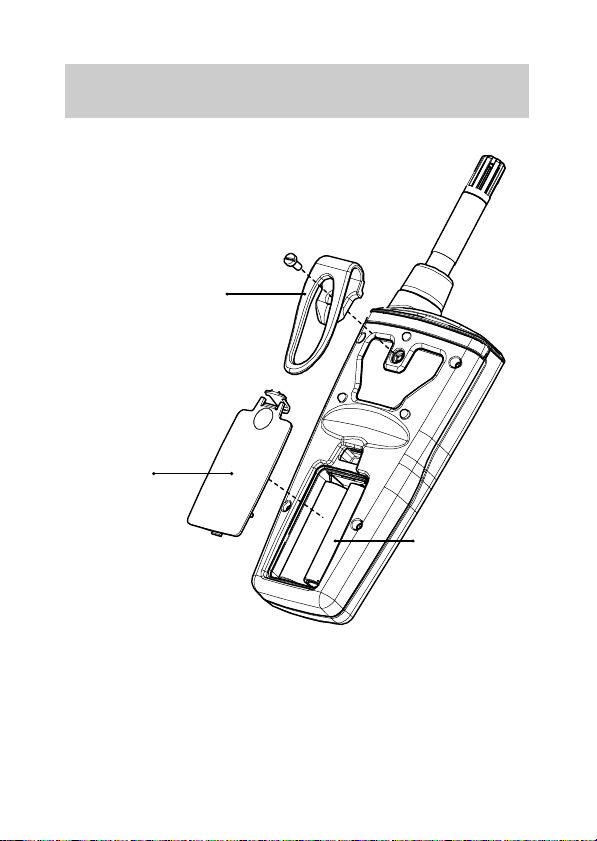
Batteries........................................................................................... 7
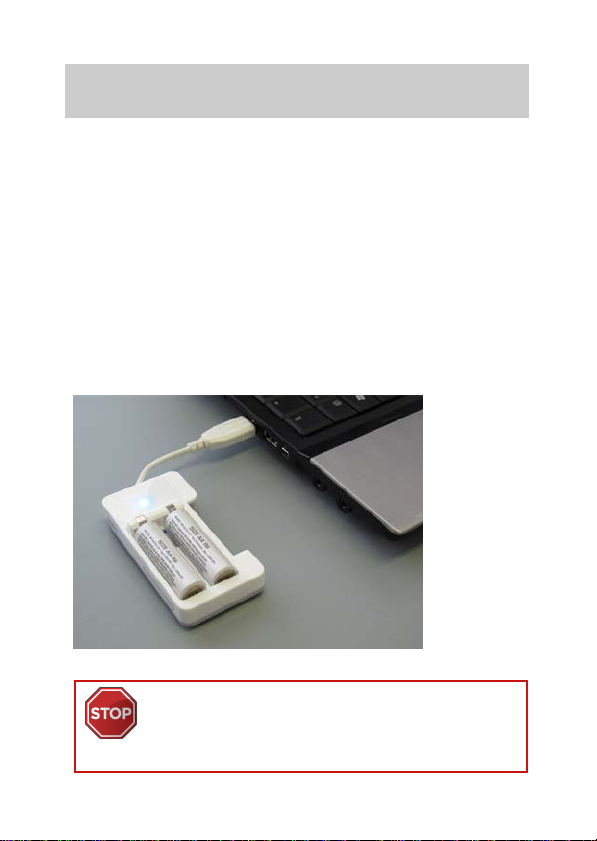
Charging...........................................................................................8
Quantities Explained ...................................................................9
Measurement Views................................................................... 10
Screen Layout and Controls............................................... 10
Indicators.....................................................................................11
Numeric View............................................................................12
Statistics View ..........................................................................13
Graph View ............................................................................... 14
Hold and Tag.............................................................................16
Main Menu ......................................................................................18
Tagged Points...........................................................................19
Graph Duration....................................................................... 20
Settings ..................................................................................... 20
Calibration..................................................................................21
Help...............................................................................................21
Settings Submenu ......................................................................22
Language...................................................................................22
Units.............................................................................................23
Time & Date ..............................................................................23
Pressure......................................................................................25

User’s Guide________________________________________________ HM40
2
Backlight....................................................................................25
Battery........................................................................................26
Navigation.................................................................................26
Factory Settings......................................................................26
How to Measure ..........................................................................27
Maintenance .................................................................................29
Cleaning .....................................................................................29
Changing the Filter ............................................................... 30
Changing the Probe................................................................31
Calibration.....................................................................................33
Calibrating the HM40 Using the HMK15 Humidity
Calibrator.................................................................................. 34
Accessories and Parts...............................................................38
HMP110 Probe...........................................................................38
Filters ..........................................................................................39
Chargers and Batteries.........................................................39
Belt Clips and Battery Covers............................................39
Technical Data ............................................................................ 40
Performance............................................................................40
Mechanical................................................................................. 41
General ....................................................................................... 41
Dimensions (in mm).............................................................. 42

User’s Guide ________________________________________________ HM40
3
First Startup
1. Check that the HMP110 probe is securely attached
and remove the yellow transport protection cap from
the probe.
2. Open the battery cover and insert two AA-size
batteries.
3. Close the battery cover and turn on the meter by
pressing the Power button. If the meter does not turn
on, check the battery orientation. Replace the
batteries with fresh/recharged ones if needed.
Initial Settings
When you power on the HM40 for the first time (or
after a factory reset of the settings), you must first
select the operation language. You will then be asked if
you want to change the following settings:
-Units
-Date
-Time
If you answer Yes to the question (recommended), the
meter will show the settings screens before showing
the measurement view. Use the arrow and function
buttons to select. For more information, see section
Settings Submenu on page 22.
HM40 will retain the date and time even during
battery changes. The clock will have to be set
again only if the meter is without battery power
for several hours.

User’s Guide________________________________________________ HM40
4
Product Overview
The Vaisala HUMICAP®Hand-Held Humidity and
Temperature Meter HM40 is a hand-held meter for
various portable measurement applications.
Main features:
-Compact and robust housing
-Measures a wide range of quantities: RH, Td, Tw, a, x,
h, T. See section Quantities Explained on page 9.
-Large graphical display
-Graphs for selected quantity and temperature
-Interchangeable HMP110 probe
-Can be user calibrated (using the HMK15 humidity
calibrator, for example)
-Powered by standard AA size batteries (2×)
-Operation temperature range -10°C ... +60°C
-Belt clip
Optional:
-USB-powered portable charger for AA-size NiMH
rechargeables
-Membrane filter for HMP110 probe for increased
protection against contaminants
For more information and order codes of the
accessories, see section Accessories and Parts
on page 38.

User’s Guide ________________________________________________ HM40
5
The HM40 Meter - Front
HMP110 probe
Filter and sensor
Probe holder
Display
Right function
L
eft function
Down
Up
Power
Menu

User’s Guide________________________________________________ HM40
6
The HM40 Meter – Back
Belt clip
Battery
cover
Batteries
2 x AA

User’s Guide ________________________________________________ HM40
7
Batteries
The HM40 is powered by two AA-size batteries. You
can use the following battery types:
-Alkaline (IEC-LR6)
-Lithium (IEC-FR6)
-NiMH (IEC-HR6)
Do not mix batteries of different types. Both
batteries must be of the same type.
Observe instructions storage and operation
instructions of the battery manufacturer.
Alkaline batteries are the standard choice in non-
rechargeable batteries. They are a good match for the
power requirements of the HM40.
Lithium batteries are a good choice if you need the
longest battery life or best capacity in low
temperatures. Lithium batteries are not rechargeable.
Do not confuse them with lithium-ion batteries, which
cannot be used in the HM40.
NiMH batteries are rechargeable, and available from
Vaisala as an option. For order codes, see section
Accessories and Parts on page 38. Instructions for using
the optional USB charger are provided in section
Charging on page 8.

User’s Guide________________________________________________ HM40
8
Charging
The optional USB charger provides a convenient way to
charge two NiMH batteries from any powered USB port
(for example, from a laptop computer).
1. Place the rechargeable batteries in the charger and
plug it into a USB port. The blue LED on top of the
charger starts to blink.
2. When the LED stops blinking and stays on, the
batteries are charged. The charging time is several
hours for two fully discharged NiMH batteries.
If you are not using a Vaisala-supplied charger and
rechargeable batteries, read and follow the
manufacturer’s own charging instructions.
Figure 1
USB Charger with Two NiMH Batteries
Do not attempt to charge non-rechargeable
(alkaline or lithium) batteries! Doing so leads to a
risk of battery leakage, equipment damage, and
risk of explosion and/or fire.

User’s Guide ________________________________________________ HM40
9
Quantities Explained
The table below describes the quantities measured by
the HM40. All of the quantities are measured or
calculated when the meter is on, independent of what is
currently displayed.
Quantity Symbol Unit(s) Description
Relative
humidity RH % Ratio of the partial pressure of
water vapor in the air to the
saturation vapor pressure of air
at the current temperature.
Dewpoint Td °C
°F Temperature at which the
water vapor in the air will
condense into water at the
current pressure. When the
dewpoint is below 0 °C, the
meter outputs frostpoint
instead of dewpoint.
Wet bulb
temperature Tw °C
°F The minimum temperature
that can be reached by
evaporative cooling in the
current conditions.
Absolute
humidity a g/m3
gr/ft3Quantity of water in a cubic
meter (or cubic foot) of air.
Mixing ratio x g/kg
gr/lb Ratio of water vapor mass per
kilogram (or pound) of dry air.
Enthalpy h kJ/kg
btu/lb Sum of the internal energy of a
thermodynamic system.
Temperature T °C
°F Temperature in Celsius or
Fahrenheit scale.

User’s Guide ________________________________________________ HM40
11
Indicators
Battery charge indicator
Fresh batteries will always show three
bars.
When the indicator shows two bars,
the voltage of the batteries has started
to drop. When there is a single
(blinking) bar left, you should replace
the batteries. The meter will turn off
automatically when the battery
voltage drops too low.
Alert indicator
This indicator is shown next to the
battery charge indicator if there is a
measurement problem. The most likely
causes are low battery and probe
problems, for example:
-Battery voltage too low to power
the probe. The measured values
may show asterisks "*" instead of
numbers.
-Probe has been disconnected
-Probe has been damaged
-Probe is incompatible
Quantity indicator
The selected quantity is highlighted by
a light frame. The symbol on the right
stands for all quantities.
For the list of quantities, see section
Quantities Explained on page 9.

User’s Guide________________________________________________ HM40
12
Numeric View
The Numeric view shows the
currently values of the selected
humidity quantity and
temperature.
In the all quantities view the font
is smaller to fit all values on
screen.

User’s Guide ________________________________________________ HM40
13
Statistics View
The Statistics view shows the
current value of the selected
quantity, as well as the maximum,
average, and minimum value
since the measurement was
started. There is also a counter
that shows how long the
measurement has been running.
The icons are:
Maximum
Average
Minimum
Measurement time
The counter for measurement
time is not shown in the all
quantities view.

User’s Guide________________________________________________ HM40
14
Graph View
The Graph view shows a
continuously updating graph of
the selected quantity and
temperature.
The graph limits and spacing
adjust dynamically to show the
full range of measurements.
HM40 has no permanent memory for
measurement data. When the meter is turned off,
the graphs are cleared.

User’s Guide ________________________________________________ HM40
15
The timescale of the graph can
be changed in the Main menu.
By default, the graph will
automatically change the
timescale to fit the measured
data. If you select a short
timescale, only the most recent
data will be visible.
The graph view is not available in
the all quantities view. Select a
single quantity to show the
graph.

User’s Guide________________________________________________ HM40
16
Hold and Tag
If you press the right function button (Hold button) in a
measurement view, two things happen:
-The measurement view freezes until you press the
Release button.
-The latest measurement point is tagged (marked and
stored in temporary memory). See section Tagged Points
on page 19.
Tagged points are shown in the graph view as small dots
below the graphs.
Measurement values at the
tagged points can be browsed
in the menu. See Tagged Points
on page 19.

User’s Guide ________________________________________________ HM40
17
When the screen is held, the top
of the display displays the current
date and time. This is useful when
you want to record the current
data (take a photograph or write
it down).
If time has not been set, the top
of the screen will simply read
“HOLD”.
When the view is held, you can reset all
measurement data by pressing the Reset
button. This will clear all graphs and tagged
points.
If you keep pressing the right function button
(long press), the meter will tag the point without
freezing the screen.

User’s Guide________________________________________________ HM40
18
Main Menu
You can open the menu from the measurement view at
any time by pressing the menu button.
If you are already in the menu, pressing the menu
button returns you to the measurement view. If you are
in a submenu, the menu button returns you to the
previous menu level.
Use the arrow buttons to move up
and down in the menu, and
function buttons to operate the
menu options. Typical functions in
the menus are:
-View and Enter open the
selected menu option or
submenu.
-Change and Set change the
value of the selected option.
-Back returns to the previous
menu view.
-Exit closes the menu and
returns to the measurement
view.
Some menu screens have more content than can
be visible at one time. This is indicated by a scroll
bar that appears on the right side of the screen.
Use the arrow buttons to scroll up and down.
Other manuals for Humicap HM40
1
Table of contents
Other Vaisala Multimeter manuals