Valex APL1212 User manual

S350123
30.09.2019
ATTENZIONE! Prima di usare la macchina, leggete e comprendete le istruzioni di sicurezza e le istruzioni d’uso
WARNING! Before using the machine, read and understand the safety instructions and operating instructions
Aspiratore polvere e liquidi
ISTRUZIONI PER L’USO
Istruzioni originali
Drum vacuum cleaner
OPERATING INSTRUCTIONS
Translation of the original instructions
Final dimension: A5
APL1212

- 2 -

- 3 -

- 4 -

DICHIARAZIONE DI CONFORMITA’
La ditta indicata in etichetta dichiara sotto la
propria responsabilità che il prodotto ivi citato
è conforme ai requisiti essenziali di sicurezza e
salute contenuti nelle seguenti direttive europee:
2014/35/CE, 2014/30/CE, 2009/125/CE
DECLARATION OF CONFORMITY
The firm indicated on the label declares, under
its own responsibility, that the product cited there
complies with the essential health and safety
requirements contained in the following European
directives:
2014/35/EC, 2014/30/EC, 2009/125/EC
Persona autorizzata a costituire il fascicolo tecnico
presso:
The person authorized to compile the technical
file is in:
Valex SpA
Via Lago Maggiore, 24
36015 Schio (VI) - Italy
Schio, 09.2019
Un procuratore - Attorney
SMIDERLE STEFANO
CODICE RICAMBI
A Tubo in plastica
B Spazzola
SPARE PART CODES
A Plastic hose
B Brush
A 1350100
B 1350098
DATI TECNICI
1 Potenza nominale
2 Capacità serbatoio
3 Tensione-frequenza nominale
4 Grado di protezione
TECHNICAL DATA
1 Nominal power
2 Tank capacity
3 Nominal voltage-frequency
4 Protection degree
1 1200 W
2 12 l
3 230V ~ 50Hz
4 IPX4

- 6 -
i
SIMBOLOGIA
Osservate con attenzione la simbologia della
fig.B e memorizzate il rispettivo significato. Una
corretta interpretazione dei simboli consente un
uso più sicuro della macchina.
1 Modello e macchina
2 Dati tecnici
3 Marchi di certificazione
4 Numero di lotto e anno di fabbricazione della
macchina. Le prime 2 cifre indicano l’anno.
5 ATTENZIONE!
6 Leggete con attenzione tutte le istruzioni
prima dell’uso
7 Idoneo ad aspirare liquidi.
V volts
Hz hertz
~ corrente alternata
W watts
l litri
IPXX grado di protezione
II doppio isolamento elettrico (senza
cavo di terra)
dB decibel
__________________________________
Vi ringraziamo per averci preferito nella scelta
di questo apparecchio elettrico, di seguito chia-
mato “aspiratore”.
ATTENZIONE! L’aspiratore è idoneo ad
aspirare polveri non dannose alla salute. E’
vietato aspirare polveri pericolose. Alcuni
modelli di aspiratore sono idonei anche ad
aspirare liquidi (miscela di liquido più aria),
solo se in etichetta dati tecnici è presente la
sigla “IPX4”. Non aspirate materiali nocivi alla
salute come amianto, alcuni tipi di metalli e
legni. Non aspirate infiammabili e/o esplosivi,
come acidi, benzina, alcool, solventi, gas, olio.
Non aspirate materiali ardenti, ceneri calde,
liquidi fusi o caldi e qualsiasi materiale con
temperatura superiore a quella ambiente.
Questo istruzioni riportano le informazioni e
quanto ritenuto necessario per il buon uso, la
conoscenza e la normale manutenzione dell’uten-
sile. Esse non riportano le informazioni sulla pe-
ricolosità di alcune sostanze; l’utilizzatore troverà
maggiori notizie su libri e pubblicazioni specifiche
o partecipando a corsi di specializzazione.
COMPONENTI
Fare riferimento alla fig. A e seguenti, allegate
alle presenti istruzioni.
1 Interruttore acceso/spento
2 Testa di aspirazione
3 Attacco tubo aspirazione
4 Scarico aria con attacco funzione soffiaggio
5 Maniglia per il trasporto
6 Serbatoio di raccolta
7 Leva sgancio testa di aspirazione
8 Tubo di aspirazione
9 Manicotto lato aspirazione
10 Manicotto lato accessori / Impugnatura
11 Accessori
12 Spina e cavo di alimentazione
13 Feritoie di ventilazione
21 Gancio appendicavo
23 Sacco raccoglipolvere
24 Bocchetta di aspirazione
25 Ruote
26 Galleggiante
27 Filtro in spugna

- 7 -
INSTALLAZIONE
ATTENZIONE! La Ditta costruttrice declina
ogni responsabilità per gli eventuali danni
diretti e/o indiretti causati da un errato al-
lacciamento.
ATTENZIONE! Prima di effettuare le se-
guenti operazioni assicuratevi che la spina
sia scollegata dalla rete elettrica.
TRASPORTO
Per trasportare l’utensile utilizzate sempre il suo
imballo (se presente); questo lo preserverà da
urti, polvere e umidità che ne possono compro-
mettere il regolare funzionamento.
MOVIMENTAZIONE
Afferrate l’utensile per l’impugnatura e dopo
l’uso appoggiatelo in piedi senza batterie.
MESSA IN SERVIZIO
Nel luogo che utilizzerete l’aspiratore elettrico è
opportuno considerare:
- che la zona non sia umida e sia al riparo dagli
agenti atmosferici.
- che attorno sia prevista un’ampia zona opera-
tiva libera da impedimenti.
- che vi sia una buona illuminazione.
- che vi sia un sufficiente ricambio d’aria.
- che sia utilizzata in vicinanza dell’interruttore
generale con differenziale.
- che l’impianto di alimentazione sia conforme
alle norme vigenti.
- che la temperatura ambiente sia compresa tra
10° e 35° C.
- che l’ambiente non sia in atmosfera esplosiva.
La macchina può essere fornita con alcuni
componenti smontati. Estraete la macchina
ed i componenti dalla confezione, verificate
visivamente la perfetta integrità e procedete al
loro assemblaggio come illustrato in fig.A-C.
MONTAGGIO RUOTE (fig.C1)
Montate le ruote come illustrato in figura.
MONTAGGIO DEL FILTRO (fig.C2).
Montare i filtri (pos.23 e 27) sul supporto filtro
come indicato in figura, facendo aderire bene la
zona di tenuta. Fare attenzione a non danneggiare
il galleggiante (pos.26) o impedire la sua corsa
verso l’alto.
Togliere il filtro in carta (pos.23) prima di
aspirare liquidi.
MONTAGGIO DELLA TESTA DI ASPIRAZIONE (fig.A)
Dopo aver montato il filtro, inserire la testa di
aspirazione (pos.2) sul serbatoio di raccolta,
facendo combaciare le chiusure laterali con le
imposte presenti sulla testa di aspirazione.
Se presenti, far combaciare le 2 frecce di rife-
rimento: una sulla testa di aspirazione e l’altra
sull’esterno del serbatoio.
Assicurare la testa di aspirazione con le chiusure
(pos.7).
MONTAGGIO DEL TUBO DI ASPIRAZIONE (fig.A)
- Inserire il manicotto (pos.9) del tubo flessibile
nell’attacco di aspirazione (pos.3).
Inserire sul manicotto (pos.10) il tubo di aspira-
zione rigido (pos.8) la bocchetta di aspirazione
(pos.24).
AVVIAMENTO E ARRESTO (FIG.A)
ATTENZIONE! Durante l’utilizzo fate in modo
che nessuno si avvicini alla vostra zona di lavoro.
Avviamento
1) Inserite la spina nella presa di alimentazione
elettrica.
2) Impugnate saldamente l’impugnatura (pos.10)
3) Con l’altra mano premete il pulsante di avvio
(pos.1) in “ON” “I”.
Arresto
Per spegnere premete il pulsante dell’interruttore
in “OFF” “O”.
Vi consigliamo di ripetere queste operazioni
alcune volte prima di iniziare il lavoro in modo
da familiarizzare il più possibile con i comandi.
Se osservate delle anomalie di funzionamento
spegnete l’aspiratore elettrico e consultate il
capitolo “Problemi, cause e rimedi”.
Quando non lavorate spegnete l’aspiratore e
staccate la spina dalla presa.
CONSIGLI D’USO
Dopo aver letto attentamente i capitoli prece-
denti, seguite scrupolosamente questi consigli
che vi permetteranno di ottenere il massimo
delle prestazioni.
Procedete con calma in modo da prendere
familiarità con tutti i comandi; solo dopo aver
acquisito una buona esperienza riuscirete a

- 8 -
sfruttarne a fondo tutte le potenzialità.
UTILIZZO
Per evitare problemi muscolari derivanti da una
postura scorretta, cercate di mantenere diritta la
schiena ed evitate di piegarvi in avanti, senza
sbilanciarvi e mantenendo l’equilibrio. Azionate
il tubo di aspirazione muovendo il braccio e non
la schiena.
Se dovete raggiungere zone difficoltose,
esempio sotto un mobile, piegate le gambe
mantenendo la schiena diritta. Alcuni tipi di
bocchette di aspirazione sono dotate di snodi,
per permettere con facilità di passare dentro ad
aperture limitate.
Durante gli spostamenti l’aspiratore vi seguirà
trascinato dal tubo di aspirazione; non tiratelo
per il cavo di alimentazione.
ACCESSORI
L’aspiratore può essere fornito con più tipi di
bocchetta di aspirazione; installate quella idonea
al lavoro che accingete ad eseguire.
Se presente, una bocchetta è dotata di un pul-
sante per trasformare la superficie di appoggio
al pavimento da liscia (esempio per tappeto)a
spazzola (esempio per aspirare polvere).
Nella base della macchina sono ricavati alcuni
alloggiamenti, in cui è possibile inserire gli ac-
cessori mantenendoli sempre a portata di mano.
Se presente, nella testa di aspirazione è ricavata
una staffa su cui è possibile appendere il cavo di
alimentazione avvolto, utile quando la macchina
è da riporre.
ASPIRAZIONE A SECCO
Per aspirare polvere e materiali di piccole
dimensioni utilizzare il sacco raccoglipolvere
(fig. A pos. 23).
ASPIRAZIONE DI LIQUIDI (MISCELA DI ARIA
E LIQUIDO) (Solo per modelli marchiati IPX4)
Attenzione! L’aspiratore è idoneo anche ad
aspirare liquidi, solo se in etichetta dati tecnici
è presente la sigla “IPX4”.
Attenzione! Non aspirare sostanze o liquidi che
possono creare schiuma.
Attenzione! Pericolo di folgorazione. L’utilizzo
di un liquido (esempio acqua) con la macchi-
na azionata dall’energia elettrica aumenta il
pericolo di scossa elettrica che può provocare
anche la morte. Per la vostra sicurezza è
obbligatorio che sia installato un apparec-
chio salvavita (chiamato anche interruttore
a corrente differenziale o RCD) sulla linea
di alimentazione elettrica per un campo di
intervento secondo le normative vigenti nel
Paese di utilizzo; consultate il vostro elettri-
cista di fiducia.
Verificate sempre prima di ogni utilizzo e con
scrupolo i collegamenti elettrici (cavo, spina,
prolunga) e l’interruttore; nessuno di questi
componenti deve essere deteriorato o guasto
e non devono entrare in contatto con il liquido
aspirato.
Prima di iniziare l’aspirazione svuotate e pulite
il serbatoio di raccolta (pos.6). Togliete il filtro
in carta (pos.23) e montate il filtro in spugna
(pos.27).
Procedete gradualmente e senza eccedere
troppo con la velocità di aspirazione del liquido.
Una volta raggiunto il livello massimo dell’acqua
aspirata, l’aspirazione viene bloccata dal galleg-
giante (fig. C pos.26).
A questo punto spegnete immediatamente l’a-
spiratore e staccate la spina dalla rete elettrica
di alimentazione. Aprite le chiusure (pos.7),
togliete la testa di aspirazione (pos.2), svuotate il
serbatoio di raccolta (pos.6), pulite ed asciugate
bene il filtro in sugna (fig.A pos.27) ed asciugate
il serbatoio.
Solo dopo aver asciugato il filtro, rimontate la
testa di aspirazione e bloccatela con le chiusure.
FUNZIONE SOFFIAGGIO
Collegando il tubo di aspirazione al condotto di
fig.E, é possibile usare la macchina per soffiare
aria.

- 9 -
PROBLEMI, CAUSE E RIMEDI
PROBLEMA CAUSE RIMEDI
L’aspiratore elettrico
non si avvia Linea di alimentazione
scollegata Verificate la linea di alimentazione elettrica
Spina non inserita Inserire la spina nella presa di alimentazione
elettrica e premere il pulsante di avvio
Guasto elettrico Rivolgetevi ad un centro di assistenza au-
torizzato
L’aspiratore elettrico
aspira poco Serbatoio pieno Svuotate il serbatoio
Sacco pieno Sostituite il sacco raccoglipolvere
Filtro sporco Pulire
E’ intervenuto il galleg-
giante (solo per modelli
che sono idonei ad aspi-
rare liquidi)
Svuotare il serbatoio
Verificate che il tubo di
aspirazione o la bocchetta
non siano ostruite
Pulire. Per liberare il tubo aiutatevi con un
manico di scopa, infilandolo dentro il tubo
senza forzare.
Testa di aspirazione non
montata correttamente Rimontate la testa di aspirazione verificando
che aderisca bene sul serbatoio e assicura-
tela con le chiusure.
Notevole aumento di
giri del motore Tubazione di aspirazione
intasata Spegnere e pulire
Il galleggiante chiude l’a-
spirazione Provare a spegnere, attendere alcuni secondi
e riaccendere. Se non ha effetto, svuotare il
serbatoio di raccolta.
ATTENZIONE! Se dopo aver eseguito gli inter-
venti sopra descritti l’aspiratore elettrico non
funziona correttamente o in caso di anomalie
diverse da quelle indicate, portatelo presso un
centro di assistenza autorizzato esibendo la
prova di acquisto e richiedendo ricambi origi-
nali. Fate sempre riferimento alle informazioni
riportate sull’etichetta dati tecnici.

- 10 -
MANUTENZIONE
ATTENZIONE! Prima di ogni controllo o
regolazione staccate l’alimentazione elettrica
scollegando la spina.
ATTENZIONE! Non manomettete o tentate
di riparare l’aspiratore elettrico.
La durata e il costo d’esercizio dipendono anche
da una costante e scrupolosa manutenzione.
Pulite regolarmente ed abbiate cura del vostro
aspiratore elettrico, vi garantirete una perfetta
efficienza ed una lunga durata dello stesso.
- Rimuovete la polvere con un pennello a setole
morbide.
- Non spruzzate o bagnate d’acqua l’aspiratore
elettrico, pericolo di infiltrazioni interne.
- Non usate infiammabili, detergenti o solventi
vari.
- Le parti in plastica sono aggredibili da agenti
chimici.
- Non utilizzate un getto d’aria compressa per la
pulizia: pericolo lancio materiale!
- Prestate particolare attenzione alla pulizia
dell’interruttore, alle feritoie di ventilazione del
motore, alla bocchetta di aspirazione.
Ad ogni utilizzo:
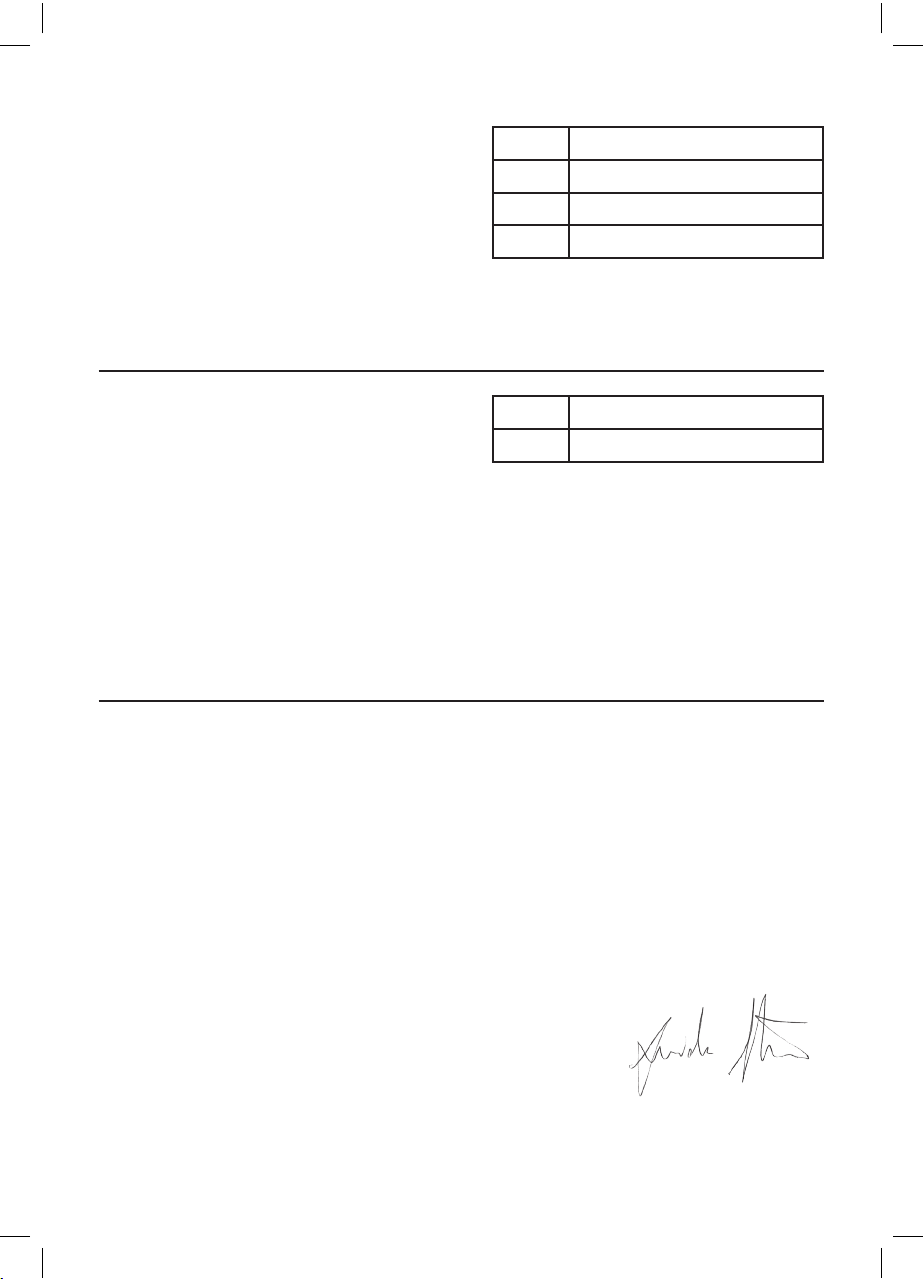
- Svuotate il serbatoio di raccolta, se necessario.
- Sfilate e pulite il filtro (fig.C). Se previsto il
lavaggio, asciugatelo bene prima di rimontarlo,
onde evitare il formarsi di muffe.
- Sganciate e sostituite il sacco raccoglipolvere,
se necessario.
SOSTITUZIONE DEL SACCO RACCOGLIPOLVE-
RE (fig. A pos.23, se presente)
Utilizzate solo ricambi originali adatti al vostro
aspiratore. Indossate occhiali di protezione e
maschera antipolvere.
Aprite le chiusure (pos.7), togliete la testa di
aspirazione (pos.2), sganciate ed eliminate il
sacco pieno, infilate un sacco nuovo prestando
attenzione che aderisca bene.
IMMAGAZZINAMENTO
Effettuate una accurata pulizia di tutta la mac-
china e sue parti accessorie (vedi paragrafo
Manutenzione).
Riponete la macchina lontano dalla portata dei
bambini, in posizione stabile e sicura. Il luogo
dovrà essere asciutto, privo da polveri, tempe-
rato e protetto dai raggi solari diretti.
Al locale di rimessaggio non devono avere
accesso i bambini e gli estranei.
SMALTIMENTO
Per la salvaguardia ambientale procedete se-
condo le leggi vigenti del Paese in cui vi trovate.
Rivolgetevi alle autorità competenti per maggiori
notizie in merito.
Quando la macchina non è più utilizzabile né
riparabile, consegnatela con l’imballo ad un
punto di raccolta per il riciclaggio.
I rifiuti elettrici ed elettronici possono
contenere sostanze pericolose per l’ambiente e
per la salute umana; non devono pertanto essere
smaltiti con quelli domestici ma mediante una
raccolta separata negli appositi centri di raccolta
o riconsegnati al venditore nel caso di acquisto di
una apparecchiatura nuova anologa. Lo smalti-
mento abusivo dei rifiuti comporta l’applicazione
di sanzioni amministative.
GARANZIA
Il prodotto è tutelato a norma di legge contro non
conformità rispetto alle caratteristiche dichiarate
purché sia stato utilizzato esclusivamente nel
modo descritto dalle istruzioni, non sia stato
manomesso in alcun modo, sia stato conser-
vato correttamente, sia stato riparato da tecnici
autorizzati e, ove previsto, siano stati utilizzati
solo ricambi originali.
In caso di utilizzo industriale o professionale
oppure in caso di impiego simile la garanzia ha
validità di 12 mesi.
Per emettere una richiesta di intervento in garan-
zia è necessario presentare la prova di acquisto
al rivenditore o ad centro assistenza autorizzato.

- 11 -
We thank you for having purchased this product,
which will hereafter also be referred to as “va-
cuum cleaner”.
IMPORTANT! The vacuum cleaner is suita-
ble for vacuuming dust which is not dangerous
to health. It is forbidden to vacuum dangerous
dust. Some models of vacuum cleaners are also
suitable for vacuuming liquids (mixture of liquid
and air), only if the initials “IPX4” are indicated
in the technical data. Do not vacuum harmful
materials to health, such as asbestos, some
types of metals and woods. Do not vacuum
flammable and/or explosive substances, such
as acids, alcohol, solvents, gas or oil. Do not
vacuum burning materials, hot ash, molten or
hot liquids or any other material with a higher
temperature than room temperature.
These instructions contain information deemed
necessary for proper use, knowledge and
standard tool maintenance. They do not include
information on the danger of some substances;
the user can find more information in specific
books and publications or by attending special
training courses.
COMPONENTS
Refer to fig. A and the following figures, attached
to these instructions.
1 On/off switch
2 Vacuum head
3 Vacuum hose connection
4 Air bleed with blower function connection
5 Transport handle
6 Collection box
7 Vacuum head release lever
8 Vacuum hose
9 Vacuum side sleeve
10 Accessory side sleeve / Hand grip
11 Accessories
12 Power supply plug and cable
13 Air vents
21 Cable hanger hook
23 Dust bag
24 Vacuum nozzle
25 Wheels
26 Float
27 Sponge filter
g
SYMBOLS
Carefully observe the symbols in fig.B and
memorise the respective meaning. Correct
interpretation of the symbols allows safer use
of the machine.
1 Model and machine
2 Technical data
3 Certification marks
4 Lot number and year of manufacture. The
first 2 figures indicate the year.
5 IMPORTANT!
6 Carefully read the instructions before use.
7 Suitable for vacuuming liquids.
V volts
Hz hertz
~ alternating current
W watts
l litres
IPXX protection degree
II double insulation system (without
earth cable)
dB decibel

- 12 -
INSTALLATION
IMPORTANT! The manufacturer is not
liable for any direct and/or indirect damage
caused by incorrect connections.
IMPORTANT! Before carrying out the fol-
lowing operations, make sure that the plug is
disconnected from the mains.
TRANSPORT
Always use the packaging when transporting the
vacuum cleaner; this will protect it from impact,
dust and humidity which can compromise its
normal operation.
MOVING
Hold the tool by the hand grip and after use put
it down upright without banging it.
STARTING UP
When choosing where to use the electrical vacu-
um cleaner, the following should be considered:
- that the place is not damp and is protected
from the elements.
- that there should be a large operational area free
from obstacles.
- that there needs to be good lighting.
- that there is sufficient air exchange.
- that it needs to be used close to the general
differential switch.
- Check that the power supply is in compliance
with the regulations in force..
- that the room temperature should be between
10° and 35°C.
- that the environment is not in an explosive
atmosphere.
The machine may be supplied with some loose
components. Take the machine and the loose
components out of the packaging and proceed
to assemble them as shown in fig. A-C.
WHEEL ASSEMBLY (fig.C1)
Mount the wheels as shown in the figure.
FILTER ASSEMBLY (fig. C2).
Assemble the filters (pos.23 and 27) on the
filter support as indicated in the figure, making
sure the seal sticks well. Take care not to da-
mage the float (pos.26) or obstruct its upwards
movement.
Remove the paper filter (pos.23) before
sucking up liquids.
ASSEMBLING THE VACUUM HEAD (fig.A)
After assembling the filter, insert the vacuum
head (pos.2) on the collection box, making sure
the side latches match up with the housings on
the vacuum head.
If present, match up the 2 reference arrows:
one on the vacuum head and the other on the
outside of the box.
Lock the vacuum head in place with the latches
(pos.7).
ASSEMBLING THE VACUUM HOSE (fig.A)
- Insert the sleeve (pos.9) of the hose in the
vacuum connection (pos.3).
Insert the rigid vacuum pipe (pos.8) and the
vacuum nozzle (pos.24) on the sleeve (pos.10).
STARTING AND STOPPING (FIG.A)
IMPORTANT! Make sure nobody is ap-
proaching the working area while the tool is
running.
Starting
1) Plug the machine into the power supply.
2) Hold onto the hand grip firmly (pos.10)
3) With the other hand press the start button
(pos.1) to “ON” “I”.
Stopping
To stop press the switch button to “OFF” “O”.
We recommend repeating these operations
several times before starting work, in order to
familiarise yourself with the controls as far as
possible.
If you notice any working defects, switch off
the electrical vacuum cleaner and consult the
chapter “Problem, causes and solutions”.
When not using the machine, turn it off and
disconnect the plug from the socket.

- 13 -
OPERATIONAL TIPS
After reading the previous chapters carefully,
apply these tips scrupulously to obtain maximum
performance.
Proceed calmly so as to become familiar with
all the controls; after having gained sufficient
experience you will be able to make full use of
its potential.
USE
To prevent muscular problems due to an in-
correct posture, try to keep your back straight
and avoid leaning forwards, without losing your
balance. Operate the vacuum hose by moving
your arm and not your back.
If you need to reach difficult areas, for example
under a piece of furniture, bend your knees kee-
ping your back straight. Some types of vacuum
nozzles are equipped with articulations, to allow
easy access to limited openings.
When you move the vacuum cleaner will follow
you dragged by the vacuum hose; do not pull it
by the power supply cable.
ACCESSORIES
The vacuum cleaner can be supplied with diffe-
rent types of vacuum nozzles; install the one that
is suitable for the job that you need to carry out.
If present, a nozzle is equipped with a button
to turn the support surface from smooth to the
floor (for example carpet) to brush (example for
vacuuming dust).
On the base of the machine, there are some
housings, in which it is possible to insert the
accessories always keeping them handy.
If present, on the vacuum head there is a bracket
on which you can hang the wound-up power
supply cable, which is useful when putting the
machine away.
DRY VACUUMING
To suck up dust and small materials use the
dust bag.
VACUUMING MIXTURES OF AIR AND LIQUID
(models marked IPX4 only)
Important! The vacuum cleaner is only also
suitable for vacuuming liquids if the initials
“IPX4” are shown on the technical data label.
Attention! Do not vacuum substances that can
create foam. Important! Risk of electrocution!
The use of a liquid (e.g. water) with an electri-
cally powered machine increases the risk of
electric shocks which could cause death. For
your safety, it is compulsory to install a circuit
breaker (also called a RCD - residual current
device) on the electric power line for an in-
tervention field according to the standards in
force in the country of use – please consult
your electrician.
Always check the electric connections (cable,
plug, extension lead) and the switch scrupu-
lously before every use; none of these compo-
nents must be deteriorated or broken and must
not come into contact with the vacuumed liquid.
Before starting vacuuming empty and clean
the collection box (pos.6). Remove the paper
filter (pos.23) and fit the foam filter (pos.27).
Proceed gradually and without using excessive
vacuuming speed for the liquid.
Once you have reached the maximum vacuumed
water level, the vacuum channel will be blocked
by the float (fig.C pos.26).
Switch off the vacuum cleaner immediately and
disconnect the plug from the power supply.
Open the latches (pos.7), remove the vacuum
head (pos.2), empty the collection box (pos.6)
and dry the foam filter well (fig.A pos.27) and
dry the box.
After drying the filter, reassemble the vacuum
head and lock it in place with the latches.
BLOWING FUNCTION
By connecting the vacuum hose to the duct in fig.
E, you can use the machine to blow air.

- 14 -
PROBLEMS, CAUSES AND SOLUTIONS
PROBLEM CAUSES SOLUTIONS
The electrical vacu-
um cleaner fails to
start
Power supply line discon-
nected Check the electric power supply line
Plug not inserted Insert the plug in the electric power supply
socket and press the start button
Electrical fault Contact an authorised service centre.
The electrical vacu-
um cleaner does not
vacuum efficiently
Box full Empty the box
Bag full Replace the dust bag
Filter dirty Clean
The float has intervened
(only for models that are
suitable to vacuum liquids)
Empty the box
Check that the vacuum hose
or the nozzle are not blocked Clean. To free the hose, use the handle of
a brush to help you, pushing it up the hose
without forcing.
Vacuum head not assem-
bled correctly Reassemble the vacuum head checking
that it fits well onto the box and lock it in
place with the latches.
Substantial increase
in motor revolutions Vacuum hose blocked Switch off and clean
The float blocks the vacuum Try to switch off, wait for a few seconds
and switch back on. If this has no effect,
empty the collection box.
IMPORTANT! If the electrical vacuum cleaner
still fails to operate correctly after you have
carried out the above operations, or in the
event of anomalies other than those described
above, take it to an authorised service centre
showing proof of purchase, and ask for original
spare parts. Always provide the information
shown on the technical data label.

- 15 -
MAINTENANCE
IMPORTANT! Before any inspection or
adjustment, always disconnect the tool from
the power supply by unplugging it.
IMPORTANT! Do not tamper or attempt to
repair the electrical vacuum cleaner.
The working life and costs also depend on con-
stant and meticulous maintenance.
Take good care of your electrical vacuum cleaner
and clean it regularly. In this way its efficiency
will be ensured and its lifespan extended.
- Remove dust with a brush with soft bristles.
- Do not wet or spray water over the electrical
vacuum cleaner - risk of internal infiltrations.
- Do not use any inflammables, detergents or
solvents.
- The plastic parts can easily be damaged by
chemical agents.
- Do not use compressed air for cleaning: Risk
of material ejection!
- Be careful when cleaning the switch, the motor
fan slots and the vacuum nozzle.
Every time it is used:
- Empty the collection box, if necessary.
- Take out and clean the filter (fig.C). If washing
is envisaged, dry it well before reassembling
it, in order to prevent the formation of mould.
- Unhook and replace the dust bag, if necessary.
REPLACING THE DUST BAG (fig.A pos.23)
Only use original spare parts suitable for your
vacuum cleaner. Use eye protection and an
anti-dust mask.
Open the latches (pos.7), remove the vacuum
head (pos.2), unhook and remove the full bag
and put in the new bag making sure it fits well.
STORAGE
Clean the machine and all its accessories tho-
roughly (see Maintenance section).
Keep the machine out of reach of children, in a
stable and safe position. The place must be dry,
free from dust, temperate and protected from
direct sunlight.
Keep children and unauthorised personnel out
of the storageroom.
DISPOSAL
In order to protect the environment, proceed
according to the local laws in force. Contact the
relevant authorities for more information.
When the machine is not longer useable or
repairable, deliver the machine and packaging
to a recycling centre.
Electric and electronic waste may contain
substances that are dangerous for the envi-
ronment and for human health. For this reason
they must never be disposed of together with do-
mestic waste, but collected separately in specific
collection centres or returned to the retailer when
similar new equipment has been purchased. The
illegal disposal of such equipment may result in
prosecution to the full extent of the law.
WARRANTY
The product is protected by law against non-
compliance with the declared characteristics
provided it is used only in the manner described
in the instructions, it has not been tampered with
in any way, it has been stored properly, has been
repaired by authorized and, where applicable,
have been used only original spare parts.
In the case of industrial or professional use or
when using such a guarantee is valid for 12
months.
To issue a claim under warranty you must
present proof of purchase to your dealer or
authorized service center.

Table of contents
Languages:
Other Valex Vacuum Cleaner manuals