manuals.online logo
Brands
  1. Home
  2. •
  3. Brands
  4. •
  5. valmont
  6. •
  7. Lighting Equipment
  8. •
  9. valmont INGAL EPS Seesaw Pole Owner's manual

valmont INGAL EPS Seesaw Pole Owner's manual

Technical Instruction
INGAL EPS Technical Instruction Seesaw Poles Page 1
Seesaw Pole Operation
1.0 Introduction
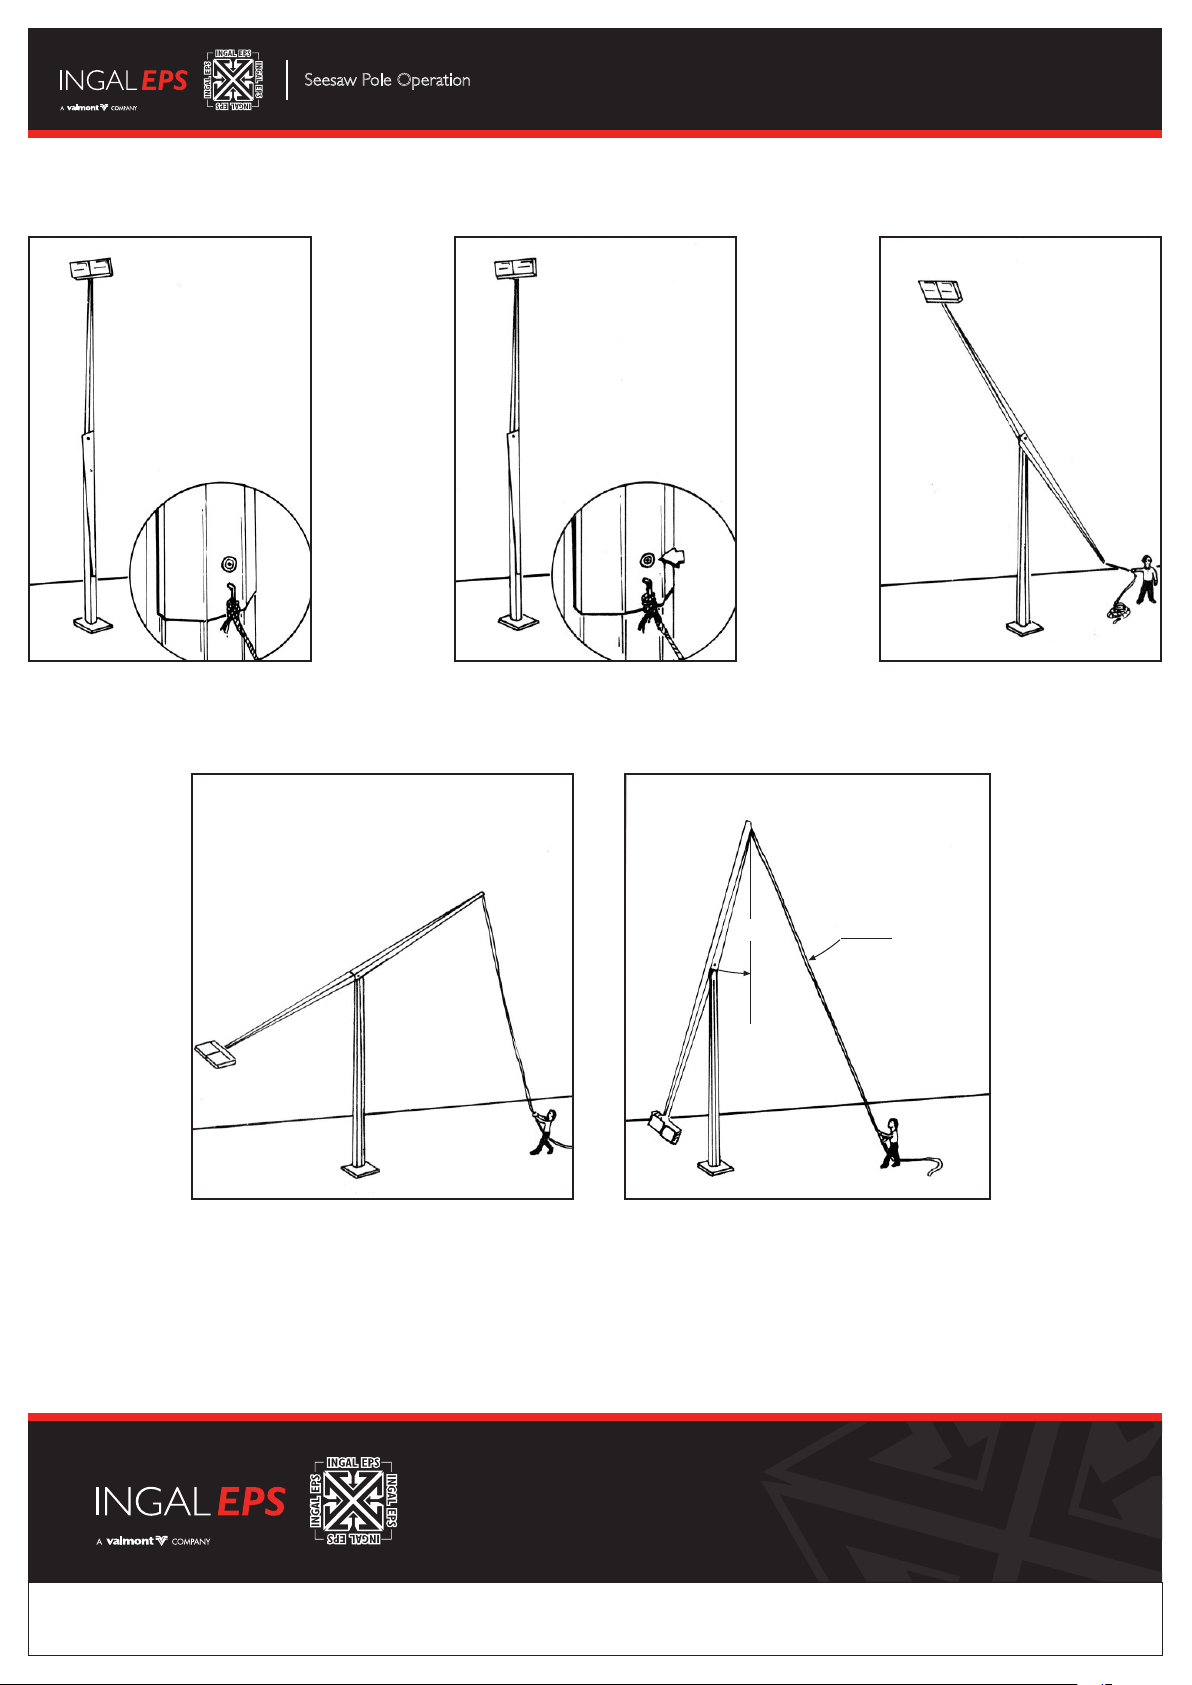
1.1 The INGAL EPS mid hinged Seesaw range of Street Lighting and Floodlighting columns provides the user with a simple, safe and effective method
to maintain luminaires at ground level. It is most suitable where height and location factors present constraints for luminaire maintenance work to
be carried out effectively.
1.2 As the column is accurately balanced, it is ideal for single-handed maintenance work and requires only a length of rope and an allen key for
operation (refer Note after clause 3.1).
2.0 Assembly of Seesaw Columns
2.1 If the column is unassembled, assemble sections in accordance with 8.6.02 Pole Assembly and Installation for Floodlight Poles as applicable to the
overall length of the Seesaw. Incorrect assembly of columns could cause serious damage to the public and private property. It is the installer’s
responsibility to ensure the sections are fitted together correctly. Note: After joining, slip joints above the hinge are to be secured with tek screws
(refer to 8.6.02 Pole Assembly and Installation for Floodlight Poles). For advice, contact your local INGAL EPS office.
2.2 After assembly of the column and whilst the column is on the ground, attach all fittings to the top of the column; headframe, crossarms, luminaires,
lighting arrestors…etc.
Note: Headframes and crossarms should be attached to the chain link at the top of the column, via the chain and “D” shackle provided, as a safety
precaution should the headframe or crossarm work loose.
2.3 Columns are supplied with a balance weight to counteract the weight of the top fittings, so prior to standing the column all ttings must be
attached for the Seesaw system to function effectively.
Note: 1. Some Seesaw columns do not require a balance weight, as the weight of the apron only is sufficient to counter balance the top weight.
2. Attachments (eg. luminaires, crossarms, banners etc.) must not be changed/modified from the original specification at time of order unless
consultation has been provided by INGAL EPS. Failure to consult INGAL EPS prior to changes may result in damage to property or serious injury
and will void INGAL EPS’ liability.
2.4 Ensure that there is sufficient slackness in the electrical cables running up the inside of the column to allow for lowering of the column and that the
cables do not foul the balance weight. Cable guides are included adjacent to the balance weight recess (refer to figure 1).
NOTE: 25m, 27m and 30m columns have stiffening plates at the hinge position. It is important that electrical cables run at the centre of the
column between the two stiffening plates and that there is a minimum of 1 metre slack in the cable length.
Figure 1.
Cables
Cable
Guides
Doc. No: 8.6.03
Revision: 0
Date: 7-8-2013
Replaces: 8.4.2.3
INGAL EPS Technical Instruction Seesaw Poles Page 2
Seesaw Pole Operation
2.5 For erection of the column refer to 8.6.02 Pole Assembly and Installation for Floodlight Poles.
Note:The orientation of the column on the foundation should take into account the direction of raising and lowering the column to ensure easy access.
3.0 Raising and Lowering (refer to illustrations in figure 2)
IMPORTANT NOTE: The two bolts with washers marked “DANGER DO NOT REMOVE” are there to secure the balance weight and should
not be removed without prior consultation with INGAL EPS.
3.1 Fasten adequate length of 12mm double braided rope to the rope hook at the base of the apron section.
NOTE: 25m, 27m and 30m columns require 2 lengths of rope and 2 men acting in UNISON to raise/lower. Each rope length is to be a minimum
of 1.7 times the column height.
3.2 Hold onto the rope or alternatively tie the rope off to a solid object and then remove the allen keyed apron-securing bolt.
3.3 Use the rope to first pull the apron away from the stub section and then allow the top section to gently swing downwards taking care to avoid
jerking of the apron, which may be detrimental to the luminaires and the column.
WARNING: To prevent rope burns, always ensure suitable rope handling gloves are used (high grip, high flexibility mountaineering type).The use
of 12mm double braided rope is recommended.
NOTE: It is important to ensure that the direction of pull on the rope is directly in line with the direction of raising and lowering of the column to
ensure that no twisting is applied to the apron section.
3.4 Standing of the lowered column is the reverse procedure as described above.
3.5 Securely re-install the allen keyed apron securing bolt and remove the rope from the apron.
4.0 Related Technical Instructions
•For 25m Seesaw column (HPM25F) refer also to 8.6.04 Pole Assembly for 25m Seesaw Pole HPM25F.
• For27mSeesawcolumn(HPM27F)referalsoto8.6.05PoleAssemblyfor27mSeesawPoleHPM27F.
• For30mSeesawcolumn(HPM30F)referalsoto8.6.06PoleAssemblyfor30mSeesawPoleHPM30F.
For more information please contact INGAL EPS:
Tel 1800 623 302 | Email [email protected]
or visit www.ingaleps.com.au
Disclaimer The instructions included in this document have been written to provide guidance only for the assembly of the equipment therein described. Industrial Galvanizers
Corporation Pty Ltd is not liable for any direct, indirect or consequential loss or damage to property or personal injury that may arise in tort, equity or otherwise at
law as a result of following these instructions. | Copyright © 2013 Industrial Galvanizers Corporation Pty Ltd, trading as INGAL EPS.
Seesaw Pole Operation
Figure 2. Raising and Lowering of Seesaw Columns
1. Fasten length of 12mm rope to
the rope hook and secure.
2. Remove allen keyed apron
securing bolt.
3. Pull apron away from stub
section allowing the top section
to gently swing downwards.
4. Complete operation, avoiding jerks, which may
be detrimental to the luminaires as well as to
the column.
5. Raising of the lowered column is the reverse
procedure, as described. Securely re-install
the allen keyed apron securing bolt on
completion of raising operation.
45º minimum

This manual suits for next models

3

Popular Lighting Equipment manuals by other brands

DTS XR 5 WASH user manual

DTS

DTS XR 5 WASH user manual

Larson Electronics EXHL-TRN-LE4-FKWL Series instruction manual

Larson Electronics

Larson Electronics EXHL-TRN-LE4-FKWL Series instruction manual

Setolite ALDEBARAN HERO Instructions for use

Setolite

Setolite ALDEBARAN HERO Instructions for use

Vision & Control LDLF60x360-G525/24V Instructions for use

Vision & Control

Vision & Control LDLF60x360-G525/24V Instructions for use

Ares Arcadia RGB Assembly instructions

Ares

Ares Arcadia RGB Assembly instructions

Nanoleaf Shapes Hexagons user manual

Nanoleaf

Nanoleaf Shapes Hexagons user manual

Atom AT6021/312 Installation sheet

Atom

Atom AT6021/312 Installation sheet

Shehds 7X40W user manual

Shehds

Shehds 7X40W user manual

Ayrton easyColor instruction manual

Ayrton

Ayrton easyColor instruction manual

Safavieh LIT4355A quick start guide

Safavieh

Safavieh LIT4355A quick start guide

Ikan MB4-2PT-KIT quick start guide

Ikan

Ikan MB4-2PT-KIT quick start guide

modway EEI-5298 Assembly instructions

modway

modway EEI-5298 Assembly instructions

Daintree GE current Evolve EFC1 Series installation guide

Daintree

Daintree GE current Evolve EFC1 Series installation guide

GTV LD-LOG16W-LED manual

GTV

GTV LD-LOG16W-LED manual

ONFORU CTB48RGB product manual

ONFORU

ONFORU CTB48RGB product manual

unios Linear Series quick start guide

unios

unios Linear Series quick start guide

Laserworld PL-36000RGB user manual

Laserworld

Laserworld PL-36000RGB user manual

Meteor Stem Dext 2.0 Series installation instructions

Meteor

Meteor Stem Dext 2.0 Series installation instructions

manuals.online logo
manuals.online logoBrands
  • About & Mission
  • Contact us
  • Privacy Policy
  • Terms and Conditions

Copyright 2025 Manuals.Online. All Rights Reserved.