Vantage Hearth MC210CS Manual

This document is protected by copyright law. Unauthorized duplicaon, display, or modicaon in any form is prohibited.
This document applies only to the soware/hardware indicated. Due to connuing development, the informaon is subject
to change without noce. This document contains no guarantees or warranes specically expressed or implied.
Fiber Opc Communicaons MC210CS
Document: CS-0059-01
Fiber Opc Communicaon Setup
Model: MC210CS
IMPORTANT INSTALLATION NOTES
• We provide two converters. One pre-installed in the sign, and the other provided for
installaon at the building (Network Room or Computer)
• They support Single Mode ber, and accept SC Type connectors only.
• We DO NOT provide the ber opc cable.
• The converters require (2) ber cables for TX (Transmit) and RX (Recieve). When
connecng, make sure the TX and RX ports are crossed from one converter to the
other.
BIG SALE NOW
15% OFF

Page 2 Page 3
CONNECTION AT THE BUILDING/OFFICE
CONNECT TO ADAPTER AT THE SIGN
• We provide two converters. One pre-installed in the sign, and the other provided for installaon at the building.
• They support Single Mode ber, and accept SC Type connectors only.
• We DO NOT provide the ber opc cable.
• The converters require 2 ber cables RX and TX. When connecng, make sure the TX and RX ports are crossed from one
converter to the other.
1Locate the Fiber Opc adapter for the building. Install
near your computer or network connecon and power on.
SIDE 1: Fiber, Status, Network SIDE 2: Power Connecon
2Plug in the other end of your Fiber Cables to the TX and RX
ports. Connect the TX from the sign to the RX at the building
and the RX from the sign to the TX at the building.
3
Plug the ETHERNET Network Cable di-
rectly to your COMPUTER
Temporary or LightSpeed ONLY
SM Innity or LightSpeed
4Verify the connecvity between the Fiber Converters from the status lights.
CONNECTION OVERVIEW
NETWORK SWITCH OR
INTERNET ROUTER
Plug your Network Cable to the ETHERNET network port on the
Fiber Converter, then connect it to your NETWORK SWITCH, or
INTERNET ROUTER.
5Access a computer that is connected
directly, or to the same network as the
sign. Then proceed to the next secon to
congure the SIGN CONTROLLER.
IF COMMUNICATION CANNOT BE ESTABLISHED:
• Check the power and status indicators on BOTH adapters.
• Verify the Fiber Cables are crossed between the adapters (TX to RX, RX to TX)
• Verify the Fiber Cables or RJ45 Ethernet Network Cables are not pinched,
damages, or disconnected.
• Contact Technical Support if the problem cannot be resolved.
REAR OF LED SIGN
FIBER OPTIC CONVERTER INSTALLATION
NOTE: Verify the soware type congured with your display. If you are using a custom or 3rd party opon, contact
the 3rd party or follow the instrucons shipped with the custom project.
LIGHTSPEED (Local)SM INFINITY (Online)
The display MUST be connected to the internet. This means
the ber converter at the building must connect to a
network switch or router.
The display is controlled directly from a computer with the
soware installed. With this opon, communicaons can be
connected directly to a single computer, OR over a network.
Internet access is not required by the sign. If using live video
the soware is pre-installed on the controller or workstaon
in the press box.
REAR OF LED SIGN
SWITCH to ROUTER
INTERNET ROUTER
CONVERTER to SWITCH
NETWORK SWITCH (oponal)
COMPUTER to ROUTER
COMPUTER ON NETWORK
BUILDING SIDE CONVERTER
Internal Fiber Converter (Pre-Installed)
Bring Fiber IN (Not Provided) ETHERNET (Oponal)
(Direct Cable Oponal for LightSpeed Soware ONLY)
FIBER LINES
FIBER to
ETHERNET
CONVERTER
FIBER TO LED SIGN (not provided)
22Idenfy the locaon of the PC Controller using the locaon
diagram that shipped with the sign. The Fiber Converter
will be mounted nearby.
33Remove required LED modules to access the internal
components
• Insert the Hex Key and twist
1/2 turn le to unlock each
latch.
The data and power cables
can be disconnected at the
module. Avoid dropping the
cables inside the sign.
• Gently pull out module, take
care not to pull the cables out.
Hex Key
44Locate the Fiber Converter mounted near the PC Controller.
(May need to remove mulple modules)
11Bring your ber lines into the display using the “COMMS”
port on the back of the LED sign.
55Connect your ber lines to the TX and RX ports on the
converter using SC Connectors. Then power on display.
INSIDE DISPLAY (or Enclosure)
FIBER
CONVERTER FIBER LINES TO BUILDING
FIBER
CONVERTER
FIBER
CONVERTER
FIBER LINES FROM SIGN
TX TX
RX RX
FIBER
CONVERTER
PWR Power Light Device is geng power.
TX/RX FIBER Indicates if there is a good FIBER OPTIC link
between the FIBER ADAPTERS
Link/Act Indicates if there is a good NETWORK connecon
between the FIBER ADAPTERS and Your Network.

Page 4 Page 5
SM Innity TM - COMMUNICATIONS
This is the default, and most common conguraon for displays using SM Innity. The controller in the display is
pre-congured to automacally get an IP address from your network and try to go online.
• Aer connecng all devices and power, go to sminnity.com and login to your account. If you did not get an
account, please contact your dealer or support for assistance.
• Verify if the display is online in the My Displays secon of SM Innity.
If the display is not connecng to the internet.
• Turn the display OFF, wait 30 seconds, then back ON. Wait 10-15 minutes, then check sminnity.com again.
• Verify your network isn’t blocking the display from SM Innity. The following domains, and all sub-domains,
must be allowed on your network.
• sminnity.com
• sminnitymedia.com
• Contact your network admin, or support for further assistance if needed.
The display needs to connect to SM Innity in order to modify content and updates. Unless the display
shipped with a Cellular Modem, the display will use your local network to connect to SM Innity online.
Before you Start:
• Make sure the display is powered on.
• Verify the communicaon devices have signal.
• Verify the communicaon device at the building is plugged into
the network switch or router.
If requested, your display may have been manually congured at the factory for a stac IP address. In most cases, this
is requested by an IT or Network team prior to shipment. Aer connecng all devices and turning on power, you’ll
need to temporarily congure your computer, set the IP address of the display, then connect it to your network and
verify connecon to SM Innity.
A quick guide is below for IT professionals, or those comfortable with networking. Detailed instrucons are provided
later in this guide.
MANUAL IP CONFIGURATION
WARNING: If you are unfamiliar with Network
Conguraon, please contact your Network
Administrator, Tech Support, or your display
provider for assistance. These instrucons carry no
guarantee, and no liability.
QUICK NETWORK GUIDE (use only if you are familiar with networking)
1. Use a computer on the same network as the sign to verify the exisng IP network informaon by using ipcong /all in a cmd window
(IP, SUB, Gate, DNS)
2. Congure the network adapter with the same ip sengs provided by DHCP (IP, SUB, Gate, DNS) to avoid any IP conicts, then add a
secondary IP address to the adapter on the same range as the sign (IE 192.168.0.100) using the Advanced buon.
3. Apply the sengs then Ping the LED sign’s default IP address (192.168.0.2) to verify sengs and local communicaon with the sign.
4. Use UltraVNC (vantageled.com/download) to remotely log into the LED Sign Controller. Contact the dealer or factory support for the
password.
5. Use the “Minimize” buon on the SM Player to access the desktop. Note: the sign will go blank during this process.
6. Congure the LED Sign Controller’s network adapter to a compable scheme for the exisng network, including IP, SUB, Gate, and
DNS. Make sure to use an IP address that will NOT be used for another computer over DHCP.
7. Add a secondary IP to the adapter (Advanced buon) set to the default IP address of the sign as a fail-safe.
8. Apply the sengs. This will may disconnect the VNC session while the sengs are changed.
9. Log back in with UltraVNC with the NEW IP address and verify the controller has access to the internet. Once conrmed, close all
open windows, maximize the SM Player applicaon, and exit out of Ultra VNC.
The sign will now sync with the SM Innity servers over the internet and any changes made in the SM Innity account will be reected on
the sign. If there are any issues or quesons, please contact your Dealer or Factory Support team.
AUTOMATIC (DHCP)
LightSpeed (SignScheduler) - COMMUNICATIONS
The display is managed by a computer connected directly to the
display, or over a network. This opon does NOT require the
display to be connected online, but does require you to install
the LightSpeed soware on your computer. If this is a Live Video
conguraon, you will use the soware pre-installed on the
workstaon or controller.
Before you Start:
• Make sure the display is powered on.
• Verify the communicaon devices have signal.
• Verify the communicaon device at the building is plugged into your computer directly, or over a network.
By default, the display’s IP address is 192.168.0.2. However, if requested, your display may have been manually
congured at the factory for a dierent IP address. In most cases, this is requested by an IT or Network team prior to
shipment.
Aer connecng all devices and turning on power, you’ll need to temporarily congure your computer, set the IP
address of the display, then verify connecon directly or across your network.
A quick guide is below for IT professionals, or those comfortable with networking. Detailed instrucons are provided
later in this guide.
MANUAL IP CONFIGURATION
WARNING: If you are unfamiliar with Network
Conguraon, please contact your Network
Administrator, Tech Support, or your display
provider for assistance. These instrucons carry no
guarantee, and no liability.
QUICK NETWORK GUIDE (use only if you are familiar with networking)
1. Use a computer on the same network as the sign to verify the exisng IP network informaon by using ipcong /all in a cmd window
(IP, SUB, Gate, DNS)
2. Congure the network adapter with the same ip sengs provided by DHCP (IP, SUB, Gate, DNS) to avoid any IP conicts, then add a
secondary IP address to the adapter on the same range as the sign (IE 192.168.0.100) using the Advanced buon.
3. Apply the sengs then Ping the LED sign’s default IP address (192.168.0.2) or the IP address requested by your IT team to verify
sengs and local communicaon with the sign.
4. Use UltraVNC (vantageled.com/download) to remotely log into the LED Sign Controller. Contact the dealer or factory support for the
password.
5. You will see the SignPlayback applicaon running and playing content on the top le corner of the screen. Avoid windows in this
area as they will show up on the display.
6. Congure the LED Sign Controller’s network adapter to a compable scheme for your exisng network, including IP, SUB, Gate, and
DNS. Make sure to use an IP address that will NOT be used for another computer over DHCP.
7. Add a secondary IP to the adapter (Advanced buon) set to the default IP address of the sign as a fail-safe.
8. Double check, then apply the sengs. This will may disconnect the VNC session while the sengs are changed.
9. Log back in with UltraVNC with the NEW IP address and verify the controller communicaons. Once conrmed, close all open
windows, make sure the SignPlayback applicaon is running, and exit out of Ultra VNC.
You can now send messages to the display using the LightSpeed soware installed on any computer with access to this display directly, or
over your network.
1. Install LightSpeed (SignScheduuler) from the disc that shipped with the display.
2. Go to Tools>Opons and select TCP/IP.
3. Add the IP address of your display and save. (leave the port at the default seng)
4. Press OK
5. Begin creang and sending content to your display. Use the Help menu or go to vantageled.com/online-training for instrucons
on using LightSpeed.

Page 6 Page 7
The Sign Controller must be on the same IP scheme as the network to connect to
your computer (LightSpeed) or the internet (SM Innity). If you have any quesons
on what IP address to use, please consult your Network Administrator or contact
technical support.
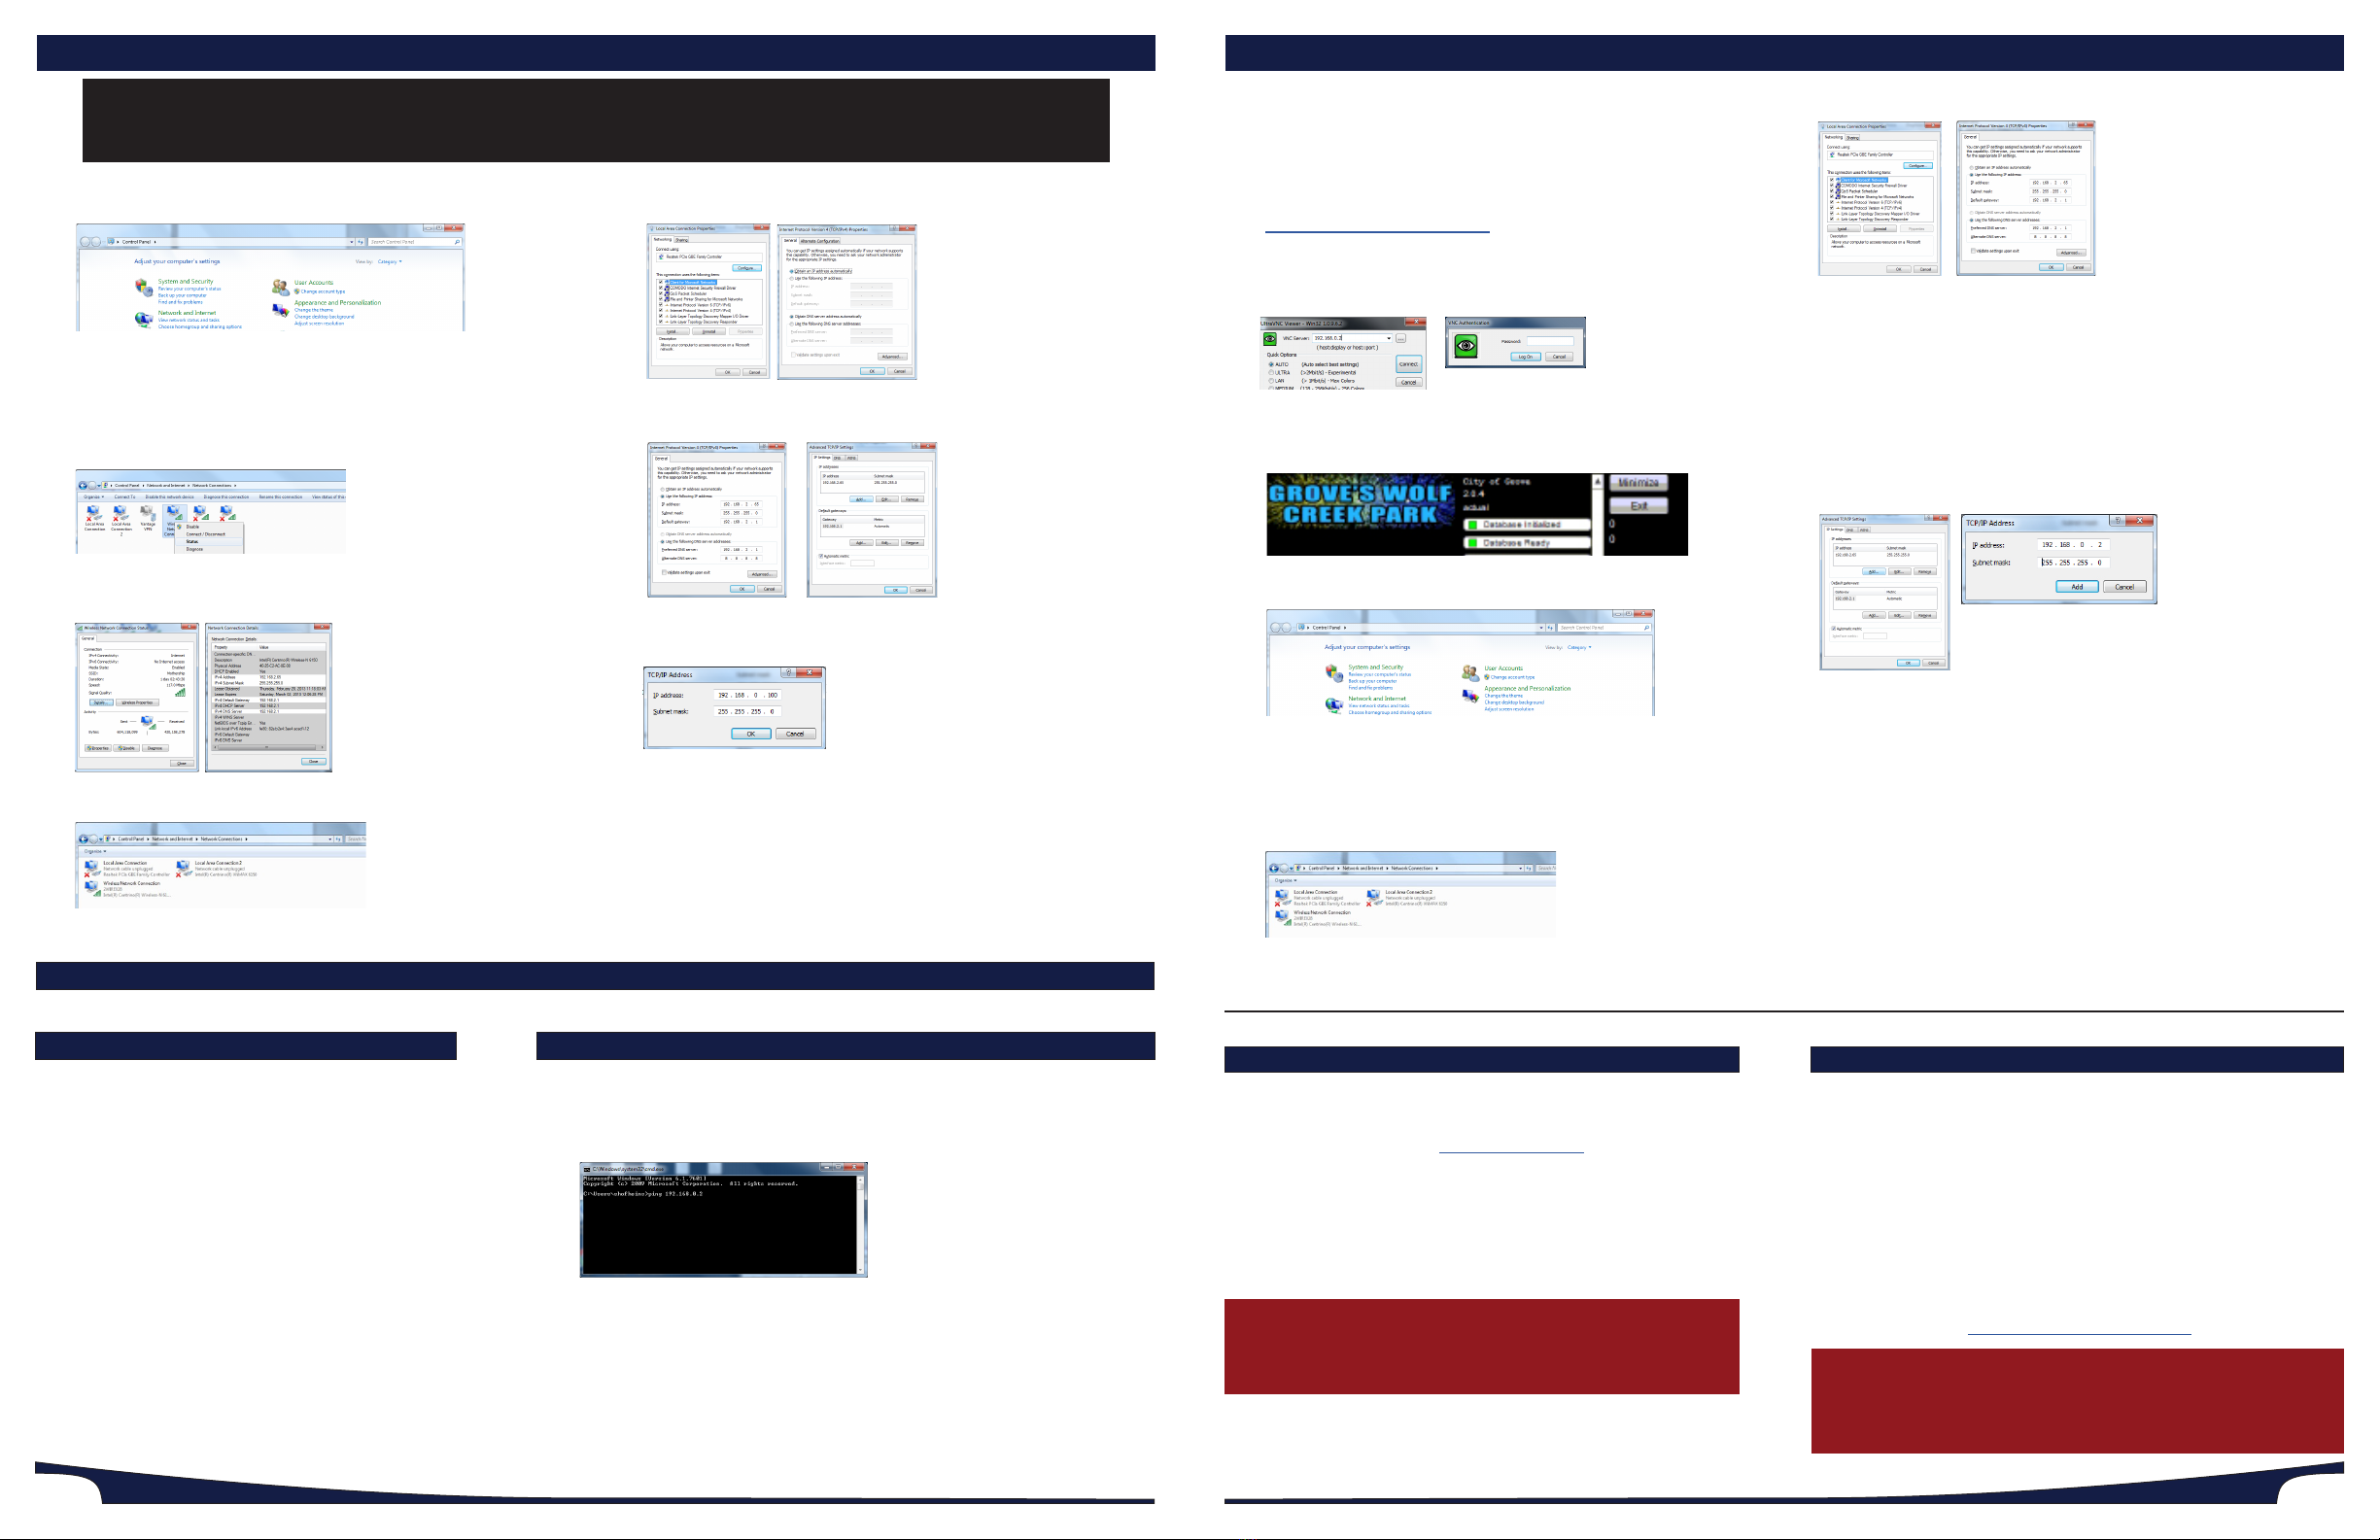
1. Download and Install the latest Windows version of Ultra VNC by going to:
hps://vantageled.com/download
2. Open Ultra VNC and type in the IP address of the sign, then hit Connect. A
password prompt will appear. Please contact your dealer or tech support for
this password.
3. You will now see the internal sign controller.
SM Innity: Press the Minimize buon to show the windows desktop
LightSpeed: You can keep the SignPlayback applicaon running.
4. Go to the Windows Start menu and select Control Panel
5. Type adapter in the search box, then select View Network Connecons.
Note: If you are using an earlier version of windows, just click on the Network
Connecons icon in the control panel.
6. Double-Click on Local Area Connecon (connected).
7. Double-Click on Internet Protocol Version 4
8. Select “Use the following IP address” Change the IP address to one that is
compable with your network, and is NOT going to be used by any other
computer. Note: This MUST be dierent from your computer’s IP address.
9. Enter a Subnet, Gateway and DNS that are compable with your network.
10. Click the Advanced buon.
11. Click the Add buon and enter the original IP Address that the sign shipped
with. IE “192.168.0.2”. Then press the Tab key to automacally ll in the
Subnet Mask then press OK.
12. Press OK on the Advanced Sengs Window, and Close buon on the
Network Connecons Properes Window to acvate the new IP Address
sengs. You may lose the connecon to the sign. If this happens , reconnect
using the new IP address.
13. A new network window may have opened on the screen. Select “Home”
network. Then close any open network windows.
14. Verify the controller has internet access by opening a webpage in a browser.
If it will not connect to the internet, contact technical support.
15. Close the browser and any other background windows.
16. Click on the SM Player to maximize if the display is using LightSpeed, make
sure the SignPlayback applicaon is running (top le corner). Then close the
Ultra VNC window.
VERIFY SIGN IS ONLINE in SM Innity TM
If you do not have your SM Innity login yet, contact your sign
provider, then connue below.
• Login to SM Innity at www.sminnity.com
• Navigate to the My Displays secon.
• Select your display (if you have more than one).
• Verify your sign is ONLINE from the Display Communicaons
area. The Last Check In date and me should be current.
Note: The page may need to be refreshed.
IF THE SIGN IS OFFLINE
• Wait 5-10 minutes and refresh the page.
• Verify your internet is working.
• Contact your sign provider or factory support.
MANUAL IP CONFIGURATION - CONFIGURE THE SIGN’S IP ADDRESSMANUAL IP CONFIGURATION - CONFIGURE YOUR IP ADDRESS
1. Go to the Windows Start menu and select Control Panel
2. Type adapter in the search box, then select View Network Connecons.
Note: If you are using an earlier version of windows, just click on the Network
Connecons icon in the control panel.
3. Right-Click on the network connecon that you will use to connect to the sign,
and select Status.
4. Click on Details and write down the IPv4 Address, Subnet Mask, Default
Gateway and DNS Server for future reference. Then close the Details and Status
Windows.
5. Double-Click on the network connecon that you will use to connect to the sign.
6. Double-Click on Internet Protocol Version 4
7. Select Use the following IP address and enter the IP address informaon that
you wrote down earlier, then click the Advanced buon.
8. Click the Add buon and enter an IP Address that is on the same scheme as the
sign (Example: 192.168.0.100). Then press the Tab key to automacally ll in the
Subnet Mask then press OK.
Note: Make sure this IP address is not being used by another computer on the network, and
it dierent from the default IP address of the sign (192.168.0.2). If you have any quesons,
ask your Network Admin.
9. Press OK on the Advanced Sengs Window, and Close buon on the Network
Connecons Properes Window to save the new IP Address sengs.
10. Verify communicaon to your network by opening up a web page.
DO NOT use the following:
192.168.0.1 192.168.0.20
192.168.0.2 192.168.0.21
Verify communicaon to the sign using a “PING” test.
1. Click the Windows Start menu.
2. In the Search box type cmd then press the ENTER. This will bring up a command window.
3. Type the word ping, hit the spacebar then type in the IP address of the sign
(Default is 192.168.0.2) then Press ENTER. If you see Request med out or Desnaon
host unreachable then you will need to verify your computers IP address and any
communicaons hardware. If you do get a response, then you are in low level
communicaon with the sign.
You can now move onto the next secon and change the IP Address of the Sign Controller.
Note: To check your IP address, type IPCONFIG in the cmd window, and press enter. This
will list all your acve network adapters, and their corresponding IP address informaon.
Opon 2 - DIRECT: Connect the Building Radio to your
computer’s network port. This will allow a direct connecon to
the sign. If your display is using SM Innity remember to plug it
back into to the network router or switch aer you have set the
IP address.
Opon 1 - THROUGH NETWORK: Leave the Building Radio
connected to the network router or switch. If you have any
trouble, you may need to use opon 2.
CONNECT TO THE SIGN and VERIFY
CONNECT VERIFY
NOTE: The instrucons below assume you want to have your computer connected to both the display and your network/internet.
If you are using LightSpeed and only want to connect directly to the sign, you can skip steps 3-4, and simply change your main IP
address on step 7, then save.
CONNECT WITH LIGHTSPEED (SignScheduler)
You can now use the LightSpeed (SignScheduler) soware to control
your display.
1. Install LightSpeed (SignScheduuler) from the disc that shipped
with the display.
2. Go to Tools>Opons and select TCP/IP.
3. Add the IP address of your display and save. (leave the port at the
default seng)
4. Press OK
5. Begin creang and sending content to your display. Use the Help
menu or go to vantageled.com/online-training for instrucons.
IF YOU CANNOT CONNECT TO THE SIGN
• Check all Communicaon Devices and Cables
• Check power to the display
• Verify you have the correct IP address entered in LightSpeed
• Contact your sign provider or factory support for further assistance.

Table of contents