Vantrue VP01 User manual


Hey, find us here:
www.vantrue.net/contact facebook.com/vantrue.live

CONTENTS
VERZEICHNIS
CONTENU
ÍNDICE
SPIS TREŚCI
目次
目录
Product View
Packliste
Qu'y a-t-il dans le paquet
Visualización del producto
Widok produktu
梱包内容
包装清单
1.
Specifications
Spezifikationen
Spécification
Especificaciones
Specyfikacje
商品仕様
规格参数
2.
1
12
24
36
48
61
70
2
13
25
37
49
62
71

CONTENTS
VERZEICHNIS
CONTENU
ÍNDICE
SPIS TREŚCI
目次
目录
2
13
26
37
49
62
71
Installation
Installationshinweise
Notes d'installation
Instalación
Instalacja
取り付け
安装说明
3.
Warranty & Support
Kundendienst
Assistance et SAV
Garantía y soporte
Gwarancja i wsparcie!
保証について
售后服务
11
23
35
47
59
68
77
4.

1. Product View
A.
B.
C.
D.
F.
Four Types of Fuses
Adapters (ATO, Mini,
ACN, Micro2)
Hardwire Kit Switch
Red Wire to Fuse
Box
Black Wire to the
Ground
E. Type C USB Dash
Cam Hardwire Kit
with 5 Gears
Yellow Wire to
ACC
A
B
C
E
F
D
- 1 -
ENEN

2. Specifications
3. Installation
Name
Connector
Input Voltage
Output Voltage
Output Current
Working Time
Cable Length
Working
Temperature
Storage
Temperature
Low Voltage
Protection
Description
Type C USB
DC 12V-24V
5V
2.8A
1 hour, 3 hours, 6 hours,
12 hours, 24 hours, always
14.8ft
-4°F to 140°F
-4°F to 158°F
12V vehicle: 11.6V, 11.9V,
12.2V, 12.5V
24V vehicle: 23.6V, 23.9V,
24.2V, 24.5V
Please check the packing list for complete-
ness and read this manual before installation.
The location and layout of the car fuse box
and the type of fuse used may vary
depending on the vehicle model and year of
manufacture. Please refer to your vehicle
manual for details.
- 2 -
EN
EN
EN
EN

Note: We recommend that you ask profes-
sional help to install to avoid installation errors.
Before you start the installation, please make
sure you have the following tools: owner's
manual, fuse adapter, fuse puller, trim
removal tool, double-sided tape, wire cutting
tool, stylus, multimeter, etc.
Please note: The items listed above are not
included in the packing list and need to be
purchased by yourself. Fuse adapters may
vary from vehicle to vehicle. Please consult
the original vehicle manufacturer or
professional auto parts installer for fuse types.
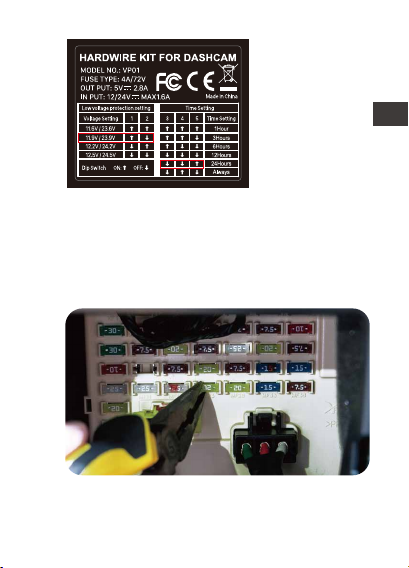
Default Setting:
11.9V/23.9V, 24
hours
Dip Switch: Gear
1-2 for low voltage
protection gears
setting, gear 3-5
for working time
setting.
3.1 Before Installing
3.2 Set the voltage and timer on and off
Please refer to the power setup label on the
product and set it on and off according to
your requirements.
- 3 -
ENEN

For example:
If your vehicle
battery voltage is
12V, the
protection
voltage to be set
is 11.6V, and the
hardwire kit
working time is 12
3.3 Find the fuse box
The fuse control box will contain many
different fuses, including cigarette lighter,
interior lights, car stereos, etc. Please refer to
your owner's manual to find the fuse box.
thours, please set he switch direction to ↑↑↓↓↓.
- 4 -
EN
EN
EN
EN

Select the correct fuse adapter based on
the fuse you removed, refer to the pictures
below, insert the fuse into the fuse adapter
and connect the fuse adapter to the red
wire of the hardwire kit. Make sure the fuse
adapter is firmly connected.
3.4 Connect the correct fuse adapter for the
hardwire kit
Remove fuse from the fuse box.
Insert the fuse into fuse adapter.
- 5 -
ENEN

4
Connect the hardwire kit with fuse adapter.
Insert the fuse adapter into fuse box.
- 6 -
EN
EN
EN
EN

3.5 Connect the fuse wire to the fuse box
(1) Fix the black wire (GNC) under a metal
bolt or screw in your vehicle.
(2) Please identify the rated power fuse on
the fuse panel, such as the fuses for applianc-
es and reading lights. The power rated fuse
will remain energized when the ignition is off.
Once identified, connect the red wire to the
rated power fuse.
Note: Please connect the hazard light fuse if
your car has "power saving mode".
WARNING: Do not connect fuses for car
computer, AIR BAG, ABS or any other car
safety related circuits.
- 7 -
ENEN

(3) Please identify the ACC fuse in the car
fuse panel refer to your car owner’s manual.
The ACC fuse only comes on when the
ignition switch is on. Once found, connect
the yellow wire to the ACC in the fuse box.
If your ACC fuse slot does not fit the ACC
fuse socket that comes with the hardwire kit,
you can cut off the fuse socket that comes
with it and wrap the yellow ACC wire around
your car’s ACC fuse socket, as shown below:
- 8 -
EN
EN
EN
EN

- 9 -
ENEN

Note: When inserting the fuse socket into the
ACC slot, you need to insert the wire wrap
end into the uncharged position in the ACC
slot.
3.6 Plug the Type C connector to the dash cam,
start the car, and test if it works.
- 10 -
EN
EN
EN
EN

4. Warranty & Support
The Vantrue dash cam hardwire kit comes
with a full 12 months warranty. If you have
any questions regarding your product, please
do not hesitate to contact the customer
service staff of your purchase channel, or
are typically answered within 12-24 hours.
Your opinion matters
VANTRUE is firmly committed to always
improving our products, services, and user
experience. If you have any thoughts on how
we can do even better, we welcome your
constructive feedback and suggestions.
Connect with us today at support@vantrue.
net
Thank You for choosing Vantrue
- 11 -
ENEN

1. Packliste
A.
B.
C.
D.
F.
A
B
C
E
F
D
Hardwire-Kit-Schalter
Rotes Stromkabe
Schwarzes
Erdungskabel
E. USB-C 5Gang-An-
passung Hardwire Kit
Gelbe ACC-
Signalleitung
4 Arten von Sicherung-
sadaptern (klein, Mini,
mittel, Mini mit langen
Beinen)
- 12 -
DE

2. Spezifikationen
3. Installationshinweise
Name
Stromschnittstelle
Eingangsspannung
Ausgangsspannung
Ausgangsstrom
Schutzzeit
Linienlänge
Betriebstemperatur
Lagertemperatur
Schutzspannung
Parameter
USB-C
DC12V-24V
5V
2.8A
1 Stunde, 3 Stunden,
6 Stunden, 12 Stunden,
24 Stunden, immer
geöffnet (Immer)
4,5 Meter
-20℃bis 60℃
-20℃bis 70℃
12V Batterie: 11,6
V,11,9 V,12,2 V,12,5 V
24V Batterie: 23,6
V,23,9 V,24,2 V,24,5 V
Bitte überprüfen Sie vor der Installation, ob die
Packliste vollständig ist, und lesen Sie diese
Anleitung, bevor Sie beginnen. Die Position
und Anordnung des Kfz-Sicherungskastens
und die Art der verwendeten Sicherung
variieren je nach Fahrzeugmodell und
Baujahr. Einzelheiten entnehmen Sie bitte
- 13 -
DE

Bevor Sie mit der Installation beginnen,
vergewissern Sie sich, dass Sie über die
folgenden Werkzeuge verfügen: Bedienung-
sanleitung, Sicherungsadapter, Sicherungsa-
bzieher, Werkzeug zum Entfernen der
Verkleidung, doppelseitiges Klebeband,
Drahtschneidewerkzeug, Prüfstift, Multimeter
usw.
Bitte beachten Sie, dass die oben
aufgeführten Artikel nicht in der Packliste des
Hardwire-Kits enthalten sind und selbst
gekauft werden brauchen. Sicherungs-
adapter können von Fahrzeug zu Fahrzeug
variieren. Bitte wenden Sie sich an Ihren
Autohersteller oder professionellen
Autoteile-Installateur für Sicherungstypen.
3.1 Vor der Installation
dem Handbuch Ihres Fahrzeugs.
*Wir empfehlen Ihnen, professionelle Hilfe in
Anspruch zu nehmen, um Installationsfehler
zu vermeiden.
- 14 -
DE

Standardeinstel-
lung: 11,9 V/23,9
V, Immer
(Hinweis: Das
Immer-Getriebe
ist eigentlich ein
zeitlich
unbegrenztes
Getriebe.)
3.2 Spannung und Zeitschaltuhr einstellen
Beispiel: Wenn
Ihre Autobatter-
iespannung 12
V beträgt,
müssen Sie die
Schutzspannung
auf 11,6 V
einstellen, die
Arbeitszeit des
DIP-Schalter: 1~2 Gänge sind Niederspan-
nungsschutzgetriebe, 3~5 sind Arbeitsstunden.
Hardwire Kits beträgt 12 Stunden und die
Schalterrichtung muss auf ↑↑↓↓↓ eingestellt
werden.
- 15 -
DE
Other manuals for VP01
1
Table of contents
Languages:
Popular Automobile Accessories manuals by other brands

Cruz
Cruz Alu-Rack L 13-140 Assembly instructions

SureCall
SureCall Fusion2Go Max Quick setup guide

Honeywell
Honeywell Thor VM1 W user guide

Pioneer
Pioneer SDA-11DAB Operation manual

CW GRILLES
CW GRILLES 4331 installation guide

Whelen Engineering Company
Whelen Engineering Company Howler HWLRB32 installation guide