VARUN K5304-LCD User manual

1
USERS GUIDE
K5304- LCD

1
Content
Introduction ..............................................................................................................................................3
1.Dimensions .......................................................................................................................................... 4
1.1 Material and color ....................................................................................................................4
2 Function and button definition .......................................................................................................... 5
2.1 Function description ................................................................................................................5
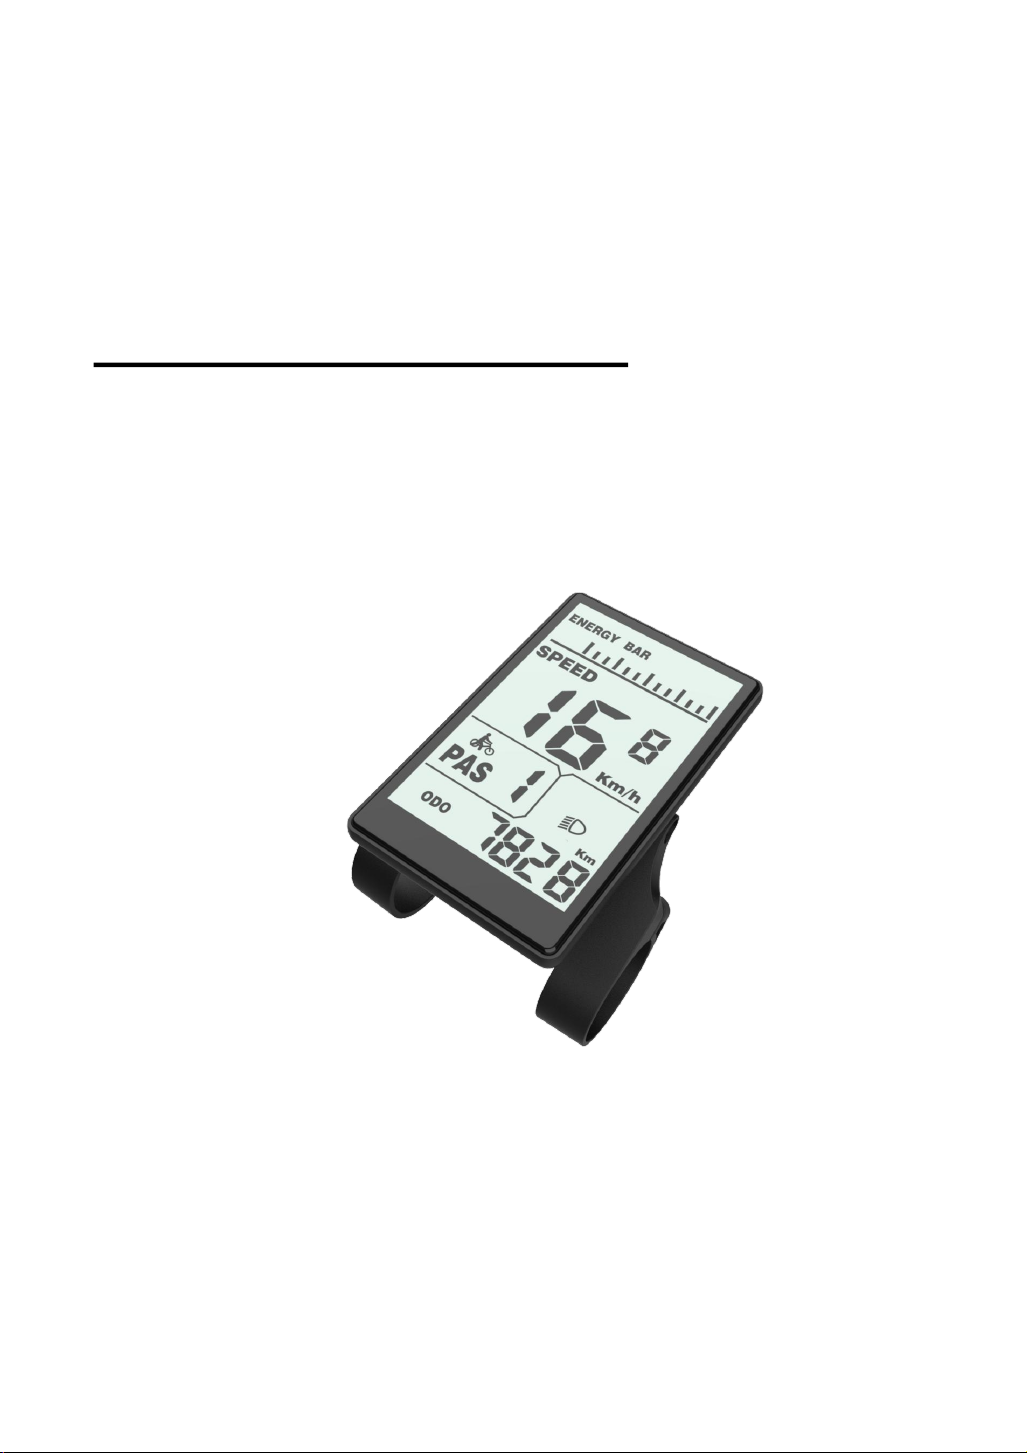
2.2 Display area ............................................................................................................................. 5
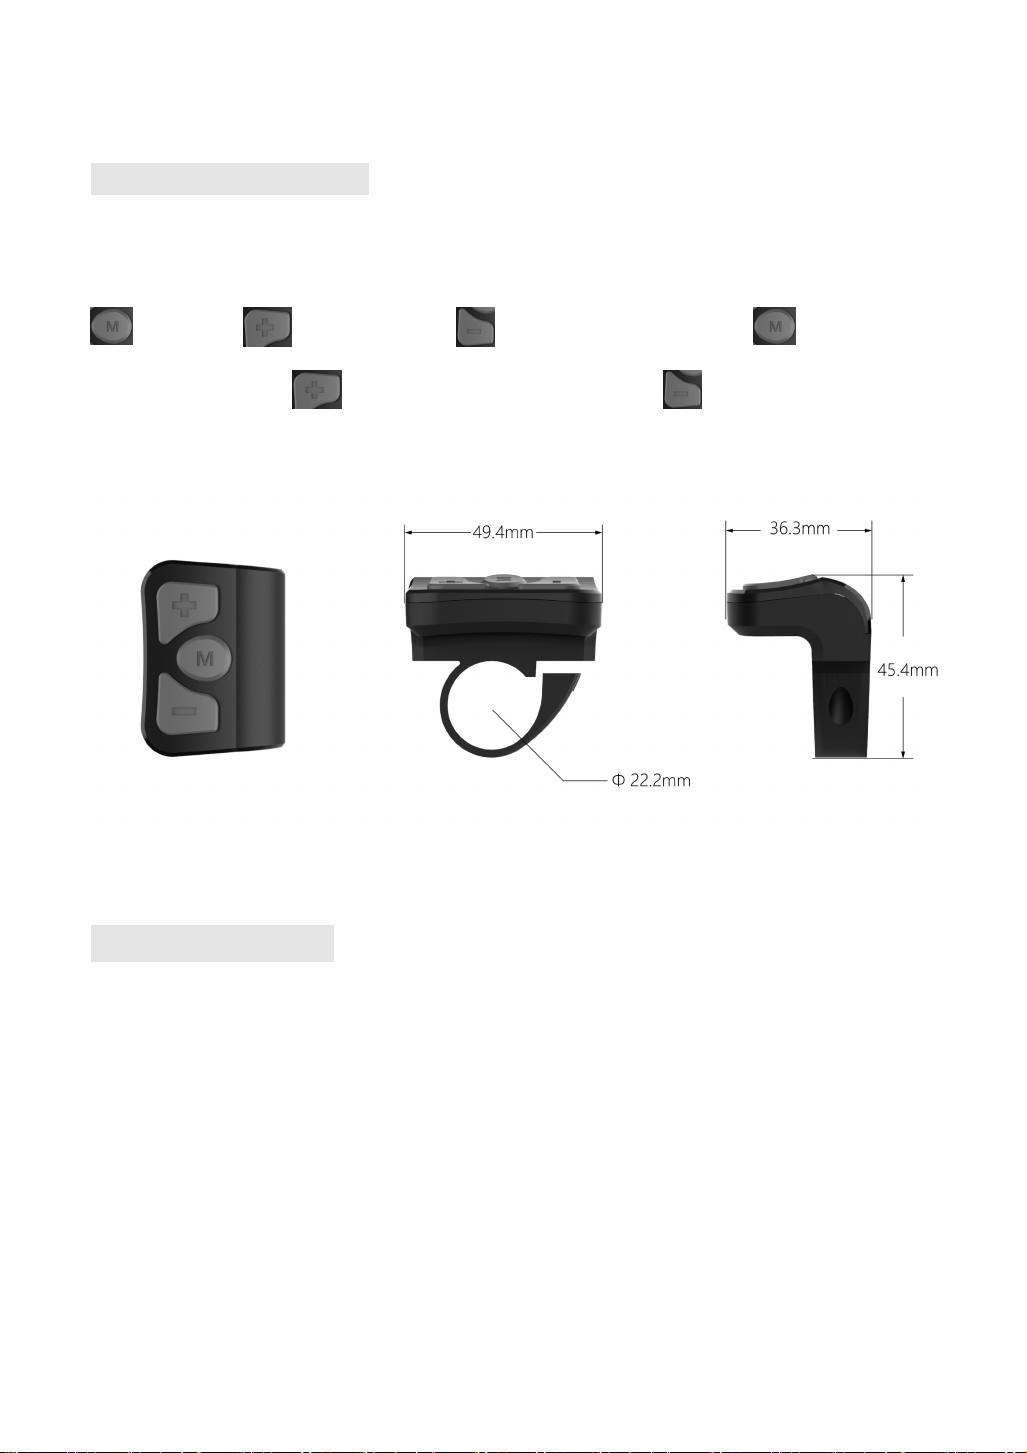
2.3 Button defination ......................................................................................................................6
3.User reminder ......................................................................................................................................6
4.Instalation instructions ....................................................................................................................... 7
5. Operation introduction ...................................................................................................................... 7
5.1 Power on/off ............................................................................................................................. 7
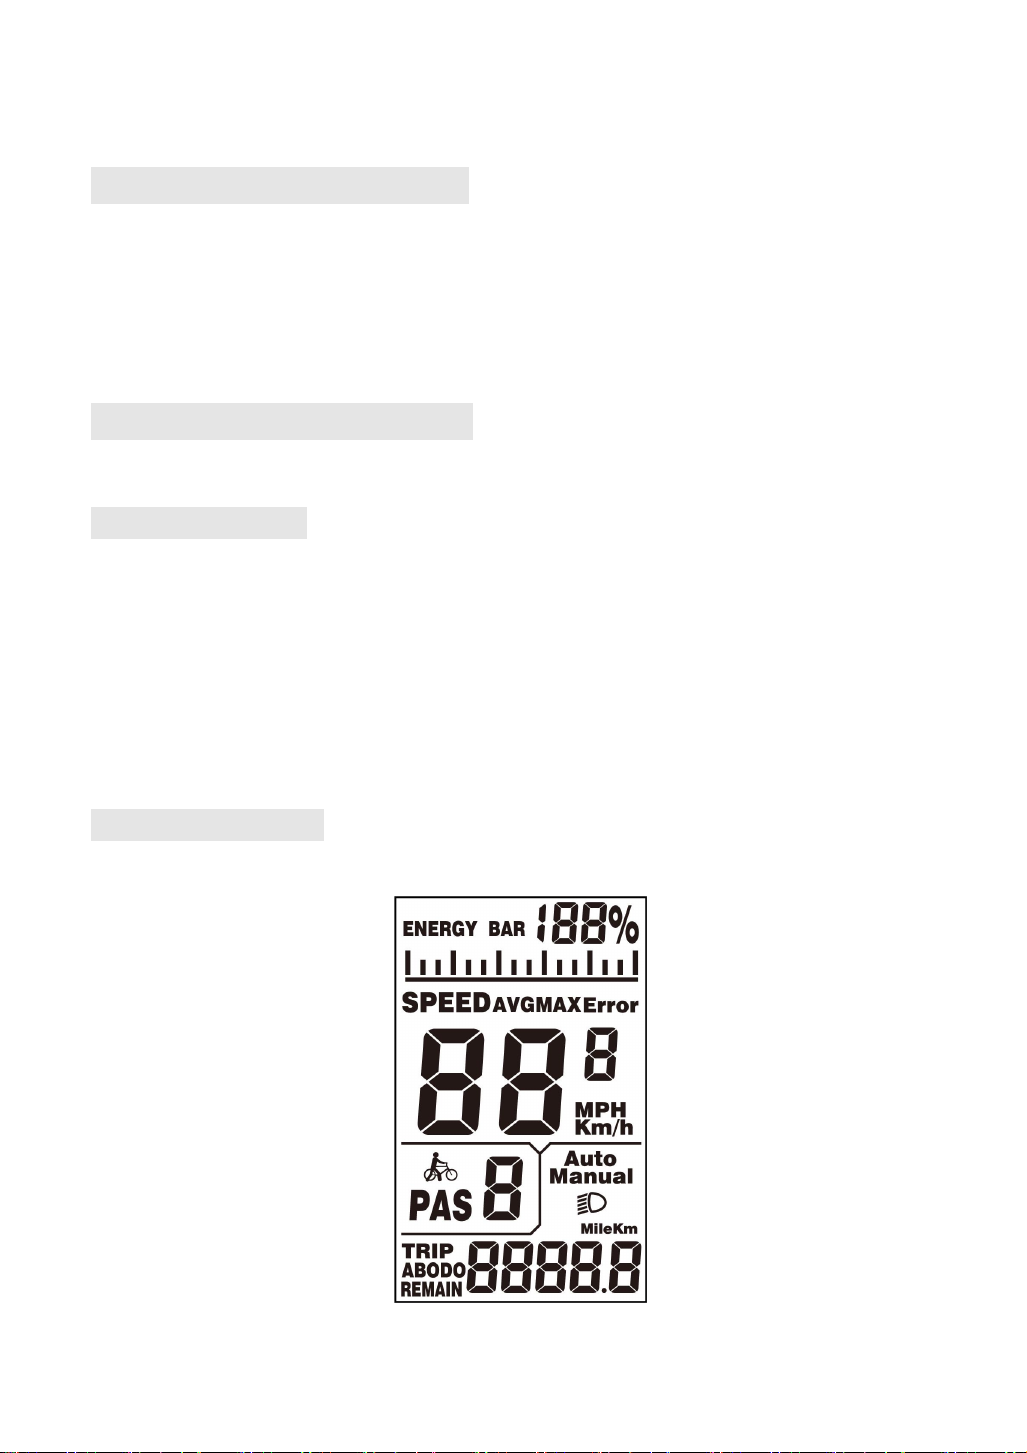
5.2 User interface ...........................................................................................................................7
5.3 Speed ........................................................................................................................................ 8
6 Error code .......................................................................................................................................... 11
7.User setting ........................................................................................................................................11
7.1 Preparation before startup ...................................................................................................11
7.2 General setting ...................................................................................................................... 11
7.2.1 Metric and imperial setting ....................................................................................... 11
7.2.2 Speed limit setting ..................................................................................................... 12
7.2.3 Wheel size setting ......................................................................................................12
7.2.4 Exit settings .................................................................................................................13
7.3 Personalized Parameter settings ........................................................................................13
7.3.1 Personalize Settings Password Input .....................................................................13
7.3.2 Battery Power Volt Setting ........................................................................................14
7.3.3 PAS level setting ........................................................................................................ 15
7.3.4 Current limit setting ....................................................................................................16
7.3.5 PAS sensor setting .................................................................................................... 17
7.3.6Speed Sensor Setting ................................................................................................ 19
7.3.7 Throttle Function Setting .......................................................................................... 19
7.3.8 System Setting ........................................................................................................... 21
7.3.8.1 Battery Delay Time Setting ........................................................................... 21
7.3.8.2 Max Speed Limit Setting ............................................................................... 21
7.3.8.3 Button Walk Assist Enable Setting ................................................................... 21
7.3.8.4 Walk Assist Speed Setting ............................................................................ 22
7.3.8.5 Slow Start up Setting ..................................................................................... 22

2
7.3.9 Exit Setting .................................................................................................................. 23
8.FAQ and Answers .............................................................................................................................23
9.Quality Warranty And Coverage .....................................................................................................23
10.Version ..............................................................................................................................................24
Appendix 1:Error Code ........................................................................................................................24

3
Introduction
Dear users, in order to better operate your e-bike, please carefully read the manual of K5304
LCD display before use. We will tell you every detail of display in the simplest language,
including the installation and setting of hardware and the normal use of the display. At the
same time, it helps you solve the possible confusion and obstacles.

4
1.Dimensions
1.1 Material and color
K5304 product housing is made of white and black PC materials. The material of the
housing is allowed to be used normally at the temperature of - 20 ℃to 60 ℃, and good
mechanical properties can be guaranteed.
Figure and dimension drawing (unit: mm)

5
2 Function and button definition
2.1 Function description
K5304 provides you with a variety of functions and displays to meet your riding needs.
K5304 displays:
◆Battery capacity
◆Speed (including real-time speed display, maximum speed display and average speed
display),
◆Distance (including trip and ODO),
◆6KM/H
◆Backlight turn on,
◆Error code,
◆Multiple setting parameters. Such as: wheel diameter, speed limit, battery capacity setting,
various PAS level and power assisted parameter setting, power on password setting, controller
current limit setting, etc.
2.2 Display area
K5304 display fully

6
2.3 Button defination
The main body of the button is made of PC material, and the button part is made of soft silicone
material, all in black. There are three buttons on the K5304 display. Including power on/mode button
, plus button and minus button . In the following description, button is replace
by the text 【MODE】. button is replaced by the text【UP】. button is replaced by the text
【DOWN】
3.User reminder
Pay attention to safety during use. Do not plug and unplug the display when it is powered on.
Avoid bumping the display as much as possible.
The film used for the display is a waterproof film. Please do not tear it off to avoid affecting the
waterproof performance of the display.
Please do not change the background parameter setting of the display at will, otherwise the
normal riding cannot be guaranteed.
When the display cannot be used normally, it shall be sent for repair as soon as possible.

7
4.Instalation instructions
Fix the display on the handlebar and adjust the appropriate angle of view. When the e-bike is
powered off, the display can be completed by inserting the connector of the display and the
connector corresponding to the controller.
5. Operation introduction
5.1 Power on/off
After hold the 【MODE】button, the instrument starts to work and provides the working power
supply of the controller. In the power on state, hold the 【MODE】button to turn off the power supply
of the e-bike In the power off state, the display no longer uses the power supply of the battery,
and the leakage current of the display is less than 1uA.
If the e-bike is not used for more than 10 minutes, the display will power off automatically.
5.2 User interface
K5304 User interface

8
5.3 Speed
Long press the [mode] button and the [UP] button to enter the speed switching interface, and speed
(real-time speed), AVG (average speed) and max (maximum speed) are displayed respectively, as
shown in the figure:
Real time speed Average speed Max speed
5.4 Trip/ODO
Press the [mode] key to switch the mileage information, and the indicate is: TRIP A(single trip) →
TRIP B (sigle trip)→ODO (cumulative mileage),as shown in the figure:

9
5.5 Walk Assist Mode
When the display is turn on, hold the [DOWN] button for 3 seconds, the e-bike will enter the
state of walk assist mode. The e-bike travels at a constant speed of 6km/h. The screen will
flash “WALK”.
Walk interface
The walk assist mode function can only be used when the user pushes the e-bike. Do
not use it when riding.
5.6 Headlight On/Off
Hold the [UP] button to display the interface as shown, and the icon appears, indicating
that the lights have been turned on. Long press the [UP] button again to turn off the lights.

10
Headlight on interface
5.7 Battery indicator
When the battery power is displayed as shown in the picture on the right, it
indicates that the battery is under voltage. Please charge it in time!
5.8 Trip resetting
When the display is turned on and e-bike is not running, hold the [mode] and [down] buttons for 2
seconds at the same time, and the Trip(single mileage) of the display will be cleared.

11
6 Error code
When the e-bike electronic control system fails, the display will automatically display ERROR
code. For the definition of the detailed error code, see Schedule 1.
Error code interface
Only when the fault is eliminated, can exit the fault display interface, the e-bike will not
continue to run after the fault occurs.
7.User setting
7.1 Preparation before startup
Ensure that the connectors are firmly connected and turn on the power supply of the e-bike.
7.2 General setting
Press and hold the [mode] button to power on display. In the power on state, press and hold the [up]
and [down] buttons for 2 seconds at the same time, and the display enters the setting state.
7.2.1 Metric and imperial setting
Enter the setting state, ST¹means imperial system selection, short press the [UP]/[DOWN] button to
switch between metric units (Km) and imperial units (Mph). Short press [MODE] button to confirm
the setting, and then enter the ST²setting interface.

12
Metric/Imperial conversion setting interface
7.2.2 Speed limit setting
Short press【UP】/【DOWN】button to set the maximum speed limit, the setting range is 20-40Km/h.
Short press [MODE] to confirm and enter the wheel diameter setting interface. The default maximum
speed of the meter is 25Km/h.
The maximum speed limit can be customized according to customer requirements
Speed limit setting interfacce
7.2.3 Wheel size setting
Short press [UP]/[DOWN] button to select the wheel diameter corresponding to the bike wheel to
ensure the accuracy of the speed display and distance display. The settable values are: 16, 18, 20, 22,
24, 26, 28, 700C, 28. The factory default wheel diameter value is 28inch. Short press【MODE】button
to confirm and enter the real-time speed display.

13
Wheel size setting interface
7.2.4 Exit settings
In the setting state, long press 【MODE】button(more than 2 seconds) to confirm to save the
current setting and exit the current setting state.
If no operation is performed within one minute, the display will automatically
exit the setting state.
7.3 Personalized Parameter settings
In order to improve the personalized use of this product, we specially added this setting. It can be set
according to different requirements of users. This setting includes the setting of battery power, PAS
level, current limit, PAS sensor, speed sensor and system settings. There are six major settings.
7.3.1 Personalize Settings Password Input
Press and hold 【UP】+【DOWN】buttons for 2 seconds to enter the normal setting interface. Press
and hold 【UP】+【DOWN】buttons again to enter the personalization setting interface.
The character “P3 ”on the bottom of the screen means the password of setting. Short press
【MODE】button to shift and input the value by pressing 【UP】/【DOWN】button. After the 4-digit
password is input, short press【MODE】button to confirm. If the password is correct, then enter the
setting item selection interface, otherwise it will stay in the password input state. The password of
personalize settings is 2962.

14
Password input interface
Press“UP/DOWN”button to select, and press“MODE”button to enter the corresponding setting
page.
7.3.2 Battery Power Volt Setting
“VOL”means battery power volt setting. Each number represents a voltage value. 5 voltage values
MUST BE entered one by one. Press 【UP】/【DOWN】button to change the value. Short press
【MODE】button to confirm and enter the setting of the next power volt value. After the five power
volt values are set, press and hold 【MODE】button to confirm, and return to the personalized
parameter setting interface.

15
Battery power voltage setting interface
7.3.3 PAS level setting
PAS level select interface
In Pedal Assistant Level Settings, there are 8 modes selectable: 0-3, 1-3, 0-5, 1-5, 0-7, 1-7, 0-9, 1- 9.
Press “UP/DOWN”button to select the mode, and press “MODE”button to confirm, then enter
to the ratio of each PAS level settings.
PAS level select interface

16
Take the 1 level for example, “30-50%”is the range value, and "40%" is the default value of the first
level, which can be set. Pressing 【UP】
/
【DOWN】button to modify, short press 【MODE】button
to confirm and enter the next assist level ratio setting. Up to 9 can be set. After setting, long press
“MODE”button to confirm and return to setting selection interface. Short press “MODE”button
to confirm and return to assist level selection
The speed of each level can be adjusted by setting the assist proportion value to meet the different
requirements for riders.
.
PAS level ratio setting interface
7.3.4 Current limit setting
“CUR”means current limit. The current limit can be set in the range of 7.0-22.0A. Press 【UP】/
【DOWN】button to change the maximum current value of the controller. Long press 【MODE】
button to confirm and return to the setting selection interface. The default value of the current limit
is 15A.
Due to different hardware of controller, the controller may not be able to reach the set 15A.

17
Current limit setting interface
7.3.5 PAS sensor setting
The Direction Setting of PAS Sensor
“PAS”means Pedal Assistant System sensor. “run-F”means forward direction, while “run-b”
means backward direction. Press “UP/DOWN”button to select F or b, and press “MODE”button
to confirm and turn to PAS sensitivity setting. The default direction is forward.
Direction of PAS sensor setting interface

18
PAS sensor sensitivity setting
The display shows SCN, indicating the sensitivity of the PAS sensor. The setting range is 2-9. 2 indicate
the highest sensitivity and 9 indicate the lowest sensitivity. Increase/decrease setting values by
UP/DOWN. Press MODE to confirm and enter the PAS sensor proportion parameter setting interface.
The factory default value is 2.
PAS sensor sensitivity setting
PAS Sensor Proportion Parameter Setting
n- represents the PAS sensor proportional parameter. The PAS sensor parameter values can be
selected by UP/DOWN. The larger the value, the more obvious the PAS feeling. Hold MODE to
confirm and return to the personalized parameter setting interface.
PAS sensor proportion parameter setting

19
7.3.6Speed Sensor Setting
SPS indicates the speed sensor setting. It can be set according to the number of magnet heads
mounted on the wheel of the e-bike, and the setting range is 1-9. Modify it by pressing UP/DOWN.
Hold MODE to confirm and return to the personalized parameter setting interface. The factory
default value is 1.
Speed sensor magnet stone selection interface
7.3.7 Throttle Function Setting
Throttle walk assist enable setting
Table of contents