Veit Brisay Fuse Master BX Series User manual

Handbook
BX 1000 / BX 600
Pressing for Excellence
GB

2
Kannegiesser Fuse Master BX
Both models, the Fuse master BX 600 and BX 1000 are equipped
with the same safe operational main elements which are
indispensable for correct and economic adjustment :
•a feed in station,
•separately controllable upper and lower surface contact heating
zones,
•a transport system with continuous upper and lower belts,
•a cooling station with long-life polyester belt,
•a control unit for easy operation and reading
Long-life maintenance-free elements and good insulation reduce
operating costs and energy consumption to a minimum. With the
Fuse master BX series 2 different pressure systems are available. If
necessary, the pressure system can be changed, even at a later
date. This allows the fusing system to be ideally adapted respective
to the specific production conditions:

3
Control elements of the machine
The Control Panel guarantees simplest adjustment of all machine
parameters as well as immediate diagnosis of possible faults, so that
these can immediately be repaired.
The well designed control panel allows a perfect, quick setting of the
fusing parameters of temperature and pressure and fusing time, thanks
to the clearly marked symbols. The set and actual working
temperatures are digitally indicated and easily read.
Control elements:
G1 adjustment of the fusing time
N1 adjustment of the upper temperature
N2 adjustment of the lower temperature
D1 adjustment of the pressure
S0 key stop
S1 key start
H1 slight lack of compressed air
H2 slight disturbance in the driving motor
H3 slight disturbance belt
S2 switch heating on/off
H4 slight disturbance heater control

4
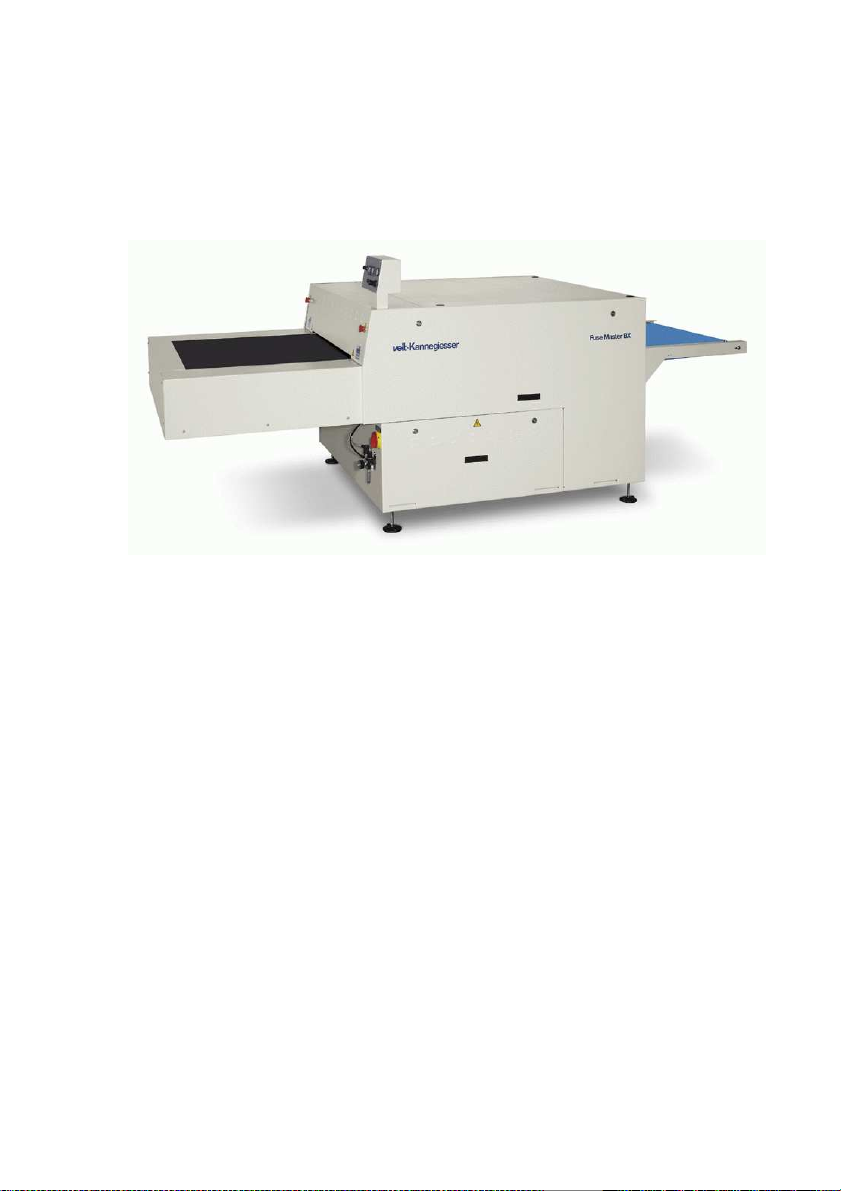
Switching on the Fuse Master BX
1. Switch on main switches.
2. Check if the emergency stop switches must be deactivated
3. Press start button
4. Possibly clean both belts
5. Switch on heating
6. Set the requested temperature on both temperature regulators
7. Set the requested fusing time on the speed regulator
8. Set the requested contact pressure on the pressure regulator
9. After approximately 30 minutes the machine will have reached the
operating temperature and is ready for production.
Switching off the Fuse Master BX
1. Switch the heating off after production has ended.
2. Clean the belts with the cleaning cloth
3. Turn the wiper bar with a clean surface facing the belt.
4. Clean the delivery rail to the cooling belt and the stripping rail with
a soft cloth.
5. Drain the sediment bowl of the air cleaner if necessary.
6. Switch off the main switches of the machine - Approx. 20 minutes
after switching off the heating.
7. Pull the cleaning cloth out of the machine.
Maintenance and servicing
In order to make sure that a fusing machine works problem-free,
it is vital to ensure that regular maintenance and service is
carried out including checking of all major functions. Systematic
service ensures the constant functioning of a fusing machine.
Therefore certain controls and services should be performed by
the maintenance technicians regularly.

5
Service notes
♦interlinings should not overlap otherwise they soil the
belts.
♦temperatures set too high cause resin to strike back.
♦During breaks the belts should regularly be
cleaned with the cleaning flag.
♦Cleaning agents should be used carefully, in order to
avoid build-up on the inside of the belt, rollers or heating
elements.
♦Never use aggressive chemicals or sharp tools for
cleaning: This shortens the belt life.
♦Covers or towels of cleaning bars or cleaning devices
should regularly be checked or replaced.
♦Transfer and strip-off blades should be cleaned in
regular intervals from resin and dust build-up.
♦The machine must be cleaned before shut-down: resins
hardened over night damage the belts when production
starts the next day.
♦Tracking and tension of the belts should regularly be
checked and readjusted, if required.
♦Scissors should be tied up with a string. Also clamps
and needles should be kept away from the feeding
area.

6
.Maintenance guide sheet
Cleaning agent
Kannegiesser developed in cooperation with some leading
chemical firms the cleaning agent KANFIX for cleaning the belts
from glue residues. The cleaning agent KANFIX is not only
suitable for cleaning the Teflon coated belts. It also conserves
the belts as an additional coating on the belts to avoid
agglomeration of glue residues. The cleaning agent KANFIX is
non-toxic, solvent-free and silicone-free. Use KANFIX only once
a day. Spread it on an approx. 10 cm wide strip of the cotton
molton fabric and insert it into the machine.

7
KANfix application
Every 2nd production day (or after 16 hours of production) sprinkle a
strip approx. 10 cm wide of Kanfix across the width of the belt. Place
the cleaning cloth in the machine so that the Kanfix melts and starts to
clean between the belts. The cleaning cloth should be used as often as
possible, i.e. during every break (mornings, lunchtime etc.) and at the
end of the day. Do not leave the cleaning cloth in the machine
overnight, as the dirty cloth sticks to the belts after they have cooled
down. The belts are then damaged when the machine is restarted.
After cleaning, two people should pull the cloth out of the machine and
wind it up.
.
?
KANfix
100 cm
10 cm

8
The cleaning and preservative powder KANFIX
KANfix contains no silicon. Silicone-containing cleaning
agents cause damages to the belts, the heating elements
and the rubber coated rollers.
KANfix, 250g container Art.Nr.214.607/4
KANfix, box with 12 x 250g containers Art.Nr. 214.608/2

9
The fusing process
The part to be fused is placed on the loading table. Please
ensure, that the cut of the interlining is 2 mm smaller than the
fabric as other wise the belts could get soiled.
The fabric together with the interlining is put on the belt. Please
note: if only one operator is working on the machine, the part to
be fused should be placed on the belt on the right side of the
machine which is marked °C, as the temperature sens ors are
located in this area.
The required fusing time can be set on the speed metre.
When the article is in the machine, the upper heating zone
warms up the material. The required temperature is set on the
thermostat. The articles are transported between the seamless
belts towards the main heating zone. Here the lower heating
zone applies heat to the articles. The desired temperature can
be set on the thermostat.
Then the articles are transported to the pressure cylinder, where
fabric and interlining get fused. The articles, still warm, leave the
machine and reach the cooling belt, where the articles can be
taken off manually or be stacked.

10
Fusing parameter
Temperature setting
Normally the recommendations of the interlining manufacturers
should be followed and adapted to the specific fabrics. For safe
fusing sufficient temperature in the glue line is important,
whereas for protection of delicate fabric surfaces a minimum
temperature on the belt surface is required. When setting of
temperature and fusing time (i.e. belt speed) it should be noted,
that the temperature in the glue line depends on the weight of
the articles, which can vary.
The heating system of the Fuse Master BX
The heating surface consists of a series of metal profiles that
form a curved panel. Heating circuits are laminated directly onto
the inside of the contact surface of each heating profile.
The sensors of the thermostats are positioned in the heating
profiles close to the heating mat and the profile surface: This
integration guarantees even heat across the entire heating
surface as well as quick response and accurate control.
Setting of fusing time
The longer the dwell time or the shorter the belt speed, the
better the glue line temperature is compatible with the machine
temperature. This means, that you need less temperature to
achieve good bond strength.

11
Setting of pressure
Generally it can be said: the higher the contact pressure, the harder
the grip of the product and the more likely the danger of strike back
and/or copying. The setting of the pressure depends very much on
the kind of material as well as the kind of interlining. Therefore we
recommend exactly following the fusing recommendations of the
interlining manufacturers and always carrying out preliminary tests.
The Fuse Master BX pressure system variations
With the Fuse Master BX concept Kannegiesser offers the possibility
of selecting two different pressure systems.
O – Pressure system for outerwear fusing
S – Pressure system for shirt fusing

12
The pressure system
The O-pressure system is suitable for a wide range of fashionable
materials and appropriate interlinings, as long as they are in the usual
easy to middle weight classes.
The S-pressure system is particularly suitable for the processing of
shirts and blouses.
The two silicone coated pressure rollers are pressed against each
other sensitively and precisely adjustable by means of pneumatic
cylinders. A sturdy pressure rocker provides for constant pressure
over the entire working width.
The specific pressure is changed by adjusting the air pressure. The
limited elasticity of the silicone coating means that the pressure
system can only partially react to thickness differences. Therefore
bonding problems can occur when simultaneously fusing materials
with large thickness differences. In addition differences in the
bonding strength can be caused when processing thicker materials
with differing use of the machine width.

13
Checking the fusing result
Bond Strength
The bond strength can be measured easily with a spring
balance. The indications are in kp/50mm or N/50mm. A general
bond strength value cannot be given as this depends on the
kind of interlining or fabric. Therefore the interlining
manufacturers indicate the required bond strength per interlining
Appearance of adhesion test
After fusing, fabric and interlining are pulled apart. The adhesion
test gives a special indication: With a good bond the coating of
the interlining should have been transferred 50% or more to the
fabric. If this is not the case, the bond is not sufficient.
Bond strength

14
Temperature test
For good fusing the melting temperature of the glue, which
means the glue line temperature is important. In the normal
case the glue line temperature differs from the set temperature
due to the isolation effect of the fabric as well as different belt
speeds.
Most suitable for a temperature test are the well-known paper
measuring tapes. We recommend covered paper measuring
tapes in order to minimize the influence of humidity of the fabric.
These paper measuring tapes can be ordered from
Kannegiesser Garment & Textile Technologies GmbH & Co.,
temperature ranges (104°C-143°C –order-Nr. 046.053/ 5) and
(143°C-182°C – order Nr. 046.054/3).
The measured temperature between the belts (without fusing
material) at medium machine speed should be in accordance
with the temperature reading on the thermostat. The easiest
way to test the glue line temperature is also by using the paper
tapes.
Temperature strips

15
Evenness of pressure
The evenness of pressure is an important criteria for an even
fusing of the interlining. Unfortunately there is no simple
measuring method. The pressure evenness can be determined
only by adhesion tests. A temperature evenness test should be
done beforehand. If different bond strengths are noticed at even
temperature, then it is necessary to test, whether the rubber
cover of the pressure roller has an even ”shore” hardness.
Furthermore the pressure roller should be checked for faults
and contractions, which can be caused by aggressive cleaning
agents.
Fusing without problems
One of the specific characteristics of garment fusing is that the
real quality of the process only becomes apparent long after
production, which means during wearing or finally during dry
cleaning or washing. Therefore, for quality fusing, it is important
that basic conditions must be fulfilled by careful selection and
coordination of machinery and material.
A regular check of the fusing results as well as the basic
functions of the machine give you the certainty of correct fusing.

16
Important rules for the daily check
for each fabric the most suitable interlining should be
selected, possibly under the assistance of the interlining
supplier.
New fabrics should be pre-tested, including dry-cleaning or
wash test, to find out the optimum fusing conditions.
The fusing equipment must be checked daily for the basic
functions, particularly for temperature accuracy.
The pressure system must be checked daily by fusing
several samples over the working width and testing the
evenness of bond strength.
The test results should be recorded in a journal, in order
to check back if fusing problems occur later on.
F
Fl
la
at
tt
te
en
ni
in
ng
g
E
Ef
ff
fe
ec
ct
t
S
Sh
hi
in
ni
in
ng
g
C
Co
ol
lo
ou
ur
r
C
Ch
ha
an
ng
gi
in
ng
g
S
Sh
hr
ri
in
nk
ka
ag
ge
e
D
De
ef
fo
or
rm
ma
at
ti
io
on
n
H
Ha
ar
rd
d
H
Ha
an
nd
dl
le
e
O
Or
ra
an
ng
ge
ep
pe
ee
el
l
E
Ef
ff
fe
ec
ct
t
M
Mo
oi
ir
re
ee
e
E
Ef
ff
fe
ec
ct
t
P
Pl
le
ea
at
ts
s
M
Mo
ov
ve
e
o
of
f
I
In
nt
te
er
rl
li
in
ni
in
ng
g
R
Re
es
si
in
n
S
So
oi
il
li
in
ng
g
P
Pr
re
es
ss
su
ur
re
e
t
to
oo
o
h
hi
ig
gh
h
P
Pr
re
es
ss
su
ur
re
e/
/
T
Te
em
mp
pe
er
ra
at
tu
ur
re
e
t
to
oo
o
h
hi
ig
gh
h
T
Te
em
mp
pe
er
ra
at
tu
ur
re
e
t
to
oo
o
h
hi
ig
gh
h
T
Te
em
mp
pe
er
ra
at
tu
ur
re
e/
/
M
Mo
oi
is
st
tu
ur
re
e
c
co
on
nt
te
en
ns
s
t
to
oo
o
h
hi
ig
gh
h
P
Pr
re
es
ss
su
ur
re
e
t
to
oo
o
h
hi
ig
gh
h/
/
W
Wr
ro
on
ng
g
H
Ha
an
nd
dl
li
in
ng
g
T
Te
em
mp
pe
er
ra
at
tu
ur
re
e
t
to
oo
o
h
hi
ig
gh
h/
/
R
Re
es
si
in
n
d
do
ot
ts
s
t
to
oo
o
l
la
ar
rg
ge
e
M
Mo
oi
is
st
tu
ur
re
e
M
Mo
oi
is
st
tu
ur
re
e/
/
P
Pr
re
es
ss
su
ur
re
e
S
Sy
ys
st
te
em
m
S
Sh
hr
ri
in
nk
ka
ag
ge
e/
/
P
Pr
re
es
ss
su
ur
re
e
S
Sy
ys
st
te
em
m
E
El
le
ec
ct
tr
ri
ic
ca
al
l
S
St
ta
at
ti
ic
c/
/
W
Wr
ro
on
ng
g
H
Ha
an
nd
dl
li
in
ng
g
W
Wr
ro
on
ng
g
S
Se
et
tt
ti
in
ng
gs
s
T
Ty
yp
pi
ic
ca
al
l
F
Fu
us
si
in
ng
g
p
pr
ro
ob
bl
le
em
ms
s
a
an
nd
d
t
th
he
ei
ir
r
c
ca
au
us
se
es
s

17
Control panel
The control panel guarantees simplest adjustment of all machine
parameters as well as immediate diagnosis of possible faults, so that
these can immediately be repaired. The well designed control panel
allows a perfect, quick setting of the fusing parameters of
temperature and pressure and fusing time, thanks to the clearly
marked symbols. The set and actual working temperatures are
digitally indicated and easily read.
Disturbance diagnostics
All electrical and mechanical machine functions are permanently
controlled by an automatic diagnosis system. Possible
malfunctions are immediately recognized and indicated on the
panel.
Possible indications of malfunctions (red LED’s)
H1 Trouble: insufficient air pressure (min. 5,3 bar).
H2 Trouble on drive motor (thermo contact motor)
H3 Upper or lower belt run off to the left hand machine side)
H4 Heating circuit control: Fuse, Relays, Temperature sensor or
heating element

18
Technical side view of Fuse Master BX
Please refer to the operating instructions for information
regarding spare parts and further technical details.
Kannegiesser Garment & Textile
Technologies GmbH
Valdorfer Straße 100
Postfach 1612
D-32602 Vlotho (Germany)
Telefon/phone: +495733-8713-0
Telefax: +495733-8713-45
This manual suits for next models
2
Other Veit Brisay Industrial Equipment manuals