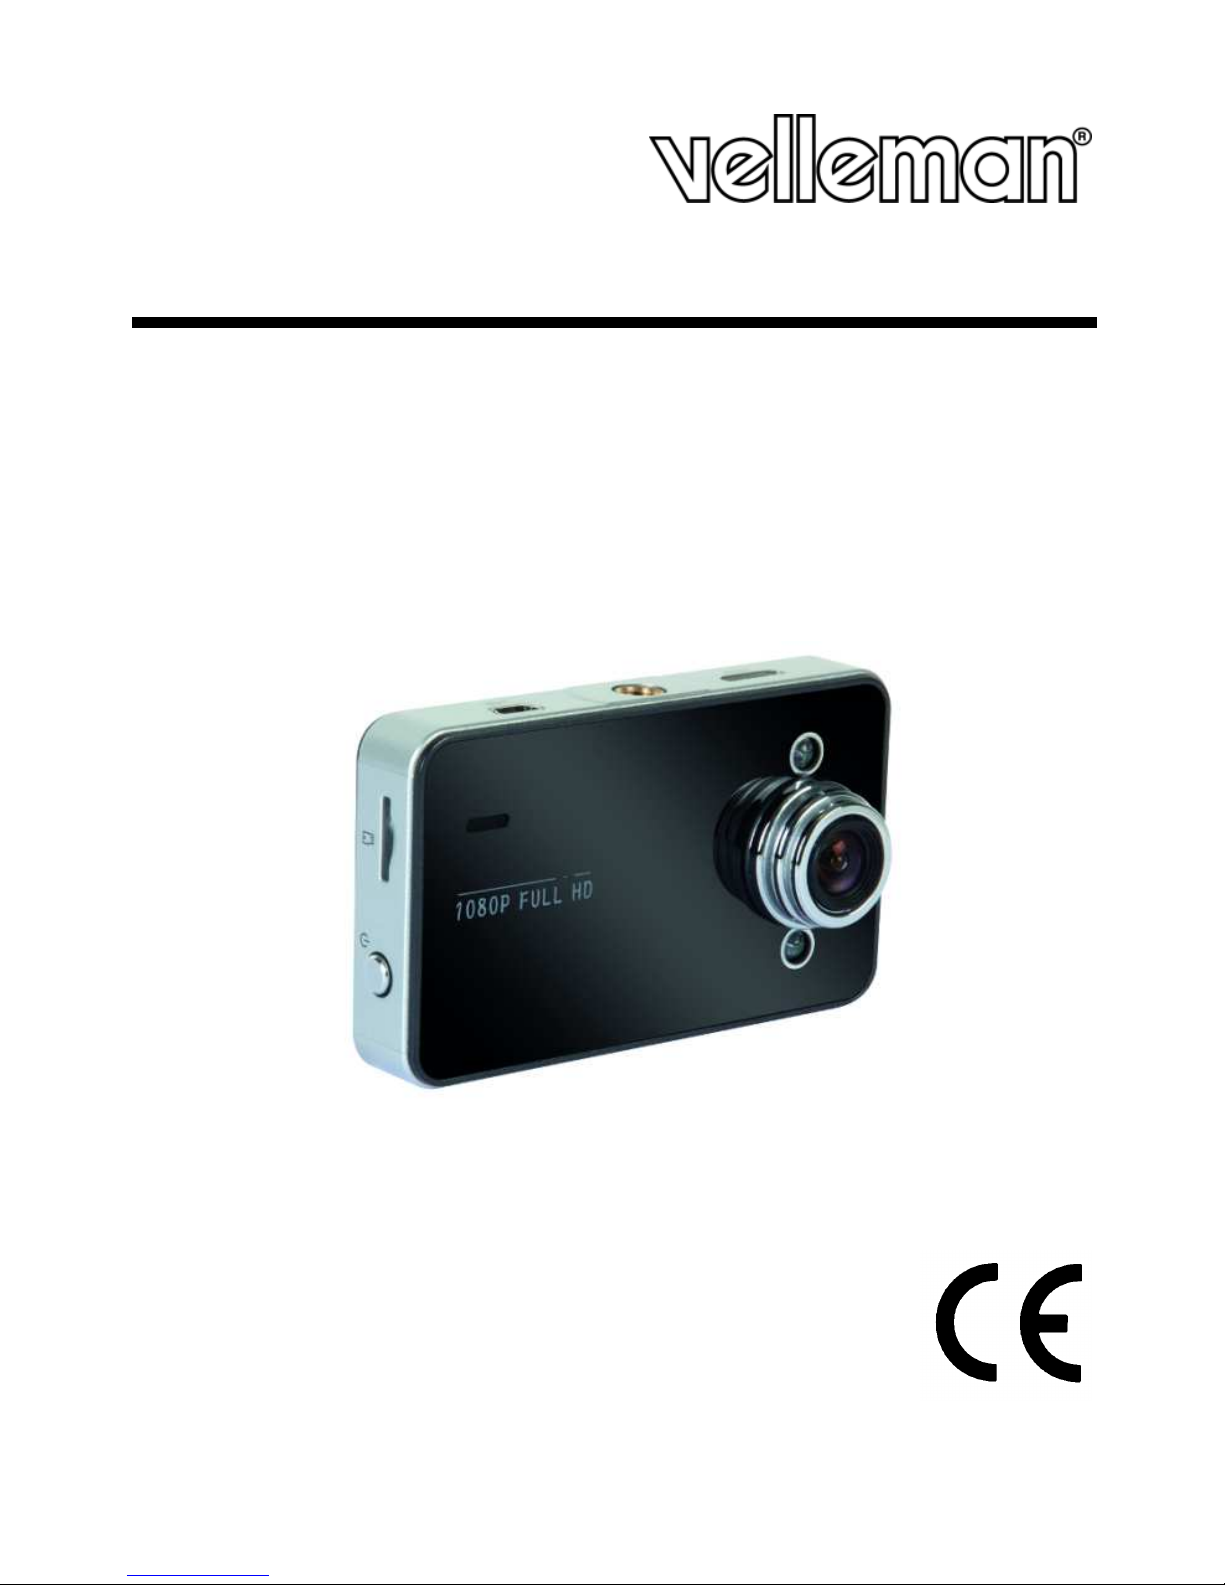
Velleman CAMCOLVC20 User manual

CAMCOLVC20
FULL HD CAR CAPTURE
COLOUR CAMERA
FULL HD
-
KLEURENCAMERA VOOR G
EBRUIK IN DE AUTO
CAMÉRA COULEUR FULL
HD POUR VOITURE
CÁMARA FULL HD A COL
OR PARA USO EN EL CO
CHE
FULL HD
-
FARBKAMERA FÜR GEBRA
UCH IM
AUTO
CÂMARA HD A CORES PA
RA USAR NO AUTOMÓVEL
KOLOROWA KAMERA SAMO
CHODOWA FULL HD
USER MANUAL
3
GEBRUIKERSHANDLEIDING 13
MODE D'EMPLOI 24
MANUAL DEL USUARIO 34
BEDIENUNGSANLEITUNG 45
MANUAL DO UTILIZADOR 56
INSTRUKCJA OBSŁUGI 67

CAMCOLVC20
V 01 – 09/10/2014 2 ©Velleman nv

CAMCOLVC20
V 01 – 09/10/2014 3 ©Velleman nv
USER MANUAL
1 Introduction
To all residents of the European Union
Important environmental information about this product
This symbol on the device or the package indicates that disposal of
the device after its lifecycle could harm the environment Do not
dispose of the unit (or batteries) as unsorted municipal waste; it
should be taken to a specialized company for recycling This device
should be returned to your distributor or to a local recycling
service Respect the local environmental rules
If in doubt, contact your local waste disposal authorities
Thank you for choosing Velleman! Please read the manual thoroughly before
bringing this device into service If the device was damaged in transit, don't
install or use it and contact your dealer
Package contents
•camera
•HDMI cable
•USB cable
•car plug cable
•window bracket
2 Safety Instructions
Keep the device away from children and unauthorised users
Mount the device in such a way that it does not distract the driver
3 General Guidelines
Refer to the Velleman® Service and Quality Warranty on the last pages
of this manual
Indoor use only Keep this device away from rain, moisture,
splashing and dripping liquids Never put objects filled with liquid
on top
Keep this device away from dust and extreme temperatures
Protect this device from shocks and abuse Avoid brute force
when operating the device

CAMCOLVC20
V 01 – 09/10/2014 4 ©Velleman nv
•Familiarise yourself with the functions of the device before actually
using it
•All modifications of the device are forbidden for safety reasons Damage
caused by user modifications to the device is not covered by the
warranty
•Only use the device for its intended purpose Using the device in an
unauthorised way will void the warranty
•Damage caused by disregard of certain guidelines in this manual is not
covered by the warranty and the dealer will not accept responsibility for
any ensuing defects or problems
•There are no user-serviceable parts inside the device Refer to an
authorized dealer for service and/or spare parts
•DO NOT use this product to violate privacy laws or perform other illegal
activities
4 Features
•portable camera with vacuum cup bracket
•the video capture camera records images on micro-SD card (not
included)
•records full HD video
•built-in microphone
•auto-record function when the device detects power on the car plug
•user-friendly setup via push buttons
•2 7" TFT colour screen
•G-sensor function
5 Overview
Refer to the illustrations on page 2 of this manual
1 lens 8 SD card slot
2 up button 9 on/off button
3 menu button 10 reset button
4 down button 11 HDMI output
5 OK button 12 bracket mounting hole
6 mode selection button 13 USB port
7 lock video button
6 Getting started
Inserting an SD card
The camera cannot record video or take pictures without an SD card inside
Insert an SD card before using the camera

CAMCOLVC20
V 01 – 09/10/2014 5 ©Velleman nv
First use
•Press the on/off button on the side of the camera to turn it on
The blue indicator will light up
By default, the camera starts in video mode For details about modes,
see section Camera modes below
•To turn the camera off, press and hold the on/off button
Setting the time
1 Press the Menu button twice
2 Use the down arrow to go to Set Date/Time and press the button OK
3 Use the up and down buttons to set the date and time and press OK
You need to press the button OK to confirm each setting
4 You can also set the date format (for example YY/MM/DD or
DD/MM/YY)
5 Press the button OK to confirm
6 Press the Menu button to quit the menu
7 Operation
7 1 Camera modes
The camera has 3 modes: video, picture and playback
To switch between modes, press the button M on the back of the camera
7 2 Recording video
1 With the camera on, press the button M to set it to video mode
(a video icon appears in the top left corner of the display)
2 You can zoom in or out with the up and down buttons
3 To start recording, press the button OK
4 To stop recording, press the button OK again
oThe camera saves the video
oTo view a video, see section Viewing video or pictures below
Note - Locking a video
•You can lock a video to prevent it from being deleted
•To do so, while the camera is recording, press the button Lock video
•For details, see section Locking video below
7 3 Taking a picture
1 With the camera on, press the button M to set it to picture mode
(a camera icon appears in the top left corner of the display)
2 You can zoom in or out with the up and down buttons
3 To take a picture, press the button OK

CAMCOLVC20
V 01 – 09/10/2014 6 ©Velleman nv
oThe camera saves the picture
oTo view a picture, see section Viewing video or pictures below
7 4 Viewing video or pictures
1 With the camera on, press the button M to set it to playback mode
oThe file type icon appears in the top left corner of the display
oThe display shows the most recent video or picture
2 Use the up and down buttons to select the file you want to view
3 For video, press the button OK to play and pause the video
Note - Viewing files on your computer
You can also view video or pictures from your computer For details, see
section File management on your computer below
8 File management on the camera
On the camera, you can
•delete files
•lock and unlock files
(for example to protect them from accidental deletion)
8 1 Deleting files
You can delete a specific file or all files at once
1 Press the button M to set the camera to playback mode
oThe file type icon appears in the top left corner of the display
oThe display shows the most recent video or picture
2 Press the Menu button , select Delete and press OK
3 Select the option you want (Delete Current or Delete All) and press
OK
4 Select OK and press the button OK to confirm
5 The camera will delete the file or files (except protected files, see next
section)
8 2 Locking and unlocking files
•To prevent a file from being accidentally deleted, you can lock it
•When in playback mode, the display will show a key icon for a locked
file
•A locked file cannot be deleted unless you unlock it first
Locking pictures
Pictures can be locked by using the Protect function in the camera menu

CAMCOLVC20
V 01 – 09/10/2014 7 ©Velleman nv
You can lock or unlock a specific file or all files at once
1 Press the button M to set the camera to playback mode
oThe file type icon appears in the top left corner of the display
oThe display shows the most recent video or picture
2 Select the option you want (Lock Current - Unlock Current - Lock All -
Unlock All) and press OK
3 Select OK and press the button OK to confirm
Locking video
You can lock a video directly while recording, as follows:
1 While the camera is recording, press the button Lock video
2 When you stop recording, the camera will save the video as a
protected file
You can also lock a video through the Protect function in the camera menu
(see section Locking pictures above to see how)
9 File management on your computer
While the camera is connected to your computer with the USB cable, you
can view and manage files from your computer
9 1 Connect the camera to your computer
1 Use the included USB cable to connect the camera to your computer
2 Select Mass Storage and press the button OK
3 On first use, your computer will install the appropriate drivers
4 You can now access the video and pictures on the SD card through
your computer’s file management system
5 All video and pictures are in the folder \DCIM on the SD card
Note: you cannot use the camera functions while the camera is connected to
your computer
9 2 View files
You can view video or pictures as any other media file on your computer
9 3 Delete files
•You can delete files directly from the SD card

CAMCOLVC20
V 01 – 09/10/2014 8 ©Velleman nv
•The lock function (see section Locking and unlocking files above)
does not apply when you are accessing the SD card from your
computer
9 4 Safely remove the camera from your computer
Windows®
When finished, it is recommended to safely remove the camera:
1 Click the icon Safely Remove Hardware in the notification area at
the right of the taskbar and click the device that you want to remove
Windows will display a notification telling you it's safe to remove the
device
2 Unplug the device from the USB port
Mac OS®
1 In the Finder, click the Eject icon next to the device
2 Unplug the device from the USB port
10 Using the camera as a webcam
You can use the camera as a webcam, as follows:
1 Use the included USB cable to connect the camera to your computer
2 Select PC Camera and press the button OK
3 On first use, your computer will install the appropriate drivers
4 You can now use the camera as a webcam, for example together with
the chat software on your computer
11 Camera options
•The camera has menus that contain options for the various modes
(video – picture - playback)
•The contents of the menus varies depending on the mode the camera is
in
•To access the menu for a mode, you need to set the camera in that
mode first
•Apart from these menus, there is a generic Setup menu that can be
accessed from every camera mode
Accessing a menu
1 Press the button M to set the camera mode (video – picture -
playback)

CAMCOLVC20
V 01 – 09/10/2014 9 ©Velleman nv
2 Press the Menu button to open the menu
Selecting a menu item
1 Use the up and down arrows to browse through the menu items
2 Press the button OK to open a menu item
3 Use the up and down arrows to set an option
4 Press the button OK to confirm
5 Press the Menu button to quit the menu
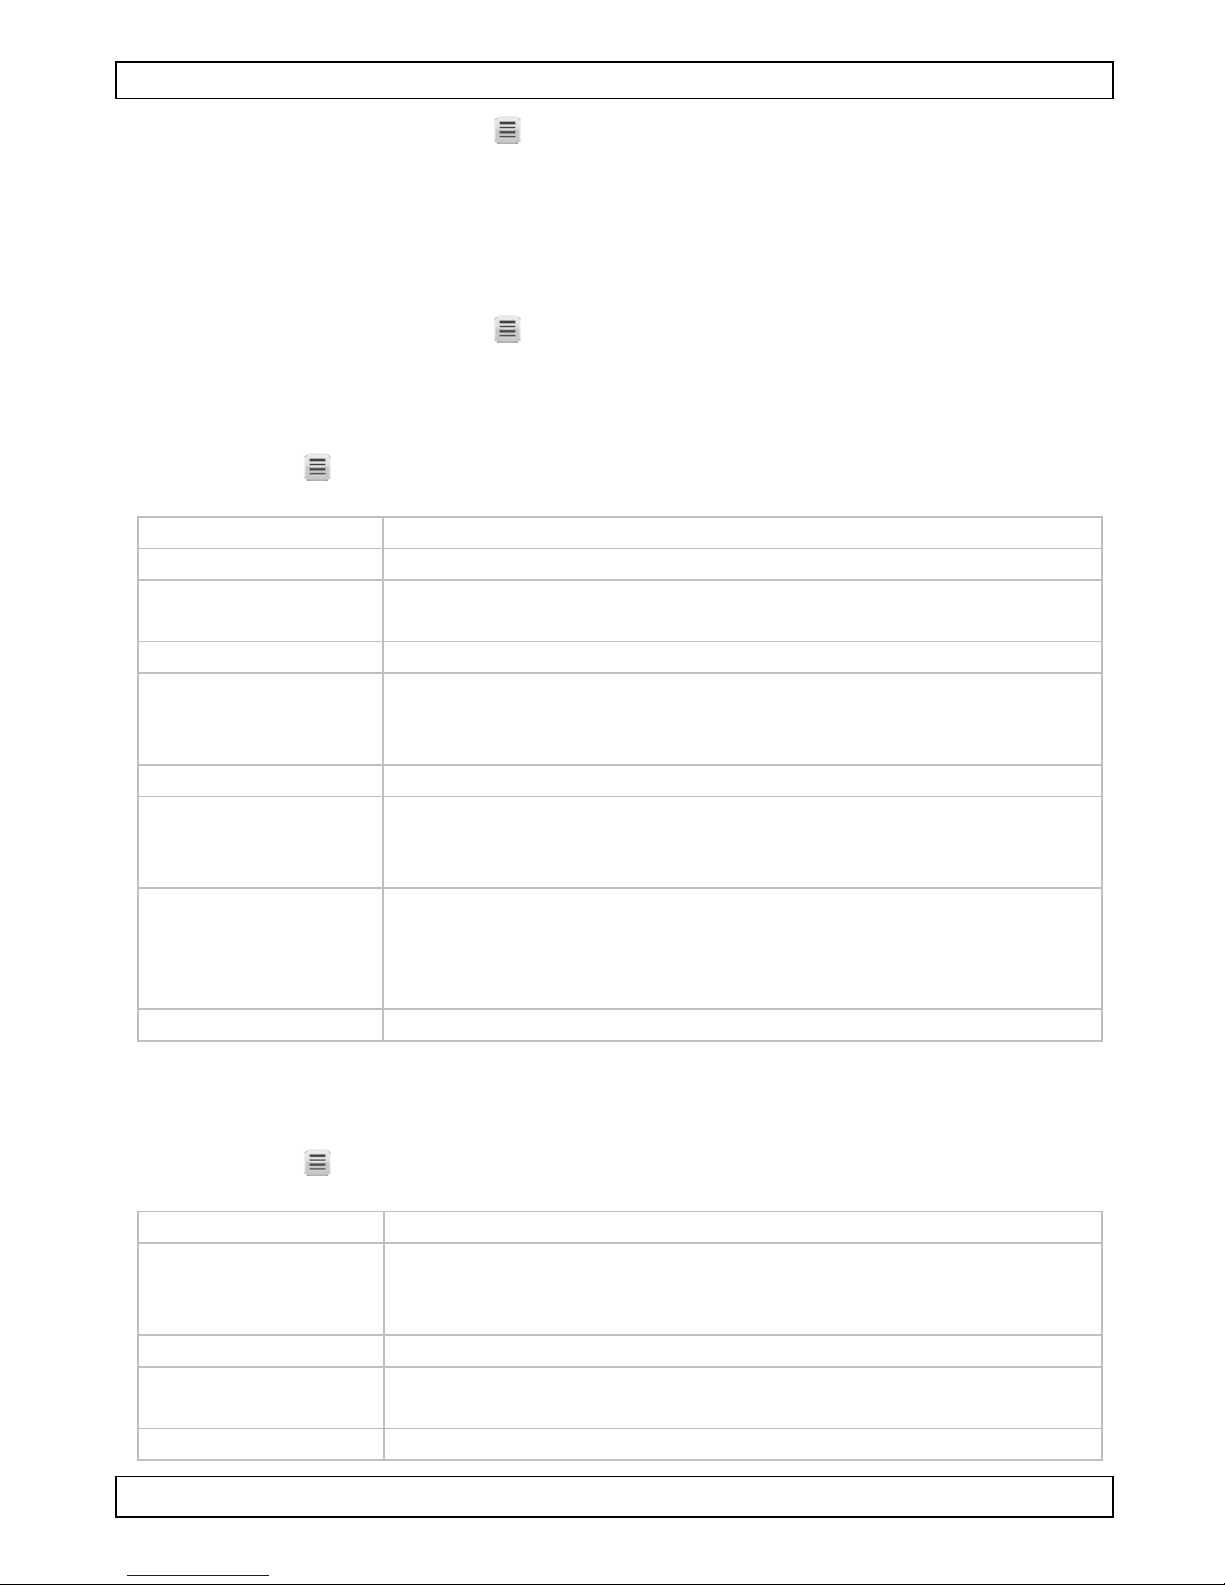
Video mode - menu options
To open the video options, set the camera in video mode and press the
Menu button The menu options are:
Menu item Function
Resolution sets the video resolution (from 1080 full HD to WVGA)
Loop Recording sets the time after which the camera will start
recording a new file
EV sets the exposure compensation
Motion
Detection turns motion detection on or off;
with motion detection turned on, the camera will start
recording as soon as it detects movement
Audio turns audio recording on or off
Date Stamp turns the timestamp function on or off;
with the function turned off, the timestamp will not be
displayed on the video or picture
Gsensor sets or turns off the acceleration from which Gsensor
function starts working (2g – 4g - 8g or off) With this
option set, the camera will save the video as a
protected file
Buttons sound turns button sound on or off
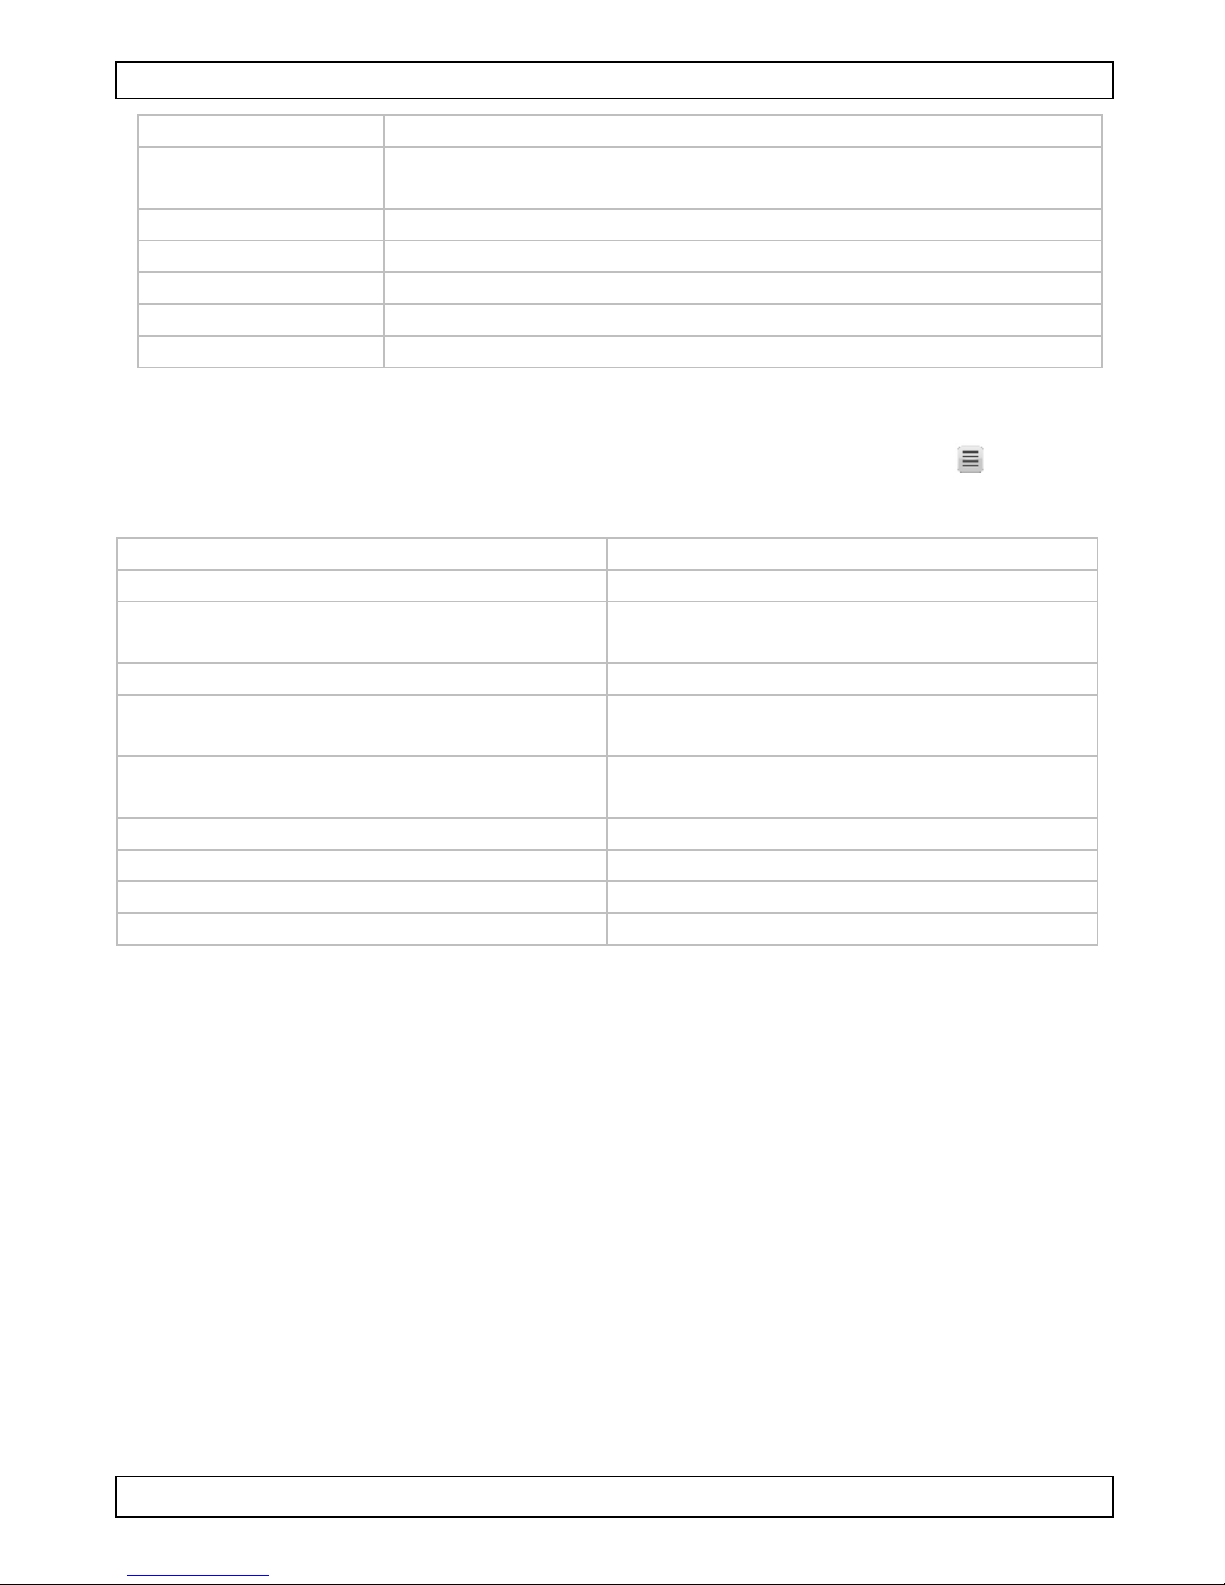
Camera mode – menu options
To open the picture options, set the camera in camera mode and press the
Menu button The menu options are:
Menu item Function
Timer Sets the delay after which the camera will take a
picture (single = no delay, timers of 2, 5 or 10
seconds)
Resolution Sets the image resolution (from 5 to 12 megapixel)
Sequence Sets the number of pictures the camera takes with
one push of the OK button (1 or 2 pictures)
Quality sets image quality (fine – normal – economy)

CAMCOLVC20
V 01 – 09/10/2014 10 ©Velleman nv
Sharpness sets image quality (strong – normal – soft)
White Balance sets white balance (auto – daylight – cloudy –
tungsten – fluorescent)
Color sets image colour (normal – black and white – sepia)
ISO sets ISO sensitivity (auto – 100 – 200 – 400)
EV sets the exposure compensation ( from -1/3 to +2/3)
Anti-Shaking turns image stabilisation on or off
Quick Review turns image preview on or off
Generic setup menu
To open the generic setup menu, press twice on the Menu button The
menu options are:
Menu item Function
Set Date/Time sets the date and time
Auto Power Off sets the auto power off function:
off – 1 minute - 3 minutes
Language sets the language
Light Frequency sets the light frequency to avoid
flickering when recording video
Screen Saver sets the screen saver
(off – 3, 5 or 10 minutes)
Image Rotation rotates the image display
Format formats the SD card
Default Setting resets all settings to factory default
Firmware version displays the firmware version
12 Battery
The battery indicator turns red when battery power is low
Charging the device
You can charge the camera:
•by connecting it to your computer through the included USB cable;
•by connecting it to your car’s charger through the included car plug
cable
When charging, the red indicator will be lit while charging and will turn off
when the camera is fully charged

CAMCOLVC20
V 01 – 09/10/2014 11 ©Velleman nv
Notes
•You cannot use the camera functions while the camera is connected to
your computer
•When the camera is connected to your computer, you need to remove it
safely before unplugging it from the USB port
See section Safely remove the camera from your computer above
This device contains an internal rechargeable battery When the
device is end-of-life, it must be disposed of in accordance with
local regulations
Do not throw the device into the fire as it may explode
13 Technical Specifications
storage capacity max 32 GB microSD card (not incl )
pick-up element CMOS sensor
night vision 2 white LEDs
viewing angle 140°
video recording recording format: M-JPEG
frame rate (fps): 24
video resolution: 1080FHD / 1080P / 720P / WVGA /
VGA / QVGA
recording capacity: ± 1 50MB/min @ 1080FHD
audio format: AAC
image recording recording format: JPEG
image resolution: 1944 x 2592 pixels (max )
video output HDMI
auto white balance
(AWB)
yes
power supply
5 VDC via USB cable or car plug cable (12/24 VDC to 5
VDC) (incl )
battery li-ion battery built-in (3 7 V, 600 mAh)
lifetime: 40 minutes continuous recording
dimensions 90 x 15 x 53 mm
weight 75 g
Use this device with original accessories only Velleman nv cannot
be held responsible in the event of damage or injury resulting from
(incorrect) use of this device
For more info concerning this product and the latest version of this
manual, please visit our website www velleman eu
The information in this manual is subject to change without prior
notice

CAMCOLVC20
V 01 – 09/10/2014 12 ©Velleman nv
All registered trademarks and trade names are properties of their respective
owners and are used only for the clarification of the compatibility of our
products with the products of the different manufacturers
Windows, Windows XP, Windows 2000, Windows Vista, Windows Aero,
Windows 7, Windows 8, Windows Mobile, Windows Server are registered
trademarks of Microsoft Corporation in the United States and other
countries
iPad, iPod, iPod touch, iPhone, Mac, iMac, MacBook, PowerBook, Power Mac,
Mac OS are trademarks of Apple Inc , registered in the U S and other
countries
© COPYRIGHT NOTICE
The copyright to this manual is owned by Velleman nv All
worldwide rights reserved No part of this manual may be copied,
reproduced, translated or reduced to any electronic medium or otherwise
without the prior written consent of the copyright holder

CAMCOLVC20
V 01 – 09/10/2014 13 ©Velleman nv
GEBRUIKERSHANDLEIDING
1 Inleiding
Aan alle ingezetenen van de Europese Unie
Belangrijke milieu-informatie betreffende dit product
Dit symbool op het toestel of de verpakking geeft aan dat, als het
na zijn levenscyclus wordt weggeworpen, dit toestel schade kan
toebrengen aan het milieu Gooi dit toestel (en eventuele
batterijen) niet bij het gewone huishoudelijke afval; het moet bij
een gespecialiseerd bedrijf terechtkomen voor recyclage U moet
dit toestel naar uw verdeler of naar een lokaal recyclagepunt
brengen Respecteer de plaatselijke milieuwetgeving
Hebt u vragen, contacteer dan de plaatselijke autoriteiten
betreffende de verwijdering
Dank u voor uw aankoop! Lees deze handleiding grondig voor u het toestel
in gebruik neemt Werd het toestel beschadigd tijdens het transport,
installeer of gebruik het dan niet en raadpleeg uw dealer
Inhoud
•camera
•HDMI-kabel
•USB-kabel
•kabel met autostekker
•raambevestiging
2 Veiligheidsinstructies
Houd dit toestel uit de buurt van kinderen en onbevoegden
Installeer het apparaat zodanig dat het de bestuurder niet afleidt
3 Algemene richtlijnen
Raadpleeg de Velleman® service- en kwaliteitsgarantie achteraan deze
handleiding
Gebruik het toestel enkel binnenshuis Bescherm het toestel
tegen regen, vochtigheid en opspattende vloeistoffen Plaats
nooit objecten gevuld met een vloeistof op het toestel
Bescherm dit toestel tegen stof en extreme temperaturen
Bescherm het toestel tegen schokken Vermijd brute kracht
tijdens de bediening

CAMCOLVC20
V 01 – 09/10/2014 14 ©Velleman nv
•Leer eerst de functies van het toestel kennen voor u het gaat
gebruiken
•Om veiligheidsredenen mag u geen wijzigingen aanbrengen aan het
toestel Schade door wijzigingen die de gebruiker heeft aangebracht aan
het toestel, valt niet onder de garantie
•Gebruik het toestel enkel waarvoor het gemaakt is Bij onoordeelkundig
gebruik vervalt de garantie
•De garantie geldt niet voor schade door het negeren van bepaalde
richtlijnen in deze handleiding en uw dealer zal de verantwoordelijkheid
afwijzen voor defecten of problemen die hier rechtstreeks verband mee
houden
•Er zijn geen onderdelen in het toestel die door de gebruiker gerepareerd
kunnen worden Voor onderhoud en/of reserveonderdelen, contacteer
uw dealer
•Installeer en gebruik deze camera NIET voor illegale praktijken en
respecteer ieders privacy
4 Eigenschappen
•draagbare camera met raambevestiging
•opname op microSD-kaart (niet meegelev )
•opname van full HD-video
•ingebouwde microfoon
•automatische opnamefunctie bij het starten van de auto
•gebruiksvriendelijke instelling via drukknoppen
•2,7" TFT-kleurenscherm
•met G-sensor
5 Overzicht
Raadpleeg de afbeeldingen op pagina 2 van deze handleiding
1 lens 8 SD-kaartslot
2 omhoogknop 9 aan-uitknop
3 menu-knop 10 resetknop
4 omlaagknop 11 HDMI-uitgang
5 OK-knop 12 montagegat voor beugel
6 modusknop 13 USB-poort
7 vergrendelknop

CAMCOLVC20
V 01 – 09/10/2014 15 ©Velleman nv
6 Aan de slag
Een SD-kaart plaatsen
De camera kan geen video opnemen of foto's maken zonder een SD-kaart
Plaats een SD-kaart voor u de camera gebruikt
Eerste gebruik
•Schakel de camera in: druk op de aan-uitknop op de zijkant van de
camera
De blauwe indicator licht op
Standaard start de camera op in videomodus Voor meer informatie
over de modi, raadpleeg paragraaf Cameramodi verderop in deze
handleiding
•Houd de aan-uitknop ingedrukt om de camera uit te schakelen
Instellen van de tijd
1 Druk twee keer op de menuknop
2 Gebruik de omlaagknop om Set Date/Time te selecteren en druk op de
OK-knop
3 Gebruik de omhoog- en omlaagknoppen om de datum en tijd in te
stellen en druk op de OK-knop
U moet op OK drukken voor elke instelling
4 U kunt ook het datumformaat instellen: bijvoorbeeld JJ/MM/DD
(YY/MM/DD) of DD/MM/JJ (DD/MM/YY)
5 Druk op de OK-knop om te bevestigen
6 Druk op de menuknop om het menu te verlaten
7 Gebruik
7 1 Cameramodi
De camera heeft 3 modi: video, foto en weergave
Om te schakelen tussen de verschillende modi, druk op de M-knop op de
achterzijde van de camera
7 2 Video-opname
1 Schakel de camera in en druk op de M-knop om de videomodus te
selecteren
(een video-pictogram verschijnt in de linkerbovenhoek van de display)
2 Gebruik de omhoog- en omlaagknoppen om in of uit te zoomen
3 Druk op de OK-knop om de opname te starten
4 Druk opnieuw op de OK-knop om de opname te stoppen
oDe camera slaat het filmpje op

CAMCOLVC20
V 01 – 09/10/2014 16 ©Velleman nv
oOm een filmpje te bekijken, zie paragraaf Filmpjes of foto's
bekijken verderop in deze handleiding
Opmerking – Een filmpje vergrendelen
•U kunt een filmpje vergrendelen zodat het niet kan gewist worden
•Ga als volgt te werk: druk tijdens de opname op de vergrendelknop
•Voor meer informatie, raadpleeg paragraaf Bestanden vergrendelen
en ontgrendelen verderop in deze handleiding
7 3 Foto's maken
1 Schakel de camera in en druk op de M-knop om de fotomodus te
selecteren
(een camera-pictogram verschijnt in de linkerbovenhoek van de
display)
2 Gebruik de omhoog- en omlaagknoppen om in of uit te zoomen
3 Druk op de OK-knop om een foto te maken
oDe camera slaat de foto op
oOm een foto te bekijken, zie paragraaf Filmpjes of foto's
bekijken verderop in deze handleiding
7 4 Filmpjes of foto's bekijken
1 Schakel de camera in en druk op de M-knop om de weergavemodus te
selecteren
oEen pictogram met het bestandstype verschijnt in de
linkerbovenhoek van de display
oHet meest recente filmpje of de meest recente foto verschijnt op de
display
2 Gebruik de omhoog- en omlaagknoppen om het gewenste filmpje of de
gewenste foto te bekijken
3 Voor een filmpje, druk op de OK-knop om het filmpje af te spelen of te
pauzeren
Opmerking – Bestanden bekijken op uw computer
U kunt de filmpjes en foto's ook bekijken op uw computer Voor meer
informatie, raadpleeg paragraaf Bestandsbeheer op uw computer
verderop in deze handleiding
8 Bestandsbeheer op de camera
Op de camera kunt u
•bestanden wissen
•bestanden vergrendelen en ontgrendelen
(bijvoorbeeld om te voorkomen dat ze per ongeluk gewist worden)

CAMCOLVC20
V 01 – 09/10/2014 17 ©Velleman nv
8 1 Bestanden wissen
U kunt één specifiek bestand wissen of alle bestanden tegelijk
1 Druk op de M-knop om de camera in weergavemodus te zetten
oEen pictogram met het bestandstype verschijnt in de
linkerbovenhoek van de display
oHet meest recente filmpje of de meest recente foto verschijnt op de
display
2 Druk op de menuknop , selecteer Delete en druk op de OK-knop
3 Selecteer de gewenste optie ("Delete Current" = dit bestand wissen; of
"Delete All" = alle bestanden wissen) en druk op OK
4 Selecteer OK en druk op de OK-knop om te bevestigen
5 De camera verwijdert het bestand of de bestanden (behalve beveiligde
bestanden, zie de volgende paragraaf)
8 2 Bestanden vergrendelen en ontgrendelen
•U kunt een bestand vergrendelen zodat het niet per ongeluk kan gewist
worden
•In weergavemodus verschijnt een sleutelpictogram op de display bij een
vergrendeld bestand
•Een vergrendeld bestand kan niet worden gewist tenzij u het eerst
ontgrendelt
Foto's vergrendelen
Foto's kunnen vergrendeld worden met behulp van de Protect-functie in het
menu
U kunt één specifiek bestand vergrendelen of ontgrendelen, of alle
bestanden tegelijk
1 Druk op de M-knop om de camera in weergavemodus te zetten
oEen pictogram met het bestandstype verschijnt in de
linkerbovenhoek van de display
oHet meest recente filmpje of de meest recente foto verschijnt op de
display
2 Selecteer de gewenste optie ("Lock Current" = huidig bestand
vergrendelen; "Unlock Current" = huidig bestand ontgrendelen; "Lock
All" = alle bestanden vergrendelen; "Unlock All" = alle bestanden
ontgrendelen) en druk op OK
3 Selecteer OK en druk op de OK-knop om te bevestigen
Filmpjes vergrendelen
U kunt een filmpje meteen vergrendelen tijdens het opnemen, als volgt:
1 Tijdens de opname, druk op de vergrendelknop

CAMCOLVC20
V 01 – 09/10/2014 18 ©Velleman nv
2 Als u stopt met opnemen, slaat de camera het filmpje op als een
beschermd bestand
U kunt een filmpje ook vergrendelen via de Protect-functie in het menu
(zie paragraaf Bestanden vergrendelen en ontgrendelen hierboven voor
meer informatie)
9 Bestandsbeheer op uw computer
Terwijl de camera op uw computer is aangesloten met behulp van de USB-
kabel, kunt u bestanden bekijken en beheren van op uw computer
9 1 De camera aansluiten op uw computer
1 Gebruik de meegeleverde USB-kabel om de camera aan te sluiten op
uw computer
2 Selecteer "Mass Storage" en druk op de OK-knop
3 Bij het eerste gebruik zal uw computer eerst de nodige drivers
installeren
4 U krijgt nu toegang tot de filmpjes en foto's op de SD-kaart via het
bestandsbeheer van uw computer
5 Alle filmpjes en foto's vindt u terug in de folder \DCIM op de SD-kaart
Opmerking: u kunt de camerafuncties niet gebruiken zolang de camera is
aangesloten op uw computer
9 2 Bestanden bekijken
U kunt filmpjes of foto's bekijken zoals alle andere mediabestanden op uw
computer
9 3 Bestanden wissen
•U kunt bestanden rechtstreeks wissen van de SD-kaart
•De vergrendelfunctie (zie paragraaf Bestanden vergrendelen en
ontgrendelen hierboven) is niet van toepassing als u de bestanden op
de SD-kaart beheert via uw computer
9 4 De camera veilig van de computer loskoppelen
Windows®
Als u klaar bent, moet u de camera veilig van de computer loskoppelen:
1 Klik op het pictogram "Safely Remove Hardware" (hardware veilig
verwijderen) in het systeemvak (rechts in de taakbalk) en klik op het
toestel dat u wilt verwijderen

CAMCOLVC20
V 01 – 09/10/2014 19 ©Velleman nv
Windows geeft een melding weer dat u het apparaat veilig kunt
verwijderen
2 Trek de USB-kabel uit de USB-poort
Mac OS®
1 Klik in de Finder op het eject-symbool naast het apparaat
2 Trek de USB-kabel uit de USB-poort
10 De camera als webcam gebruiken
U kunt de camera als webcam gebruiken, als volgt:
1 Gebruik de meegeleverde USB-kabel om de camera aan te sluiten op
uw computer
2 Selecteer "PC Camera" en druk op de OK-knop
3 Bij het eerste gebruik zal uw computer eerst de nodige drivers
installeren
4 U kunt de camera nu gebruiken als webcam, bijvoorbeeld met de
chatsoftware op uw computer
11 Cameraopties
•In de menu's op de camera vindt u opties voor de verschillende modi
(video – foto – weergave)
•De inhoud van de menu's hangt af van de huidige cameramodus
•Om het menu voor een bepaalde modus te openen, moet u de camera
eerst in de gewenste modus plaatsen
•Naast de specifieke menu's is er ook een menu met algemene
instellingen Dit menu is toegankelijk vanuit elke cameramodus
Een menu openen
1 Druk op de M-knop om de cameramodus in te stellen (video – foto –
weergave)
2 Druk op de menuknop om het menu te openen
Een menu-item selecteren
1 Gebruik de omhoog- en omlaagknoppen om door de menu-items te
bladeren
2 Druk op de OK-knop om een menu-item te openen
3 Gebruik de omhoog- en omlaagknoppen om een optie in te stellen
4 Druk op de OK-knop om te bevestigen
5 Druk op de menuknop om het menu te verlaten

CAMCOLVC20
V 01 – 09/10/2014 20 ©Velleman nv
Videomodus – opties
Om het menu met video-opties te openen zet u de camera in videomodus
en drukt u op de menuknop De opties zijn:
Menu-item Functie
Resolution de beeldresolutie instellen (van 1080 full HD tot
WVGA)
Loop Recording de tijd instellen waarna de camera in een nieuw
bestand begint op te nemen
EV de belichtingscompensatie instellen
Motion
Detection
de bewegingsdetectie in- of uitschakelen;
als bewegingsdetectie actief is, begint de camera met
opnemen zodra ze een beweging waarneemt
Audio geluidsopname in- of uitschakelen
Date Stamp de datumstempel in- of uitschakelen;
als deze functie uitgeschakeld is, verschijnt de
datumstempel niet op het filmpje of de foto
G-sensor instellen of uitschakelen van de versnelling waarbij de
G-sensorfuncties actief worden (2 g – 4 g – 8 g of
uit) Als deze optie is ingeschakeld, slaat de camera
het filmpje op als een beschermd bestand
Buttons sound het geluid van de knoppen in- of uitschakelen
Fotomodus – opties
Om het menu met foto-opties te openen zet u de camera in fotomodus en
drukt u op de menuknop De opties zijn:
Menu-item Functie
Timer de vertragingstijd waarmee de camera een foto maakt
("single" = geen vertraging; timers van 2,
5 of 10 seconden)
Resolution de beeldresolutie instellen (van 5 tot 12 megapixels)
Sequence serie-opname: het aantal foto's instellen dat de
camera maakt met één druk op de OK-knop
(1 of 2 foto's)
Quality de beeldkwaliteit instellen: fine (fijn) – normal
(normaal) – economy (zuinig)
Sharpness de beeldscherpte instellen: strong (scherp) – normal
(normaal) – soft (zacht)
White Balance de witbalans instellen: auto (automatisch) – daylight
(daglicht) – cloudy (bewolkt) – tungsten (gloeilamp) –
fluorescent (fluorescentielamp)
Color de beeldkleur instellen: normal (normaal) – black and
Other manuals for CAMCOLVC20
1
Table of contents
Languages:
Other Velleman Dashcam manuals