MIOFIVE B09HT854VJ User manual


1
What’s in the box
Miofive Dash Cam x 1
Crow Bar x 1
Static Sticker x 1
Backup Double-sided
Adhesive Tape x 1
Car Charger x 1Car Charger x 1
Charging Cable x 1Charging Cable x 1
User Manual x 1User Manual x 1

2
1
2
3
4
5
Camera Lens
Power Button
Status Indicator LED
Speaker
Vents
Microphone
12
3
4
5
6
6

3
5
1
6
1
2
3
4
5
6
Power Port
Vents
Screen
Album/Back Button
Setting/Next Button
Emergency Video (EMER Video)/Confirm Button
2
3
4

4
Installation
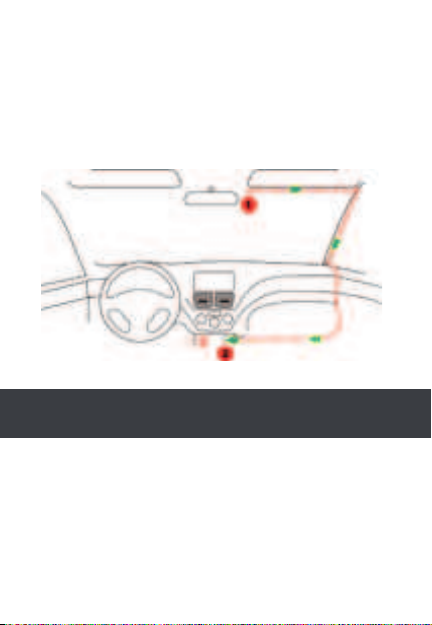
1. Install the electrostatic sticker
Park your car in a safe area, and turn off the car engine. Take
out the electrostatic sticker from the packing box and install it
in the recommended area on the windshield, as shown in the
figure below. Please clean the windshield, and remove the air
bubbles between the electrostatic sticker and the windshield
during the installation.
2. Connect the power supply
Connec t the USB cable to the micro USB port of the Dash
Cam. Run the cable along the edge of the windshield, tucking
it away in the seams (With the Crowbar), and extend it all the
way to the USB port of the Car Charger. Be sure to keep it
away from the airbag area.
Insert the Car Charger into your cigarette lighter, connect
the Dash Cam to the Car Charger.
Note: Please DO NOT attached the dash cam with the
sticker to the windshield before the camera calibration to
ensure AI feature works properly.

5
3. Camera Calibration
You need to find a good position and angle to install the dash
cam. Start the car engine (DO NOT install under driving) to
power on and start from pressing the Setting Button in the
middle on the right side, find System Settings gAI gCamera
calibration. Align vertical line to the center, horizontal line to
the vanishing point of the road in the preview LCD screen as
shown below. Make sure the dash cam does not interfere with
the driver’s view.
Note: The AI accuracy is dramatically effected by the
position of installation. Please install carefully.
The vanishing point of the road is
in the button of the image.
The camera is tilted
The engine cover occupy too much
area in the image

6
4. Attach the Dash Cam
Remove the protective sticker on the Dash Cam bracket and
attach the Dash Cam to the center of the electrostatic sticker
(the sweet spot in step 3), as shown in the figure below. Press
the bracket mount by hand to ensure that the heat resistant
adhesive is in close contact with the electrostatic sticker. Lock
the bracket to the Dash Cam. You will hear a snap when it is in
place.
5. Check and adjust the dash cam angle
Ensure your dash cam is installed as the right angle in step
3. You may adjust the camera angle up or down against the
preview screen to ensure that the camera is facing correctly.

7
Miofive Dash Cam App Download
Please scan the QR code below or search ‘Miofive’ in App Store
or Google Play to download the App.
Systems Supported:
Android 5.0 and above / iOS 10.0 and above.
Note: In order to connect to Dash Cam Wi-Fi, please list
the APP in your trust application list and make sure the Dash
Cam Wi-Fi is on.

8
Using Your Miofive APP
Connect to the Dash Cam
1. Check the indicator status on
the dash cam, make sure the
power indicator slowly blinks
green.
2. Make sure your phone and
dash cam are in close range
(within 2 meters).
3. Go to Phone Wi-Fi Setting
and turn Wi-Fi on.
4. Launch the Miofive APP.
(Recommend register account
to unlock advanced features).
5. Press “Devices”, and press”
Connect to the Dash Cam Wi-Fi”.
6. Choose your Miofive network
name (SSID) from the Wi-Fi
network list (ex. “Miofive_xxxx”,
default password: 1234567890).
Input the password to connect.
7. Return to Miofive app once
the connection is complete.

9
Using Your Miofive Dash Cam
LED Indicator Information
LED Indicator Dash Cam Status
Green LED light blinks
(1 sec)
Working, loop recording
Green LED light blinks
(250 ms)
Emergency recording
Green LED light solid on Stop recording, user operating
Red LED light blinks Firmware updating
Red LED light blinks fast
(0.5 sec) for 3 times
Low battery
Red LED light solid on eMMC abnormal
Control Menu
By pressing the button on the right side of the LCD panel, you
could enter the control menu.
By pressing this button, the current video clip will be locked
and stored in EMER Video.
Album
Settings
EMER Video

10
Features
Parking Mode
When your car is not running, i.e. the engine is turned off,
the Dash Cam will automatically power off in 10 seconds and
enter Parking Mode. When a shock or crash is detected, the
G-Sensor will activate the Dash Cam and start recording a
16-second and a 60-second video. The Dash Cam will then re-
enter the Parking Mode.
Time Lapse
Time Lapse recording is a technique whereby the frequency at
which file frames are captured (frame rate) is lower than that
used when playing back the recording. Time Lapse recording
can be considered the opposite of slow motion, as when the
recording is played back time appears to be moving faster.
This feature operates for up to 24 hours after the ignition is
turn off.
Emergency Recordings
A 16-second video and a 60-second video will be captured
when the G-Sensor is activated in case of sharp turns or a
sudden stop. When the capacity of these videos reaches 30%
of the eMMC space, the oldest ones will be overwritten by the
new ones.
Travel Log
Travel Log Record the driving path of your journey. Your
video and photo will store the GPS information and shows the
geographic in your album. Your journey could be store in your
personal account in the cloud.
Note: Not all features are listed in this manual.
Note: Use of this function requires a hardwire kit (NOT
included) to provide a constant power supply.
Note: No personal data is collected. All GPS log data is
stored anonymously in US Amazon Web Service.

11
Firmware/APP Update
APP Update
Once there is a new App version released, your mobile system
and the App will send an update notification. Follow the
prompts to update it.
Firmware Update
Firmware update can be achieved through OTA (Over The Air)
Open APP – connect to dash cam – Enter Settings - Firmware
Update,
Then follow the prompt to upgrade.
Troubleshooting
Scenario Malfunction
symptom
Root cause/Solution
Installation Image blur 1. Make sure the lens
protector is removed
2. The windshield might
reflects, slightly adjust the
camera angle to avoid
reflection
Day and night
image quality
differs a lot
Normally the window
film’s transparency rate is
between 68%~80%, it will
effect the recording result
Power disconnect
frequently
Due to different car
models, please adjust the
car charger angle to avoid
loosing position
Note: DO NOT power off the Dash Cam during the update.
The Dash Cam will restart automatically after the firmware is
successfully updated. Please contact us immediately if the
update fails.

12
Start up Unable to start 1. Make sure the car
charger indicator light is on,
if not please reinstall the
car charger
2. The built-in battery
might be low, please
connect the USB cable to a
power source
3. Press the power button
for 4 secs to shut down.
After shut down, press the
power button to reboot
Welcome screen
stops, screen
black out, button
does not work
Press the power button for
4 secs to shut down. After
shut down, press the power
button to reboot
Recording Did not start
recording
automatically
after start up
1. Reboot the dash cam
2. Format built-in eMMC
storage
Stops recording
abnormally
Format built-in eMMC
storage
LCD screen black
out
If “LCD Auto-Off” is on, the
camera will enter power
saving mode if no operation
been performed for 30 or
60 secs (default). The LCD
screen will turn on again
after pressing any button.

13
No sound is
recorded in the
video
1. Check if the
“Microphone” is Off in the
Recording settings (The
icon on the right upper LCD
screen shows mute)
2. Turn the “Microphone”
On in the “Recording
settings”
Video recorded
is blur
1. Make sure the lens
protector is removed
2. Make sure the
windshield or camera lens
is clean
Video time stamp
incorrect
1. Use the APP to connect
the dash cam, the dash
cam will perform auto time
calibration once connected
to the APP
2. Manually set the “Date
and Time” under “System
Settings”
Connecting
to PC
Cannot find
external storage
Please use an USB
cable that support data
transmission (The charging
cable in the box does NOT
supports data transmission)

14
APP
connects via
Wi-Fi
Cannot connect
to dash cam
1. Make sure your phone
Wi-Fi is turn on (For iOS
user, select Miofive’s Wi-Fi
SSID under Wi-Fi settings)
2. Force close and restart
the APP
3. Turn OFF the Mobile
data. When your
smartphone connects to
your dash cam, it creates a
new Wi-Fi network. In some
iOS or Android versions,
your camera may stop
using that network if it
doesn’t detect internet —
which your dash cam will
not provide. Shutting down
data or in some cases,
turning on airplane mode
and then turning on Wi-Fi
will fix the issue of your
camera not connecting to
your dash cam.
Cannot playback
the recorded
video on the
mobile phone
Might be related to player
or mobile phone’s system,
please try to playback on
your PC
Takes too long to
connects
1. If there are too much
Wi-Fi SSID nearby, the
connection might failed due
to signal interfered. Please
use the dash cam in a less
interfered environment
2. Mobile phone system
might be overloaded, close
the other APPs or reboot
the phone

15
Forget APP
connection
password
1. Default password is
“1234567890”
2. Find your password
under “Connect via Wi-Fi”
3. Restore to defaults
under “System Settings”
Customer Service
18-month Limited Warranty
Life-time Support
E-mail: [email protected]om
Specifications
CPU: Novatek processor
Wi-Fi: Wi-Fi 2.4/5GHz
G-Sensor: Built-in 3 axis accelerometer, motion locking,
adjustable sensitivity
Storage: Built-in 64G eMMC high speed flash, loop recording
GPS: Built-in GPS
Camera: FOV 140˚, F1.8
Image Sensor: Sony IMX415
Image Resolution: 3840 x 2160
Screen: 2.2-inch IPS Display
Power Input: 5V / 2.4A
Built-in Battery Capacity: 500mAh
Operating Temperature: -10˚C~45˚C / 14˚F~113˚F
Weight: ~145g
Dimension: 116x60x55mm
Important Notices
Please read all precautions, cautions and instructions carefully
before using this product to ensure proper and safe usage.

16
Precautions
CAUTION:
To reduce the risk of electric shock, do not perform any
servicing other than that contained in the instruction manual
unless you are qualified to do so. Have the unit serviced by a
qualified service technician if;
The unit has been exposed to rain or water.
The unit does not seem to operate normally.
The unit exhibits a marked change in performance.
LCD:
A Liquid Crystal Display (LCD) screen is a multilayer complex
component, containing 384,000 pixels. Pixels can however fail
during normal product life. 1 pixel = 0.000026% failure rate,
and one pixel failure per year of operation is considered normal
and not a cause for concern.
Battery:
»Do not immerse or expose the Dash Cam or batteries to
rain, water or other liquids.
»Do not leave the device exposed to a heat source or in
a high-temperature location, such as in the sun or in an
unattended vehicle. To prevent the possibility of damage,
remove the Dash Cam from the vehicle or store it out of direct
sunlight, such as in the glove box.
»Do not operate the Dash Cam outside of the following
temperature range:
from -10˚ to 45˚C (from 14˚ to 113˚F).
»When storing the Dash Cam for an extended time period,
Warning:Warning: Do not expose this product to rain, moisture orDo not expose this product to rain, moisture or
water under any circumstances, doing so may result in thewater under any circumstances, doing so may result in the
risk of electric shock or fire.risk of electric shock or fire.

17
store within the following temperature range: from 0˚ to 25˚C
(from 32˚ to 77˚F).
»Do not use a power and/or data cable that is not approved
or supplied by Miofive.
»Contact your local waste disposal department to dispose
of the Dash Cam/batteries in accordance with applicable local
laws and regulations.
G Sensor:
The G Sensor within the Dash Cam measures forces exerted
upon it, with reference to one g which is the nominal force
exerted upon us when stationary on the earth’s surface. The
G Sensor will also trigger to protect any recording currently in
progress, if a pre-determined threshold of force is exceeded.
The G Sensor protection will be adversely affected if the
Dash Cam is NOT mounted in the vertical direction i.e. with
the lens pointing to or from the direction of travel. G Force
information derived from a G Sensor is not warranted to be
totally accurate at all times, as it is derived from the G Sensor
through a sampling method over time. The precision of the G
Sensor value recorded depends upon when the acceleration
took place at the instance of the sample taken. The thresholds
to trigger the video protection rely upon a trigger value being
exceeded between two successive samples, in any one of the
three G Sensor axis. If the Automatic G Sensor protection does
NOT trigger during an event, then the EMER Video button
should be pressed, in order to protect the file. Protecting
the file can also be performed through the Miofive App for
applicable Wi-Fi models.
GPS:
The lines Dataset/s have been simplified in order to reduce the
number of track points required for detailed lines. Although
every effort has been made to ensure the correctness and
accuracy of the Dataset (Speed, Altitude, location etc), Miofive
makes no representations, either express or implied, as to
the accuracy, currency, completeness or suitability for any
particular purpose of the information and accepts no liability
for any use of the Dataset or any responsibility for any reliance

18
placed on that information. The user acknowledges that the
Dataset cannot be guaranteed error free and that use of the
Dataset is at the user’s sole risk and that the information
contained in the Dataset may be subject to change without
notice.
Magnet Warnings:
The Dash Cam contains magnets. Under certain circumstances,
magnets may cause interference with some internal medical
devices, including pacemakers and insulin pumps. Devices
that contain magnets should be kept away from such medical
devices. Magnets may cause damage to some electronic
devices, including hard drives in laptop computers and bank
/ credit or membership cards. Use caution when devices and
mounts that contain magnets are near electronic devices or
bank / credit or membership cards.
Windshield Mounting Legal Restriction:
Before using the Dash Cam on your windshield, check the state
and local laws and ordinances where you drive. Some laws
prohibit or restrict the placement of objects on the windshield
of a motor vehicle. IT IS THE USER’S RESPONSIBILITY TO
MOUNT THE DEVICE IN COMPLIANCE WITH ALL APPLICABLE
LAWS AND ORDINANCES. Always mount your Miofive Dash
Cam in a location that does not obstruct the driver’s view of
the road. Miofive does not assume any responsibility for any
fines, penalties, or damages that may be incurred as a result of
any state or local law or ordinance relating to the use of your
Miofive Dash Cam.
Camera Legal Requirements:
In some jurisdictions it could be considered an invasion of
privacy rights to take or publicly display photographs or
videos of people or their vehicles using this product. It is your
responsibility to know and comply with applicable laws and
rights to privacy in your jurisdiction and in any jurisdiction in
which you may use this device. Video recordings made by
this Dash Cam should be for personal use only. Publication of
the recordings on YouTube, the internet or other methods is
subject to the data protection legislation and the requirements
Table of contents