ProofCam PC 105 User manual
Fo V
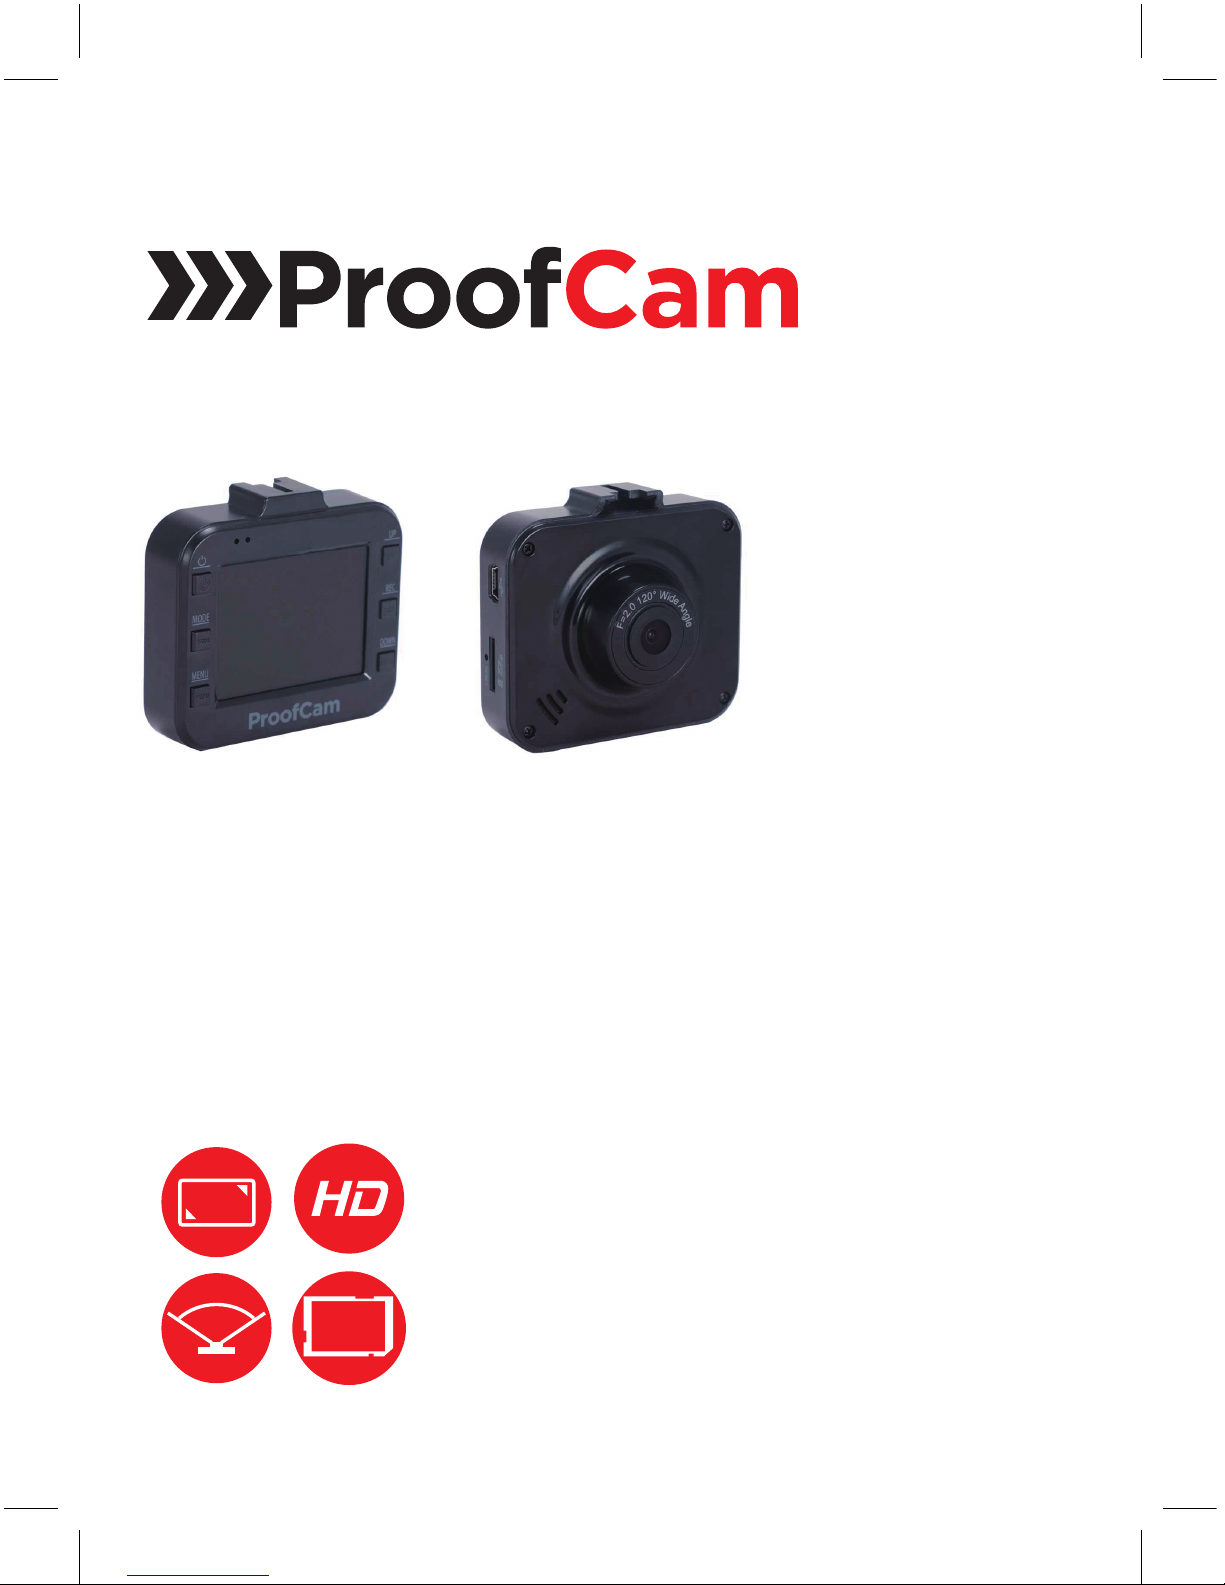
PC 105 HD Dash Cam
Designed and tested by experts
INSTRUCTION MANUAL
2.0’’
32GB
support
120°

Congratulations on
choosing the PC 105
Forward Facing HD
Dash Cam.
Please read these
instructions carefully
before use.

Contents
Product Features P01
Unpacking P01
Identification of Controls P02
Preparing for Use P03
Installing the Dash Cam P04
Connecting to Power P04
Powering the Dash Cam On / Off P05
Set the Date / Time P06
Mode Selection P06
Using the Dash Cam P06
Recording Screen P07
Emergency File Protection P07
Motion Detection P09
G-sensor Collision
Recording Protection P09
Video Menu Options
P10
Video Mode
P10
Setup Menu Options
P11
Setup Mode
P12
Taking Picture
P14
Still Capture Menu Options
P14
Still Capture Settings
P15
Playing Back Videos and Photos
P16
Play Video and Photo Screen
P16
Playback Menu Options
P17
P18
Battery Warning and
Installation Notes
P19Caution
P19Warranty
P20Specification
Audio On / Off P09

Product Features
›HD 720p Dash Cam
›1.3 Megapixel CMOS Sensor
›2.0” TFT Display
›120˚ Wide Angle Lens
›Support up to 32GB Class10 Micro SD Memory Card
›G-sensor Collision Recording Protection
›Motion Detection
›Seamless Loop Recording
Unpacking
Unpack the contents of the box and ensure the following components
are present.
›PC 105 Dash Cam
›Micro SD Card
›In Car Charger
›Suction Pad
›Sync Cable
›Quick Start Guide
›Windows Sticker
›Advertising Card
01
PC 105 HD Dash Cam
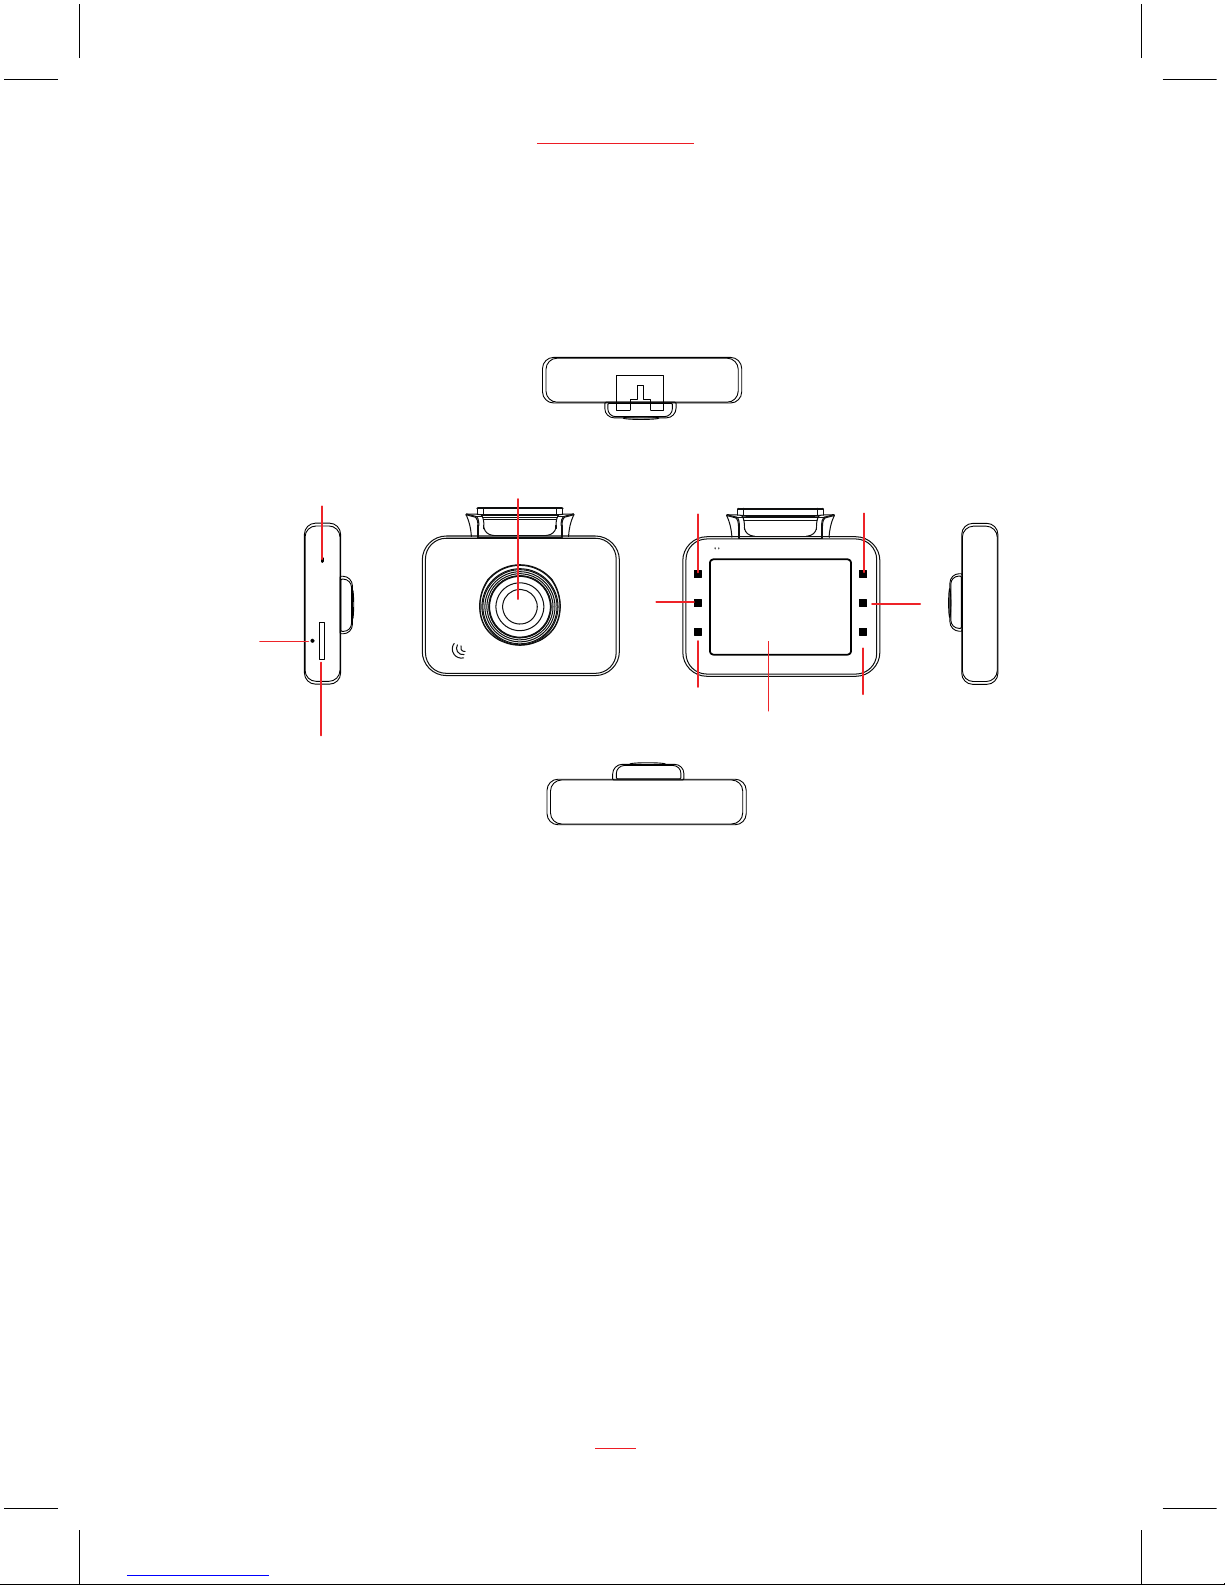
Identification of Controls
Controls:
1. Lens
2. Power button
3. Mode button
4. Menu button
5. LCD
6. Down / Motion Detection button
7. REC/OK button
8. Up button
9. Micro SD Card slot
10. USB Port for power adaptor
11. Reset button
www.proofcam.com
02
F
=
2
.
0
1
2
0
°
W
i
d
e
A
n
g
l
e
1
2
3
10
11
9
8
6
5
4
7
Preparing for Use
Battery Indicator and Charging
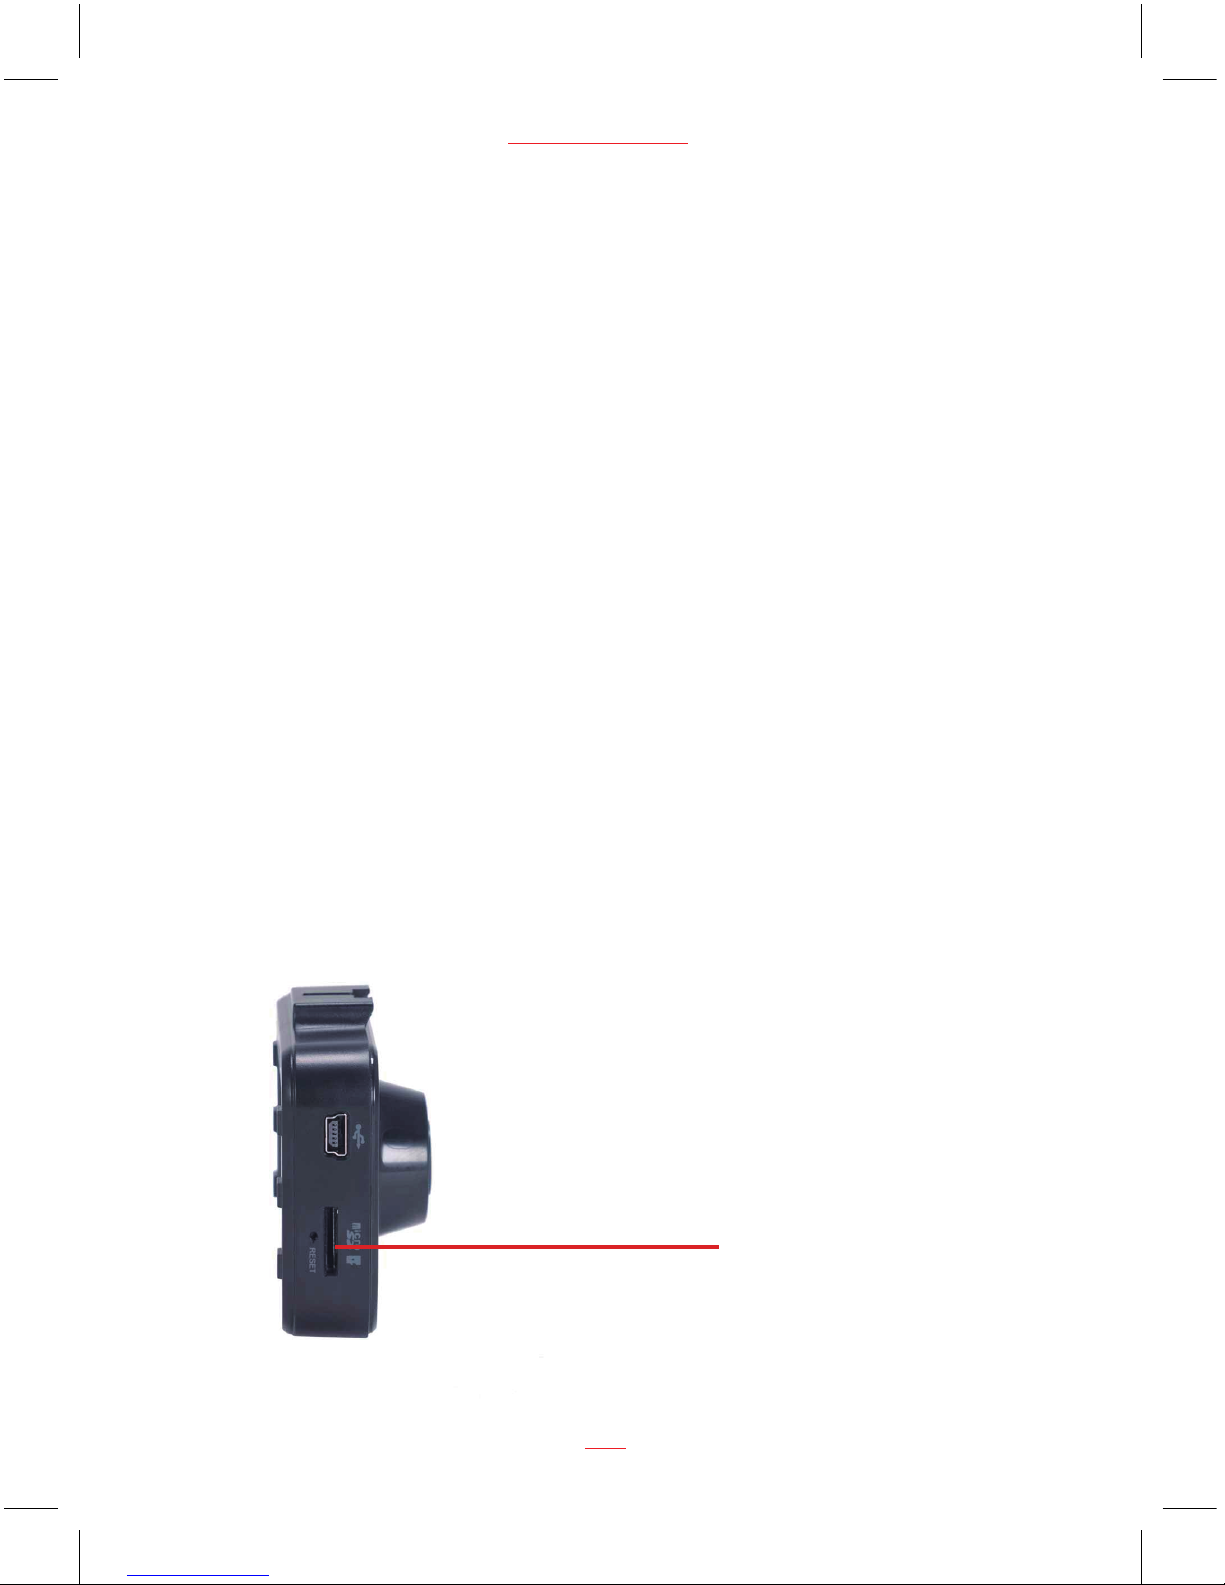
Inserting the Micro SD Card (included)
Follow the direction indicated on the dash cam to insert the Micro SD card,
a click sound is heard indicating the Micro SD card is in position.
To remove the Micro SD card, push to eject the Micro SD card out of the slot.
NOTE:
1. Do not remove or insert the Micro SD card when the dash cam is turned on.
This may damage the Micro SD card.
2. Please use a minimum Class 10 or higher rating Micro SD card, maximum
up to 32GB.
3. Please format the Micro SD card before the initial use.
4. When removing the Micro SD card, be careful that the card may spring out
and get lost. The Micro SD card slot has this spring-out feature for easy removal
of the card.
Micro SD Card slot
03
PC 105 HD Dash Cam
5. Dash Cam pre-installed a 4GB Class 10 Micro SD card, which has two months
warranty. The warranty date is deemed to be from the date you received your
Dash Cam.

Installing the Dash Cam
1. Push the suction pad into the slot on the top of the dash cam, make sure the
suction pad is securely locked in place.
2. Remove the protective film from the suction cup, with the suction-cup laying
flat, position the suction-cap on the windshield, and then press down the
clamp to suction pad the holder to the windshield. Make sure the base is securely
locked in place.
3. Loosen the knob to swivel the dash cam vertically. Lock the knob, to confirm that
the dash cam is securely locked in place.
4. Rotate the dash cam 360° to have proper view if required.
Connecting to Power
Use only the supplied in car charger for activating the dash cam and charging the
built-in battery.
1. Connect one end of car charger to USB port on the dash cam.
2. Plug the other end of the car charger to the in car power socket of your
vehicle. Once the vehicle engine is started, the device automatically turns on.
It will also turn off when the engine is turned off.
www.proofcam.com
04
Note:
Some vehicles have an in car power supply that remains on, even if the engine
is turned off. If this is the case, you will need to manually turn the dash cam on
and off, using the power button, when you enter and leave the vehicle.
1.
2. Any excess cable can normally be tucked into the ceiling of the vehicle. We have
a video to advise on how best to fit the PC 105 which is available at
www.proofcam.com and visit “ Dash Cam Resources”. You can also search
“How to fit an PC 105” on YouTube.

Powering the Dash Cam On / Off
Auto Power On / Off
Once the vehicle engine is started, the dash cam automatically turns on and starts
recording (must have Micro SD Card installed). After the car engine is stopped, the
dash cam will automatically save the last recorded file and shutdown.
Manual Power On / Off and Reset
Manual Power On / Off
Short press the Power button 1 second to power the dash cam on and off.
Reset the Dash Cam
In case the dash cam fails to function normally due to unknown causes, press the
Reset button with sharp pin, wait for 5 seconds and then press the Power button
to restart the dash cam. Sometimes it is also necessary to format the Micro SD Card,
which can be performed from the menu settings.
Power
button
Reset
button
05
PC 105 HD Dash Cam
Note: If your vehicle in car power remains on after the car engine has been turned
off, you may need to remove the car charger, or turn the PC 105 off using the
power button. This is because if the in car power remains on, the PC 105 will
not know that the engine has turned off.

Set the Date / Time
To set the correct date and time, press MENU button to enter the menu setting,
then press MENU button again to change to Setup Settings,
button to select Date/Time setting, press REC/OK button to set it, then press
and buttons to adjust the value, press
setting, after finished all the settings, press
to exit from menu setting. To start recording press once.
Mode Selection
The default settingis Video Mode , press MODE button to switch to
Capture Mode , PlaybackMode.
Using the Dash Cam
Recording Videos
Before starting to record, please ensure that the Micro SD card (included) is
inserted. If you are using the dash cam for the first time, please format the
SD card at first. Please press button to start recording, the video
•
recording icon flashes on the screen. The recorded files are saved to the
SD card. To stop recording, press button again. With the car charger
connected the dash cam will automatically turn on and start recording when
the car engine starts. When the engine stops, the dash cam will automatically
save the last file and turn off.
www.proofcam.com
06
then press Down
REC/OK button to switch to next
MENU button to exit from menu
REC/OK button
Still
then press MODE button to switch to
REC/OK
REC/OK
Note - if your vehicle in car power remains on after the car engine has been
turned off, you may need to remove the power lead, or turn the PC 105
off using the power button. This is because if the in car power remains
on, the PC105 will not know that the engine has been turned off.

Emergency File Protection
Important:
The RAC 107 records in segments onto the Micro SD card. The default segment
duration is 2 minutes, which can be changed from the menu settings. For
example, 1 hour of recording would generate 30 x 2 minute segments.
During recording, press MENU button
to protect current video, the lock icon
appears on the screen, if you press the MENU button during the first 10 seconds
of this video, both the current and the last video segment will be protected; if you
press the MENU button between the first 10 seconds and the last 10 seconds, the
current video will be protected; if you press the MENU button during the last 10
seconds, both current and the next video segment will be protected and cannot be
replaced .
Remove the protection from the video:
Press REC/OK button to stop recording, then press Mode button twice switch to
Playback Mode, choose the protection video and then press Menu button to enter
playback menu, press up and down buttons to enter Protect settings and then
press REC/OK button to enter Protect Sub menu , using UP and DOWN buttons to
select “Unlock Current” or “Unlock All”, press REC/OK button to confirm unlock
current video or all the protected videos, the lock icon will disappear from
the screen, the video will not be protected and can be replaced if the Micro SD card
is full.
Recording Screen
07
PC 105 HD Dash Cam
Note: The protective video can be seen the lock icon in dash cam playback
mode, but it can’t be distinguished in computer.

2. If unlock protection is required for all files, please choose Unlock All.
www.proofcam.com
08
change a Micro SD card or delete the protected files manually.
full if the Micro SD card is full of protected files. To continue recording, please
1. The recording will stop automatically and the screen will show Micro SD card is
NOTE:
3. Follow similar steps to protect videos, pictures.

Motion Detection
First, press REC/OK button to stop recording; Second, short press Down button
to activate the Motion Detection function(the default setting is Off), the motion
detection icon appears on the third icon positon on the left side of the
screen, then standby for detection, it will recording automatically once the dash
cam detects any motion in front of the lens, 5 second is a segment.
The dash cam will start next 5 second recordingif any motion is detected, keep not to
detect any motion and light before lens, then press down button can exit from the
motion detection mode and the icon will disappear from the screen.
NOTES:
1. When the battery is fully charged and is in good condition, the dash cam can
record continuously for about 50 minutes.
2. As the dash cam is used, the battery storage capacity will decrease gradually.
G-sensor Collision Recording Protection
(Protect Level)
When a collision is detected while recording, the lock icon will appear on
the upper side of the screen and the current video segment will be protected
automatically and cannot be replaced.
Audio On / Off
During recording, press power button to turn the microphone on and off.
09
PC 105 HD Dash Cam
NOTES: 1. The default setting is Low.
2. If the collision happened and you wish to protect the following videos,
you can also press menu button to acctivate the SOS function during
recording.

Video Menu Options
www.proofcam.com
10
Video Mode
Function List Description Available Option
Resolution
Setting for video resolution.
720P 1280 x 720 is the default
settings.
1080FHD 1920 x 1080
1080P 1440 x 1080
720P 1280 x 720
WVGA 848 x 480
VGA 640 x 480
Loop recording
Setting for enabling automatic
loop record and the video clip time.
Off - The recording will stop when
the SD card is full.
30 seconds /1 minute /2 minutes -
Select segment recording time.
For example, the recording time is
2 mintues. If 20 minutes of video
is recorded, then 10 segments each
of 2 minutes in length will be created.
Off / 30 Seconds / 1 Minutes
/ 2Minutes
Exposure
Manual compensation for low or
bright light levels. The more
negative “-” in scale, the darker
the recorded video appears. The
more appears “+” in scale, the
brighter the recorded video
appears. 0 is the neutral setting
for this option and is the default
value.
-2.0 / -5/3 / -4/3 / -1.0 / -2/3
/ -1/3 / +0.0 / +1/3 / +2/3 /
+1.0 / +4/3 / + 5/3 / +2.0
Function List Description Available Option
Setting to enable / disable the recording
video voice.
Off - Disables to record video without voice.
On - Enables to record video with voice.
This is the default one.
Off / On
Setting to stamp the date on the video.
Off - No date shows on the screen.
On - Date shows on the screen and
this is the default value.
Setting for the sensitivity to detect
collision to protect the recording
video.
Off - Disable the G-sensor function.
High - The collision will be detected
at the easiest.
Medium - The collision will be detected
easier.
Low - The collision will normally be
detected. This is the default setting.
Off / High / Medium
/ Low
11
PC 105 HD Dash Cam
Record Audio
Date Stamp Off / On
G - Sensor
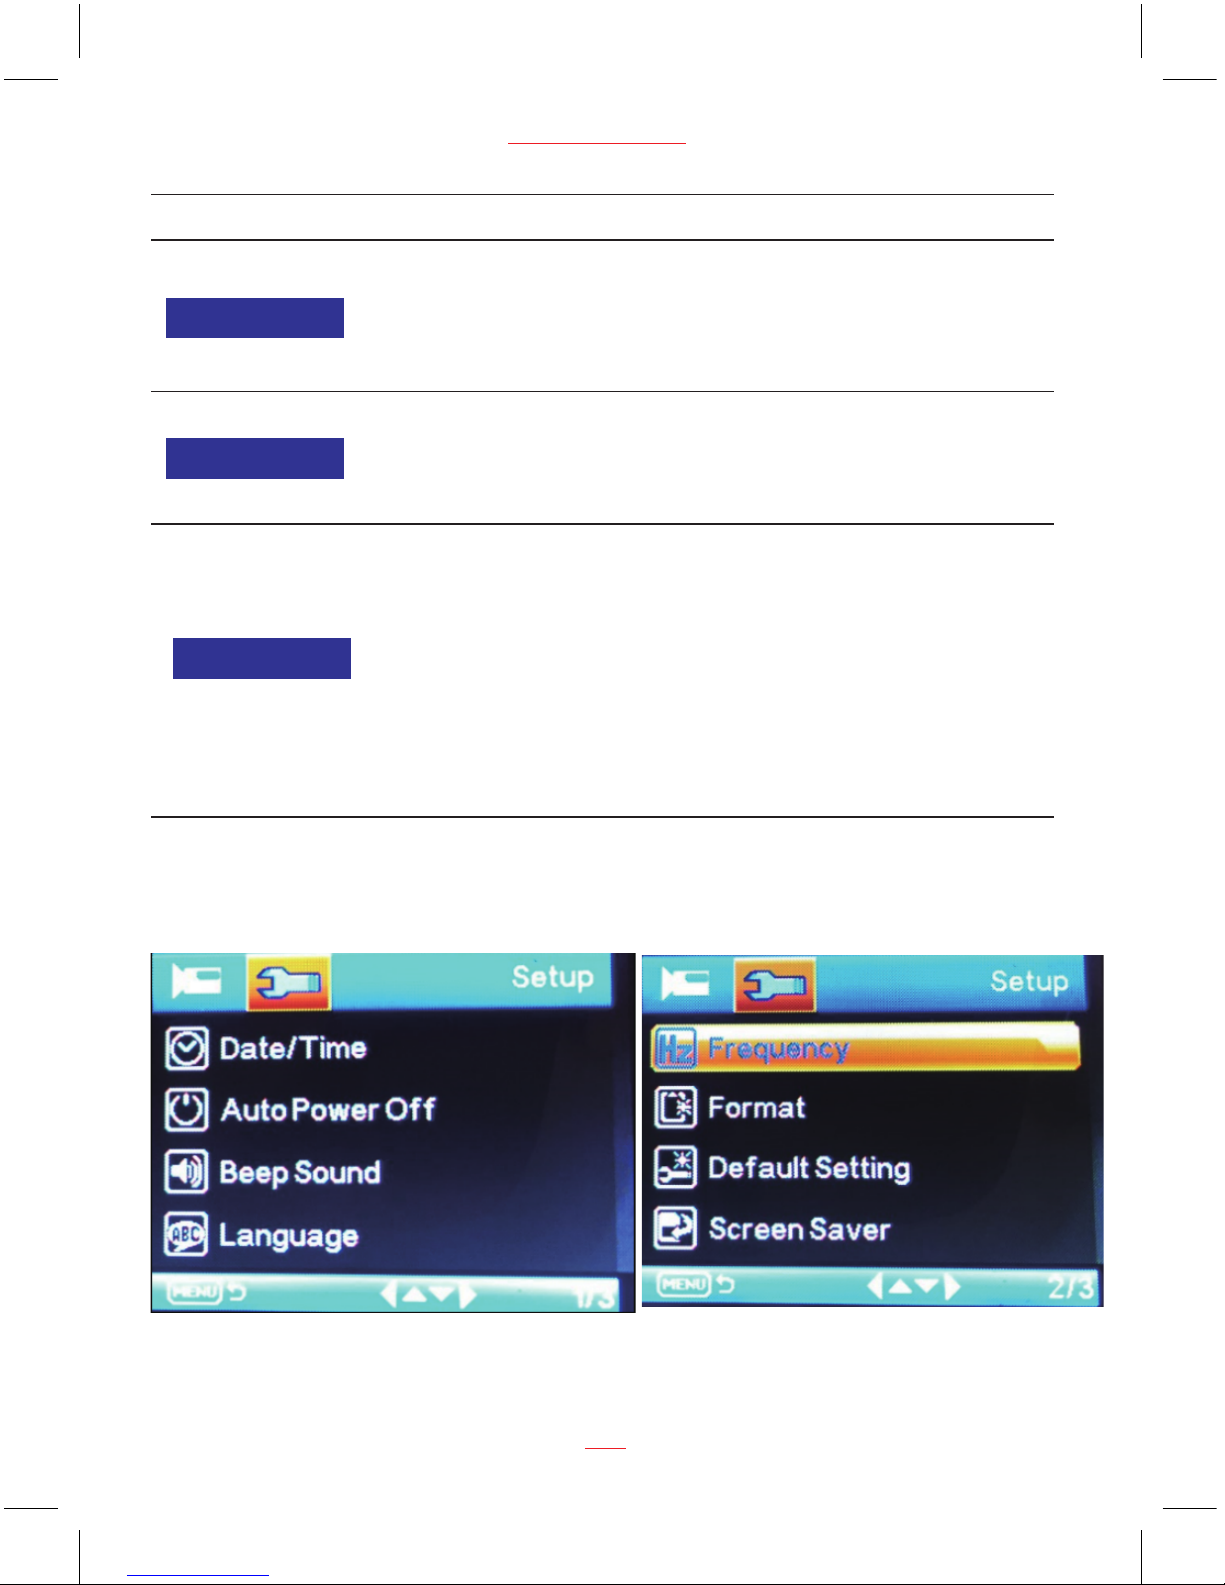
Setup Menu Options

www.proofcam.com
12
Setup Mode
Function List Description Available Option
Set the system date & time. DD / MM / YY
HH : MM : SS
Date / Time
Off / 1 Minute / 3 Minutes
Set the automatic power off time when
the dash cam is not recording or
operating.
Off - The dash cam will not automatically
power off. This is the default setting.
1 Mintues - The dash cam will
automatically turn off after the dash cam
is not recorded or operated 1 minutes.
3 Minutes - The dash cam will
automatically turn off after the dash cam
is not recorded or operated 3 minutes.
Auto Power Off
Off / On
Setting to enable / disable the press
button beep sound.
Off - No beeps sound when you press
button.
On - Select this to enable audible
system beeps when seeting the menu
options. This is the default setting.
Beep Sound

Function List Description Available Option
Select the desired OSD language.
English
13
PC 105 HD Dash Cam
Language
Set the suitable frequency. 50 Hz / 60 HzFrequency
Format the inserted Micro SD card
videos and pictures.
OK - Select this option completes the
format process. All the videos and
pictures will be deleted.
Cancel - Select this to end the format
and return to the previous menu.
Warning: All videos and photos are
permanently deleted and CANNOT
be recovered once the SD card is
formatted.
Cancel / OK
Format
Set the dash cam to the original
factory default settings.
Default Setting Cancel / OK
Manage the backlight of the screen.
It is advisable to enable this feature to
preserve the battery power.
Off - Select to disable power saving
for the screen. Screen will keep on
all the time.
1 minute / 2 minutes / 5 minutes -
The dash cam will automatically shut
down the screen after 1 minute / 2
minutes / 5 minutes if no operation.
2 minutes is the default setting.
Note: If enabled, the dash cam continues
to record video even when the screen is
shut off.
Press any button to turn on the screen.
Off / 1 Minute /
2 Minutes /
5 Minutes
Screen Saver
This option displays the current firmware
version of the dash cam.
This information may be important for
service and support communications.
Version 20170514V01

Taking Picture
To take a picture make sure the Still Capture Mode is selected. Press the
REC/OK button to take a photo. Photos are saved on the SD Card.
Still Capture Screen
Still
Capture
Mode
SD Card
Status
Battery
Status
Remaining
Numbers to
Take Photo
Exposure ISO
Still Capture Menu Options
14
www.proofcam.com
01521
White
Balance
1.3M
Image
Resolution

PC 105 HD Dash Cam
15
Still Capture settings
Function List Description Available Option
Capture Mode Set the photo zoom. Single / 2S Timer /
5S Timer / 10S Timer
Set the photo resolution.
1.3M is the default value
12M 4032 x 3024
10M 3648 x 2736
8M 3264 x 2448
5M 2592 x 1944
3M 2048 x 1536
2MHD 1920 x 1080
VGA 640 x 480
1.3M 1280 x 960
Resolution
On / Off
Set the photo sequence.
Sequence
Fine / Normal / EconomySet the photo quality.
Quality
Strong / Normal / SoftSet the photo effect.
Sharpness
Auto / Daylight / Cloudy /
Fluorescent
Set the photo effect.
White Balance
Normal / Black & White /
Sepia
Set the photo color.
Color

www.proofcam.com
16
Function List Description Available Option
ISO Set the photo effect. Auto / 100 / 200 / 400
-2.0 / -5/3 / -4/3 / -1.0 /
-2/3 / -1/3 / +0.0 / +1/3 /
+2/3 / +1.0 / + 4/3 / +5/3
/ +2.0
Manual set the photo’s compensation
for low or bright light levels.
Exposure
On / Off
Reduce or don’t affect the photo shaking
level.
Anti Shaking
Off/2Seconds/5SecondsSet the photo review speed.
Quick Review
Off / Date / Date/TimeSet the stamp format on the photo.
Date Stamp
Playing Back Videos and Photos
Play Video and Photo Screen
Note:
The first file in playback is the last operating video / photo before entering playback mode. The
following files will be the ruled in turn according to operate time.
Press MODE button switch to playback mode, press UP and DOWN buttons to select the videos
and photos, then press REC/OK button to view video and photo.

Playback Menu Options
Function List Description Available Option
This option allows for the deletion of
one or more videos /photos from the
memory card.
Delete Current - This option allows a
single video or photo to be deleted from
the inserted memory card per action.
Delete All - This option allows all videos
or all photos to be deleted from the
inserted memory card per action.
Warning: Videos and photos CANNOT be
recovered once they are deleted.
Delete Current /
Delete All
Protect one or all videos /photos from
being replaced when the memory card
is full.
Lock Current - This option allows a single
video or photo to be protected.
Unlock Current - This option allows a
single video or photo to be unprotected.
Lock All - This option allows all video or
photos to be protected.
Unlock All - This option allows all video
or photos to be unprotected.
Lock Current
Unlock Current
Lock All
Unlock All
Playback
17
PC 105 HD Dash Cam
Delete
Protect
Set the playing speed. 2 Seconds / 5 Seconds
/ 8 Seconds
Slide Show
Other manuals for PC 105
1
Table of contents
Other ProofCam Dashcam manuals


