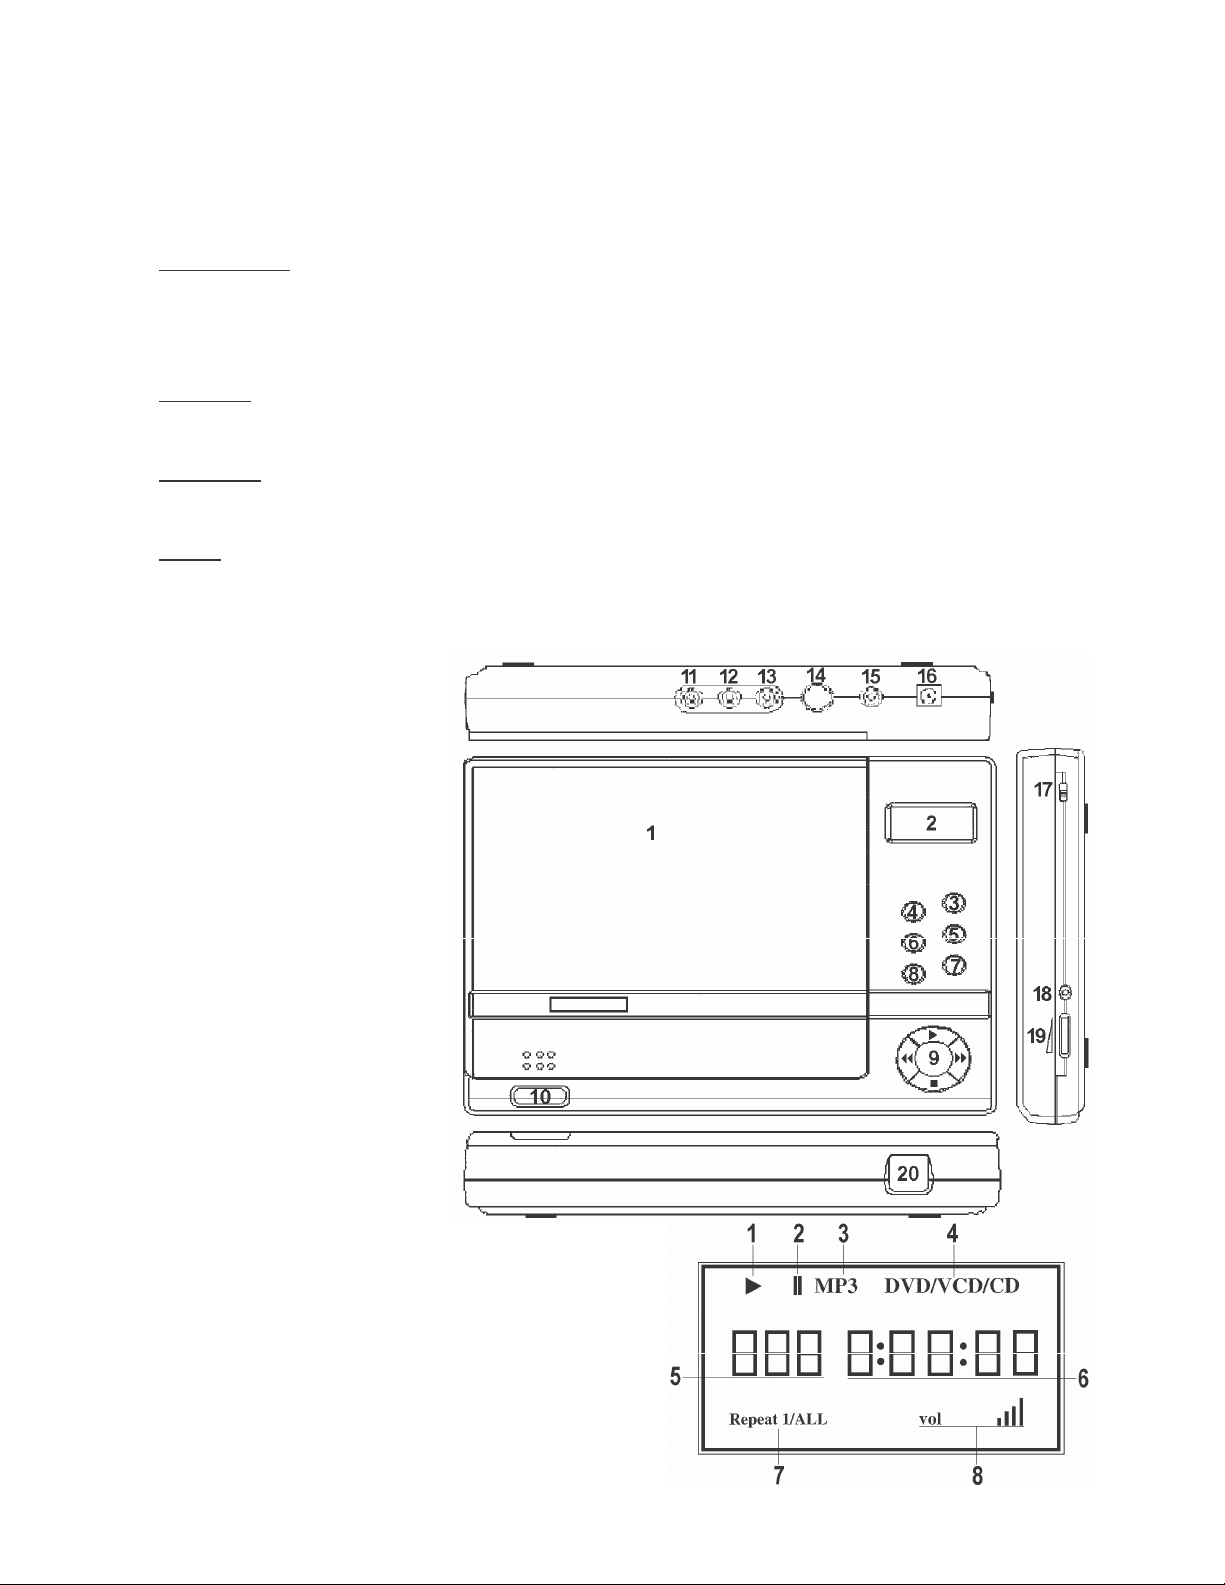
Velleman CARDVD3 User manual

CARDVD3 1 VELLEMAN
CARDVD3 – PORTABLE CAR DVD PLAYER
1. Introduction
Thank you for buying the CARDVD3! Please read the manual thoroughly before bringing this device into service.
If the device was damaged in transit, do not use it and contact your dealer.
The warranty automatically becomes void if the user personally tries to repair or modify the device. The warranty also
becomes void in case of damage caused by inappropriate use or the disregard of standard safety prescriptions in
general and those in this manual in particular. Velleman Inc. does not accept responsibility for personal injury caused
by the disregard of the safety instructions in this manual. This also goes for all types of consequential loss.
The CARDVD3 comes with this manual, a remote control (with a 3V lithium battery), an audio/video cable, an AC/DC
power adapter and a 12V car plug. This DVD player plays these media types:
DVD (8 or 12cm) Audio cd (8 or 12cm)
mp3 cd (8cm) Video cd (8 or 12cm)
2. Safety Instructions
Do not open the housing! There are un-insulated high tensions inside.
Protect this device against rain and humidity.
Invisible laser beam when the device is open and the automatic beam interruption is not functioning.
•LASER
This DVD (Digital Versatile Disc) player contains a laser system. Read this manual carefully to ensure proper
use of the device and retain this manual for future reference.
Should the device require maintenance, have it performed by a qualified technician.
Other adjustments or procedures than specified in this manual may result in hazardous radiation exposure.
Never look directly into the laser beam.
Laser type: semiconductor laser GaAIAs
Wave length: 650nm / 780nm
Output power: 5mW
Beam divergence: 60°
•Keep this device away from rain and moisture. Should it get wet, turn it off immediately and wipe it with a soft, dry cloth.
•Make sure that the available voltage does not exceed the voltage stated in the specifications of this manual.
•Install the device is away from electromagnetic wave sources and where it is protected against heat and dust.
•Do not use the CARDVD3 when electrostatic discharge may occur (thunder and lightning).
•When the device has been exposed to a change in temperature, condensation may occur. Leave the device
switched off until is has acclimatized (may take 1-2 hours). A disc may also condense: when it has been exposed
to a sudden change in temperature, wipe it with a soft and dry cloth before inserting it into the device.
•Familiarise yourself with the functions of the device before actually using it. Do not allow operation by unqualified
people. Any damage that may occur will most probably be due to unprofessional use of the device.
•Do not open the housing or try to repair the device yourself to avoid the risk of electric shock (dangerous voltages
inside) and to avoid exposure to the laser source, which can cause radioactive damage inside the human body.
Furthermore, this will void the warranty. Any servicing or repair has to be executed by a qualified technician.
•Do not insert anything into the device other than appropriate discs in good condition. Do not insert bent or broken
discs. If you hear a strange noise or scratching sounds while the disc is playing, stop it immediately.

CARDVD3 2 VELLEMAN
•Keep all wiring away from heat sources.
•Hold the plug when plugging in or pulling out the AC or car adapter ; do not pull the power cord.
•If an adapter or power cord is damaged, take it to your dealer and do not try to repair it yourself.
3. General
•MACROVISION: this product incorporates copyright protection technology that is protected by method claims of
certain US patents and other intellectual property rights owned by Macrovision Corporation and other rights
owners. Use of this copyright technology must be authorized by Macrovision Corporation and is intended for
home and other limited viewing uses only unless otherwise authorized by Macrovision Corporation. Reverse
engineering or disassembly is prohibited.
•FCC notice: This equipment has been tested and found to comply with the limits for a Class B digital device.,
pursuant with the FCC Rules, Part 15. These limits are designed to provide reasonable protection against harmful
interference in a residential installation.
•FCC caution: To assure continued compliance, (example: use only shielded interface cables when connecting to
computer or peripheral devices), any changes or modifications not expressly approved by the party responsible
for compliance could void the user's authority to operate this equipment.
•DOLBY: *manufactured under license from Dolby Laboratories. "Dolby" and the double-D symbol are trademarks
of Dolby Laboratories. Confidential unpublished Works. 1992-1997 Dolby Laboratories, Inc. All rights reserved.
4. Controls and Connections
1. Disc compartment cover
2. LCD display
3. PBC (playback control)
4. Repeat
5. Pause
6. A-B
7. Next
8. Prev(ious)
9. Back / play / forward / stop
10. Open
11. Audio L output
12. Audio R output
13. Video output
14. S-Video output
15. Optical digital output
16. 12Vdc input
17. on/off button
18. Earphone socket
19. Volume control
20. Sensor remote control
5. LCD display
1. disc is playing
2. playback is paused
3. mp3 disc indicator
4. DVD, VCD or regular disc indicator
5. track or title number
6. track / disc playing time
Fig. 1
Fig. 2

CARDVD3 3 VELLEMAN
7. repeat 1: current track is playing repeatedly
repeat all: whole disc is playing repeatedly
8. volume setting
6. Remote Control
1. MENU: return to main menu (DVD)
2. PBC: playback control for VCD 2.0 format
3. DISPLAY: call on-screen display menu
4. POWER: switch the device on/off
5. Numeric keys: 1-9 + 0 + "10+"
6. PROGRAM: program the track playing order
7. SEARCH: jump to a particular chapter / point in time
8. TITLE: search for a particular title
9. VOCAL: select audio track on VCD
10. PLAY / Enter
11. SETUP: system set-up
12. : stop playback
13. : pause playback
14. /: previous / next track
15. RESUME: return to the previous screen
16. /: fast rewind / forward (VCD: 2x/4x ; DVD: 2x, 4x, 8x)
17. EJECT: no function
18. VOL +/-: adjust volume setting
19. MUTE: switch off all audio output
20. SUBTITLE: select or switch off subtitles
21. ANGLE: select camera angle
22. LANGUAGE: select a language (DVD)
23. Selection buttons (,, ,)
24. ZOOM: enlarge the picture on the screen
25. 1-ALL: replay 1 track or all tracks
26. A-B: select point A and B & replay the part between them
27. SLOW: slow down playback (1/2 speed - 1/4 - 1/8 - full speed)
The CARDVD3 can receive the remote control signal if it's within an angle of 30° above, below, to the left or the right
of the point straight ahead of the sensor. The maximum distance is approximately 5 metres.
7. Connections
1. to the mains: connect the AC/DC adapter to the DC input (fig. 1 # 16) and insert it in the power outlet.
2. in the car: connect the adapter to the DC input (fig. 1 # 16) and insert the plug in the cigarette lighter.
3. to a TV set: power off both devices, connect the audio/video connections of the CARDVD3 (fig. 1 #11, 12 & 13) to
those of the TV set by means of the enclosed cable. Connect an S-Video cable if possible (fig. 1 # 14).
4. to an audio amplifier: power off both devices and connect the audio outputs of the CARDVD3 (fig. 1 #11 & 12) with
those of the amplifier. Make sure the colours match.
5. headphones: set the volume level of the CARDVD3 to a low level by means of the volume control (fig. 1 #19) and
connect the headphones to the connection (fig. 1 #18). Set the volume (fig. 1 #19) to your liking.
8. Operation
1. Make the appropriate connection before switching on the device.
2. Open the disc compartment by pressing the OPEN button (fig. 1 #10), insert a disc and press it down on the axis.
3. Close the disc compartment by closing the lid (fig. 1 #1).
Fig. 3

CARDVD3 4 VELLEMAN
4. Switch all devices on (fig. 1 #17 for the CARDVD3) and select the appropriate video source on the TV set or
screen, or the appropriate audio channel on the amplifier.
5. Normally the CARDVD3 will play the disc automatically. If not, press PLAY (fig. 1 #9 ►or fig. 2 #10).
6. During playback:
- press STOP or to stop playback.
- press PAUSE or to pause playback (then press PLAY or ►again to continue playback).
- press NEXT (fig. 1 #7) or on the remote control to jump to the next track.
- press PREV (fig. 1 #8) or on the remote control to jump to the previous track.
- press to play the disc in fast forward mode. Press PLAY or ►to cancel fast playback.
- press to play the disc in fast backward mode. Press PLAY or ►to cancel fast playback.
7. During stop:
- press PLAY or ►to start playback.
- press NEXT (fig. 1 #7) or on the remote control to select the next track.
- press PREV (fig. 1 #8) or on the remote control to select the previous track.
8. To retrieve the disc, press STOP or , switch the device off and press OPEN (fig. 1 #10) to open the disc
compartment. Carefully remove the disc from the axis.
9. Special Buttons and Functions
a. PBC
When PBC is on, the REPEAT and SEARCH functions will not work, but the other functions will work normally.
When PBC is off, the RETURN button will not work, but the other functions will work normally.
The moment PBC is switched off, the player will restart playback at the beginning of the disc.
b. A-B Playback
1. Press the A-B button (fig. 1 #6 or fig. 3 #26) a first time during playback to determine point A.
2. Press the A-B button a second time to determine point B ; the part between A and B will be continuously repeated.
3. Press the A-B button a third time to cancel the A-B mode.
c. Repeat Play
The repeat function only works when PBC mode is turned off.
1. To repeat one track: select the desired track and press REPEAT (fig. 1 #4) or 1-ALL (fig. 3 #25) once.
2. To repeat the whole disc, press REPEAT (fig. 1 #4) or 1-ALL (fig. 3 #25) twice.
3. To cancel the repeat function, press REPEAT (fig. 1 #4) or 1-ALL (fig. 3 #25) a third time.
d. Slow Motion Play
During playback, press SLOW (fig. 3 #27) to slow down playback.
By pressing the button several times, you can slow down the speed to 1/2, 1/4 or 1/8.
During slow motion playback, the sound is muted.
e. On Screen Display (OSD)
Press the DISPLAY button (fig. 3 #3) to call the OSD menu.
Press the DISPLAY button again to switch off the OSD function.
f. Numeric Keypad
Press any one digit number key to select the chapter or track with that number.
To select a chapter or track from 10 to 19, press "+10" once, followed by the second digit.

CARDVD3 5 VELLEMAN
To select a chapter or track from 20 to 29, press "+10" twice, followed by the second digit etc.
To select track 106 (for example ; this is possible on an mp3 disc), press "+10" ten times, then press "6".
g. ZOOM Function
Press ZOOM to enlarge the image from the centre. Press ZOOM again to return to the original image size.
To move the zoomed area around, use the selection buttons on the remote control (fig. 3 #23).
h. Programmed playback
1. Stop playback and press PROGRAM (fig. 3 #6)."P xx:xx" will appear on the screen. The first xx represents the
program number ; the second xx is for the track number.
2. Enter the number of the first track to be programmed by means of the numeric keypad on the remote control.
3. Do the same for the 2
nd
, 3
rd
etc. tracks.
4. When all desired tracks have been entered, press PLAY to make the CARDVD3 play the programmed sequence.
10. Troubleshooting
If the CARDVD3 does not seem to be working properly, first check the table below:
Problem Suggestion
Check if the on/off button on the right side is set to ON.
Check if power plug is properly connected.
No power
Check if there is power at the AC outlet by connecting another device.
Check if the TV set is switched on.
Select the correct AV input on the TV set.
No picture
Check the connection of the video cable.
Check the disc for dirt or fingerprints ; wipe it clean with a dry, soft cloth, wiping
from the centre to the edge.
Distorted picture
Sometimes a small amount of picture distortion may appear. This is not a
malfunction.
Disc and TV set are not set to the same format (PAL/NTSC)Image distorted completely / no colour
Ensure the DVD player is not connected through a VCR.
Ensure the label side of the disc faces up.
Wipe the disc clean.
Check if the disc is defective by trying another disc.
Disc cannot be played
It is possible that the CARDVD3 cannot read certain mp3 discs.
Check if the amplifier is defective by selecting another sound source.
Verify if DTS is selected in the Audio menu if a DTS disc is being played.
No sound
Ensure a DTS decoder is connected when selecting DTS.
Check if the program requires another disc to be loaded.No return to start-up screen upon disc
removal Reset by unplugging and reconnecting the power line.
Aim the remote control directly towards the remote control sensor.
Remove all obstacles in the signal path.
CARDVD3 does not respond to remote
control
Check the battery in the remote control.
Check the digital connections.
Check the digital out menu to make sure the digital output is set correctly.
No audio at digital output
Verify if the audio format of the selected language matches your amplifier.
Have your CARDVD3 checked or repaired by a qualified technician when:
- the device has been exposed to rain or water
- the device does not appear to function normally.
- the hints above provide no solution
! Do not try to repair the device yourself !

CARDVD3 6 VELLEMAN
11. Technical Specifications
Dimensions (W x D x H) 210 x 160 x 35mm
Weight 0.55kg
Physical disc format 8cm / 12cm DVD, VCD, CD
Video system NTSC / PAL
Video decompression MPEG-2 (ISO / IEC-13818), MPEG-1, JPEG
Video output composite
Audio output 2-channel stereo analogue audio out
Power consumption <18W
Working temperature 5-35°C
Remote control range max. 5m
Remote control keys 42
Remote control battery 1 x 3.0V Lithium battery
The information in this manual is subject to change without prior notice.
CARDVD3 – DRAAGBARE DVD-SPELER VOOR IN DE WAGEN
1. Inleiding
Dank u voor uw aankoop! Lees deze handleiding grondig voor u het toestel in gebruik neemt.
Als het toestel werd beschadigd tijdens het transport, gebruik het dan niet en raadpleeg uw verdeler.
De garantie vervalt automatisch indien de gebruiker het toestel zelf probeert te herstellen of modificeren. De garantie
vervalt ook bij kwetsuren die worden veroorzaakt door ongeoorloofd gebruik of door het niet naleven van de
gangbare veiligheidsvoorschriften in het algemeen en de voorschriften in deze handleiding in het bijzonder. Velleman
kan niet aansprakelijk worden gesteld voor kwetsuren veroorzaakt door het niet naleven van de
veiligheidsvoorschriften in deze handleiding. Dit geldt ook voor alle vormen van gevolgschade.
De CARDVD3 wordt geleverd met deze handleiding, een afstandsbediening (met 3V lithiumbatterij), een audio/
videokabel, een netadapter en een 12V adapter voor in de wagen.
Deze DVD-speler is geschikt voor de volgende mediatypes:
DVD (8 of 12cm) Audio cd (8 of 12cm)
mp3 cd (8cm) Video cd (8 of 12cm)
2. Veiligheidsinstructies
Open de behuizing niet! Binnenin zijn niet-geïsoleerde hoge spanningen aanwezig.
Bescherm dit toestel tegen regen en vochtigheid.
Onzichtbare laserstraal wanneer het toestel open is en het automatische onderbrekingssysteem niet werkt.
•LASER
Deze DVD (Digital Versatile Disc)-speler werkt met een lasersysteem. Lees deze handleiding zorgvuldig om
zeker te zijn dat u het product goed gebruikt, en hou deze handleiding bij om later eventueel te consulteren.
Laat dit toestel onderhouden en herstellen door een geschoolde technicus.
Andere bedieningen, regelingen en procedures dan omschreven in deze handleiding kunnen leiden tot
blootstelling aan gevaarlijke straling.
Kijk nooit in de laserstraat.

CARDVD3 7 VELLEMAN
Type laser: halfgeleider laser GaAIAs
Golflengte: 650nm / 780nm
Uitgangsvermogen: 5mW
Straaldivergentie: 60°
•De beschikbare spanning mag niet hoger zijn dan de spanning in de specificaties achteraan de handleiding.
•Plaats het toestel uit de buurt van toestellen die elektromagnetische golven ontwikkelen en bescherm het tegen
hitte en stof.
•Gebruik de CARDVD3 niet wanneer elektrostatische ontladingen kunnen voorkomen (donder en bliksem)
•Wanneer het toestel werd blootgesteld aan temperatuurschommelingen kan er condensatie optreden. Laat het
toestel dan uit staan en op kamertemperatuur komen (kan 1 tot 2 uur duren). Een disc kan ook condenseren. Is
dit het geval, veeg ze dan af met een zachte droge doek voor ze in het toestel te steken.
•Leer eerst de functies van het toestel kennen voor u het gaat gebruiken. Ongeschoolde personen mogen dit
toestel niet gebruiken. Meestal is beschadiging het gevolg van onprofessioneel gebruik.
•Open de behuizing niet en probeer het toestel niet zelf te herstellen. U loopt het risico op elektrische schokken
(gevaarlijke spanningen binnenin) of blootgesteld te worden aan de laserbron, die radioactieve schade aan uw
lichaam kan toebrengen. Laat dit toestel onderhouden en herstellen door een geschoolde technicus.
•Steek niets anders dan DVD's, cd's of vcd's in het toestel. Steek er geen kapotte of geplooide discs in. Als u een
vreemd geluid hoort terwijl de disc afgespeeld wordt, stop dan de weergave.
•Hou alle bedrading uit de buurt van warmtebronnen.
•Neem steeds de stekker vast als u de auto- of AC-adapter aansluit of loskoppelt. Trek nooit aan de stroomkabel.
•Is een adapter of stroomkabel beschadigd, breng hem naar uw verdeler en probeer niet hem zelf te herstellen.
3. Algemeen
•MACROVISION: dit product bevat technologie voor bescherming van de auteursrechten. De intellectuele
eigendom en patenten voor de VS zijn in handen van Macrovision Corporation en andere eigenaars van rechten.
Het gebruik van deze technologie moet zijn toegelaten door Macrovision Corporation, en is bedoeld voor gebruik
in huiselijke sfeer en een beperkt aantal andere toepassingen, tenzij Macrovision Corporation uitdrukkelijk andere
toepassingen toegelaten heeft. Het is verboden deze technologie te ontleden of tegen te werken.
•FCC mededeling: Dit toestel is getest en conform bevonden met de limieten voor een digitaal toestel van klasse B
volgens de FCC regels, deel 15. Deze limieten zijn gesteld om een redelijke bescherming te bieden tegen
schadelijke storing in een huiselijke omgeving.
•FCC waarschuwing: Zorg ervoor dat de conformiteit gerespecteerd wordt (bijvoorbeeld: gebruik enkel
afgeschermde kabels als u het toestel verbindt met een computer of een ander randapparaat). De gebruiker kan
zijn rechten om dit apparaat te gebruiken, ontzegd worden bij iedere wijziging of aanpassing die niet uitdrukkelijk
is goedgekeurd door de partij die instaat voor de conformiteit.
•DOLBY: Dit toestel is vervaardigd onder licentie van de Dolby Laboratories. "Dolby" en het dubbel-D symbool zijn
handelsmerken van Dolby Laboratories. Vertrouwelijke onuitgegeven werken. 1992-1997 Dolby Laboratories, Inc.
Alle rechten zijn voorbehouden.
4. Bedieningsorganen (zie figuur 1 op blz. 2)
1. Klep disccompartiment
2. LCD-scherm
3. PBC (playback control = weergavecontrole)
4. Repeat (herhalen)
5. PAUSE knop
6. A-B
7. NEXT knop (volgende)
8. PREVIOUS knop (vorige)
9. terug / afspelen / vooruit / stop knoppen
10. Knop voor ontgrendeling klep
11. Audio L uitgang
12. Audio R uitgang
13. Video uitgang
14. S-Video uitgang
15. Optische digitale uitgang
16. 12Vdc in aansluiting
17. Aan/uit-schakelaar (op de zijkant)
18. Hoofdtelefoonaansluiting
19. Volumeregeling hoofdtelefoon
20. Sensor afstandsbediening

CARDVD3 8 VELLEMAN
5. LCD display
1. disc wordt afgespeeld
2. weergave wordt gepauzeerd
3. er zit een mp3-CD in de lezer
4. er zit een DVD, VCD of gewone CD in de lezer
5. het nummer dat wordt afgespeeld
6. de tijdsweergave van het fragment dat wordt afgespeeld
7. repeat 1: huidig nummer wordt herhaaldelijk afgespeeld
repeat all: de hele disc wordt herhaaldelijk afgespeeld
8. volume-instelling
6. Afstandsbediening (zie figuur 3 op blz. 3)
1. MENU: terugkeren naar menu (DVD)
2. PBC: weergavecontrole (enkel VCD 2.0)
3. DISPLAY: menu op het scherm laten verschijnen
4. POWER: om het toestel aan of uit te zetten.
5. Numeriek toetsenbord 1-9 + 0 + "10+"
6. PROGRAM: de speelvolgorde bepalen
7. SEARCH: een specifiek nummer / tijdstip zoeken
8. TITLE: een specifieke titel zoeken
9. VOCAL: audiospoor selecteren op VCD
10. PLAY / ENTER: disc afspelen / bevestigen
11. SETUP: systeem set-up
12. : weergave stoppen
13. : weergave pauzeren
14. /: naar het vorige / volgende nummer gaan
15. RESUME: terug naar het vorige scherm
16. /: snel terugkeren / doorspoelen
17. EJECT: (geen functie)
18. VOL +/-: geluidssterkte hoger / lager zetten
19. MUTE: alle audio-uitgangen afzetten
20. SUBTITLE: ondertitels selecteren / afzetten
21. ANGLE: invalshoek camera selecteren
22. LANGUAGE: taal selecteren (DVD)
23. Selectieknoppen (,,,)
24. ZOOM: inzoomen op het beeld op het scherm
25. 1-ALL: om 1 of alle nummers te herhalen
26. A-B: om het stuk tussen punt A en punt B te herhalen
27. SLOW: weergave vertragen (1/2 - 1/4 - 1/8 snelheid)
De CARDVD3 kan het signaal van de afstandsbediening ontvangen als deze zich binnen een hoek van 30° boven,
onder, links of rechts van het punt recht voor de sensor bevindt. De maximum afstand voor ontvangst is 5 meter.
7. Aansluitingen
1. op het lichtnet: sluit de stroomadapter aan op de DC-ingang (fig. 1 # 16) en steek hem in het stopcontact.
2. in de auto: sluit de adapter aan op de DC-ingang (fig. 1 # 16) en stop het andere eind in de sigarenaansteker.
3. op een Tv-toestel: zet beide toestellen uit, verbind de audio/videokanalen van de CARDVD3 (fig. 1 #11, 12 & 13)
met die van het Tv-toestel via de meegeleverde kabel. Sluit zo mogelijk ook een SVideokabel aan (fig. 1 # 14).
4. op een audioversterker: zet beide toestellen uit en verbind de audioaansluitingen van de CARDVD3 (fig. 1 #11 &
12) met die van de versterker. Zorg ervoor dat de kleuren overeenkomen.
5. een hoofdtelefoon: zet de volumeregeling (fig. 1 #19) van de CARDVD3 laag en sluit de hoofdtelefoon aan op de
aansluiting (fig. 1 #18). Regel het volume (fig. 1 #19) naar uw believen.
8. Bediening
1. Maak de vereiste aansluitingen voor u de toestellen aanschakelt.
2. Open het disccompartiment met de OPEN-knop (fig. 1 #10), plaats een disc en klik deze vast op de as.
3. Sluit het disccompartiment door de klep (fig. 1 #1) dicht te drukken.
4. Schakel de toestellen aan (schakelaar fig. 1 #17 voor de CARDVD3) en selecteer indien nodig de correcte
videobron op het scherm / Tv-toestel en desgevallend de correcte audiobron op de audioversterker.
5. Normaal zal uw CARDVD3 de disc automatisch beginnen afspelen. Is dit niet het geval, druk dan op de
weergaveknop (fig. 1 #9 ►of fig. 2 #10).
Fig. 2

CARDVD3 9 VELLEMAN
6. Tijdens de weergave:
- druk op STOP of om de weergave te stoppen.
- druk op PAUSE of om de weergave te pauzeren (druk daarna op PLAY of ►om de weergave te hervatten).
- druk op NEXT (fig. 1 #7) of op de afstandsbediening om naar het volgende nummer te gaan.
- druk op PREV (fig. 1 #8) of op de afstandsbediening om naar het vorige nummer te gaan.
- druk op om de disc versneld af te spelen. Druk op PLAY of ►voor normale weergave.
- druk op om de disc versneld achterwaarts af te spelen. Druk op PLAY of ►voor normale weergave.
7. In STOP mode:
- druk op PLAY of ►om de weergave te starten.
- druk op NEXT (fig. 1 #7) of op de afstandsbediening om het volgende nummer te selecteren.
- druk op PREV (fig. 1 #8) of op de afstandsbediening om het vorige nummer te selecteren.
8. Om de disc te verwijderen: druk op STOP of , schakel het toestel uit en druk op OPEN (fig. 1 #10) om het
disccompartiment te openen. Haal voorzichtig de disc van de as.
9. Speciale knoppen en functies
a. PBC
Wanneer PBC aan ligt, zullen de REPEAT en SEARCH functies niet werken ; alle andere functies wel.
Wanneer PBC uit staat, zal de RETURN knop niet werken ; alle andere functies wel.
Wanneer PBC uitgezet wordt, zal de speler de weergave herbeginnen van het begin van de disc.
b. A-B Weergave
1. Druk een eerste keer op de A-B knop (fig. 1 #6 of fig. 3 #26) om punt A in te stellen.
2. Druk een tweede keer op A-B om punt B in te stellen; het stuk tussen A en B zal continu herhaald worden.
3. Druk een derde keer op A-B om de A-B mode uit te schakelen.
c. Herhaalfunctie (Repeat)
De herhaalfunctie werkt alleen wanneer de PBC mode uit staat.
1. Om 1 nummer continu af te spelen: selecteer dat nummer en druk op REPEAT (fig. 1 #4) of 1-ALL (fig. 3 #25).
2. Om de hele disc continu af te spelen: druk twee maal op REPEAT (fig. 1 #4) of 1-ALL (fig. 3 #25).
3. Om de herhaalfunctie uit te schakelen, drukt u een derde keer op REPEAT (fig. 1 #4) of 1-ALL (fig. 3 #25).
d. Vertraagde weergave (Slow motion)
Druk tijdens de weergave opSLOW (fig. 3 #27) om de weergave te vertragen.
Door meerdere keren op de knop te drukken vertraagt u de snelheid tot 1/2, 1/4, of 1/8.
Tijdens de vertraagde weergave wordt het geluid uitgeschakeld.
e. On Screen Display (OSD)
Druk op de DISPLAY knop (fig. 3 #3) om het OSD menu op te roepen.
Druk nogmaals op de DISPLAY knop om de OSD functie uit te schakelen.
f. Numeriek toetsenbord
Druk op een nummertoets om het hoofdstuk of nummer met dat nummer te selecteren.
Om een hoofdstuk of nummer van 10 tot 19 te selecteren, drukt u één keer op "10+", gevolgd door het tweede cijfer.
Om een hoofdstuk of nummer van 20 tot 29 te selecteren, drukt u twee keer op "10+", gevolgd door het tweede cijfer.
Om nummer 106 te selecteren (bijvoorbeeld op een mp3-disc), drukt u 10 keer op "10+" en dan op 6.

CARDVD3 10 VELLEMAN
g. ZOOMfunctie
Druk op ZOOM om het beeld van in het midden te vergroten. Druk nogmaals op ZOOM om terug te keren naar het
oorspronkelijke beeldformaat. Om de zoompositie te veranderen gebruikt u de selectieknoppen (fig. 3 #23).
h. Geprogrammeerde weergave
1. Stop de weergave en druk op PROGRAM (fig. 3 #6). Op het scherm zal "P xx:xx" verschijnen. De eerste xx staat
voor het programmeernummer ; de tweede xx is het oorspronkelijke nummer van de disc (verder "track").
2. Geef de track in die eerst moet worden afgespeeld (krijgt automatisch programmeernummer 01).
3. Geef daarna de tracks in die op de 2
de
, 3
de
etc. plaats moeten komen.
4. Wanneer u alle tracks in volgorde ingegeven hebt, drukt u op PLAY om de tracks in die volgorde af te spelen.
10. Troubleshooting
Als uw DVD niet schijnt te werken, overloop dan eerst even de tabel hieronder:
Probleem Suggestie
Ga na of de on/off knop aan de rechterkant op ON staat.
Ga na of de stekker correct verbonden is.
Geen voeding
Ga na of er stroom op het stopcontact zit: sluit een ander toestel aan.
Ga na of het tv-toestel aanstaat.
Selecteer de juiste AV-ingang op uw tv-toestel
Geen beeld
Controleer de aansluitingen van de videokabel.
Controleer de disc op vuil of vingerafdrukken ; veeg ze schoon met een droge, zachte
doek van het midden naar de rand.
Vervormd beeld
Soms kan een lichte vervorming optreden ; dit is geen defect.
Disc en tv staan niet op hetzelfde formaat afgesteld (PAL / NTSC).Volledig vervormd beeld / geen kleur
Ga na of de DVD-speler niet via een videorecorder aangesloten is.
Ga na of de disc met de labelzijde naar boven zit.
Veeg de disc schoon.
Ga na of de disc stuk is: probeer het met een andere disc.
Disc kan niet worden gelezen
Het is mogelijk dat de CARDVD3 bepaade mp3-discs niet kan lezen.
Ga na of de versterker defect is door een andere geluidsbron te proberen.
Ga na of DTS geselecteerd is in het audiomenu wanneer u een DTS-disc wil afspelen.
Geen geluid
Verzeker u ervan dat een DTS decoder aangesloten is als u DTS selecteert.
Ga na of er geen andere disc moet worden geladen.Startscherm verschijnt niet nadat disc
verwijderd is Herinitialiseer het toestel door het de voeding los te koppelen en weer aan te sluiten.
Richt de afstandsbediening rechtstreeks naar de sensor vooraan het toestel.
Verwijder alle voorwerpen uit de signaallijn.
CARDVD3 reageert niet op de
afstandsbediening
Controleer de batterij in de afstandsbediening.
Controleer de digitale aansluitingen.
Ga na of de digitale uitgang correct is ingesteld in het digitale uitgang-menu.
Geen audio op digitale uitgang
Ga na of het audioformaat van de geselecteerde taal overeenkomt met dat van uw
versterker.
Laat uw CARDVD3 nakijken of herstellen door een geschoold technicus wanneer:
- het toestel blootgesteld is aan regen of water
- het toestel niet normaal lijkt te werken
- bovenstaande tips niet helpen
! Probeer het toestel niet zelf te herstellen !

CARDVD3 11 VELLEMAN
11. Technische specificaties
Afmetingen (B x D x H) 210 x 160 x 35mm
Gewicht 0.55kg
Formaat discs 8cm / 12cm DVD, VCD, CD
Videosysteem NTSC / PAL
Videodecompressie MPEG-2 (ISO / IEC-13818), MPEG-1, JPEG
Videouitgang composiet
Audiouitgang 2-kanaals stereo analoge audiouitgang
Verbruik <18W
Werktemperatuur 5-35°C
Bereik afstandsbediening max. 5m
Aantal knoppen afstandsbediening 42
Batterij afstandsbediening 1 x 3.0V Lithiumbatterij
De informatie in deze handleiding kan te allen tijde worden gewijzigd zonder voorafgaande kennisgeving.
CARDVD3 – LECTEUR DVD PORTABLE POUR VOITURE
1. Introduction et caractéristiques
Nous vous remercions de votre achat ! Lisez le présent manuel attentivement avant la mise en service de l'appareil.
Si l’appareil a été endommagé pendant le transport, ne l'utilisez pas et consultez votre revendeur.
La garantie est annulée automatiquement si l'utilisateur essaie de réparer ou modifier l'appareil lui-même. La
garantie sera également annulée en cas de dommages causés par une utilisation inappropriée ou par le non respect
des prescriptions de sécurité standard en général et les prescriptions de sécurité de la présente notice en particulier.
Velleman n'est responsable ni des blessures causées par le non respect des prescriptions de sécurité de la présente
notice, ni des pertes indirectes de n'importe quel type.
Le CARDVD3 est livré avec ce manuel, une télécommande (avec une pile lithium 3V), un câble audio/vidéo, un
adaptateur CA/CC et une fiche allume-cigare 12V. Ce lecteur DVD lit les médias suivants:
DVD (8 ou 12cm) cd audio (8 ou12cm)
cd mp3 (8cm) cd vidéo (8 ou 12cm)
2. Prescriptions de sécurité
N'ouvrez pas le logement! Il y a de hautes tensions non isolées à l'intérieur.
Protégez l'appareil contre la pluie et l'humidité.
Rayon laser invisible quand l'appareil est ouvert et l'interruption automatique du rayon ne fonctionne pas.
•LASER
Ce lecteur DVD (Digital Versatile Disc) contient un système laser. Lisez le présent manuel attentivement afin
d'utiliser l'appareil convenablement et gardez ce manuel pour référence future.
Tout entretien éventuel doit être exécuté par un technicien qualifié.
D'autres réglages ou procédures que ceux dans ce manuel peuvent mener à l'exposition aux rayons nocifs.
Ne regardez jamais droit dans le rayon laser.

CARDVD3 12 VELLEMAN
Type de laser: semi-conducteur laser GaAIAs
Longueur d'onde: 650nm / 780nm
Puissance de sortie: 5mW
Divergence de rayon: 60°
•Protégez l'appareil contre la pluie et l'humidité. S'il devrait se mouiller, éteignez-le immédiatement et séchez-le
avec un chiffon sec et doux.
•La tension disponible ne peut pas dépasser la tension mentionnée dans les spécifications à la fin de ce manuel.
•Installez l'appareil loin de sources d'ondes électromagnétiques et où il est protégé contre chaleur et poussière.
•N'utilisez pas votre CARDVD3 quand il y a un risque de déchargement électrostatique (tonnerre et éclair).
•Après exposition à des variations de température, il se peut qu'il y ait de la condensation dans l'appareil. Laissez
l'appareil s'acclimater (peut durer 1 à 2 heures). Un disque peut également être condensé. S'il a été exposé à des
variations de température, frottez-le avec un chiffon sec et doux avant de l'insérer dans l'appareil.
•Familiarisez-vous avec le fonctionnement de l'appareil avant de l’utiliser. Ne permettez pas aux personnes non
qualifiées d'opérer cet appareil. La plupart des dégâts sont causés par un usage non professionnel.
•N'ouvrez pas le logement ou n'essayez pas de réparer l'appareil vous-même afin d'éviter le risque de choc
(voltages dangereux à l'intérieur) et pour éviter exposition à la source de laser, ce qui peut causer des dommages
à l'intérieur du corps humain. Tout entretien ou réparation doit être fait par un technicien qualifié.
•N'insérez rien d'autre dans l'appareil que des disques appropriés en bonne condition. N'insérez pas de disques
pliés ou cassés. Si vous entendez un bruit étrange pendant la lecture, arrêtez l'appareil immédiatement.
•Gardez tout câble bien à l'abri de sources de chaleur.
•Manipulez la fiche quand vous branchez ou débranchez un adaptateur ; ne tirez jamais le fil.
•Si un adaptateur ou un fil conducteur est endommagé, portez-le à votre revendeur et n'essayez pas de le réparer
vous-même.
3. Général
•MACROVISION: ce produit contient de la technologie pour la protection de copyright. Les droits intellectuels et
les patents pour les Etats-Unis sont la propriété de Macrovision Corporation et d'autres propriétaires. L'utilisation
de cette technologie doit être autorisée par Macrovision Corporation et vaut uniquement pour des applications
domestiques et d'autres applications de vue limitée, aux exceptions autorisées par Macrovision Corporation. Il est
interdit de disséquer ou contrarier cette technologie.
•Notification FCC: Cet appareil a été testé et considéré compatible avec les limites d'un appareil digital classe B,
conforme aux régulations FCC, partie 15. Ces limites sont conçues pour assurer une protection raisonnable
contre des perturbations nocives dans une installation résidentielle.
•Avertissement FCC: pour assurer la continuité de la conformité (par exemple: utilisez uniquement des câbles
d'interface blindés lors de connexion à un ordinateur ou un appareil périphérique), toute modification pas
explicitement approuvé par la partie responsable pour la conformité peut interdire à l'utilisateur d'utiliser l'appareil.
•DOLBY: *produit sous licence de Dolby Laboratories. "Dolby" et le symbole double D sont des marques déposées
de Dolby Laboratories. Travaux confidentiels non publiés. 1992-1997 Dolby Laboratories, Inc. Tous droits réservés.
4. Réglages et Connexions (voir figure 1 à la page 2)
1. Couvercle compartiment de disque
2. Ecran LCD
3. PBC (playback control = contrôle de lecture)
4. Repeat
5. Pause
6. A-B
7. Next
8. Prev(ious)
9. Back / play / forward / stop
10. Open
11. Sortie audio L
12. Sortie audio R
13. Sortie vidéo
14. Sortie S-Vidéo
15. Sortie digitale optique
16. Entrée 12Vcc
17. Bouton on/off
18. Connecteur casque d'écoute
19. Réglage volume
20. Capteur télécommande

CARDVD3 13 VELLEMAN
5. Ecran LCD
1. lecture disque en cours
2. lecture est pausée
3. indicateur disque mp3
4. indicateur DVD, VCD ou cd régulier
5. numéro du chapitre ou de la plage
6. temps de lecture plage / disque
7. repeat 1: plage actuelle est répétée en continu
repeat all: disque entier est répété en continu
8. réglage volume
6. Télécommande
1. MENU: retourner au menu principal (DVD)
2. PBC: contrôle de lecture pour VCD format 2.0
3. DISPLAY: menu OSD (affichage sur l'écran)
4. POWER: allumer / éteindre l'appareil
5. Clavier numérique: 1-9 + 0 + "10+"
6. PROGRAM: programmer la séquence des plages
7. SEARCH: sauter à un chapitre / moment spécifique
8. TITLE: chercher une plage particulière
9. VOCAL: sélectionner une piste audio sur VCD
10. PLAY / Enter
11. SETUP: menu système
12. : arrêter la lecture
13. : pauser la lecture
14. /: plage précédente / suivante
15. RESUME: retourner à l'écran précédent
16. /: avance / retour rapide (VCD: 2x/4x ; DVD: 2x, 4x, 8x)
17. EJECT: pas de fonction
18. VOL +/-: réglage volume
19. MUTE: éteindre tout sortie audio
20. SUBTITLE: sélectionner ou enlever sous-titres
21. ANGLE: sélectionner l'angle de la caméra
22. LANGUAGE: sélectionner une langue (DVD)
23. Boutons de sélection (,, ,)
24. ZOOM: agrandir l'image sur l'écran
25. 1-ALL: répéter 1 plage ou toutes les plages
26. A-B: sélectionner point A et B et relire la partie entre les 2
27. SLOW: ralentir la lecture (1/2 vitesse - 1/4 - 1/8 - pleine allure)
Le CARDVD3 peut recevoir le signal de la télécommande si elle se
trouve dans un angle 30° au-dessus, en dessous, à gauche ou à droite du point droit devant le capteur. La distance
maximale est 5 mètres.
7. Connexions
1. au réseau électrique: connectez l'adaptateur CA/CC à l'entrée CC (fig. 1 # 16) et branchez-le dans la prise.
2. dans la voiture: connectez l'adaptateur à l'entrée CC (fig. 1 # 16) et insérez la fiche dans l'allume-cigare.
3. à un téléviseur: éteignez les 2 appareils, faites les connexions audio/vidéo du CARDVD3 (fig. 1 #11, 12 & 13) au
téléviseur par moyen du câble inclus. Connectez un câble S-Vidéo si possible (fig. 1 # 14).
4. à un amplificateur audio: éteignez les 2 appareils et connectez les sorites audio du CARDVD3 (fig. 1 #11 & 12)
aux entrées de l'amplificateur. Vérifiez que les couleurs correspondent.
5. casque d'écoute: mettez le volume du CARDVD3 sur un niveau bas par moyen du réglage volume (fig. 1 #19) et
connectez la casque d'écoute à sa connexion (fig. 1 #18). Réglez le volume (fig. 1 #19) selon votre choix.
Fig. 2
Fig. 3

CARDVD3 14 VELLEMAN
8. Opération
1. Etablissez les connexions appropriées avant d'allumer l'appareil.
2. Ouvrez le compartiment de disque en appuyant le bouton OPEN (fig. 1 #10), insérez un disque et serrez-la sur l'axe.
3. Fermez le compartiment du disque en fermant le couvercle (fig. 1 #1).
4. Allumez tous les appareils (fig. 1 #17 pour le CARDVD3) et sélectionnez la source vidéo appropriée sur le
téléviseur ou l'écran, ou le canal audio approprié sur l'amplificateur.
5. Normalement, le CARDVD3 lira le disque automatiquement. Sinon, pressez PLAY (fig. 1 #9 ►ou fig. 2 #10).
6. Pendant la lecture:
- pressez STOP ou pour arrêter la lecture.
- pressez PAUSE ou pour pauser la lecture (puis pressez PLAY ou ►pour continuer la lecture).
- pressez NEXT (fig. 1 #7) ou sur la télécommande pour sauter à la plage suivante.
- pressez PREV (fig. 1 #8) ou sur la télécommande pour sauter à la plage précédente.
- pressez pour lire le disque en mode avance rapide. Pressez PLAY ou ►pour annuler l'avance rapide.
- pressez pour lire le disque en mode retour rapide. Pressez PLAY ou ►pour annuler le retour rapide.
7. Pendant l'arrêt:
- pressez PLAY ou ►pour commencer la lecture.
- pressez NEXT (fig. 1 #7) ou sur la télécommande pour sélectionner la plage suivante.
- pressez PREV (fig. 1 #8) ou sur la télécommande pour sélectionner la plage précédente.
8. Pour enlever le disque, pressez STOP ou , éteignez l'appareil et pressez OPEN (fig. 1 #10) pour ouvrir le
compartiment de disque. Enlevez le disque de l'axe soigneusement.
9. Boutons et fonctions spéciaux
a. PBC
Quand PBC est actif, les fonctions REPEAT et SEARCH ne seront pas disponibles ; le reste marchera normalement.
Quand PBC est éteint, le bouton RETURN ne sera pas disponible ; le reste marchera normalement.
Au moment où PBC est éteint, le lecteur commencera la lecture au début du disque.
b. Lecture A-B
1. Pressez le bouton A-B (fig. 1 #6 ou fig. 3 #26) une première fois pendant la lecture pour indiquer le point A.
2. Pressez le bouton A-B une deuxième fois pour indiquer le point B ; la partie entre A et B sera répété en continu.
3. Pressez le bouton A-B une troisième fois pour annuler la fonction A-B.
c. Lecture répétée
La fonction lecture répétée est uniquement disponible quand le mode PBC est éteint.
1. Pour répéter une plage: sélectionnez la plage désirée et pressez REPEAT (fig. 1 #4) ou 1-ALL (fig. 3 #25) une fois.
2. Pour répéter le disque entier, pressez REPEAT (fig. 1 #4) ou 1-ALL (fig. 3 #25) deux fois.
3. Pour annuler la fonction repeat, pressez REPEAT (fig. 1 #4) ou 1-ALL (fig. 3 #25) une troisième fois.
d. Lecture ralentie
Pendant la lecture, pressez SLOW (fig. 3 #27) pour ralentir la lecture.
En pressant le bouton plusieurs fois, vous pouvez ralentir la vitesse à 1/2, 1/4 ou 1/8.
Pendant la lecture ralentie, le son est coupé.
e. On Screen Display (OSD ; affichage sur l'écran)
Pressez le bouton DISPLAY (fig. 3 #3) pour afficher le menu OSD.
Pressez le bouton DISPLAY encore une fois pour désactiver la fonction OSD.

CARDVD3 15 VELLEMAN
f. Clavier numérique
Pressez un bouton avec 1 chiffre pour sélectionner la plage avec ce numéro.
Pour sélectionner un chapitre ou une plage de 10 à 19, pressez "+10" une fois, suivi par le second digit.
Pour sélectionner un chapitre ou une plage de 20 à 29, pressez "+10" deux fois, suivi par le second digit etc.
Pour sélectionner la plage 106 (par exemple sur un disque mp3), pressez "+10" dix fois, puis pressez "6".
g. Fonction ZOOM
Pressez ZOOM pour agrandir l'image du milieu. Pressez ZOOM encore une fois pour retourner au format originel.
Pour agrandir une autre partie de l'image, utilisez les boutons de sélection sur la télécommande (fig. 3 #23).
h. Lecture programmé
1. Arrêtez la lecture et pressez PROGRAM (fig. 3 #6)."P xx:xx" sera affiché. Le premier xx représente le numéro de
la programmation, le deuxième xx, c'est le numéro de la page.
2. Entrez le numéro de la première plage à être programmé par moyen du clavier numérique sur la télécommande.
3. Répétez l'étape 2 pour les 2ième, 3
ième
... plages.
4. Quand toute plage désirée a été programmée, pressez PLAY pour commencer la lecture des plages programmées.
10. Troubleshooting
Si le CARDVD3 ne fonctionne pas normalement, consultez d'abord le tableau ci-dessous:
Problème Suggestion
Vérifiez si le bouton on/off (fig. 1 #17) est positionné sur ON.
Vérifiez si la prise est branchée convenablement.
Pas de puissance
Vérifiez s'il y a du courant sur la prise électrique.
Vérifiez si le téléviseur est allumé.
Sélectionnez l'entrée AV correcte sur le téléviseur.
Pas d'image
Vérifiez la connexion du câble vidéo.
Vérifiez si le disque n'est pas sale ou marqué de doigts ; nettoyez-le avec un
chiffon sec et doux en frottant du milieu au bord.
Image perturbée
Il se peut qu'un peu de perturbation apparaisse. Ce n'est pas un défaut.
Disque et téléviseur n'ont pas le même format (PAL/NTSC)Image perturbé complètement / pas de
couleurs Vérifiez si le lecteur DVD n'est pas connecté par un magnétoscope.
Vérifiez si le côté label du disque se trouve au dessus.
Nettoyez le disque.
Vérifiez si ce n'est pas le disque qui est défectueux ; essayez un autre disque.
Disque ne peut pas être lu
Il se peut que le CARDVD3 ne puisse pas lire certains disques mp3.
Vérifiez si l'amplificateur n'est pas défectueux ; essayez une autre source de son.
S'il s'agit d'un disque DTS: vérifiez si DTS est sélectionné dans le menu Audio.
Pas de son
Quand vous sélectionnez DTS, assurez-vous qu'un décodeur DTS est connecté.
Vérifiez si le programme ne demande pas qu'un autre disque soit chargé.L'écran de démarrage n'est pas affiché
après enlevage du disque Réinitialisez l'appareil en débranchant et rebranchant le câble d'alimentation.
Dirigez la télécommande directement vers le capteur de télécommande.
Enlevez tout obstacle du chemin du signal.
CARDVD3 ne réagit pas sur
télécommande
Vérifiez la pile dans la télécommande.
Vérifiez les connexions digitales.
Vérifiez le menu digital out pour assurer que la sortie digitale est réglée
correctement.
Pas d'audio à la sortie digitale
Vérifiez si le format audio de la langue sélectionnée est compatible avec votre
amplificateur.

CARDVD3 16 VELLEMAN
Portez votre CARDVD3 à un technicien qualifié quand:
- l'appareil a été exposé à la pluie ou de l'eau
- l'appareil ne fonctionne pas normalement
- les suggestions dans le tableau n'offrent pas de solution
! N'essayez pas de réparer l'appareil vous-même !
11. Spécifications techniques
Dimensions (La x P x H) 210 x 160 x 35mm
Poids 0.55kg
Format de disque 8cm / 12cm DVD, VCD, CD
Système vidéo NTSC / PAL
Décompression vidéo MPEG-2 (ISO / IEC-13818), MPEG-1, JPEG
Sortie vidéo composite
Sortie audio analogue stéréo à 2 canaux
Consommation <18W
Température de travail 5-35°C
Portée télécommande 5m max.
Boutons télécommande 42
Pile télécommande 1 x pile lithium 3.0V
Toutes les informations présentées dans ce manuel peuvent être modifiées sans notification préalable.
CARDVD3 – REPRODUCTOR DVD DE COCHE PORTÁTIL
1. Introducción
¡Gracias por haber comprado el CARDVD3! Lea cuidadosamente las instrucciones del manual antes de usarlo.
Si el aparato ha sufrido algún daño en el transporte no conecte el aparato a la red y póngase en contacto con su
distribuidor.
La garantía se anula automáticamente si el usuario intenta reparar o modificar el aparato él mismo. Lesiones o
daños causados por un uso inapropiado o por descuido de las instrucciones estándar de seguridad y, sobre todo, de
las instrucciones de seguridad de este manual invalidarán también la garantía. Velleman no será responsable de
ningún daño causado por el descuido de las instrucciones de seguridad de este manual ni de cualquier otro
problema resultante.
El CARDVD3 se entrega con este manual del usuario, un mando a distancia (con una pila de litio de 3V), un cable
audio/vídeo, un adaptador CA/CC y un conector mechero de 12V. Este lector DVD es apto para las siguientes
marcas:
DVD (8 ó 12cm) cd audio (8 ó 12cm)
cd mp3 (8cm) cd vídeo (8 ó 12cm)

CARDVD3 17 VELLEMAN
2. Instrucciones de seguridad
¡Nunca abra la caja! Puede sufrir una peligrosa descarga eléctrica al tocar los cables con un voltaje peligroso.
No exponga este equipo a lluvia o humedad.
Rayo láser invisible que se produce al abrir el aparato y cuando el sistema de interrupción automática no
funciona.
•LÁSER
Este lector DVD (Digital Versatile Disc) utiliza un sistema de lectura láser. Para asegurar un uso apropiado,
lea cuidadosamente el manual y guárdelo para futuras referencias.
La instalación y el mantenimiento deben ser realizados por personal especializado.
El uso inadecuado de los controles y ajustes y los procedimientos diferentes a los especificados en este
manual pueden causar la exposición a una peligrosa radiación láser.
Nunca mire directamente al rayo láser.
Tipo láser: láser semiconductor GaAIAs
Longitud de la onda: 650nm / 780nm
Potencia de salida: 5mW
Divergencia del haz: 60°
•No exponga este equipo a lluvia o humedad. Si se llegara a mojar, apáguelo inmediatamente y séquelo con un
paño seco y suave.
•Asegúrese de que la tensión de red no sea mayor que la tensión indicada en las especificaciones al final de este
manual.
•Instale el aparato lejos de fuentes de ondas electromagnéticas y protéjalo del calor y el polvo.
•No use el CARDVD3 si puede producirse una descarga electrostática (trueno y relámpago).
•No conecte el aparato si ha estado expuesto a grandes cambios de temperatura. Espere hasta que el aparato
llegue a la temperatura ambiente. Esto puede durar de 1 a 2 horas.
•Familiarícese con el funcionamiento del aparato. Sólo personas cualificadas pueden manejar este aparato. La
mayoría de los daños son causados por un uso inadecuado.
•No abra la caja y no intente reparar el aparato usted mismo. Evitará así el riesgo de choques (tensiones
peligrosas en el interior) y para evitar la exposición a la fuente de láser, lo que puede causar daños en el interior
del cuerpo humano. La instalación y el mantenimiento deben ser realizados por personal especializado.
•Introduzca sólo discos de 12cm en el aparato. No introduzca discos de 8cm. No introduzca discos deformados o
rotos. Si oye un ruido extraño durante la reproducción, desactive el aparato inmediatamente.
•Mantenga los cables lejos de fuentes de calor.
•Tire siempre del enchufe para desconectar el cable de red, nunca del propio cable.
•Si un adaptador o hilo conductor está dañado, no intente repararlo usted mismo. La reparación debe llevarse a
cabo por personal especializado.
3. General
•MACROVISIÓN: Este producto incorpora la tecnología de protección del copyright protegida por ciertas patentes
norteamericanas y otros derechos de la propiedad intelectual que pertenecen a Macrovision Corporation y otros
propietarios de los derechos. El uso de esta tecnología de protección debe ser autorizado por Macrovision
Corporation, y sólo está destinado para el uso doméstico y otros usos limitados, a menos que Macrovision
Corporation lo autorice explícitamente. Queda prohibido ir contra esta tecnología.
•Noticia FCC : Este aparato ha sido comprobado y cumple con los límites establecidos para dispositivos digitales
de la clase B, según la sección 15 de las normas de la FCC. Estos límites están diseñados para ofrecer una
protección razonable contra interferencias perjudiciales cuando el equipo funciona en un entorno residencial.
•Aviso FCC : Para asegurar la conformidad, sólo use cables blindados al conectar el aparato a un ordenador u
otro equipo periférico. Cualquier cambio o modificación sin expresa autorización de la parte responsable de la
conformidad puede anular el derecho del usuario a usar el equipo.

CARDVD3 18 VELLEMAN
•DOLBY: Este dispositivo ha sido fabricado bajo la licencia de Dolby Laboratories. "Dolby" y el símbolo de la doble
D son marcas registradas de Dolby Laboratories. Obras Confidenciales no Publicadas. 1992-1997 Dolby
Laboratories, Inc. Todos los derechos reservados.
4. Ajustes y Conexiones (véase figura 1 en la p. 2)
1. Tapa del compartimiento de disco
2. Pantalla LCD
3. PBC (playback control = control de reproducción)
4. Repeat (repetir)
5. Pause
6. A-B
7. Next (salto al capítulo siguiente)
8. Prev(ious) (salto al capítulo anterior)
9. Back / play / forward / stop
10. Open
11. Salida audio L
12. Salida audio R
13. Salida de vídeo
14. Salida S-Vídeo
15. Salida óptica digital
16. Entrada 12Vcc
17. Botón on/off
18. Conector de auriculares
19. Ajuste del volumen
20. Sensor del mando a distancia
5. Pantalla LCD
1. indica que se está reproduciendo el disco
2. indica que se ha interrumpido la reproducción
3. indica que hay un disco mp3 en el lector
4. indica que hay un DVD, VCD o cd normal en el lector
5. indica el número que se está reproduciendo
6. indica el tiempo de reproducción del fragmento que se está
reproduciendo
7. repeat 1: para repetir el título actual
repeat all: para repetir todo el disco
8. ajuste del volumen
6. Mando a distancia
1. MENU: volver al menú principal (DVD)
2. PBC: control de lectura para VCD formato 2.0
3. DISPLAY: menú OSD (visualización en la pantalla)
4. POWER: activar/desactivar el aparato
5. Teclado numérico: 1-9 + 0 + "10+"
6. PROGRAM: programar el orden de reproducción de los títulos
7. SEARCH: saltar a un capítulo / momento específico
8. TITLE: buscar un título particular
9. VOCAL: seleccionar una pista audio en VCD
10. PLAY / Enter
11. SETUP: menú sistema
12. : parar la lectura
13. : pausar la lectura
14. /: título anterior / siguiente
15. RESUME: volver a la pantalla anterior
16. /: retroceder/avanzar rápidamente (VCD: 2x/4x ; DVD: 2x, 4x, 8x)
17. EJECT: sin función
18. VOL +/-: ajuste del volumen
19. MUTE: desactivar cualquier salida audio
20. SUBTITLE: seleccionar o desactivar los subtítulos
21. ANGLE: seleccionar el ángulo de la cámara
22. LANGUAGE: seleccionar un idioma (DVD)
23. Botones de selección (,, ,)
24. ZOOM: aumentar el tamaño de la imagen
25. 1-ALL: repetir uno o todos los títulos
Fig. 2
Fig. 3

CARDVD3 19 VELLEMAN
26. A-B: seleccionar punto A y B y repetir la parte entre los 2 puntos
27. SLOW: reducir la velocidad de reproducción (1/2 - 1/4 - 1/8 – full speed (velocidad máxima))
El CARDVD3 puede recibir la señal del mando a distancia cuando se encuentra dentro de un ángulo de 30° arriba,
abajo, a la izquierda o a la derecha del punto que se encuentra frente al sensor. La distancia máx. para la recepción
es de 5 metros.
7. Conexiones
1. a la red: conecte el adaptador CA/CC a la entrada CC (fig. 1 # 16) y conéctelo a la toma de corriente.
2. en el coche: conecte el adaptador a la entrada CC (fig. 1 # 16) e introduzca el conector en el mechero.
3. a un televisor: desactive ambos aparatos, conecte las conexiones de audio/vídeo del CARDVD3 (fig. 1 #11, 12 &
13) a las del televisor mediante el cable incluido. Si es posible, conecte un cable S-Vídeo (fig. 1 # 14).
4. a un amplificador audio: desactive ambos aparatos, conecte las conexiones de audio del CARDVD3 (fig. 1 #11 &
12) a las del amplificador. Asegúrese de que los colores coincidan.
5. a unos auriculares: Ajuste el nivel de volumen del CARDVD3 al mínimo mediante el ajuste de volumen (fig. 1 #19)
y conecte los auriculares a la conexión (fig. 1 #18). Ajuste el volumen (fig. 1 #19) a su antojo.
8. Funcionamiento
1. Haga las conexiones necesarias antes de activar el aparato.
2. Abra la tapa del compartimiento de disco pulsando el botón OPEN (fig. 1 #10), introduzca un disco y colóquelo
sobre el eje.
3. Cierre el compartimiento de disco apretando la tapa (fig. 1 #1).
4. Active todos los aparatos (fig. 1 #17 para el CARDVD3) y seleccione la fuente de vídeo apropiada en el televisor
o la pantalla, o el canal de audio apropiado en el amplificador.
5. Normalmente, el CARDVD3 empezará a leer el disco automáticamente. Si no es el caso, pulse PLAY (fig. 1 #9
►o fig. 2 #10).
6. Durante la reproducción:
- pulse STOP o para detener la reproducción.
- pulse PAUSE o para pausar la lectura (luego pulse PLAY o ►para continuar la reproducción).
- pulse NEXT (fig. 1 #7) o en el mando a distancia para saltar al título siguiente.
- pulse PREV (fig. 1 #8) o en el mando a distancia para saltar al título anterior.
- pulse para avanzar más rápidamente. Pulse PLAY o ►para anular el avance rápido.
- pulse para retroceder más rápidamente. Pulse PLAY o ►para anular el retroceso rápido.
7. Durante la parada:
- pulse PLAY o ►para empezar la reproducción.
- pulse NEXT (fig. 1 #7) o en el mando a distancia para seleccionar el título siguiente.
- pulse PREV (fig. 1 #8) o en el mando a distancia para seleccionar el título anterior.
8. Para expulsar el disco del aparato, pulse STOP o , desactive el aparato y pulse OPEN (fig. 1 #10) para abrir el
compartimiento de disco. Saque cuidadosamente el disco del eje.
9. Botones y funciones especiales
a. PBC
No estarán disponibles las funciones REPEAT y SEARCH si PBC está activado; lo demás funcionará normalmente.
No estará disponible el botón RETURN si PBC está desactivado; lo demás funcionará normalmente.
El lector empezará la reproducción desde el principio del disco si PBC está desactivado.
b. Reproducción A-B
1. Pulse el botón A-B (fig. 1 #6 o fig. 3 #26) una primera vez durante la reproducción para indicar el punto A.
2. Pulse el botón A-B una segunda vez para indicar el punto B ; la parte entre A y B se repetirá continuamente.
3. Pulse el botón A-B una tercera vez para anular la función A-B.

CARDVD3 20 VELLEMAN
c. Reproducción repetida
La función de repetir la reproducción sólo está disponible si el modo PBC está apagado.
1. Para repetir un título: seleccione el título deseado y pulse REPEAT (fig. 1 #4) o 1-ALL (fig. 3 #25) una vez.
2. Para repetir el disco completo, pulse REPEAT (fig. 1 #4) o 1-ALL (fig. 3 #25) dos veces.
3. Para anular la función repeat, pulse REPEAT (fig. 1 #4) o 1-ALL (fig. 3 #25) una tercera vez.
d. Reproducción lenta
Pulse SLOW (fig. 3 #27) durante la reproducción para reproducir el disco más lentamente.
Pulsando el botón varias veces, puede reducir la velocidad a 1/2, 1/4 ó 1/8.
Durante la reproducción lenta no hay reproducción de sonido.
e. On Screen Display (OSD ; visualización en pantalla)
Pulse el botón DISPLAY (fig. 3 #3) para visualizar el menú OSD.
Vuelva a pulsar el botón DISPLAY para desactivar la función OSD.
f. Teclado digital
Pulse un botón con una cifra para seleccionar el capítulo o título con este número.
Para seleccionar un capítulo o un título de 10 a 19, pulse "+10" una vez, seguido por el segundo dígito.
Para seleccionar un capítulo o un título de 20 a 29, pulse "+10" dos veces, seguido por el segundo dígito etc.
Para seleccionar el número 106 (por ejemplo en un disco mp3), pulse "+10" diez veces, luego pulse "6".
g. Función ZOOM
Pulse ZOOM para aumentar el tamaño de la imagen del medio. Pulse ZOOM otra vez para volver al formato original.
Para aumentar el tamaño de otra parte de la imagen, utilice los botones de selección en el mando a distancia (fig. 3
#23).
h. Reproducción programada
1. Detenga la reproducción y pulse PROGRAM (fig. 3 #6)."P xx:xx" se visualizará. El primer xx representa el número
de la programación, el segundo xx es el número del título.
2. Introduzca el número del primer título que quiere programar con el teclado digital en el mando a distancia.
3. Repita el paso 2 para el segundo, tercero...título.
4. Después de haber programado todos los títulos deseados, pulse PLAY para empezar la reproducción de los títulos
programados.
10. Solución de problemas
Si el CARDVD3 no funciona normalmente, consulte en primer lugar la siguiente lista :
Problema Sugerencia
Verifique si el botón on/off (fig. 1 #17) está en la posición ON.
Verifique si la toma de corriente está conectada correctamente.
No hay corriente
Verifique si el enchufe tiene corriente.
Verifique si el televisor está encendido.
Seleccione la entrada AV correcta en el televisor.
No hay imagen
Verifique la conexión del cable de vídeo.
La imagen está distorsionada Verifique si el disco está sucio o si hay huellas dactilares en el disco ; limpie el
disco con un paño seco y suave frotando desde el centro hacia el borde.
Table of contents
Languages: