VELOCITY-RC QUASAR Instruction Manual

VELOCITY-RC
QUASAR
ELECTIC DUCTED FAN
BUILDING INSTRUCTIONS
R08-V01
BUILDING INSTRUCTIONS

QUASAR PAGE 2 OF 14
THE MODEL
Quasar is an ARF EDF rainer. I ’s designed o be powered by a WM300 or
WM400 impeller fan uni and a veloci y-rc EDF mo or. Of course i ’s possible o
build i as a pusher oo. Should you no ins all he fixed landing gear, you have
o place he servos on he op side of he wings.
Al hough Quasar is a s able airplane and an ideal EDF rainer, i ’s no a plane
for absolu ely beginners. You should have some experience wi h flying and
pu ing oge her ARF’s.
We s rongly recommend owner o read he ins ruc ion before hey s ar
building he model.
TECHNICAL SPECIFICATIONS
Fuselage leng h: 28.7 in 730mm
Wingspan: 34.6 in 880mm
Takeoff weigh : ~35 ounces ~1kg
CONTENT OF THE KIT
- Fiberglass fuselage, white painted
- Laser cutted formers, partly preinstalled
- 2 vertical stabilizers, balsa finished with red covering film
- Main wings balse / ply finished with 3 color covering film
- M400 EDF impeller system
- Clear canopy
- Fixed landing gear
- All hard parts
BUILDING INSTRUCTION

QUASAR PAGE 3 OF 14
ITEMS NEEDED TO COMPLETE
4 ch. Compu er Radio sys em w/ 2 or 3 servos.
1 Elec ronic brushless speed con roller
1 480 size brushless mo or
Lipo ba ery 3S
5 and 30 minu e epoxy
CA glue
Thread locking adhesives
Velcro
STANDARD TOOLS:
Drill or Dremel ool
Plyer/cu er
Scissor
X ac o Knife
Soldering iron
VERY IMPORTANT GENERAL RULES
Always sandpaper and degrease all areas where glue will be applied.
Never apply glue direc on covering film nor on pain ed surfaces.
Secure all screws and nu s wi h hread locking adhesives (e.g. Loc i e
or similar).
CHECKING THE CONTENT OF THE KIT
1. Fiberglass fuselage
2. Film covered wings
3. Film covered ver ical s abilizer
4. Clear canopy
BUILDING INSTRUCTION

QUASAR PAGE 4 OF 14
5. Fron former
6. Ba erie ray
7. Back former
8. Push rods, rudder horns
9. Fixed landing gear
10. Wing joiner
11. Div. accessories
BUILDING INSTRUCTION

QUASAR PAGE 5 OF 14
PREPARING THE FUSELAGE
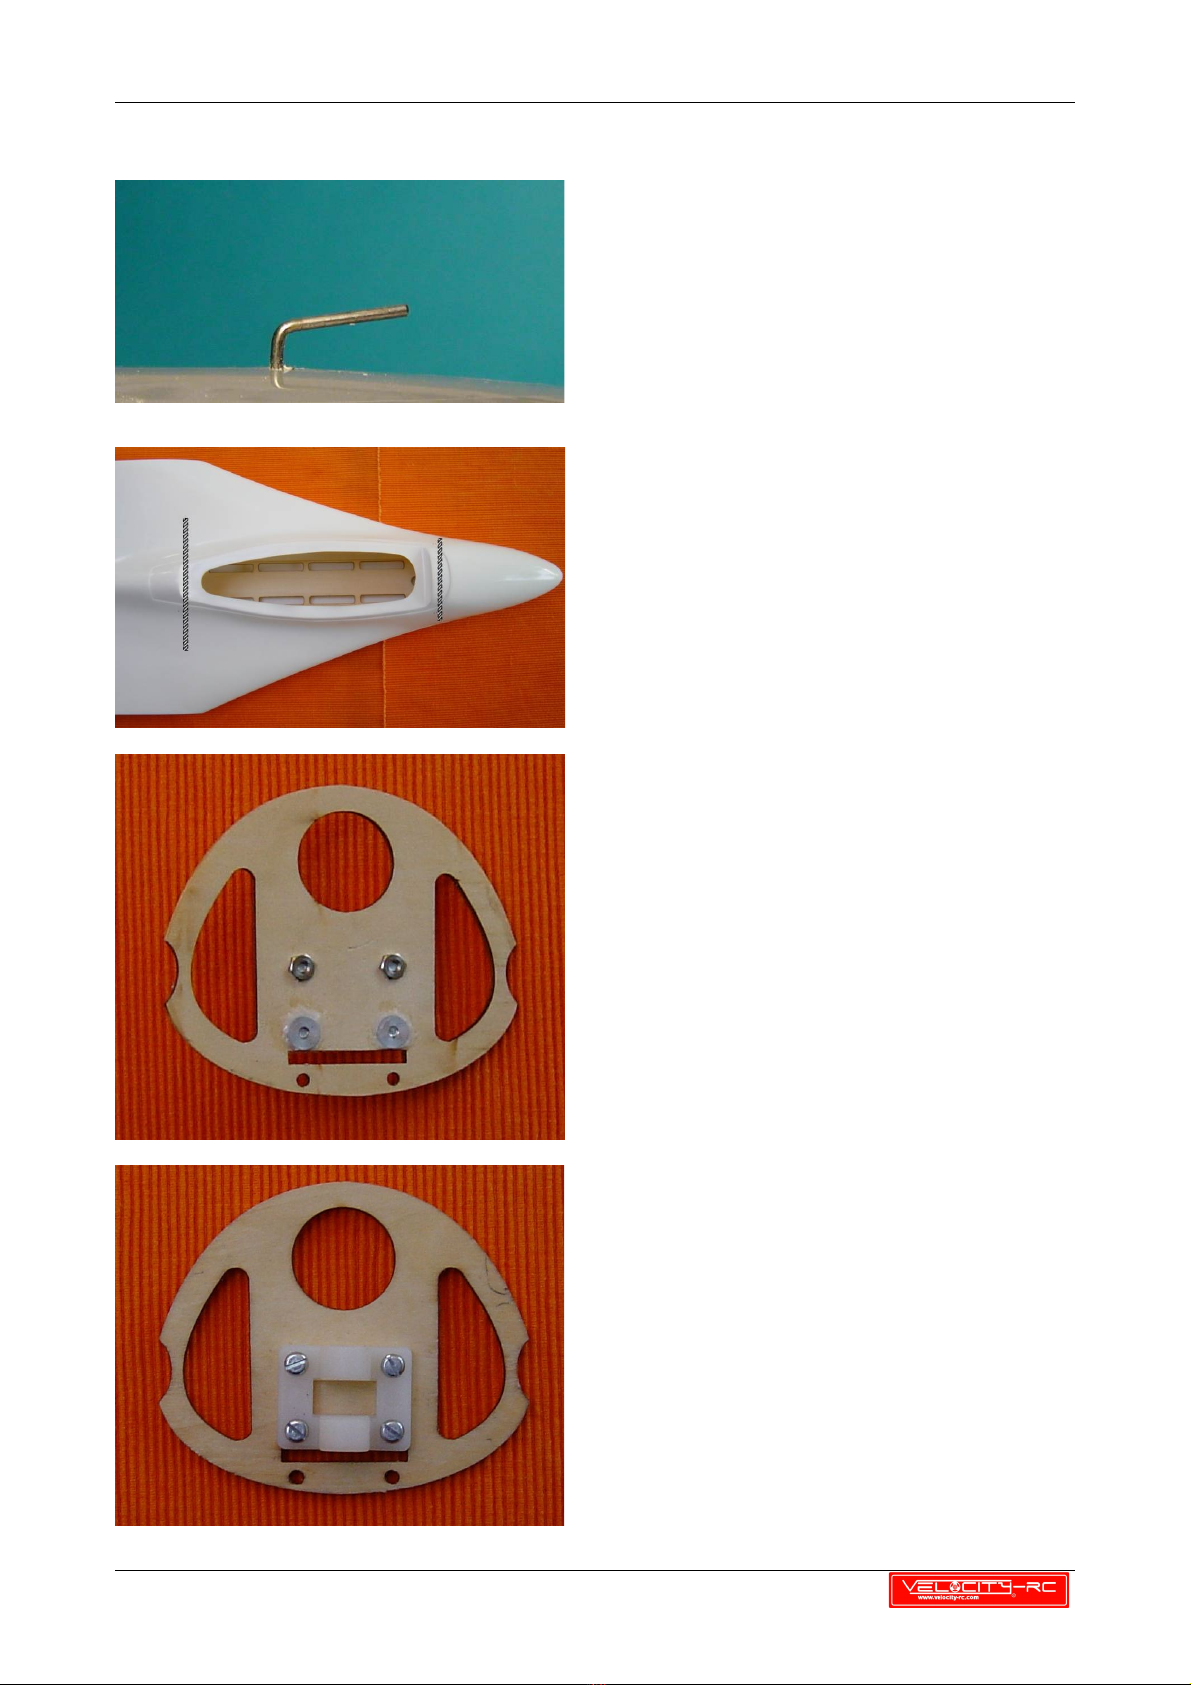
If you plan o s ar he Quasar wi h a
bungee, you have o ins all a bungee
hook firs . The posi ion for his is loca ed
180mm behind he fuselage nose. Before
inser ing he hook, glue in a
reinforcemen from 2mm ply o he
bo om of he fuselage (abou 20mm x
50mm).
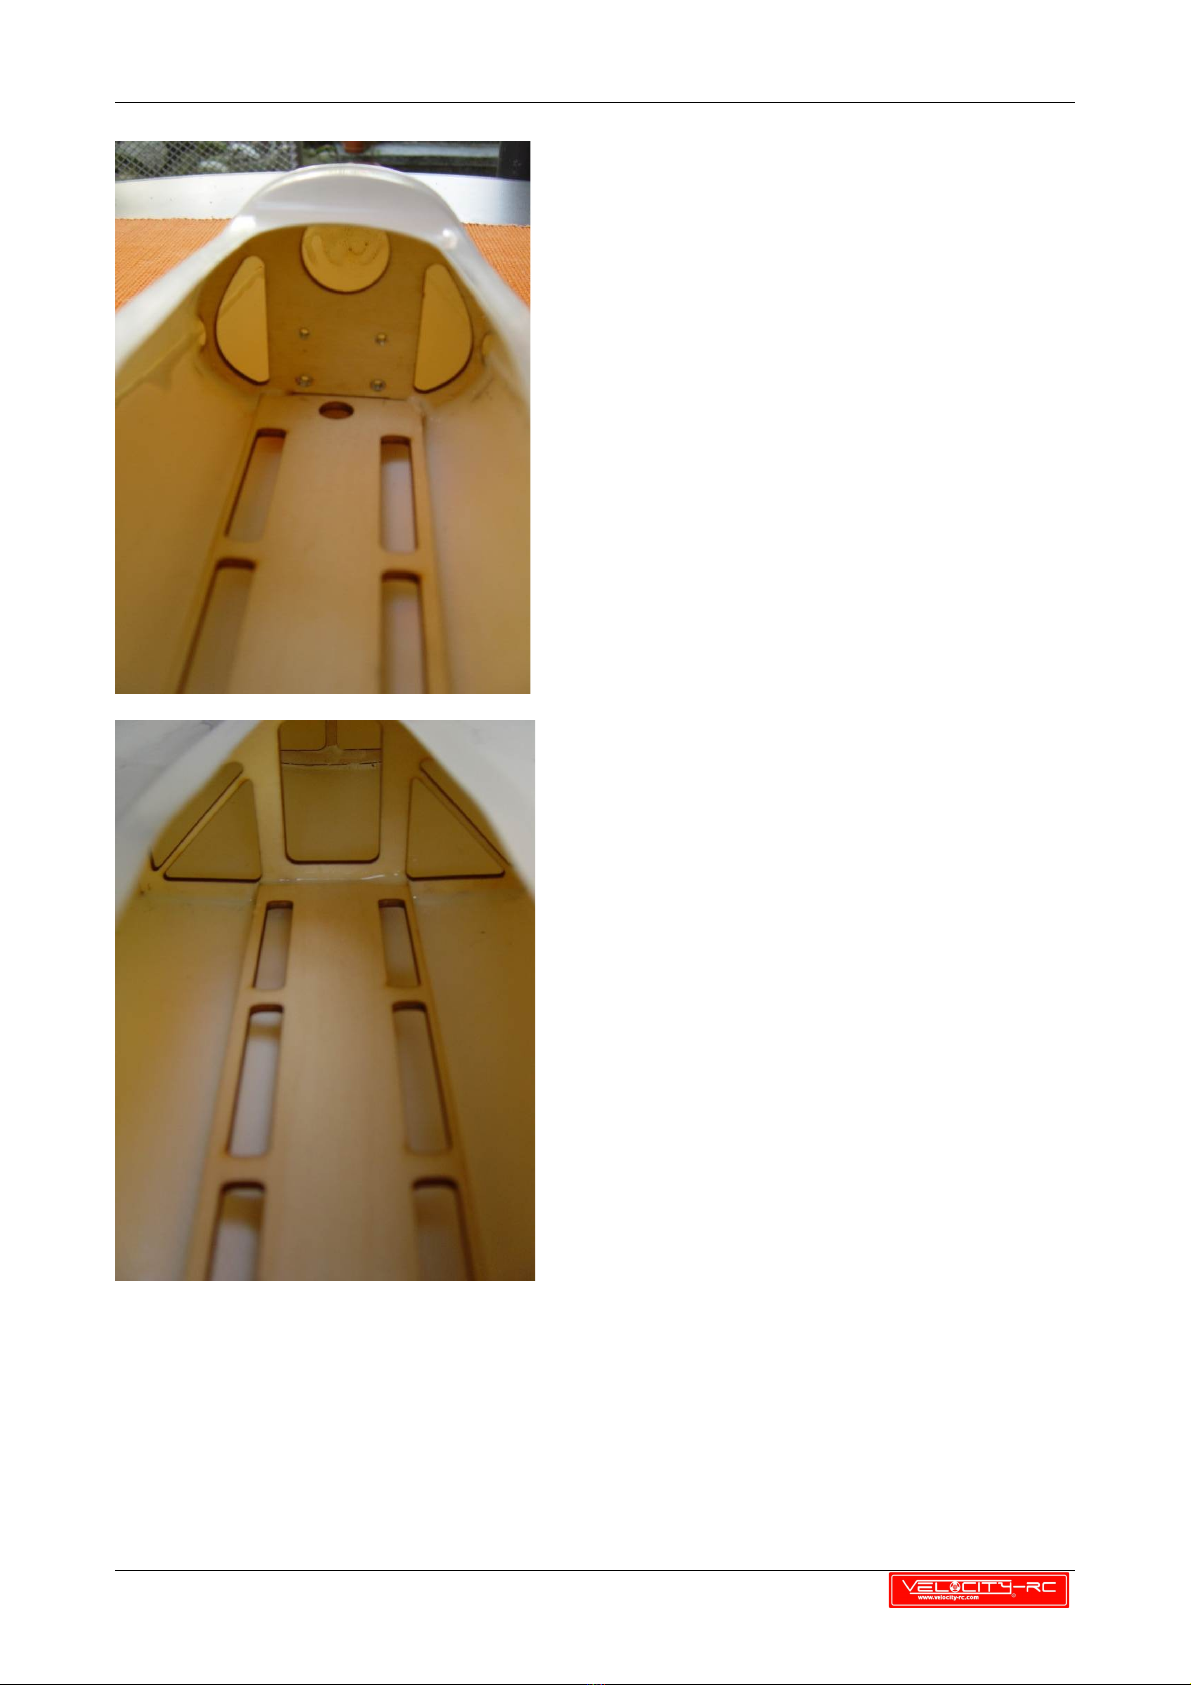
This pic ure shows he posi ion for fron
and back formers holding he ba erie
ray.
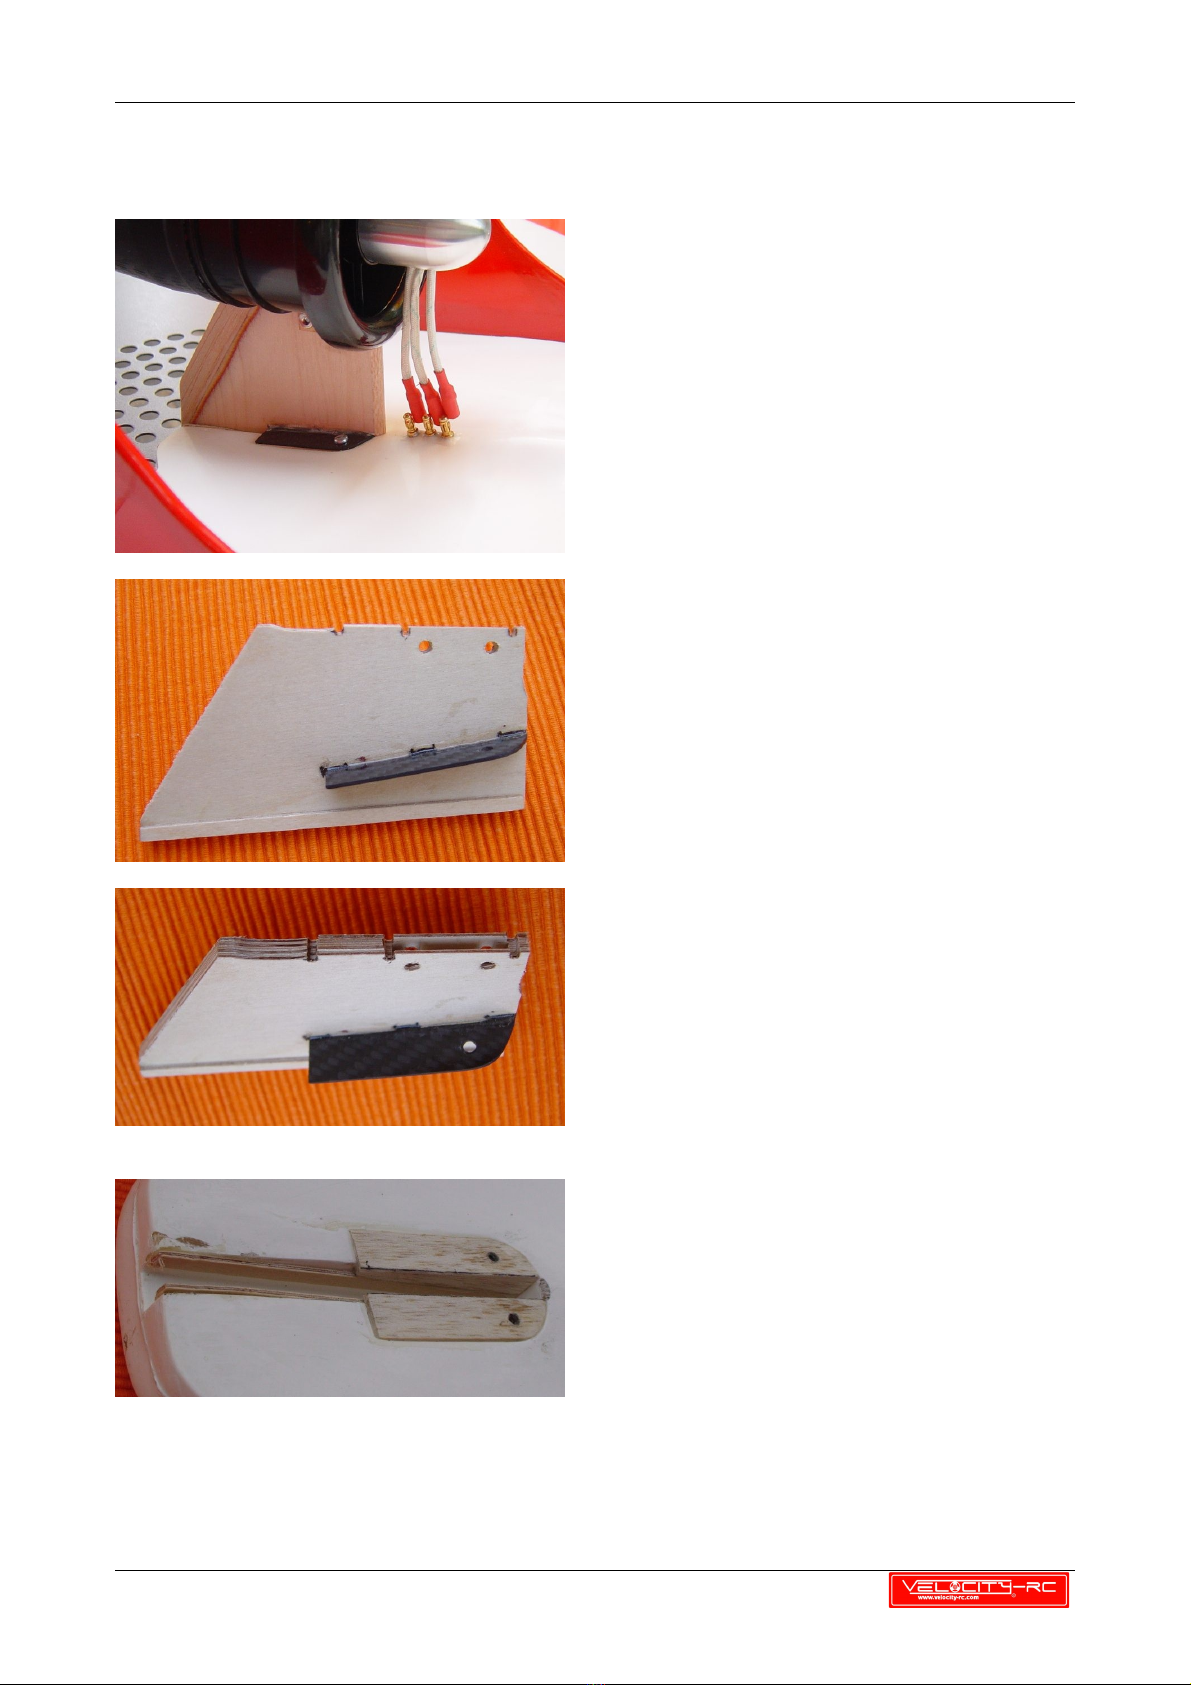
Firs prepare and ins all he fron former.
Drill he holes for moun ing he nose gear
suppor . Press and glue in press nu s.
Check ha he ba erie ray fi s proper
in o he rec angular cu ou in he fron
former.
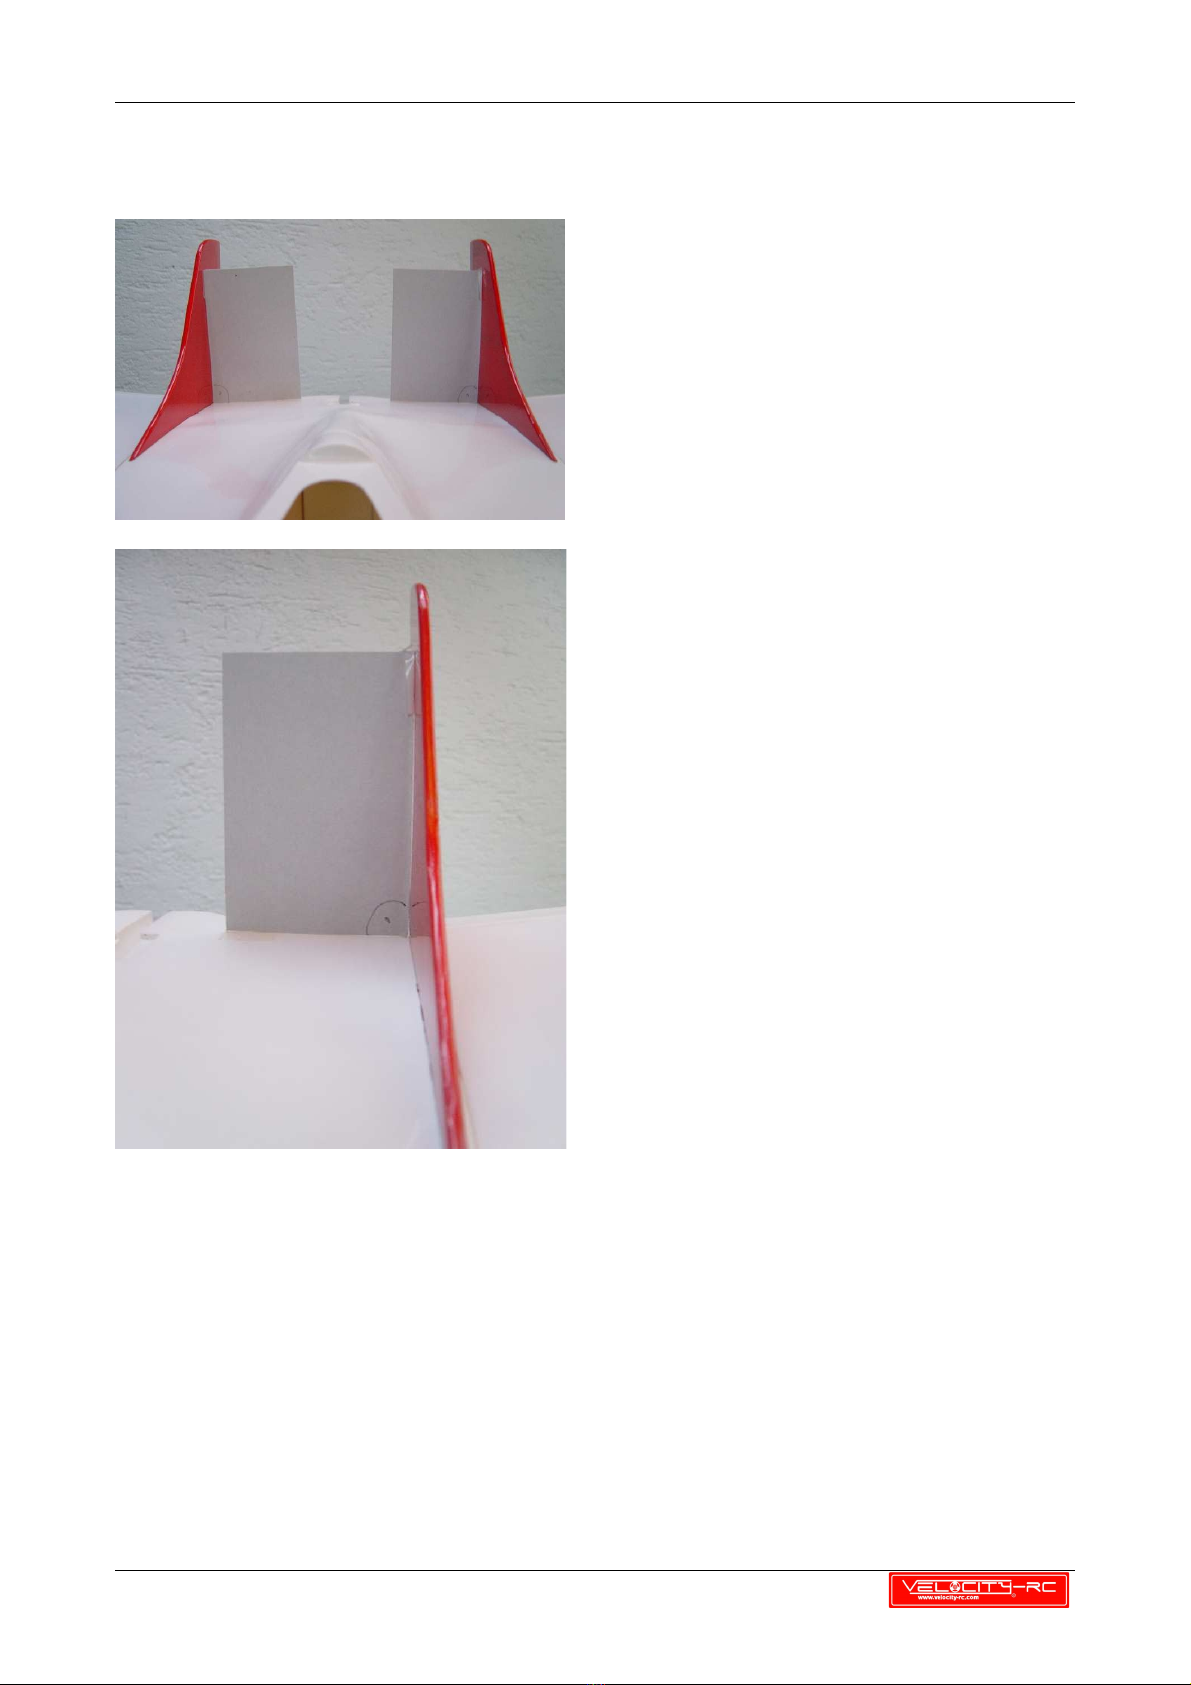
Sand he spar allong he ou er shape.
Mark he posi ion for he fron spare in
he fuselage and sand his area oo.
If he fron former fi s properly in i s
posi ion, glue in he former. The side wi h
he press nu s mus be paced in direc ion
o he nose.
Above all, check for an exac ly ver ical
ins alla ion because he fron wheels
s ru .
BUILDING INSTRUCTION

QUASAR PAGE 6 OF 14
If he glue is cured, you have o glue in
he ba erie ray and he back former a
he same ime. O herwise i ’s no possible
o slide in he ba ery ray in o he
rec angular cu ou s in he fron and back
formers.
Sand he back former allong he ou er
shape and he glueing area from he
fuselage before applying he glue.
Pay a en ion, he round hole mus be
placed a he fron former side.
BUILDING INSTRUCTION

QUASAR PAGE 7 OF 14
PREPARING THE VERTICAL STAB
Firs sand down he pain on he
glueing area on he fuselage.
Remove he covering film on he
bo om side of he ver ical s abs
and sand he wood surface ligh ly
wi h a fine gri sand paper before
epoxy is being applied on he
surface.
Hold he s abilizers in place wi h he
help of wo car on pieces con aining
a 90 degree angle.
BUILDING INSTRUCTION

QUASAR PAGE 8 OF 14
PREPARING THE FAN MOUNT
The fan moun has o be buil wi h wo
1mm and one 3mm ply wood boards. In
he a achmen you will find a empla e
for hese par s. These par s are
designed for he WM400 fan uni .
You have jus o glue oge her he hree
main boards ( he 3mm board in he
cen er) and add on he bo om end on
each side a ply wood s ripe.
The flange of he fan mus fi properly
in o he groove on he op side of he
moun . Two srews M3 x 8 will hold he
fan.
Glue in he o her wo ply wood s ripes
in o he groove in he fuselage and fill
he cavi y halfes wi h balsa wood. To
de ermine he correc posi ion, use he
fan moun as a gauge bu avoid gluing
oge her fan moun and fuselage.
BUILDING INSTRUCTION

QUASAR PAGE 9 OF 14
Now you can slide in he fan moun in o
he groove. The moun should fi
exac ly in o he groove wi hou
olerance.
Glue in on bo h sides he flange pla es
o he fan holder. Two screws will hold
he fan moun in place.
The fan wil be igh ened wi h wo M3
srews. The inser ed moun is secured
wi h wo wood screws.
BUILDING INSTRUCTION

QUASAR PAGE 10 OF 14
CANOPY
The easies way o fixa e he canopy
is wi h he use of small magne s.
Drill wo holes wi h he diame er of
he magne s in o he cockpi sec ion
of he fuselage. Glue in he magne s
from he inner sice of he fuselage.
The magne s mus aligned wi h he
shape of he fuselage.
Build wo small formers from balsa
equipped wi h magne s and glue hem
o he wo canopy ends. Use he
fuselage as gauge for his work.
BUILDING INSTRUCTION

QUASAR PAGE 11 OF 14
WINGS
Glue he hinges firs in place on he
wing side wi h hin CA glue or – be er-
wi h special hinge glue. When he glue
has cured fi he aileron and glue in he
hinge on his side. Check for free
movemen of he aileron.
Remove he covering film a he servo
posi ions and ins all he servos.
The servo wires should have a leng h of
abou 350mm and mus feed hrough
he roo rib.
De ermine he posi ion for he rudder
horns and screw hem o he rudders.
The servo rod should be arranged in an
angle of 90° o he rudder.
Glue in he four dowels in o he roo
ribs of he wings.
If you will use he landing gear, do
emporarily ins all he main gears. You
have jus o slash he covering film o
inser he s eel wire in o he grove and
secure i wi h he enclosed locks.
The wings are now ready o a ach o
he fuselage. Remove he main gear
before his work.
BUILDING INSTRUCTION

QUASAR PAGE 12 OF 14
Sand he fuselage and wing roo firs .
Drill a hole o allow servo wires o go
hrough.
Pre assemble he plywood wing joiner in
he fuselage and wing and see if he
wing fi s nicely before applying i wi h
epoxy.
S ar by gluing one wing panel wi h 30
minu e epoxy. Firs apply some epoxy
inside he wing joiner slo in he
fuselage. Press he wing spar inside he
fuselage.
Remove excess epoxy. Now apply epoxy
in he wing spar slo in he wing roo
and also apply epoxy on he wing roo .
Slide he wing over he hard wood wing
spar and press he wing agains he
fuselage.Make sure he leading and
railing edge are bo h aligned o he
fuselage.Remove he excess epoxy wi h
a clean clo h and cleaning alcohol.
Proceed wi h he o her wing panel he
same way.
While glue is curing place fuselage and
wings on 4 ba ens. The ba ens placed
a he wing ips are 8mm larger hen
he ba ens a he fuselage / wing
joining poin .
BUILDING INSTRUCTION

QUASAR PAGE 13 OF 14
INSTALLING THE ELECTRONICS
Now i ’s ime o ins all all he elec ronic
s uff in o he fuselage.
Typically he receiver will be placed in
he sec ion behind he cockpi . This
allows shor servo cables. Use velcro or
double-faced sco ch ape o hold he
receiver in place.
Bes place for he ESC is he room
be ween Fan and cockpi . Use velcro or
double-faced sco ch ape o hold he
ESC on place. For an easy conec ing of
he mo or wires, you may glue in 3
3.5mm gold connec ors as shown in he
pic ure.
BATTERIE TRAY AND CG
The CG (cen er of gravi y) will be
adjus ed wi h he posi ion of he
ba erie pack. So his posi ion is
depending of he used equipemen .
De ermine in a firs s ep he
aproxima ed posi ion for he ba erie
pack. To do his, all he par s mus be
ins alled in o he Quasar.
By changing he posi ion of he ba erie
pack find he CG poin which is loca ed
440mm behind he fuselage nose.
The ba erie pack mus be secured well
on i s place by using velcro apes or
similar.
BUILDING INSTRUCTION

QUASAR PAGE 14 OF 14
Check Bef re FIRST FLIGHT
CG 440mm from he nose
Eleva or hrows +/- 10mm wi h 35% exponen ial
Aileron hrows +8mm / -6mm wi h 35% exponen ial
Check all rudder for correc direc ion of movemen s
Check all screws are igh en and secured
Do a range check wi h mo or power on
Never fly if some hing doesn’ work properly
WARNING
Alth ugh the Quasar is a stable airplane and an ideal EDF trainer, it is
n t a beginner’s airplane. This airplane is capable f high speeds and
theref re can cause seri us pers nal injury and pr perty damage. We
str ngly urge y u t seek the help f an AMA appr ved instruct r if
this is y ur first aircraft f this type. Please use c mm n sense.
Fly in suitable areas f r a high-speed aircraft such as an AMA
appr ved field.
Vel city-rc assumes n liability f r the perati n r perf rmance f
this pr duct. It is the resp nsibility f the perat r t use this pr duct
in a safe and resp nsiblemanner.
BUILDING INSTRUCTION
Table of contents
Other VELOCITY-RC Toy manuals
Popular Toy manuals by other brands

Mattel
Mattel MEGA CONSTRUX FIRETRUCK GLK54 Assembly instructions

Mega Construx
Mega Construx Barbie DREAMTOPIA DPK95 instruction manual

ItsImagical
ItsImagical U16 operating manual

Eduard
Eduard Bf 109E-4 1/32 Assembly manual

marklin
marklin 37309 user manual

Costume Specialists
Costume Specialists Mama Duck quick start guide