velomann VDOUBLE 10 User manual

VDOUBLE 10 User Manual
Thank you for purchasing VDOUBLE 10 Bluetooth Cycling Computer !
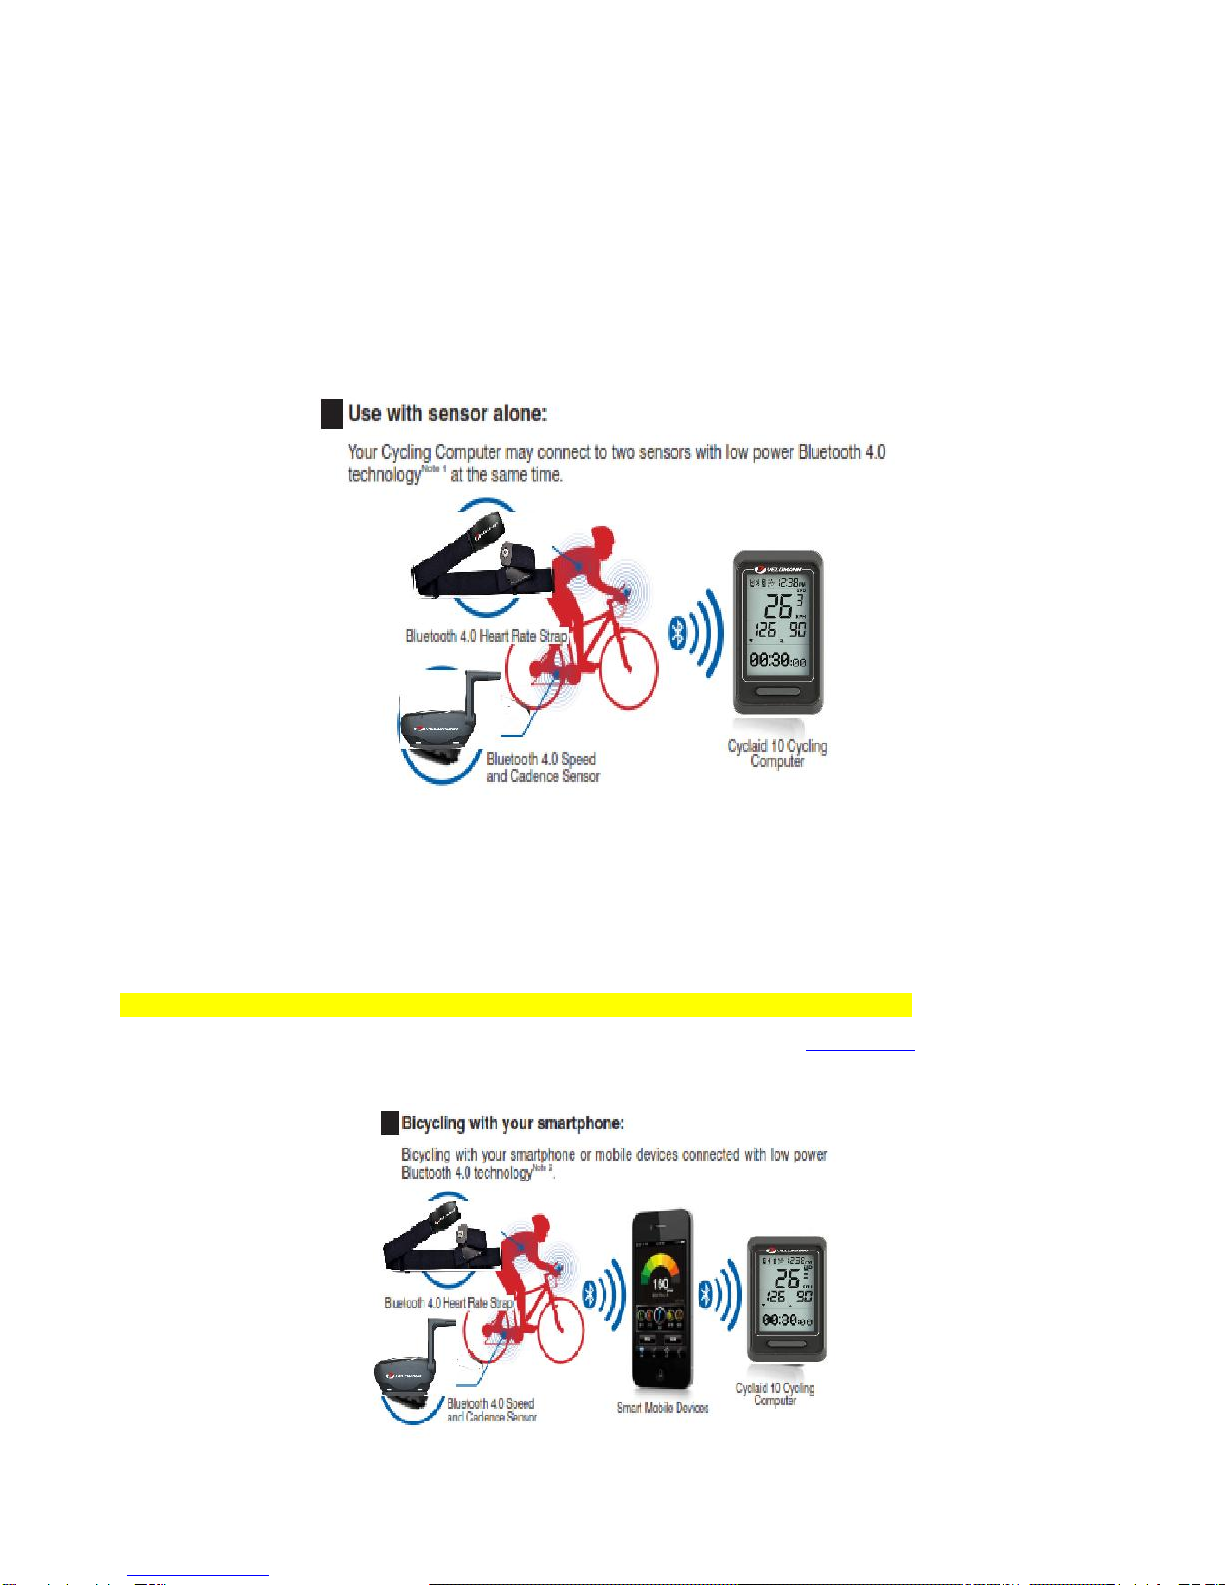
Your Cycling Computer employs low power Bluetooth 4.0 technology for you to exercise together with mobile
devices or sensor accessories.
It helps a lot in your daily exercise training program.
About this manual
Please read this manual carefully before using this product for its correct and effective use.
Icons you may find in this manual:
Notes.
Tips and remarks.
Appendix For other information and battery replacement, please refer to appendix.
Please download and view the latest release of this manual at WWW.VELOMANN.COM
Items included with your product
VDOUBLE 10 Bluetooth 4.0 Cycling Computer
Accessories: Fixer, Fixing Pad and Cable Ties
Quick Start Guide
Warranty Card
Trademark
Bluetooth®is the registered trademark of Bluetooth SIG, Inc.
Apple, Mac OS,iPhone, iPad, Multi-Touch are trademarks of Apple Inc.
"HTC ONE" is a registered trademark of HTC Corporation
Android is a trademark of Google Inc.

Table of Contents
1 Getting to Know Your VDOUBLE 10
1-1 Applications
1-2 Keys
1-3 Screen overview
1-4 Switch the function mode
Function modes
2 Pairing with Sensor
2-1 Pair with your HRM
2-2 Pair with your Speed and Cadence Sensor
3 Basic Setup
3-1 System setup
Tire circumference (L) cross reference table
3-2 User setup
3-3 Hot Key setup
3-4 Sensor setup
4 Install the Cycling Computer
5 Exercise Mode
Training program cross reference table
Instant exercise screen
6 Log Function
6-1 Browse and delete file
6-2 Upload file
7 Exercise Statistics
8 Connect to Smartphone or Mobile Device
8-1 Install App and enable the Bluetooth function
8-2 Pair your Cycling Computer with mobile device
8-3 Phone exercise sync.
8-4 Synchronize with smartphone
S Specifications
A Appendix

1 Getting to Know Your VDOUBLE 10
1-1 Applications
Please refer to the following application and operation index to know more about using your Cyclaid 10.
Use with sensor alone:
Your Cycling Computer may connect to two sensors with low power Bluetooth 4.0technology NOTE1 at the same time.
Bicycling with your smartphone:
Bicycling with your smartphone or mobile devices connected with low power Bluetooth 4.0 technology NOTE2
Note 1: Compatible with VELOMANN Heart Rate Strap (model VD10BELT )
VELOMANN Speed and Cadence Sensor (model VD10SPEED)
Note 2: Compatible with any device running iOS 5.0 or Android 4.3 or later and featuring Bluetooth 4.0 (require installation of App: ALA COACH+).
•For more information on compatible mobile devices and supported accessories, please refer to page 23 or browse web site at www.velomann.com.

Application cross reference table:
Operation index:
Use with sensors
Setup Hot KeySetup sensorPair with sensorBasic setupInstall the Cycling ComputerStart bicyclingBrowse records
Bicycling with your smartphone
Install AppSetup Hot KeyPair with mobile devicePair with sensorNOTE3Sync. SetupInstall the Cycling ComputerSync. bicycling
Note 3: Please refer to operation manual included with your sensors
Please pair the optional sensor device with your cycling computer before its first use. (Page 10-11)
Please complete the following pairing before using it together with smartphone for the first time:
1.Pair the Cycling Computer with your smartphone or mobile device. (Page 24)
2.Pair the optional sensor with your smartphone or mobile device.

1-2 Keys
•OK
•In the standby mode, this may be the:
Exercise Hot Key or
Phone Hot Key
•Start bicycling
•Turn backlight
•Right/Down arrow key
•Exit/Back
•Stop bicycling
•Press and hold the / / keys until the screen fully display to reset the Cycling Computer.
•Do the basic setups described in page 12-15 after Cycling Computer reset. If you have setup Cycling Computer with the ALA COACH+ App, you may re-sync settings to your Cycling
Computer as described in "Phone sync" on page 26-27.

1-3 Screen Overview
Status bar
Heartbeat display
Current time
Speed display
Pedaling frequency display
Information display
Symbol
Name
Symbol
Name
Connection to Mobile Phone
Speed
Connection to Sensor
Heartbeat
Cycling Computer Battery Power
Pedaling Frequency
Upload File
Average
AM
Maximum
PM
Speed in Imperial UOM
Target Achievement Trophy
Speed in metric UOM
Screen of the Cycling Computer sleeps when the latter being in standby mode.
The screen displays symbol of currently active mode or the one you are about to enter into.

1-4 Switch the Function Mode
1. When using your product for the first time, press to turn on Cyclaid 10 and select to English, Deutsch, Français, spañol, Italiano, Português
NOTE1. Press to exit after LANGUAGE SETTINGS is completed.
2. Press to switch the screen to individual windowNOTE2.
3. In the selected window, press to enter.
4. Press to switch flashing setup item or page, press to change settings.
5. Press 2~3 times in any window to exit to standby mode.
Starts timing: Press to enter the bicycling mode in standby modeNOTE3.
Standby
mode
TRAINING
PROG.
MEMORY
FILE
HOT KEY
SET
SENSOR
SET
PHONE
SYNC
PAIRING
SENSOR
USER
SET
SYSTEM
SET
EXERCISE
STAT.
Exercise
Mode
Log Function
Hot Key Setup
Sensor Setup
Synchronize
with
Smartphone
Pair with
Sensor
User Settings
Bike Settings
Exercise
Statistics
•Note 1: If you have already setup the Language Settings once, you can change it by going to SYSTEM SET >LANGUAGE.
•Note 2: Press to switch to individual setup window in standby mode.
•Note 3: Press to switch to bicycling mode and start timing. (Refer to page 15 Hot Key setup.)
Function modes:
Function modes
Description
TRAINING
PROG.
1.Your Cycling Computer comes with low, moderate, and high exercise
intensity and customizable training programs including: target heart rate
zone and target time, distance, and calories. (Page 17-18)
2.Execute training program and view instant exercise information.
(Page 17 and 19)
MEMORY
FILE
1.You can keep up to 7 records.
2.Browse and delete file. (Page 20)
3.Upload file. (Page 21)
HOT KEY
SET
Switch between hotkeys. (Page 15)
SENSOR
SET
Sensor setup. (Page 15)
PHONE
SYNC
Sync. with Smartphone. (Page 26-27)
PAIRING
SENSOR
1.Pair with Your HRM. (Page 10)
2.Pair with Your Speed and Cadence Sensor. (Page 11)

USER
SET
Setup personal data. (Page 14)
SYSTEM
SET
Setup tire circumference (L), enable auto lap counting and setup single
lap distance, enable backlight, setup date/ time, and change language.
(Page 12-13)
EXERCISE
STAT.
View total exercise amount including accumulated exercise time,
distance and energy burnt. (Page 22)
2 Pairing with Sensor
2-1 Pair with Your HRM
1. In standby mode, press to point to PAIRING SENSOR, press to enter.
2. In the PAIRING HRM window, press to create Bluetooth connection and start pairing.
3. Paired successfully, message OK prompts, press to exit. Pairing failed, message NO-DEV prompts, press to exit to PAIRING HRM and starts
from STEP 2 again.
Please refer to the Heart Rate Strap manual on wearing it properly, or press and hold the metal button at the back of the heart rate sensor (HRM) with both hands until the "OK"
message prompts in your Cycling Computer.
Make sure HRM is set to ON in the Sensor Setup window. (Page 15)
Keep your heart rate sensor and Cycling Computer within 10cm from each other. Keep both away from other Bluetooth devices to prevent incorrect pairing.

2-2 Pair with Your Speed and Cadence Sensor
1. In standby mode, press to point to PAIRING SENSOR, press to enter.
2. Press to point to PAIRING BIKE, press to create Bluetooth connection and start pairing.
3. Paired successfully, message OK prompts, press to exit. Pairing failed, message NO-DEV prompts, press to exit to PAIRING BIKE and starts
from STEP 2 again.
Please refer to the Speed and Cadence Sensor manual to install the sensor and its included magnet to your bike, turn the crank counterclockwise until the sensor is connected to the
Cycling Computer and the "OK" message prompts.
Make sure SPD/CAD is set to ON in the Sensor Setup window. (Page 15)
Activate your Speed and Cadence Sensor before pairing by cranking to start the sensor and establish connection. Your Speed and Cadence Sensor remains awake for one
minute. It goes back to sleep mode again if no Bluetooth connection is enabled.
Keep your Speed and Cadence Sensor and Cycling Computer close to each other and away from other Bluetooth devices for correct pairing.

3 Basic Setup
3-1 System Setup
Please setup your basic data before using your product. You may setup your basic data with the ALA COAH+
App on your mobile phone or devices and synchronized it to your
Cycling Computer. See Page 26-27 for its operation.
3-1 System Setup
1. In standby mode, press to point to SYSTEM SET, Press to enter.
2. Press to point to the next setup item or page.
3. Press to change settings.
4. Press to exit after setup is completed.
SYSTEM
SET
WHEEL
1900mm
AUTO LAP
OFF
LAP DST
1 KM
LIGHT
OFF
YEAR
2014
MONTH
01
DAY
01
TIME
12:38
24H
LANGUAGE
ENGLISH
Tire
Circumference
(L)
Auto Lap
Single Lap
Distance
Back Light
Last two digits
of year of the
Gregorian
calendar
Month
Day
Time
12-24 Hours
Language
Settings
Tire size:
You can find the tire size indicated at both sides of your wheel. For your reference, use the tire circumference (L) chart below.
Tire size setup range:
• Single lap distance setup range: 1-5 kilometers.
1-5 miles.
•You may turn on the backlight for 5 seconds by pressing the key after the backlight option is selected.
•The back light may be too dim to be noticed under direct sun light.

3-2 User Setup
1. In standby mode, press to point to USER SET, Press to enter.
2. Press to change setup page.
3. Press to change settings.
4. Press to exit after setup is completed.
Setup page
Setup page
Description
UNIT (Unit of measure)
•UOM option: metric CM / KG or Imperial FT / LB
GENDER
•MALE or FEMALE
AGE
•Setup range: 10-99 year-old
HEIGHT
•Setup range: 120-230 cm (3' 11" ~ 7' 5")
WEIGHT
•Setup range: 30-150 KG (67-330LB)
HR MAX (Maximum heart rate)
•Setup range: 130-220 bpm
HR ALERT NOTE 1
•ON or OFF
•Please enter your age, gender, height and weight accurately as these may determine the accuracy in calculating your target training heartbeat and burnt calories range.
•The maximum heart rate is derived from the "Age Formula: 220 - Age" formula automatically. It is highly recommended to change these settings only with more accurate values
arrived with physicians and professional lab monitoring.
•Note 1: If you are above your target heart rate zone limits, the heart rate value starts flashing.
3-3 Hot Key Setup
1. In standby mode, press to point to HOT KEY SET, Press to enter.
2. Press to switch between hotkeys:
CONNECT PHONE (Phone Hot Key) or CONNECT SENSOR (Exercise Hot Key).
3. Press to exit after setup is completed
• Press to enter Phone Sync. Bicycling in standby mode directly once the Hot Key is set to CONNECT PHONE. (Page 25)
• Press to enter Bicycling Training in standby mode directly once the Hot Key is set to CONNECT SENSOR. (Page17-19)
3-4 Sensor Setup
1. In standby mode, press to point to SENSOR SET, press to enter.
2. Press to switch between HRM or SPD/CAD setup screen.
3. Press to select ON (connect) or OFF (disconnect).
4. Press to exit after setup is completed.
Connection with Heart Rate Strap
Connection with Speed and Cadence Sensor
Your Cycling Computer can connect to two Bluetooth 4.0 sensors (Heart Rate Strap and Speed and Cadence Sensor) at one time.
Please only connect sensors required by specific exercises to save time in search for Bluetooth connections.

4 Install the Cycling Computer
Accessories included with your product:
Fixer
Fixing pad
Cable Ties
CR2032 button battery (pre-installed in your product)
Installation method:
1. Place the fixing pad under the fixer and attach both to the bike frame.
2. Tie the fixer with cable ties.
3. Place the Cycling Computer in the fixer 45 degree to the frame as shown in the diagram.
4. Turn the Cycling Computer clockwise until it clicks into the 12-oclock position.

5 Exercise Mode
1. In standby mode, press to point to TRAINING PROG., press to enter.
2. Press to switch between training programs.
3. When pointed to training target area for manual setup (e.g. the green labeled area), press to point to flashing setup item, press to change
settings. (See cross reference in page 18)
4. After setup, press to start bicycling.
5. Press to view instant information during bicycling. (See crossreference in page 19)
6. Stop bicycling, press to end, select Exit, press YES/NO, to confirm, press again to view results of current bicycling, press to exit, select Save,
press YES/NO, to confirm, the system returns to standby mode after bicycling data is saved.
Switch between training programs
Instant bicycling screen
Change to see other information: DistanceCaloriesExercise Timing

Training programs:
Training program
Name
Description
Light*
•Intensity: 60~70% of the maximum heart rate.
•Application: health upkeep and weight control.
Medium*
•Intensity: 70~80% of the maximum heart rate.
•Application: aerobic exercise and advanced fitness
training.
Strong*
•Intensity: 80~90% of the maximum heart rate.
•Application: sports games and athletic training.
Target Heart Rate Zone
•Setup range
lower limit: 70-144 bpm
upper limit: 144-220 bpm
Target Training Time
•Setup range:
0-99 hours
5-55 minutes
Target Distance
•Setup range in metric unit: 0.5-999.9 kilometer.
•Setup range in Imperial unit: 0.5-619.5 miles.
Target Burning Calorie
•Setup range: 50-10,000 Cal (Kcal).
•Training program marked with " " symbol is calculated by your Cycling Computer system according to your age setup. You may customize the target heart rate range with the HR-SET
program.
•The upper and lower limit of heartbeat varies with your age. Please choose and set a proper training target on the basis of your physical fitness before every exercise session.
•After a custom training target is achieved, a champion trophy displays on the screen.
•Precautions before exercising:
1. Make sure the optional sensor has been paired with your Cycling Computer. (Page 10-11)
2. Set the Cycling Computer Hot Key to CONNECT SENSOR. If you have set HOT KEY to CONNECT SENSOR, you may skip the training program selection by pressing key in
the sleep mode to start exercise timing directly. (Page 15)
3. Please only connect sensors required by specific exercises to save time in search for Bluetooth connections. (Page15)
4. Activate your Speed and Cadence Sensor before using by cranking to start the sensor and establish connection. Your Speed and Cadence Sensor remains awake for one
minute. It goes back to sleep mode again if no Bluetooth connection is enabled.
5. In case your Cycling Computer lost connection with the sensor during bicycling, the message "LINK HR or LINK SC" prompts, press to select option YES or NO, press to
confirm your choice. If you choose option YES, your Cycling Computer starts searching for the sensor again, searched successfully, continue timing. If you choose option NO,
your Cycling Computer continues the timing without searching for the sensor.

Instant exercise screen:
Connection to the sensorNOTE 1
HeartbeatNOTE 2
Other information displayNOTE 4
Current Time
SpeedNOTE 3
Pedal frequencyNOTE 3
Indicator
Name
Description
SpeedNOTE 3
•Kilometers (Miles) per hour
•Display in metric unit: KPH (KM per Hour)
•Display in Imperial unit: MPH (Mile per Hour)
HeartbeatNOTE 2
•Heartbeat per minute
•Display unit: BPM (Heartbeat per Minute)
Pedal FrequencyNOTE 3
•Pedaling frequency in minute
•Display unit: RPM (Rate per Minute)
Exercise Timing
•Display format: HH:MM:SS
Trip Distance
Display in unit of Kcal (Cal)
CaloriesNOTE 2
•In unit of percentage (%)
SlopeNOTE 5
•Setup range: 50-10,000 Cal (Kcal).
HeightNOTE 5
•The metric display unit: 1 meter (M)
•The Imperial display unit: 1 foot (FT)
•Note 1: The symbol display at top of screen once connected with the sensor and with smartphone.
•Note 2: Value of heartbeat and calories display only when worked together with Heart Rate Strap. The heartbeat reading flashes once the target area is exceeded.
•Note 3: Value of speed, pedal frequency and trip distance display only when worked together with Speed and Cadence Sensor.
•Note 4: When viewing current other information, name of the reading displays 1 second before its value does.
•Note 5: Slope and height readings derived from GPS of your phone display only when a smartphone or mobile device is connected.

6 Log Function
6-1 Browse and Delete File
1. In standby mode, press to point to MEMORY FILE, press to enter.
2. Press to point to file selection, to enter, press to page through the file.
3. Viewing single lap dataNOTE 1 in the VIEW LAPS window, select YES, to confirm, press to view single lap data in sequence, press after viewing
to back to last page.
4. To delete a file: in the DELETE FILE window, select YES, to confirm the deletion.
5. Press to exit after the operation is completed.
Average Heartbeat
Current Time
Average Speed
Average Pedaling Frequency
Maximum Heartbeat
Maximum Speed
Maximum Pedaling Frequency
Other information reference table:
File information
Name
File information
Name
Trip time
Exercise Time
View laps
Select to view single lap dataNOTE
1(See STEP 4)
Trip distance
Distance
Upload file
Upload File (See page 21)
Calorie
Calories
Delete file
Delete File (See STEP 5)
Laps
Number of Laps
• Note 1: You may get to view average speed/heartbeat/ pedaling frequency/time per laps.
• Maximum number of laps: 50, lap equivalence: metric: one kilometer per lap. Imperial: one mile per lap.

6-2 Upload File
1.Open ALA COACH+ App>Settings>My Sensors>Cycling Computer>Cycling Computer Data Import>SMART CYCLING.
2.In the Cycling Computer MEMORY FILE>desired file selection>UPLOAD FILE window, press to select YES, to confirm and create Bluetooth
connection, connected, press App Start button.
3.After the uploading is completed, the App prompts OK, press App Save button and then press the button at upper left corner to exit the mobile
device, press at your Cycling Computer to exit.
Inspection is ON
Upload completed, click to exit.
•Precautions on file uploading:
1.Make sure the mobile device has paired with your Cycling Computer. (Page 24)
2.Check the mobile device>Settings>Bluetooth®system and ALA COACH+ App>Settings>My Sensors>Cycling Computer is ON.

7 View Exercise Statistics
1. In standby mode, press to point to EXERCISE STAT., press to enter.
2. Press to page through accumulation data.
3. Press again to enter the RESET window. To reset accumulation dataNOTE 1, select YES, to confirm your choice.
4. Press to exit after the operation is completed.
Total TME
3 HR
Total DST
45 KM
Total CAL
1128
Accumulated
Exercise Time
Accumulated
Distance
Accumulated
Energy
Consumption
Confirm window
•Execute RESET to clear total exercise amount data.
•The RESET function does not erase the exercise file. To delete it, go to MEMORY FILE, and select individual file for deletion.

8 Connect to Smartphone or Mobile Device
8-1 Install App and Enable the Bluetooth Function
Please install the ALA COACH+ App on your mobile device before connecting to it and open your mobile
device's Bluetooth®function for functions including pairing, synchronizing exercises, and file uploading.
Search and install: ALA COACH+
Please scan to download immediately
Supported OS: Apple iOS 5.0 or later, Android 4.3 or later
Compatible mobile devices:
•iPhone 4S or later
•iPod Touch 5 or later
•iPad 3 or later
•iPad mini or later
•HTC One Max
•HTC One (M8)
•Please visit us at www.VELOMANN.com to learn more about the latest information on compatible mobile devices and supported accessories.
Please make sure you have turned on your mobile device >Settings>Bluetooth®system in advance.
Please pair your optional sensor with the mobile device. (See user manual included with the sensor for the pairing procedure.)

8-2 Pair Your Cycling Computer with Mobile Device
STEP 1 Check your mobile device>Settings>Bluetooth®system is open. (Page 28)
STEP 2 Set Cycling Computer Hot Key to CONNECT PHONE. (Page14)
STEP 3 Open ALA COACH+ App>Settings>My Sensors>Cycling Computer >Cycling Computer Setting>Add New Sensor.
STEP 4 Pairing steps:
1. When Cycling Computer is in standby mode, press to create Bluetooth connection.
2. Once your Cycling Computer is discovered by the App, press to start pairing.
3. Once pairing is completed, the App prompts OK, press the upper left button to exit the mobile device and key to exit your Cycling
Computer.
Keep your mobile device and Cycling Computer within 10cm from each other and keep both away from other Bluetooth devices to prevent incorrect pairing.
Table of contents