VELTOP Sun Ride User manual

1
WARNING!
Failure to follow these instructions could hinder proper function and cause product failure.
- 1x
Rack mounting bracket
to be attached to the rear luggage
rack
or
- 1x
Seat mounting bracket
to be attached to a seat frame
cross-member.
- 1x
Storage bag with enclosed canopy
- 1x
L-bracket
to attach the storage bag to the Rack or Seat
mounting bracket
- 3x
Two-part poles
, to support the canopy horizontally, these
being:!2x 85cm
Side rails
with angle joints on one end and
1x 58cm
Front rail
- 2x
Front rigid straps
, which are black nylon straps with Velcro,
stiffened by two-piece fiberglass rods inside them, to be attached
between the frame and the front of canopy to support it vertically
(standard height 27.5 inches)
- 1x small parts bag, containing:!- 2x
5 inch fiberglass
rods,
optionally used to shorten the length of Front rigid straps!
- 1x
5mm allen wrench
.!
- 2x
Frame straps
, which attach the Front rigid straps to the frame!- Transparent
Frame protective strips
to keep the Frame straps and Seat
mounting bracket from scratching your frame
Not provided:
To assemble this product you will also need a 10mm
crescent wrench, or its equivalent
This product is made of the following parts:
Thank you for choosing the
VELTOP SUN RIDE
.
This product was designed, manufactured and assembled by
CYCLO-SYSTEM
in France.
To ensure proper function and durability of this product, please read and follow these instructions.
The purpose of the
VELTOP SUN RIDE
is to protect the user from the sun.
This product should not be used on unpaved roadways, and it is not recommended for off-road riding.
Versions of this product can be installed on nearly all recumbent tadpole tricycles equipped with a cargo rack on the back, or on a seat frame
cross-member of suitable diameter.
INSTRUCTIONS FOR INSTALLATION & USE
VELTOP SUN RIDE
or

2
I. INSTALLING THE RACK OR SEAT MOUNTING BRACKET
A. Cargo rack version
The Rack mounting bracket should normally be attached near the rear end
of the rack so as not to hinder the installation of panniers or a trunk bag.
Remove the first and second of the three bolts in Rack mounting bracket,
leaving one in place at the end, and set the Rack mounting bracket on the
rear rack.
The lower part of the Rack mounting bracket, still attached by the third
bolt, goes under the rack top.
Re-install the other two bolts and tighten all three.
B. Seat back version
Fasten the pair of clamps at the lower end of the Seat mounting bracket
to the seat frame cross-member near the top of the seat back. To protect
the paint on the seat frame, wrap the transparent frame protective strips
around the cross-member where the clamps go.
Optional:
If a neck rest is already installed, replace the 22mm metal tube
in the Seat mounting bracket with a longer tube (22mm or 7/8 inch
outside diameter) so the pair of clamps at the lower end of the Seat
mounting bracket do not interfere with the neck rest.
Arrange the three sections of the Seat mounting bracket so the upper
section is close to vertical and not interfering with the neck rest or the
rider's head.
Provisionally tighten all bolts. These may be loosened later for adjustment
of the completed canopy.
II. ATTACHING THE L-BRACKET
The L-bracket attaches to the upper part of the Rack or Seat mounting
bracket. It may be oriented forward or back, depending on fitting needs.
Orienting it forward is more common with the Rack mount, while orienting
it back is more common with the Seat mount.
The two bolts on the upper part of the Rack or Seat mounting bracket go
into the slotted part of the L-bracket. These bolts can be loosened to
adjust the height of the canopy.
III. ATTACHING THE storage bag
Bolt the storage bag onto the top of the L-bracket using any pair of holes,
depending on your fitting needs. Use your 5mm allen wrench and 10mm
crescent wrench. The Veltop logo on the Storage bag faces rear.

3
IV. ASSEMBLING THE CANOPY
Pull the canopy out of the storage bag and lay it on a table with the
Velcro side facing up. The front of the Canopy has a long Velcro strip
and diagonally cut corners. Open up the Velcro flap at the front of the
Canopy. The rear of the canopy has two short Velcro strips and
rounded corners.
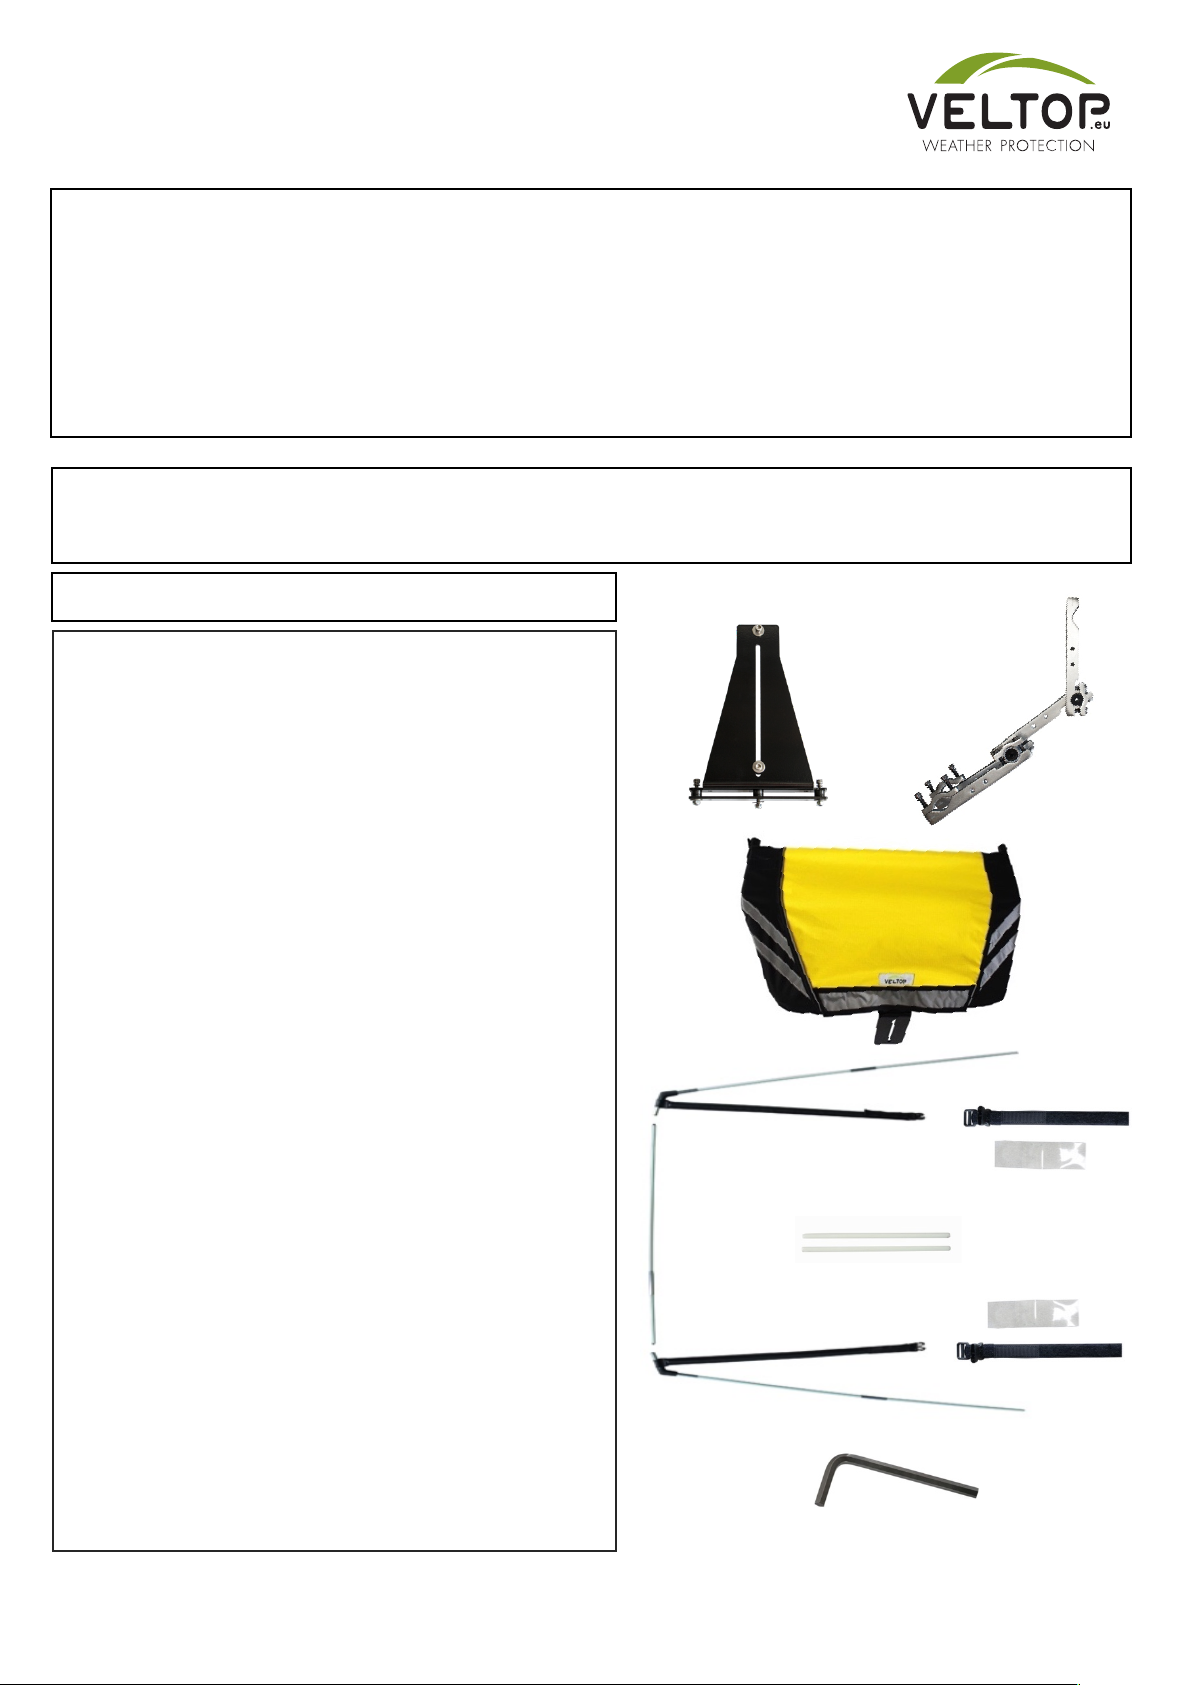
Assemble the 85mm Side rails and insert them into the side pockets on
the Canopy. The angle joints on one end of the Side rails are at the
front end of the Canopy. The rear ends of the Side rails will project out
the back of the Canopy.
Put the looped end of each Front rigid strap around each angle joint.
The Velcro on the Front rigid straps should face down against the
Canopy.
Assemble the 58cm Front rail. Insert each end of it into the angle joints
and fold the Velcro flap at the front of the Canopy over it.
Disconnect the free half of the clip-on buckles from the Frame straps
and attach these to the Velcro ends of the Rigid front straps. Double
the ends of the straps back and Velcro them into place.
V. INSTALLING THE FRAME STRAPS
Wrap the Frame straps around the frame close to the front wheels.
These should be placed as forward and as far apart as possible. They
can go on the main cross-member, on the head tubes, or on the base of
the steering assemblies, depending on the design of the tricycle. To
protect the paint on the tricycle frame, wrap the transparent Frame
protective strips around the frame where the straps go.
VI. INSTALLING THE FRAME STRAPS
Here is the big moment! Flip over the Canopy so the Velcro side faces
down.
Fit the rear ends of the Side rails into the cups on the Storage bag and
hold the Canopy to the Storage bag with the Velcro.
Clip the bottom ends of the Rigid front straps to the Frame straps.

4
VII. adjustments
To accommodate different designs of tricycles and different heights of
riders, it is possible to adjust the height of rear end of the Canopy.
Loosen the two bolts holding the Rack or Seat mounting bracket to the L-
bracket. Adjust it so it leave at least 5cm distance from the top of the
rider's head to the underside of the Canopy.
You can also adjust the length of the Front rigid straps. Some adjustment
can be made by tensioning the straps through the buckle at the Frame
straps. You can shorten the Front rigid straps more by removing the lower
part of the fiberglass rods inside them and replacing it with the shorter 5
inch rods provided in your small parts bag.
You can shift the canopy to front or rear by changing the pair of holes the
Storage bag attaches to in the L-bracket. The L-bracket itself can be
turned to face front or rear.
IIX. PRECAUTIONS
Do not iron the canopy as it is constructed from polyester. Avoid washing
it to keep from damaging the reflective strips.
If you transport your trike on a car, remove the Canopy and Storage bag.
When leaving the tricycle outside, or when riding in strong winds, retract
the Canopy into the Storage bag.
Do not use your canopy in extreme weather conditions. Postpone your
trip or dismantle the system.
Enjoy your Veltop Sun Ride and stay cool!
CYCLO-SYSTEM
3621 route d’Albertville
74320 SEVRIER
FRANCE
T : 0033 (0)4 50 77 56 17
F : 0033 (0)4 50 63 45 36
www.veltop.eu
Table of contents