manuals.online logo
Brands
  1. Home
  2. •
  3. Brands
  4. •
  5. VENETA
  6. •
  7. Indoor Furnishing
  8. •
  9. VENETA 3 Sided L Frame Outside Mount User manual

VENETA 3 Sided L Frame Outside Mount User manual

Position the assembled frame evenly
around the window openings and secure
with a screw into the upper left frame
ONLY.
1.
Once the left side is secured, level the
frame on the window and secure with a
screw into the upper right frame. Shutter
will be fully secured in later steps.
1.
Set all frames on a flat surface. Position each side of the frame and
line up the Hoffmann Key slot. Insert the Hoffmann Key into each
slot at the back of the frame. Use a rubber mallet if necessary.
The Hoffmann Key has a rounded side and a flat side. The
rounded side should be inserted in slot first.
Remove frame inserts and place them away from the installation area.
Carefully remove panels and frames from the packaging.
All frame parts are labeled (top, bottom, left, and right).
Step 2 – Level the Frame
Step 3 – Secure the Frame
Step 1 – Assemble the Frame
1.
2.
3.
!
4. Connect the side frames and the sill plate
using miter/connecting screws.
Shutters Installation Instructions
3 Sided L Frame Outside Mount
CONGRATULATIONS on purchasing the finest shutters
in the market. You can take pride that your purchase
will enhance the function and beauty of your home.
IMPORTANT: Do not mix panels or frames from other windows. Install one shutter at a time.
Getting Started
Step 1: Assemble Frame
Step 2: Level the Frame
Step 3: Secure the Frame
Step 4: Attach the Panels
Step 5: Add the Finishing Touch
Installation Overview
Tools needed for installing your shutter:
Pencil Level Box Knife Rubber mallet
Drill Screwdriver
Getting Started
Remove the shutter from the package. Do not discard any of the packaging material until the
shutter operates to your satisfaction. Check the diagram below to make sure you have the
necessary parts.
Hinge
Pins
Hinge
Screws
(for Deadlock)
Frame
Screws
TM
Installation Video
Hinge Pins
L
Frame
Frame Insert
Shutter
Panel
Shutter
Panel
Hoffmann
Keys
Sill Plate
Miter/
Connecting
Screws
Scan the QR code with
your smartphone to
follow along with video
instructions.
Lifetime Limited Warranty
All Veneta™shutters have a lifetime limited warranty and will be free from defects in
materials or workmanship for as long as the original retail purchaser owns the shutters,
provided that such products were properly installed in residential dwelling; and such
products were made or assembled exclusively from original materials and components.
Any resale or other transfer of the product and/or materials voids this warranty.
For a complete copy of this warranty, please visit www.venetawindowfashions.com, or
contact customer service by email or phone.
Customer Service
1-855-558-1222
Email: [email protected]
Website: www.venetawindowfashions.com
Adjust the Tension System
Veneta™shutters are made to resist most staining substances and may be easily cleaned
by simply wiping down or dusting. For any stains or marks, a soapy water solution may be
used along with a damp cloth. Open the louvers and panels, and wipe down the front and
back of the shutters. You may also remove the panels from the frame and take down to
clean.
Maintain Your Shutter
If over a period of time the louvers on your shutters should
loosen or not function properly, a built-in tension system can be
adjusted. Simply open the panels fully and find the tension
adjuster screw hole on the side of each panel. Use a screwdriver
to gently turn the screw on each side of the panel to your desired
resistance level. Repeat process for other panel(s) if necessary.
Tension
Adjuster
Version 37103-64200
IMPORTANT: Check shutter operation and alignment before installing frame inserts, as
frame inserts can NOT be removed once they are snapped into place.
Match each frame insert with the corresponding side of the frame: Left to Left, Top to Top,
Right to Right.
Snap inserts into place. This will cover screws and provide a finished look.
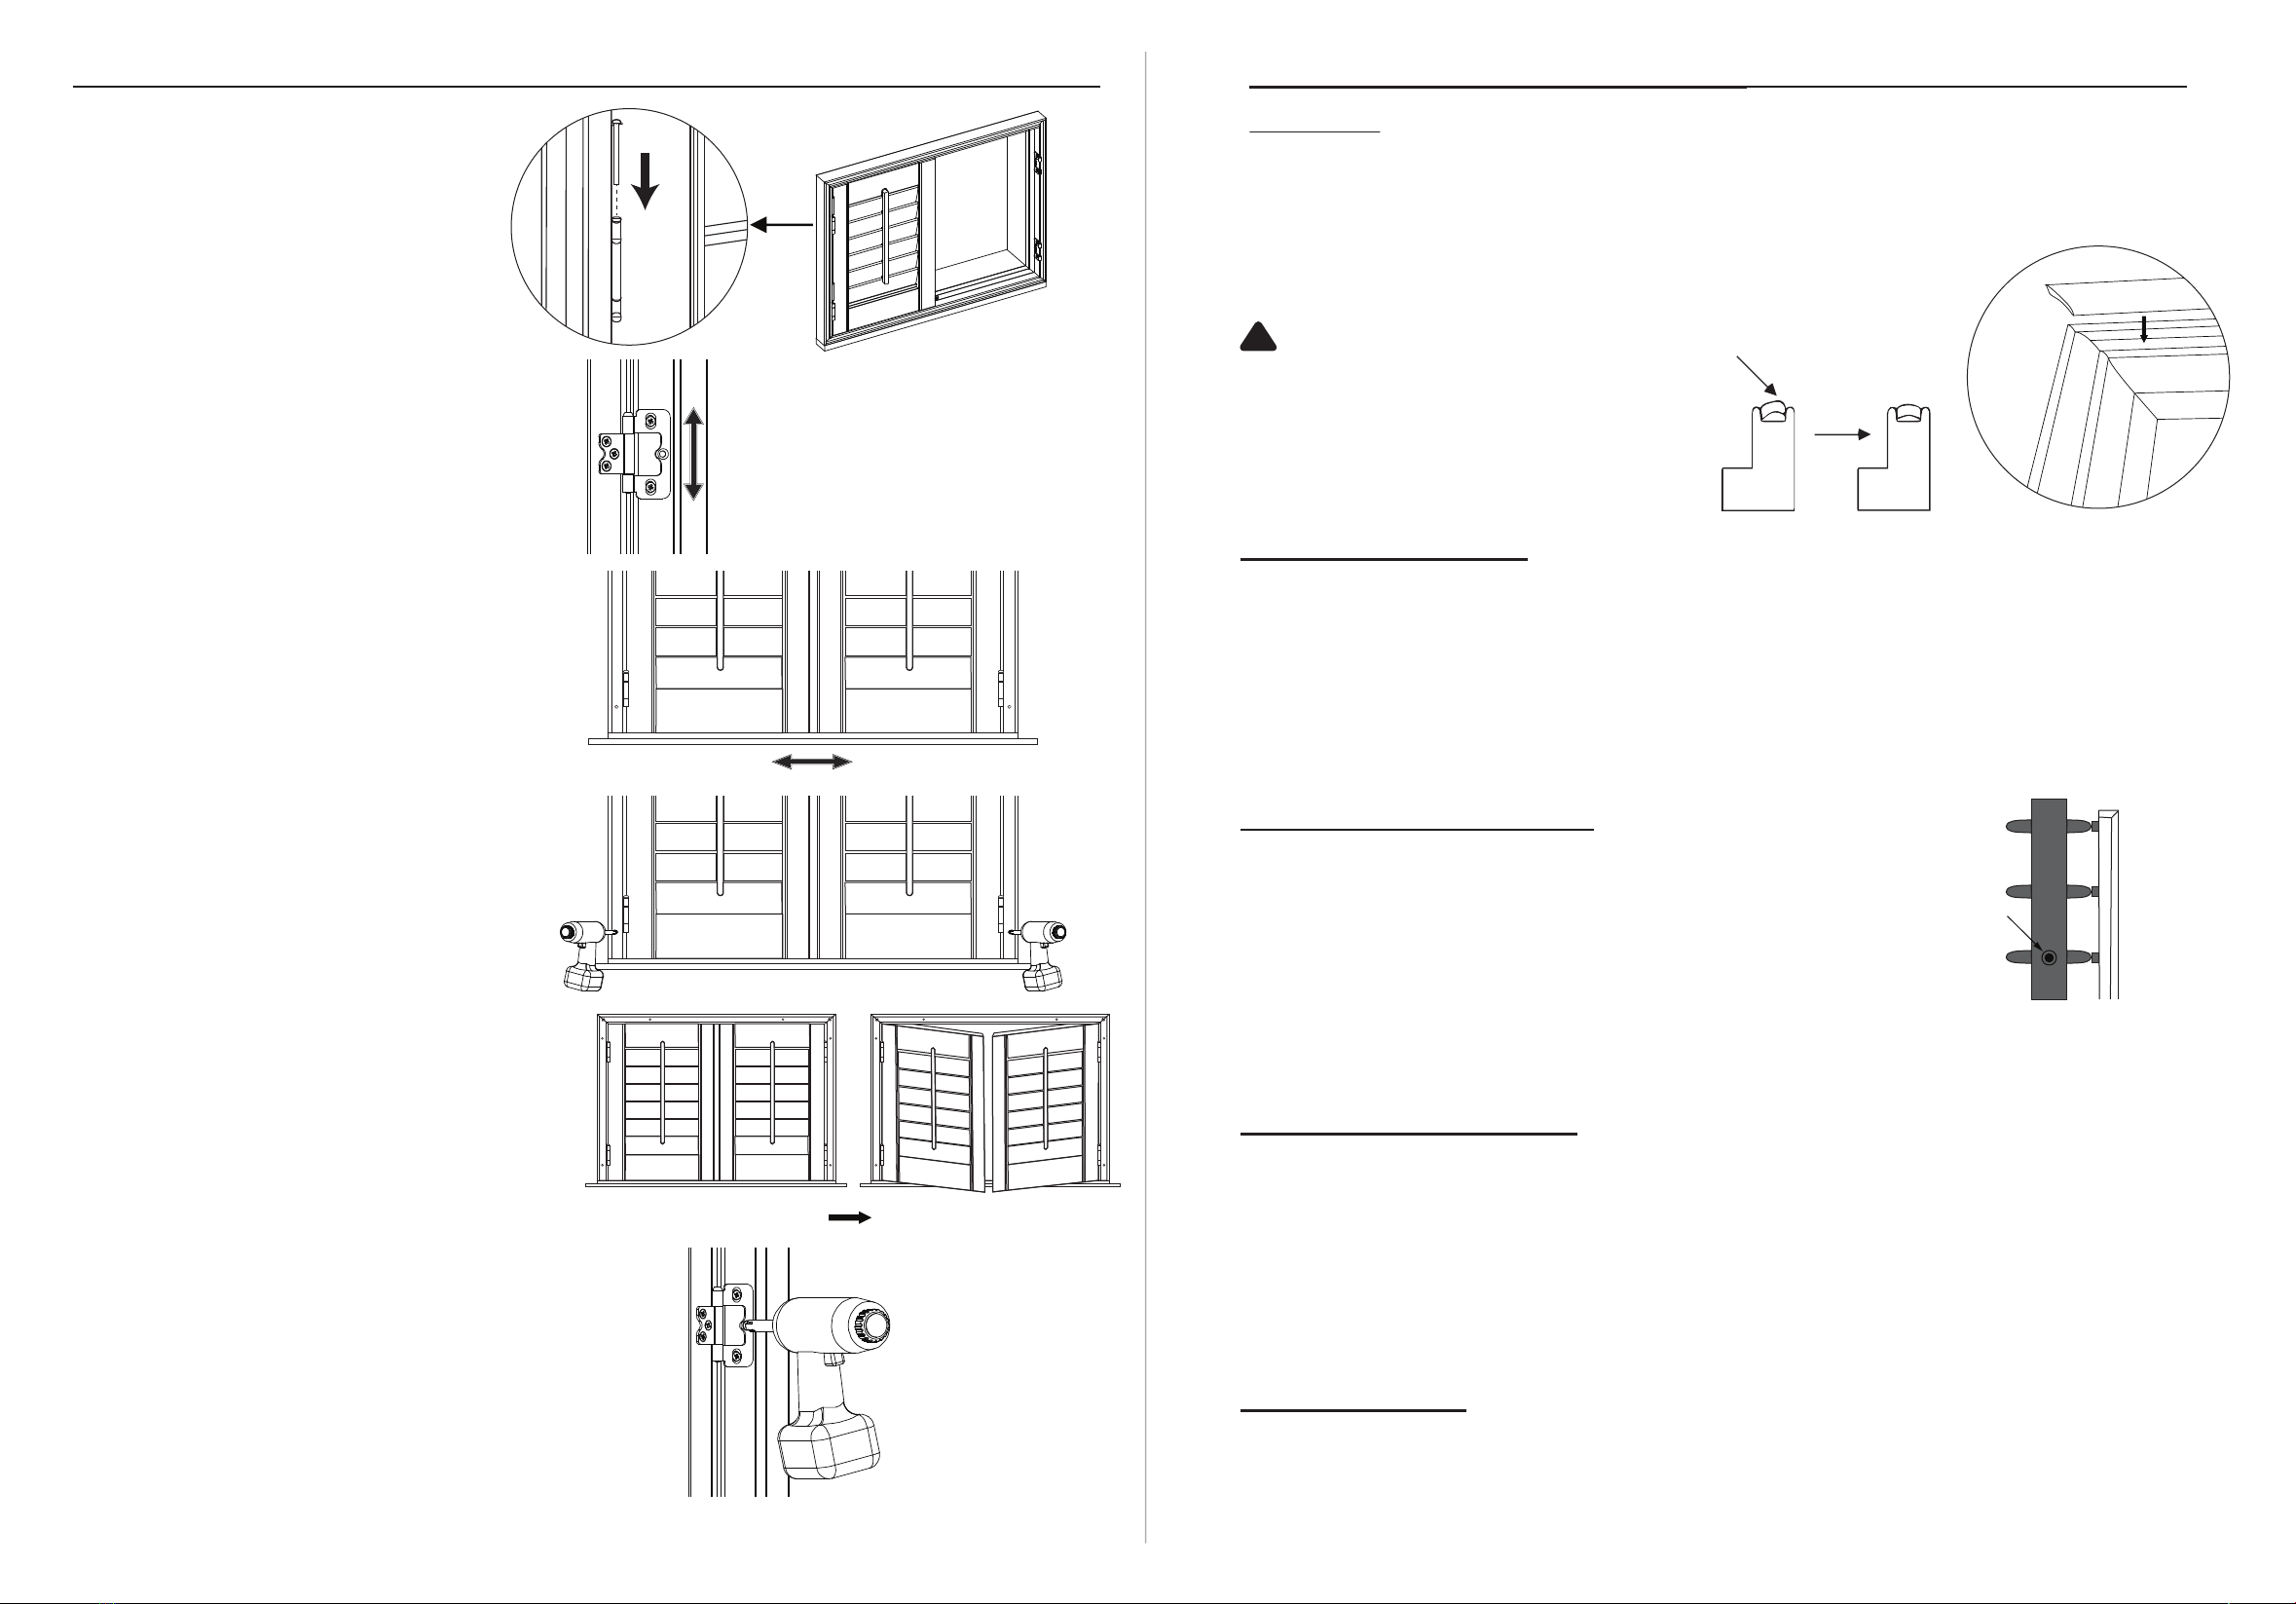
Step 5 – Add the Finishing Touch
A rubber mallet can be used to help install frame inserts.
!
Place the left shutter panel in the frame,
align the hinges, and insert the hinge pin.
Repeat for the right shutter panel.
1.
Step 4 – Attach the Panels
Open and close panels to make sure
panels operate properly. Secure the
frame with screws through the rest of the holes.
5.
Fasten the deadlock screw for all hinges.
6.
Please check the gap between panel and
frame at the top and bottom. The gap should
be even; if not, then shift frame left to right
until the gap is even.
3.
If panel hinges are not aligned with
frame hinges properly, then frame hinges
can be adjusted.
2.
Once even, secure a screw at the bottom
of the left frame and right frame.
4.

Other VENETA Indoor Furnishing manuals

VENETA 4 Sided L Frame Outside Mount User manual

VENETA

VENETA 4 Sided L Frame Outside Mount User manual

VENETA 37103-64600-B Instruction sheet

VENETA

VENETA 37103-64600-B Instruction sheet

VENETA 37103-64500-B Instruction sheet

VENETA

VENETA 37103-64500-B Instruction sheet

Popular Indoor Furnishing manuals by other brands

J.Burrows JB5TMTLSWE Assembly instructions

J.Burrows

J.Burrows JB5TMTLSWE Assembly instructions

Trasman 1152 BO1 Assembly manual

Trasman

Trasman 1152 BO1 Assembly manual

fantastic furniture Cooper Lowboy 3 Drawer manual

fantastic furniture

fantastic furniture Cooper Lowboy 3 Drawer manual

OYPLA Home 3663 user manual

OYPLA Home

OYPLA Home 3663 user manual

dellonda Chester Rattan DG67 Assembly instructions

dellonda

dellonda Chester Rattan DG67 Assembly instructions

ASKO-NÁBYTEK ATXD14 Assembling Instruction

ASKO-NÁBYTEK

ASKO-NÁBYTEK ATXD14 Assembling Instruction

Stryker 3500-000-150 Operation & maintenance manual

Stryker

Stryker 3500-000-150 Operation & maintenance manual

Himolla Tangram Motion Series Assembly instructions

Himolla

Himolla Tangram Motion Series Assembly instructions

Till-Hilft 87024.731 manual

Till-Hilft

Till-Hilft 87024.731 manual

Home Decorators Collection JS-3427-C Use and care guide

Home Decorators Collection

Home Decorators Collection JS-3427-C Use and care guide

RAB ProRak 26 quick start guide

RAB

RAB ProRak 26 quick start guide

Interbuild Stockholm Balcony Table foldable Assembly instructions

Interbuild

Interbuild Stockholm Balcony Table foldable Assembly instructions

DREAMS Eppy Sofa Bed Assembly instructions

DREAMS

DREAMS Eppy Sofa Bed Assembly instructions

SOUND FRIDGE CT51-FRIDGE user manual

SOUND FRIDGE

SOUND FRIDGE CT51-FRIDGE user manual

Next 231989 Assembly instructions

Next

Next 231989 Assembly instructions

Homelegance BF-1UP-CT Assembly instruction

Homelegance

Homelegance BF-1UP-CT Assembly instruction

Eljer 091-2190 Specification sheet

Eljer

Eljer 091-2190 Specification sheet

Probuilder 52461 instruction manual

Probuilder

Probuilder 52461 instruction manual

manuals.online logo
manuals.online logoBrands
  • About & Mission
  • Contact us
  • Privacy Policy
  • Terms and Conditions

Copyright 2025 Manuals.Online. All Rights Reserved.