Venicci ENGO BASE User manual

ENGO BASE
ENG
1
CZ
73
PL
25
SK
97
IT
49
DE
120
ES
144
This is an i-Size Enchanced Child Restraint System. It is approved accord-
ing to UN Regulation No.129, for use in, i-Size compatible vehicle seat-
ing positions as indicated by vehicle manufacturers in the vehicle users’
manual.
If in doubt, consult either the Enhanced Child Restraint System manufac-
turer of the retailer.
Do not use the ECRS in seating positions where there is an active airbag
installed.
Venicci Engo
ECE R129/03
The height of the children ranges from 40cm to 87cm/ The weight of the
children should be less than or equal to 13kg.
This child safety seat has passed UN Regulation No. 129/03. Please read
the full instrustions before assembling and using this product.
Notice
Made in China
Distributed in Europe: Babysky Sp z o.o Sp. k
Distributed in the United Kingdom: MAGICBABY LTD
Unit 7 Bookelds Way, S63 6DL Manvers Rotherham
www.venicci.co.uk

Notice / Uwaga / Nota / Oznámení / Oznámenie / Beachten Sie / Aviso
• isofixbase ECE R129/03
• ThisisUniversalBeltedEnchancedChild RestraintSystem.Itis approvedaccordingtoUNRegulationno.129,foruse
primarilyin„Universalseatingpositions”asindicatedbyvehiclemanufacturersinthevehicleuser’smanual.
• Ifindoubt,consulteithertheEnchanded ChildRestraintSystemmanufacturerof theretailer.
• DonotusetheECRS inseatingpositions wherethereisanactiveairbaginstalled.
• isofixbase ECE R129/03
• Totoje univerzálnydetskýzádržnýsystémspásmi. JeschválenýpodľapredpisuOSN č.129 napoužitiepredovšetkýmna
„univerzálnychmiestachnasedenie”,akouvádzajúvýrobcoviavozidielvnávodenapoužívanie vozidla.
• Vprípadepochybnostísa obráťtebuďna výrobcuEnchandedChildRestraintSystem(Enchaneddetský zádržnýsystém)
alebonapredajcu.
• SystémECRSnepoužívajtenamiestachna sedenie,kdejenainštalovanýaktívnyairbag.
• isofixbase ECE R129/03
• To jesturządzenieprzytrymującedladzieci kategotrii„i-Size”.Uzyskałoono homologacjęzgodniezregulaminemnr129,
dostosowanianamiejscachsiedzącychkategorii„i-Size”wskazanychprzezproducentówpojazdówwinstrukcji
użytkownikapojazdu.
• Wprzypadkuwątpliwościnależyskonsultowaćsięzproducentemlubsprzedawcądetalicznymurządzenia.
• Nieużywćtegofotelikanasiedziskachpojazdówwyposażonychwaktywnąpoduszkępowietrzną.
• isofixbase ECE R129/03
• DiesisteinverbessertesKinderrückhaltesystemmit Gürtel (ECRS).Esist gemäßder UNRegelungNr.129fürdieVerwen-
dunghauptsächlichin„Universal-Sitzpositionen”zugelassen,wievonden AutoherstellerninderAutobetriebsanle-
itungangegeben.
• WendenSiesichimZweifelsfallentwederanden KinderrückhaltesystemmitGürtel-Herstelleroderden Einzelhändler.
• VerwendenSiedasKinderrückhaltesystemmitGürtelnichtin Sitzpositionen,in deneneinaktiverAirbaginstalliertist.
• isofixbase ECE R129/03
• Questoèun SistemaAvanzatodiRitenutadeiBambinii-Size.Èapprovatosecondoil regolamentoUNN.129,per l’uso
inposizionidi sedutadeiveicolicompatibiliconlai-sizecomeindicatodai produttorideiveicolinelmanuale utente
delveicolo.
• Seindubbio,consultareiproduttoridiSistemiAvanzatidiRitenutadeiBambinioilrivenditore.
• Nonusarel’ECRSinposizionidiseduta doveèpresenteunairbagattivo.
• isofixbase ECE R129/03
• Esteesunsistema deproteccióninfantilmejoradoi-Size.Está aprobadodeacuerdocon elReglamenton.º129dela ONU,
parasuuso enposicionesdeasientodevehículoscompatiblesconi-Sizesegúnloindicado porlosfabricantesde
vehículosenelmanual delvehículo.
• Paracualquierduda,consulteconelfabricanteodistribuidordelsistemadesujeciónparaniñosavanzado.
• Nouseel ECRSenasientosdonde hayaunairbagactivoinstalado.
• isofixbase ECE R129/03
• Jednáseo univerzálnípásovýzádržnýsystémproděti. JeschválenpodlepředpisuOSNč.129propoužití předevšímna
„univerzálníchmístechksezení”, jakjeuvedenovýrobcivozidelvnávodukpoužitívozidla.
• Vpřípaděpochybnostíse obraťtebuďnavýrobceproduktu„Rozšířenýzádržnýsystémproděti”,nebo naprodejce.
• NepoužívejtesystémECRSnamístechk sezení,kdejeinstalovánaktivníairbag.

01
Contents Warning
02
Contents.....................................................................................................................1
Warning.................................................................................................................. 2-3
Know your infant carrier ..................................................................................... 4-6
1. Certication...........................................................................................................6
2. Use in the vehicle ............................................................................................. 7-8
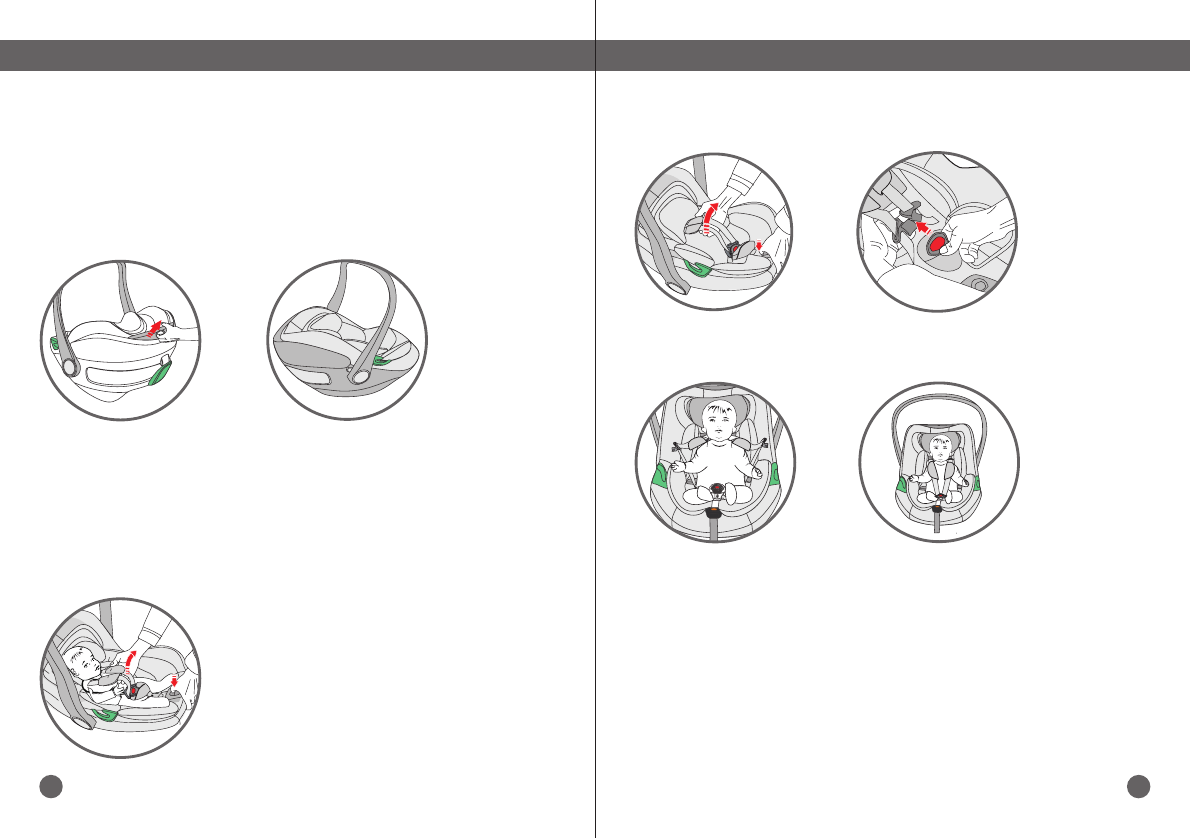
3. Securing your baby........................................................................................9-13
3.1 Securing your baby using the baby insert...........................................................9
3.2 Adjusting the handle................................................................................................ 10
3.3 Adjusting the headrest ............................................................................................ 11
3.4 Loosening the shoulder straps.............................................................................. 11
3.5 Securing your baby using the harness............................................................... 12
3.6 Tightening the harness............................................................................................ 13
3.7 Checklist to unsure that your baby is buckle up correctly.......................... 13
4. Installation in the vehicle..................................................................................14
4.1 Securing infant carrier in your vehicle................................................................ 14
4.2 Installation in the vehicle for 40-87cm, Rearward facing ISOFIX+support
leg+harness...................................................................................................................15-17
4.3 Disassembly instructions...................................................................................17-18
5. Fitting the sunshade..........................................................................................19
6. Care instructions ..........................................................................................20-24
6.1 Care instructions......................................................................................................... 20
6.2 Care for the harness buckle.................................................................................... 20
6.3 Method of cleaning fabric cover.....................................................................21-22
6.4 Re-tting the cover.................................................................................................... 22
6.3 Cleaning ........................................................................................................................ 23
6.4 Year warranty.........................................................................................................23-24
1. The rigid items and plastic parts of an Enchanced
Child Restraint System shall be so located and
installed that they are not liable, during everyday use
of the vehicle, to become trapped by an movable seat
or in a door of the vehicle.
2. To use carry-cots perpendicular to the longitudal
axis of the vehicle.
3. Any straps holding the restraint to the vehicle
should be tight, that any support-leg should
be in contact with the vehicle oor, that any straps
or impact shields restrainting the child should be
adjusted to the child’s body, and that straps should
not be twisted.
4. It is important to ensure that any lap strap is worn
low down, so that the pelvis is rmly engaged.
5. The Enchanced Child Restraint System should be
replaced when it has been subject to violent stresses
in an accident.
6. It is danger to make any alterations or additions
to the device without the approval of the Type
Approval Authority, and it is also danger not following
closely the installation instructions provided by the
Child Restraint System manufacturer.

03
Warning Know your infant carrier
04
7. Be sure that children are not left in their Enhanced
Child Restraint System unatteneded.
8. Be sure that any luggage or other objects liable
to cause injuries in the event of a collistion shall be
properlu secured.
9. Be sure that the Enhanded Child Restrainnt System
shall no be used without the cover.
10. Be sure that the Enhanced Child Restraint System
cover should not be replaced with any other than the
one recommended by the manufacturer, because
the cover constitutes an integral part of the restraint
performance.
11. Be reered to the vehicle manufacturer’s hand-
book for the use of an“i-Size ECRS”.
1. Headrest
2. Shoulder pad
3. Shoulder buckle
4. Harness release button
6. Harness strap
14. Baby insert
14

05
Know your infant carrier Know your infant carrier
06
7. Handle
8. Lap belt guide
9. Shade shed shaft
10. Seat shell
11. Handle adjustor
12. Diagonal belt guide
13. Headrest adjuster
15. ISOFIX connector
16. ISOFIX Release button
17. Support leg adjusting button
18. Support leg block
19. Support leg indicator
20. Base unlocking handle
12

07
Use in the vehicleUse in the vehicle
08
You can use your child car seat as follows:
... as a child safety seat installed in a vehicle.
Child Safety Seat
Tested and certied
according to ECE*R129
Applicable size
range
Height from
40 cm to 87 cm
Body Weight
Up to 13 kg
Venicci Engo
The child safety seat has been designed, tested and certied
according to the requirements of the Euripean Standard
for Child Sarety Equipment (ECE R 129).
The seal of approvel E (in a circle) and the approval number
are located in the approval label (sticker on the child safety seat).
This approval will be invalidated in you make any modications
to the child safety seat. Only the manufacturer is permitted to make
modications to the child safety seat.
*ECE = European Standaed for Safety Equipment
1. Certication 1. Use in the vehicle
Warning
Never use this child restraint system in
seating positions where an active airbag
is installed.
An active frontal airbag may cause death or
seriously injury of your child in an accident.
Please read the instructions carefully and keep
safely for future reference. There is and instruc-
tions compartment in the back of the child car
seat for storage of the instructions manual.

09
Securing your baby Securing your baby
10
3. Securing your baby
3.1 Securing your baby using the baby insert
3.2 Adjusting the handle
For the protection of your baby
You can engage the adjustor in four positions
The baby insert gives your baby the necessary support
while he or she is still small. The baby insert is used to
provide extra comfort for very small babies.
Caution! Please use the baby insert attached to this
infant carrier when your baby’s height is less than 75cm.
• Always secure your baby in the infant carrier using the harness.
• Never leave your baby unattended in the infant crrier when placing it on
elevated surfaces (e.g. A table, nappy changig unit, etc.).
• Never allow the strap end to become caught in moving parts (e.g. Automat-
ic doors, escalators, etc.).
• Caution! The plastic parts of the infant carrier heat up in the sun, so that
your baby may ger burnt. Protect your baby and the infant carrier against
intensive solar radiation (e.g. By putting a light cloth over the seat).
• The infant carrier requires only one seating postion in the car. This advan-
tage means, however, that your baby must be in a semi-reclined position.
• Take your baby out of the infant carrier as often as possible to relieve its
spine. We recommend frequent breaks during long journeys. Even outside
of the car, please avoid leaving your baby in the infant carrier for too long.
simultaneously press both buttons on the handle.
Then whilst holding the adjuster pressed turn the handle backwards until
it engages in the desired position.
A: Only available for carrying, can not be used when installing on the vehicle
seat.
Caution! Ensure that the handle is securely engaged before you pick up the
infant carrier.
B: For placing your baby into the infant carrier.
Tip! You can move the handle from one position to another by pushing a
button.
C: For setting the infant carrier down safety outside the car.
D: Available for installation status on the vehicle seat.

11
Securing your baby Securing your baby
12
3.5 Securing your baby using the harness3.3 Adjusting the headrest
3.4 Loosening the shoulder straps
A correctly adjusted headrest ensures your baby’s optimal posture
in the infant carrier.
To adjust the height of the headrest to t your baby:
The headrest must be adjusted so that the shoulder straps are at the same
lever as your baby’s shoulders or slightly above.
Caution! Do not twist of interchange the shoulder straps.
Tilt the headrest adjuster until it disengages.
Slide the headrest adjuster until the shoulder straps are at the
correct height and re-engage.
• Loosening the shoulder straps
• Open the harness buckle (press the red release button).
• Place your baby into the infant carrier.
• Put the shoulder straps over the shoulders of your baby, then put the
buckle tongues together and engage in the harness buckle with
an audible“click”

13
Securing your baby Installation in the vehicle
14
3.6 Tightening the harness
3.7 Checklist to ensure that your baby is buckled up
correctly.
Pull the strap end.
Caution! Pull the strap end straight towards
you, not upwards or downwards.
Please pay attention to the strap end.
Whilst travelling (especially outside the car)
it should always be attached to the cover.
In the case of an emergency stop or an additional accident usecured
persons or objects may cause injuty to other vehicle occupants. Please
always check that...
The baby insert is only suitable for infants
with height from 40 to 75 cm. If your child has
height more than 75cm, please take our the
baby insert.
Some vehicle seat covers of sensitive materials (e.g. Velour, leather, etc..)
may develop wear marks when child seats are used. This can be avoided
by placing a blanket or towel under the child seat.
• The shoulder straps of the infant carrier are
comfortable but rm around your child.
• The shoulder straps are adjusted correctly.
• The shoulder straps are not twisted.
• The buckle tongues are engaged in the
harness buckle.
4.1 Installation in the vehicle
For the safety of your baby, please check that...
For the protection of all vehicle occupants
To protect your vehicle.
Please do not leave your child unattended in the child
safety seat in the vehicle.
• The backrests of the vehicle seats are locked (i.e. That a foldable rear
seat bench latch is engaged).
• All heavy of sharp-edged objects in the vegicle (e.g. On the parcel
shelf) are secured.
• All persons in the vehicle have their seat belts fastened.
• The child safety seat is always secured when it is in the vehicle, even
if no child is being transported.

15
Installation in the vehicle Installation in the vehicle
16
4.2 Installation instructions for 40-87 cm, Rearward facing,
ISOFIX + Support Leg + harness.
4.2.1 Method one:
First install the base on the seat, then put the infant carrier into the base.
4.2.2 Method two:
First install infant carrier into the base, and then install both on the seat.
Unfold support leg until it locks in place.
Press the ISOFIX release button to slide
the ISOFIX connectors to the end.
Push the ISOFIX connectors directly into the an-
chorages until you hear and audible sound“click”.
Grasp the seat base to check the seat if it is fastened
tighly or shakes, meanwhile observe the ISOFIX red/
green indicator. If the seat shakes and the ISOFIX
connectors are pulled out, please repeat the above
steps and install it again.
Push the ISOFIX connectors directly into the
anchorages until you hear an audible sound“click”.
Grasp the seat base to check the seat if it is fastened
tighly or shakes, meanwhile observe the ISOFIX red/
green indicator. If the seat shakes and the ISOFIX
connectors are pulled out, please repeat the above
steps and install again.
Squeeze the support leg
adjusting button, pull out the
support leg until it rests firmly
on the floor. Observe the ISOFIX
red/green indicator ro confirm
the installation status.
Put the infant
carrier into the
base.
Unfold support
leg until it locks
in place. Press the
ISOFIX release
button to slide the
ISOFIX connectors
to the end.
Squeeze the support leg
adjusting button, pull out
the support leg until it rests
firmly on the floor. Observe the
ISOFIX red/green indicator to
confirm the installlation status.
Caution: Please only move to next step when ISOFIX has been slid to the
end with appearing the red marks.
Pull the infant carrier into the base, and ensure that the handle is in its upper position D.

17
Installation in the vehicle Installation in the vehicle
18
Ensure that the handle is in its upper position D.
Squeeze the support leg adjusting button
to retract the support leg.
Squeeze the support leg adjusting button
to retract the support leg.
Finally, rotate the support leg
and insert it into the slot at the
bottom of the seat.
Finally, rotate the support leg
and insert it into the slot at the
bottom of the seat.
4.3 Disassembly instrustion
4.3.1 Method one:
First remove the infant carrier from the base, then remove the base.
4.3.2 Method two:
Remove the infant carrier and the base from the seat together.
Pull the handle
on the base to
unlock. Remove
the infant carrier
from the base.
Press the ISOFIX
release button to
slide the ISOFIX
connectors to
separate the base
and the seat.
Press the ISOFIX release button
to slide the ISOFIX connectors to
separate the base and the seat.

19
Fitting the sunshade Care instructions
20
5. Pull the head plate to expand / Fold the canopy 6.1 Care instructions
Fold Status Expand Status
To retain the protective eects
6.2 Care for the harness buckle
The function of the harness buckle is important for the safety of your
child. The malfucntions of the harness buckle are mostly attributable
to accumulations of dirt and dust.
• In an accident at a collision speed above 10 km/h the child safety seat could
suer damage which is not necessarily obvious.
• In such cases it is extremelu important that you replace the child seat.
Please dispose of it properly.
• Regulatly check all important parts for damage.
• Encure the correct operation of all mechanical components.
• To prevent damage ofr breakage, ensure that the child seat does not be-
come jammed in the car door, seat runners, etc.
• Should the child seat be damaged (for example after dropping it) it must be
inspected be the manufacturer.

21
Care instructions Care instructions
22
6.4 Re-tting the cover
6.3 Method of cleaning fabric cover
To ret the cover on the seat just hook up the elastic loops to its
hook stand, and t back the headrest cover.
1. Take out the button on the side part of the cover.
2. Take out the button on the main cover.
3. Press the harness release button and at same time
pull both shoulder straps forward.
4. Take out the button on the main cover and the shoulder pad.
5. Take out the fabric cover and wash it.

23
Care instructions Warranty
24
6.5 Celaning
Please be sure to use only original Venicci replacement seat covers, as the
seat cover is important to the proper functioning of the system. Replacement
seat covers are available from your retailer and or at branches.
The child seat must not be used without the seat cover.
• The cover can be removed and washed with a mild detergent using the
washing machine’s cycle for delicate items (30oC). Please observe the
instructions on the washng label of the cover. The colours of the cover may
fade if washed at more than 30oC. Do not spin, and never tumble dry in an
electric clothes dryer (the fabric may separate from the padding).
• The plastic parts can be cleaned using soapy water. Do not use harsh
cleaning agents (such as solvents).
• The harness can be removed and washed in lukewarm soapy water.
• Caution! Never remove the buckle tongues from the straps.
• The child safety seat is covered by a 12-month warranty.
• We hereby assure you that the product has been manufactured in accord-
ance with current EU requirements regarding safety and quality standards
and that at the time of purchase the product is free from manufacturing
and material defects.
• The warranty is valid in the country of purchase and is satised by the
authorised distributor.
6.6 1-year warranty
• The warranty covers all manufacturing defects in regard to the materials
and workmanship, provided that the product is used in accordance with
the user’s manual, under normal conditions, by the rst enduser and
within 12 months from the date of purchase. Manufacturer assumes
responsibility for the repair or replacement of the defective product, but
the guarantor decides about the choice of how to remove the defect
and process the complaint.
• The warranty does not cover damage caused by daily use, such as the
wear of fabric as well as the natural loss of colours and deterioration of
the materials resulting from the normal ageing of the product.
• The warranty also does not apply in the event of damage to the product
due to accidental damage, non-observance of the user’s manual, im-
proper use, damage due to negligence, re, contact with liquid or other
external causes.
• At the time of ling a complaint, the child safety seat must have all
labels or an identication number and may only be serviced by a person
authorised to do so.
Made in China
Distributed in Europe: Babysky Sp z o.o Sp. k
Distributed in the United Kingdom: MAGICBABY LTD
Unit 7 Bookelds Way, S63 6DL Manvers Rotherham
www.venicci.co.uk

25
Zawartość Uwaga!
26
Zawartość.................................................................................................................25
Ostrzeżenie........................................................................................................26-27
Elementy fotelika..............................................................................................28-29
1. Certykacja..........................................................................................................30
2. Użytkowanie w samochodzie ....................................................................31-32
3. Zapinanie dziecka w foteliku .....................................................................33-37
3.1 Używanie wkładki...................................................................................................... 33
3.2 Zmiana położenia rączki.......................................................................................... 34
3.3 Regulacja zagłówka................................................................................................... 35
3.4 Luzowanie pasów....................................................................................................... 35
3.5 Zapinanie dziecka w pasy fotelika ....................................................................... 36
3.6 Zacieśnianie pasów................................................................................................... 37
3.7 Upewnij się, że dziecko jest prawidłowo zapięte w foteliku....................... 37
4. Montaż w samochodzie ....................................................................................38
4.1 Montaż w samochodzie........................................................................................... 38
4.2 Montaż fotelika w samochodzie dla 40-87cm, tyłem do kierunku jazdy,
ISOFIX+wspornk+pasy fotelika..............................................................................39-41
4.3 Demontaż z samochodu ...................................................................................41-42
5. Obsługa budki.....................................................................................................43
6. Pielęgnacja fotelika......................................................................................44-48
6.1 Pielęgnacja fotelika ................................................................................................... 44
6.2 Sprzączka pasów ........................................................................................................ 44
6.3 Czyszczenie tapicerki..........................................................................................45-46
6.4 Montaż tapicerki......................................................................................................... 47
6.5 Czyszczenie fotelika .................................................................................................. 47
7. Gwarancja............................................................................................................48
1. Twarde elementy oraz plastikowe części urządzenia
przytrzymującego dla dzieci należy umieścić i zain-
stalować w taki sposób, by w normalnych warunkach
eksploatacji pojazdu ne mogły zostać uwięzione przez
przsuwne siedzenie lub drzwi pojazdu.
2. Przenośne łóżeczka należy instalować prostopadle
do osi wzdłóżnej pojazdu.
3. Należy pamiętać, że wszelkie paski mocujące
urządzenie przytrzymujące do pojazdu powinny być
napięte, każdy wspornik (noga) powinien dotykać
podłogi pojazdu, aby taśmy (pasy) przytrzymujące
dziecko były dopasowane do budowy jego ciała oraz
by taśmy (pasy) nie były poskręcane.
4. Należy dopilnować, by wszystkie taśmy biodrowe
przebiegały nisko, tak aby miednica była mocno przy-
trzymywana.
5. Zaleca się wymianę urządzenia, jeśli zostało podda-
ne gwałtownym obciążeniom podczas wypadku.
6. Pamiętaj o niebezpieczeństwie związanym z wszel-
kimi przeróbkami lub instalacją dodatkowych elemen-
tów urządzenia bez zgody organu udzielającego ho-
mologacji typu oraz niebezpieczeństwa związanego z
nieprzestrzeganiem instrukcji instalacji dostarczonych

27
Uwaga! Elementy fotelika
28
przez producenta urządzenia przytrzymującego.
7. Nie pozostawiaj dziecka bez opieki w urządzeniu
przytrzymującym dla dzieci.
8. Bagaż lub inne przednioty mogące spowodować
obrażenia ciała w przypadku zderzenia powinny być
odpowiednio zabezpieczone.
9. Nie używać urządzenia przytrzymującego dla dzieci
bez tapicerki.
10. Nie zastępuj tapicerki urządzenia przytrzymują-
cego dla dzieci inną niż zalecona przez producenta,
gdyż stanowi ona instegralną część urządzenia mającą
wpływ na jego funkcjonowanie.
11. Instruckje dotyczące urządzenia przytrzymującego
dla dzieci należy zachować w jego okresie użytko-
wania lub umieścić je w instrukcji obsługi pojazdu w
przypadku wbudowanych urządzeń przytrzymują-
cych.
12. Zapoznaj się z instrukcją obsługi samochodu w
celu używania urządzenia przytrymującego dla dzieci
kategotrii„i-Size”
1. Zagłówek
2. Ochraniacze pasów
3. Pas naramienny
4. Przycisk luzowania pasów
6. Pas dopasowujący
14. Wkładka dla najmniejszyh dzieci
14

29
Elementy fotelika Elementy fotelika
30
7. Rączka
8. Prowadnica pasa biodrowego
9. Daszek budki
10. Skorupa fotelika
11. Przycisk regulacji rączki
12. Prowadnica pasa piersiowego
13.Regulator oparcia
12
15. Łączniki ISOFIX
16. Przyciski zwalniające ISOFIX
17. Przycisk regulacji wspornika
18. Dolna część wspornika
19. Wskaźnikj wspornika
20. Dźwignia wypinania fotelika

Użytkowanie w samochodzie
32
Montaż fotelika w samochodzie:
Certykacja
... jako fotelik samochodowy montowany
w samochodzie.
Venicci
Testowany i certykowany
zgodnie z ECE*R129
Wzrost dziecka
Wzrost dziecka
od 40cm do 87cm
Engo
Fotelik samochodowy został zaprojektowany, przetestowany i
certykowany zgodnie z wymogami europejskiego standardu dla
fotelików samochodowyh (ECE R 129).
Znak certykacji E (w kółku) i numer homologacji znajdują się na
naklejce homologacyjnej (umieszczonej na foteliku)
Ta homologacja nie będzie obowiązywać, jeżeli fotelik zostanie pod-
dany modykacjom. Wyłącznie producent może poczynić modyk-
acje w foteliku.
Zapoznaj się z instrukcją obsługi samochodu w celu prawidłowego
zamocowania fotelika samochodowego.
*ECE = europejski standard dla fotelików samochodowyh
1. Certykacja 1. Użytkowanie w samochodzie
OSTRZEŻENIE
Nigdy nie używaj tego fotelika samochodowego
na siedzeniach pojazdów z aktywną poduszką
powietrzną.
Aktywna poduszka powietrzna może powodować
śmierć lub poważne obrażenia ciała dziecka podczas
wypadku.
Należy dokładnie przeczytać instrukcję obsługi i
zachować ją na przyszłość, jako odniesienie. W tylnej
części fotelika znajduje się miejsce do przechowywa-
nia instrukcji obsługi.
31

33
Użytkowanie fotelika Użytkowanie fotelika
34
3. Użytkowanie fotelika
3.1 Używanie wkładki
3.2 Regulacja rączki
W celu zapewnienia ochrony Twojemu dziecku
Rączkę fotelika można ustawić w jednej z czterech pozycji.
Wkładka ma za zadanie zapewnienie ochrony dziecku,
gdy znajduje się ono w foteliku. Wkładka ma za zadanie
zapewnienie dodadatkowego komfortu najmniejszym
dzieciom.
Uwaga! Należy używać wkładki w foteliku dla dziecka
o wzroście do 75cm.
• Zawsze zapinaj dziecko w foteliku przy użyciu pasów.
• Nigdy nie pozostawiaj dziecka bez opieki w foteliku, jeżeli kładziesz fotelik
na podwyższeniu (n.p. Na stole, podczas zmiany pieluszki, etc.).
• Zwróć uwagę, czy żaden z elementów fotelika nie został przytrzaśnięty (np.
Przez przesuwne drzwi pojazdu, itd..)
• UWAGA! Elementy fotelika mogą bardzo się nagrzać w przypadu wystawie-
nia go na działanie promieni słonecznych, co może prowadzić do poparze-
nia dziecka. Aby temu zapobiec, w przypadku pozostawienia fotelika w
samochodzie – przykryj go np. kocem.
• Dziecko powinno znajdować się w pozycji pół-leżącej w foteliku.
• Podczas podróży rób przerwy i wyciągaj dziecko z fotelika tak często, jak to
tylko możliwe. Nie pozwól dziecku na zbyt długie przebywanie w foteliku
samochodowym.
W tym celu, wciśnij oba przyciski znajdujące się po bokach rączki
i jednocześnie ustaw ją w wybranym położeniu.
Pozycja:
A: Wyłącznie do przenoszenia fotelika – nie może być używana
w samochodzie.
UWAGA! Przed podniesieniem fotelika zawsze upewnij się, że rączka jest
prawidłowo zablokowana.
B: W celu umieszczczenia dziecka foteliku.
C: W celu umieszczenia fotelika poza siedziskiem samochodu.
D: W celu montażu fotelika w samochodzie

35
Użytkowanie fotelika Użytkowanie fotelika
36
3.5 Zapinanie dziecka przy użyciu sprzączki pasów3.3 Regulacja zagłówka
3.4 Luzowanie pasów naramiennych
Prawidłowo ustawiony zagłówek zapewnia dziecku jego optymalne
ułożenie w foteliku.
W celu zmiany wysokości zagłówka:
Zagłówek powinien być ustawiony na takiej wysokości, aby pasy naramienne
fotelika przechodziły bezpośrednio nad lub nieco powyżej ramion dziecka.
UWAGA! Pasy nie mogą być luźne, poskręcane ani skrzyżowane.
Pociągnij taśmę znajdującą się za zagłówkiem i jednocześnie pchnij
zagłówek w wybrane położenie (aby pasy naramienne przechodzły
na właściwej wysokości).
Wciśnij przycisk luzowania pasów i jednocześnie
pociągnij oba pasy naramienne (nad sprzączką
fotelika).
• Poluzuj pasy fotelika
• Rozepnij sprzączkę (w tym celu wciśnij czerwony przycisk).
• Umieść dziecko w foteliku.
• Poprowadź pasy naramienne nad ramionami dziecka, następnie połącz
obie, wysuwalne części sprzączki i wsuń je w otwór sprzączk. Powinieneś
usłyszeć kliknięcie.
Table of contents
Languages:
Other Venicci Car Seat manuals