• TheunitshouldbeinSTANDBYmodetosetalarm.
• ThealarmcanbesettoactivatetwiceadaybysettingtwodifferentalarmtimesinALARM1andALARM2.
• Theunitcanbesetto“BUZZER”,“TUNER”or“ ”alarm.
To Set Alarm 1
1. Press the ALM 1 button, then the “ ”icon,hour&minutedigitsblink
on the display.
2. Press the HOUR button to adjust the hours.
3. PresstheMIN button to adjust the minutes.
4. PresstheTIME/Fn button to select “BUZZER”,“TUNER”,“ ”.
Note: The shown “TUNER”iconrepresentsRadio(FM)mode.
5. AdjustthevolumecontroltoobtainthedesiredvolumefortheAlarm1.
6. PresstheALM 1 button again to confirm.
7. The alarm 1 indicator will light up.
Notes:
• Forthe“TUNER”Alarm,youshouldtuneintoyourdesiredstationinFMbandbeforesettingalarms,anditwillturn
on to the last station you tuned in.
• For“ ”Alarm,insertyouriPod/iPhoneintotheconnector.IfnoiPod/iPhoneisinserted,itwillalarmtothebuzzer
instead.
Theclockradiowillwakeupto“BUZZER”,“TUNER”,“ ”,whenalarmtimerreachesthepresettimeandthenturns
offautomaticallyafter60minutes.
Note: Aftertheunitwakesupto“TUNER”or“ ”,youcanadjustthevolumecontroltoobtainthedesiredvolume.
To Set Alarm 2
Settingthealarmforalarm2isthesameassettingalarm1(UsetheALM 2 button instead of the ALM 1 button).
Note: IftheAlarm1&Alarm2aresettothesametime,theunitwillalarmonceonly.
To Turn Off Alarm
1. Snooze(Ifyouwanttosnoozeafewmoreminutes)
Pressing the SNOOZEbuttonwilldeactivatethesoundfor9minutes.Snoozefunctioncontinuestooperate1hour
after the preset alarm time.
2. To stop alarm sound
Press the (Standby/On)buttontostopalarmsound,anditwillresumeafter24hours.
To Change the Alarm Time
Set the alarm time again.
To Cancel Alarm Mode
Press and hold the ALM 1 or ALM 2 buttons for 2 seconds until the alarm1 or alarm2 indicator disappears.
Note: Press and hold the ALM 1 or ALM 2 buttons for 2 seconds again to resume the previous alarm mode.
Compatible iPod/iPhone Types
TROUBLESHOOTING GUIDE
LISTENING TO YOUR iPod/iPhone
LISTENING TO YOUR iPod/iPhone
SLEEP TIMER SETTING
Removing an iPod/iPhone Dock Adapter
RemovetheDockAdapterbygrippingtheinsidewith
your thumb, then lifting out the adapter using the friction
between your thumb and the adapter.
Inserting Your iPod/iPhone
1. EnsureanappropriateiPod/iPhoneDockingAdapterisinstalled.
2. InsertyouriPod/iPhoneintotheconnectorinthedock.
Cleaning the Unit
• Besuretoturnofftheunit,disconnectthepoweradapterandremoveallexternalconnectionsbeforecleaningtheunit.
• Wipetheunitwithadrysoftcloth.Ifthesurfacesareextremelydirty,wipecleanwithacloththathasbeendippedin
aweaksoap-and-watersolutionandwrungoutthoroughly,thenwipewithadrycloth.
• Neverusealcohol,benzene,thinner,cleaninguidorotherchemicals.DONOTusecompressedairtoremovedust.
MAINTENANCE
Thesleeptimerturnstheunitoffautomaticallyatapre-selectedtime.
1. Whiletheunitison,presstheSLEEP button, “ ”willblinkand“90”willbeshownonthedisplay.
2.Press the SLEEP button repeatedly to select the desired sleep time (in minutes) as listed below:
Note: “OFF”meansthesleepmodeisdisabled.
3. Aftersettingadesiredsleeptime,the“ ”iconwillbeshownonthedisplay.
4. Theunitwillautomaticallyturnoffonceitreachesthesleeptime.
• Toclearthepresetsleeptime,presstheSLEEP button repeatedly until “OFF”appears.
Problems Solutions
Clock
Clockdoesnotshowthecorrecttime. • Therehasbeenanelectricalpowerinterruption.Resettheclock.
Alarm does not come on at the preset
time.
• Isthecurrenttimecorrectlysetonthetimedisplay?
• Isthealarmtimecorrectlyset?
RADIO
PoorFMreception • MakesureFMantennawireisfullyextended.
• Electricalinterferenceinyourhomecancausepoorreception.Movethe
unit away from them (especially those with motors and transformers).
iPod/iPhone
iPod/iPhonedoesnotdockproperlyordoes
not install properly.
• RemoveyouriPod/iPhonefromthedockandcheckforobstructionon
theconnectorsinthedockandonyouriPod/iPhone.Makesureyouare
usingtheappropriateadapterforyourmodelofiPod/iPhone.
iPod/iPhone does not respond to the
speakersystem.
• MakesurethatyouriPod/iPhoneisworkingproperlybeforedockinginto
theunit.PleaserefertoyouriPod/iPhonemanualfordetails.
iPod/iPhone Dock
Adapter
(not included)
Installing an iPod/iPhone Dock Adapter
1. Before connecting your iPod/iPhone, we recommend
you install the appropriate iPod/iPhone Dock Adapter
(suppliedwiththeiPod/iPhoneorsoldseparately)inthe
dockoftheunit.
2. Insert your iPod/iPhone Dock Adapter (not included)
intothedockuntilitsitsrmlyinplace.
- 4 - - 5 - PrintedinChina811-803191W012
Design and specifications are subject to change without notice.
VENTURER ELECTRONICS (“VENTURER”)makesthefollowinglimitedwarranty.Thislimitedwarrantyextendtothe
originalconsumerpurchaserandislimitedtonon-commercialuseoftheproduct.
Ninety (90) Day Parts & Labor Warranty
VENTURERproductspurchasedintheUnitedStatesorCanadaarewarrantedtobefreefromdefectsinmaterialsor
workmanshipforaperiodofninety(90)daysfromthedateoftheiroriginalretailpurchase.Iftheunitfailstoconformto
this warranty, we will service the product using new or refurbished parts and products, at VENTURER’s sole discretion.
Duringaperiodofninety(90)daysfromtheeffectivewarrantydate,VENTURER will provide, when needed, service labor to
repairamanufacturingdefectatitsdesignatedServiceCenter.ToobtainwarrantyserviceintheUnitedStatesorCanada,
you must first call our Customer Support Center at (800) 252-6123, during the hours listed in the box below. The
determination of service will be made by VENTURER Customer Support. PLEASE DO NOT RETURN YOUR UNIT TO
VENTURERWITHOUT PRIOR AUTHORIZATION.Neworremanufacturedreplacementsfordefectivepartsorproductswill
beusedforrepairsbyVENTURERatitsdesignatedServiceCenterforninety(90)daysfromtheeffectivewarrantydate.
Suchreplacementpartsorproductsarewarrantedforanadditionalninety(90)daysfromthedateofrepairorreplacement.
The Customer will be required to ship the unit to the Service Center indicated at the time Customer Support is contacted
tomakethenecessaryrepairs.Thecustomerisresponsibleforalltransportationchargestotheservicefacility.
Packaging and Shipping Instruction
WhenyousendtheproducttotheVENTURERservicefacilityyoumustusetheoriginalcartonboxandpackingmaterial
or an equivalent as designated by VENTURER.
Your Responsibility
(1) Youmustretaintheoriginalsalereceipttoprovideproofofpurchase.
(2) ThesewarrantiesareeffectiveonlyiftheproductispurchasedandoperatedintheUnitedStatesorCanada.
(3) Warrantiesextendonlytodefectsinmaterialorworkmanship,anddonotextendtoanyproductorpartswhichhave
been lost or discarded, or damage to product or parts caused by misuse, accident, improper operation or maintenance,
or use in violation of instructions provided with the product, or to product which has been altered or modified
withoutauthorizationofVENTURER, or to products or parts thereof which have had the serial number removed or
changed.
Out of Warranty
Intheeventyourproductrequiresrepairafterthelimitedwarrantyperiodhasexpired,pleasecontactourCustomer
SupportCenterat1-800-252-6123or www.1800customersupport.com.
Hours: Monday–Thursday: 9–7, Friday: 9–5, Saturday: 9–12 EST.
Important:
Youareresponsibleforanytransportation,shippingorinsurancerelativetothereturnofproducttoourProduct
Returns Center.
Allwarrantiesimpliedbystatelaw,includingtheimpliedwarrantiesofmerchantabilityandtnessforaparticularpurpose,
areexpresslylimitedtothedurationofthelimitedwarrantiessetforthabove.Withtheexceptionofanywarrantiesimpliedby
statelawasherebylimited,theforegoingwarrantyisexclusiveandinlieuofallotherwarranties,guarantees,agreements
and similar obligations of manufacturer or seller with respect to the repair or replacement of any parts. In no event shall
VENTURER be liable for consequential or incidental damages.
Noperson,agent,distributor,dealerorcompanyisauthorizedtochange,modifyorextendthetermsofthesewarranties
in any manner whatsoever. The time within action must be commenced to enforce any obligation of VENTURER arising
underthewarrantyorunderanystatute,orlawoftheUnitedStatesorCanadaoranystatethereof,isherebylimitedto
ninety(90)daysfromthedateofpurchase.Thislimitationdoesnotapplytoimpliedwarrantiesarisingunderstatelaw.
This warranty gives you specific legal rights and you may also have other rights, which may vary, from state to state. Some
statesdonotallowlimitationonhowlonganimpliedwarrantylasts,whenanactionmaybebrought,ortheexclusionor
limitation of incidental or consequential damages, so the above provisions may not apply to you.
For more information on other products and services, please visit our web site at
www.1800customersupport.com
Important:Alsokeepyour“BillofSale”asproofofpurchase.
Modelno................................................................Productname...............................................................................
Type of set ....................................................................................................................................................................
Serial no. ................................................................ Invoice no. ....................................................................................
Date purchased...................................................... Dealer name .................................................................................
FORSERVICEANDREPAIR,PLEASEVISITwww. 1800customersupport.com
LIMITED WARRANTY
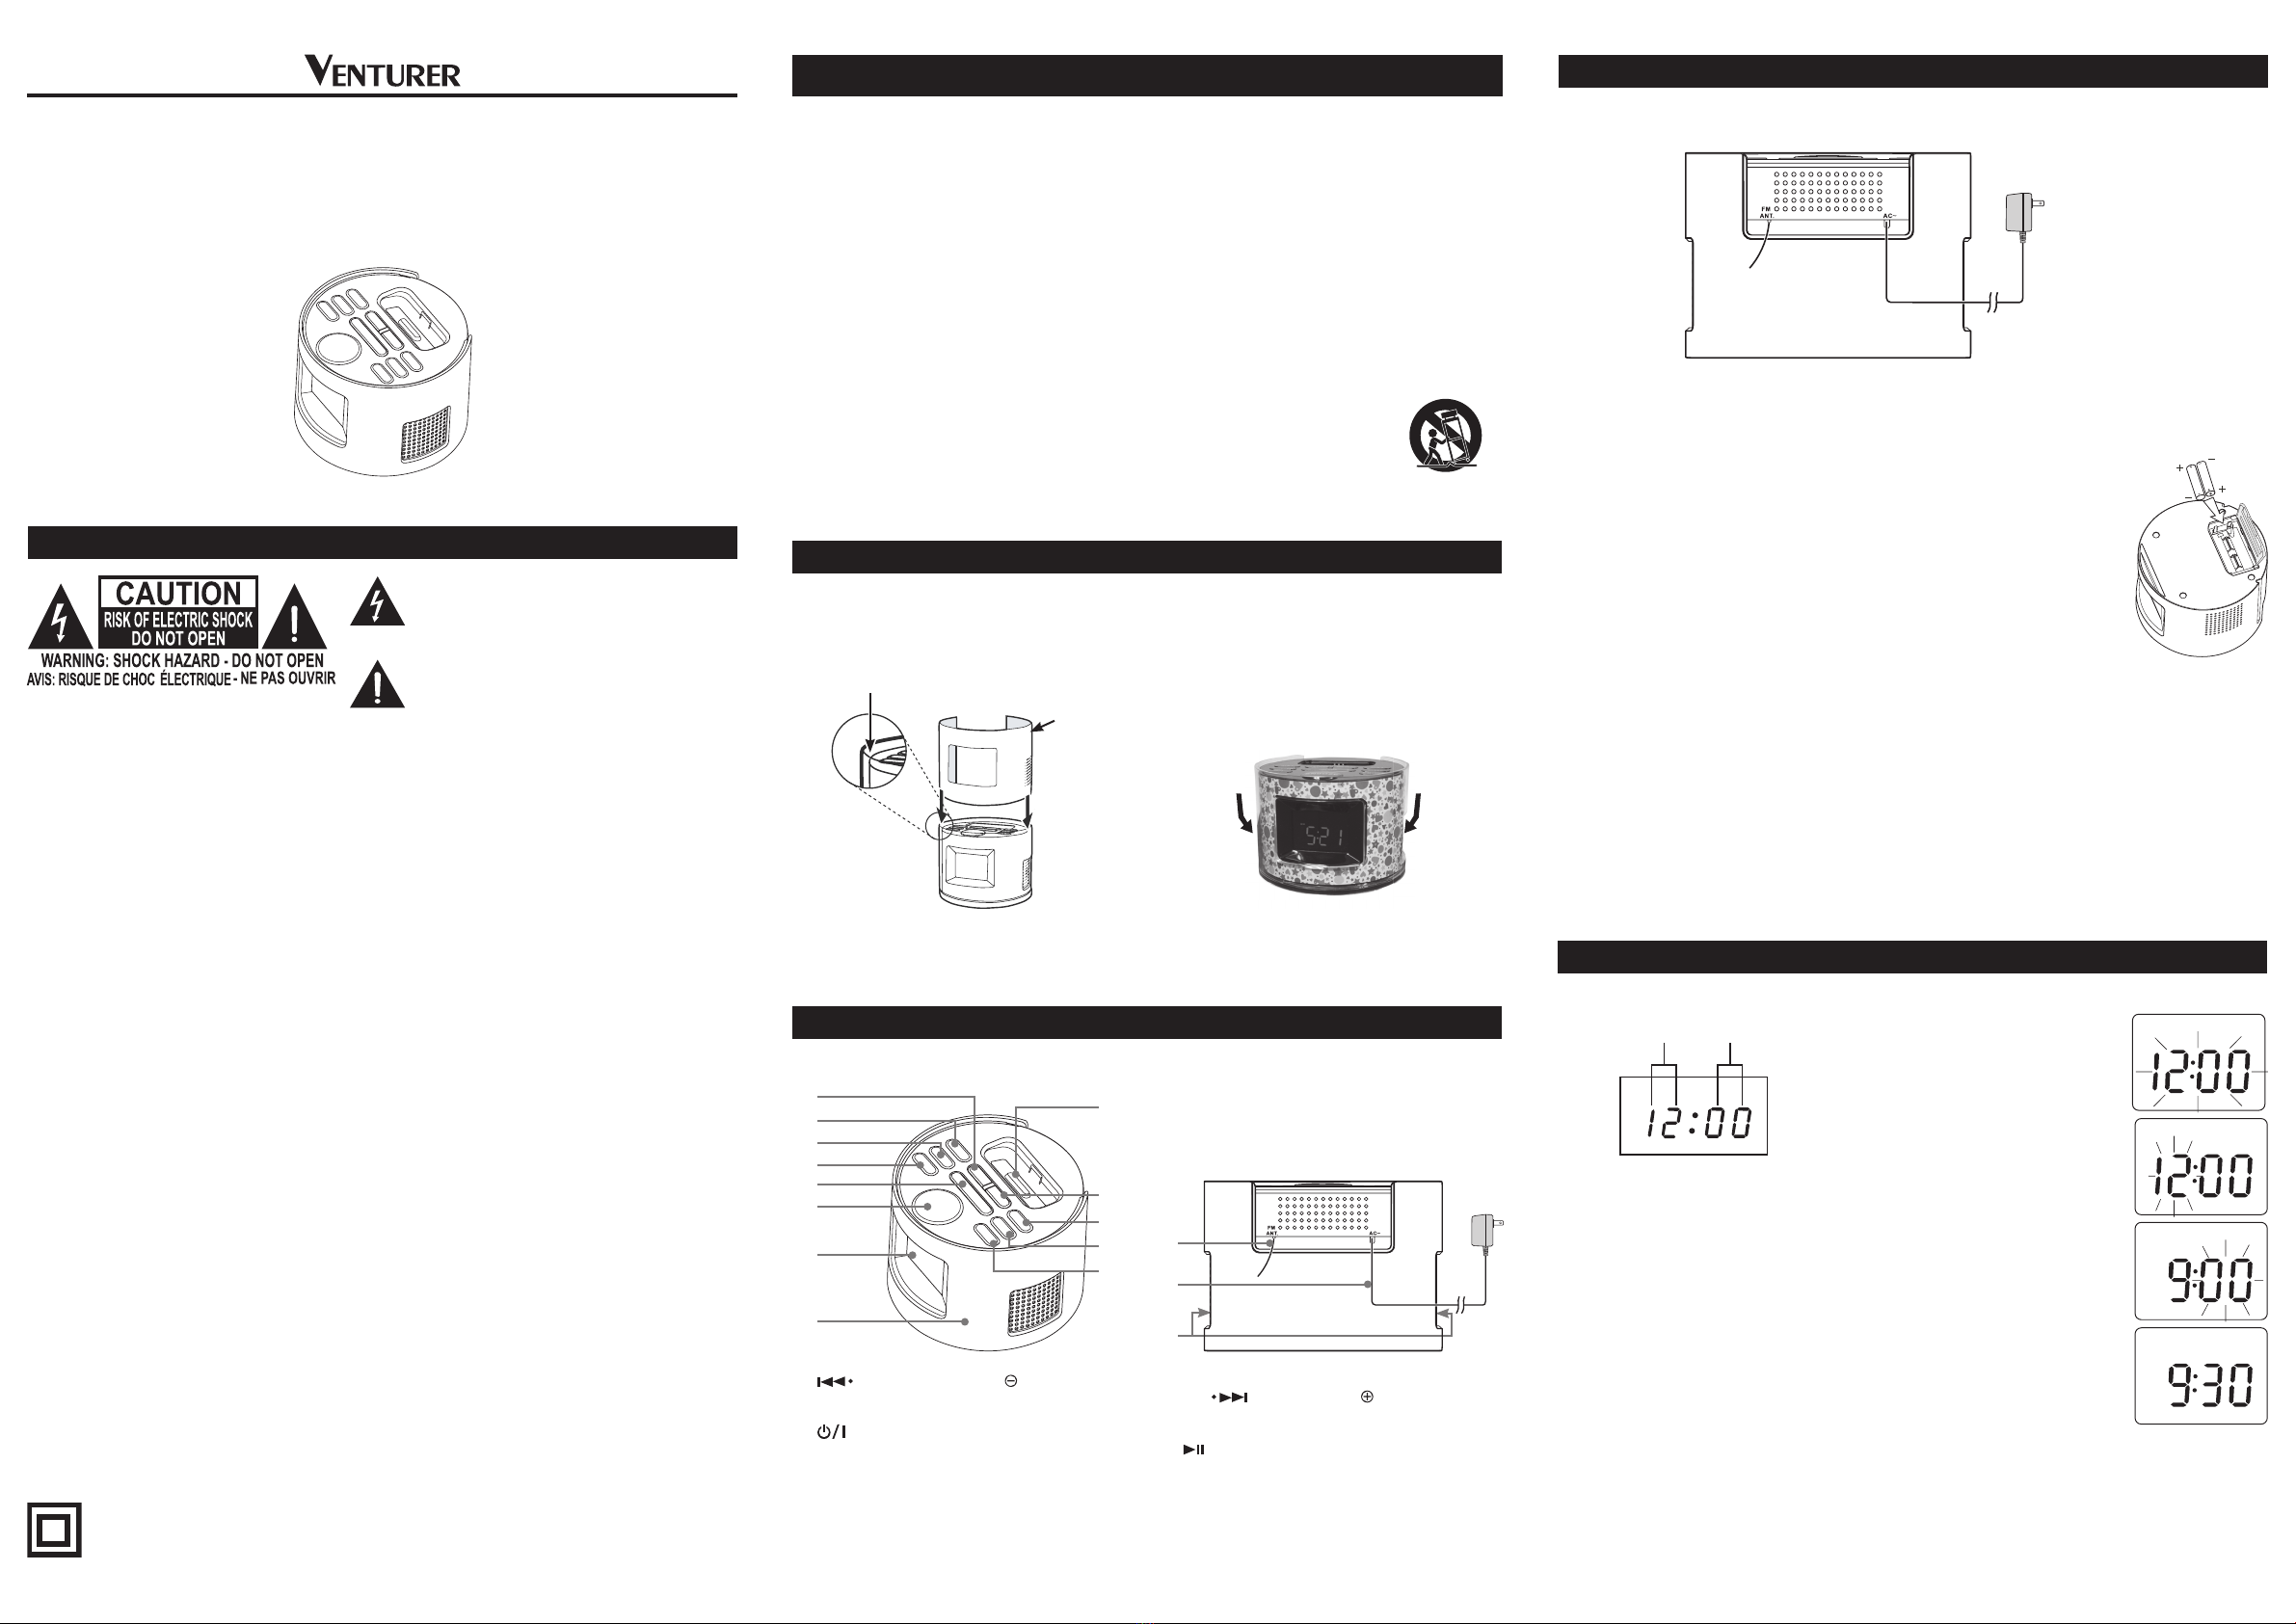
DUAL ALARM SETTING
Alarm2
Indicator
Alarm1
Indicator
HourDigitsMinuteDigits
SPECIFICATIONS
AC:120V~60HzACSUPPLY
BACKUPBATTERIESFORCLOCK:2x“AASIZE”
RADIOFREQUENCY:FM87.5~107.9MHz
LISTENING TO THE FM RADIO
1. Press the (Standby/On)buttontoturntheuniton.
2. Press the TIME/Fn button to tuner mode.
3. Pressthe or button to tune in to a station.
• AdjusttheVOLUME control to obtain the desired volume.
Searching for a Station Automatically
• Pressandholdthe or buttonuntilthetunerstartssearchingforastation,thenrelease.Afterndingaclear
station, the search stops automatically.
Note: Thesearchmaynotstopatastationwithaveryweaksignal.
Presetting Stations
Theunitcanstoreatotalof20stationsinmemory.Presettingallowsyoutotuneintoastationdirectly.
1. Tune in to a desired station (see previous section).
2. Press the MEM button.Thepresetnumberwillblinkandthe“MEM”indicatorwillbeshownonthedisplay.
3. PressthePRESET button repeatedly to select the preset number you desire.
4. PresstheMEM button again to store it in memory.
5. Repeatsteps1-4tostoreotherstations.
Tuning in to a Preset Station
Press the PRESET buttonrepeatedlytoselectapresetstationthatyouwouldliketoenjoy.
For Better Reception
Fullyunwindtheantennawire.Extendtheantennawireandplaceitinthepositionthatsoundsbest.
Notes:
• Whenthereceptionisgood,the“STEREO”indicatorwillappearonthedisplay.
• DonotconnecttheFMantennatoanoutsideantenna.
Start Playback
1. Press the (Standby/On)buttontoturnontheunit.
2. Press the TIME/Fn button repeatedly until the “ ”indicatorappearsonthedisplay.
3. ThentheiPod/iPhonewillstartplayingautomatically.
Notes:
• TheiPod/iPhonewillbechargedautomatically(untilfullycharged)whilstitisdockedinthecradle(Exceptwhenyou
are listening to the radio.).
• IfyouriPhoneiscalledwhileitisdocked,playbackwillbepaused.
Pausing Playback
• Pressthe button.
• Toresumeplayback,pressthe button again.
Skipping to a Another Track
• Presseitherthe or button according to the desired direction.
• Pressthe buttontoskiptothebeginningofthecurrenttrackorprevioustrack.Pressthe buttontoskipto
thebeginningofthenexttrack.
Locating a Particular Point on a Track
• Keepeitherthe or buttonpressedduringplayback,accordingtothedesireddirection,andreleaseatthe
desired point.
Note:Pleaserefertotheowner’smanualthatwassuppliedwithyouriPod/iPhoneformoredetails.
Asconcernsgrowabouttheenvironmentalimpactofoutdated electronic products, VenturerElectronics
iscommittedto beingapartof thesolution.Freeof charge, VenturerElectronicscustomerscan return
qualifyingunitstousforrecycling.Formoredetails,pleasevisitourwebsiteatwww.venturer.com/recycle
orcall1-800-252-6123.
• iPodtouch(1stgeneration)
• iPodtouch(2ndgeneration)
• iPhone
• iPhone3G
• iPhone3GS
• iPodnano(1stgeneration)
• iPodnano(2ndgeneration)
• iPodnano(3rdgeneration)
• iPodnano(4thgeneration)
• iPodnano(5thgeneration)
• iPodclassic