Venue Tag User manual
VENUE Tag – Quick Start Guide
AN-000380
Revision:1.0
1. Charging
The VENUE Tag can be charged in two ways:
-Put the VENUE Tag in the charging cradle.
-Plug the USB charging cable to the USB port of the VENUE Tag.
Note:
-When the tag is in charging mode, the LEDs will ash yellow at 0.5Hz (1 second on and 1 second o).
-VENUE Tag will get turned on automacally with any of the above two charging methods.
2. Turning on the VENUE Tag
-Put the VENUE Tag in the charging cradle or plug the USB charging cable to
the USB port of the VENUE Tag to turn it on.
-Alternavely, press and hold the recessed power buon to turn it on.
Note:
-When VENUE Tag is turned on, if Wi-Fi has not been congured, the LEDs will
ash yellow with a periodic paern of 2 long-period ashes followed by 2
short-period ashes.
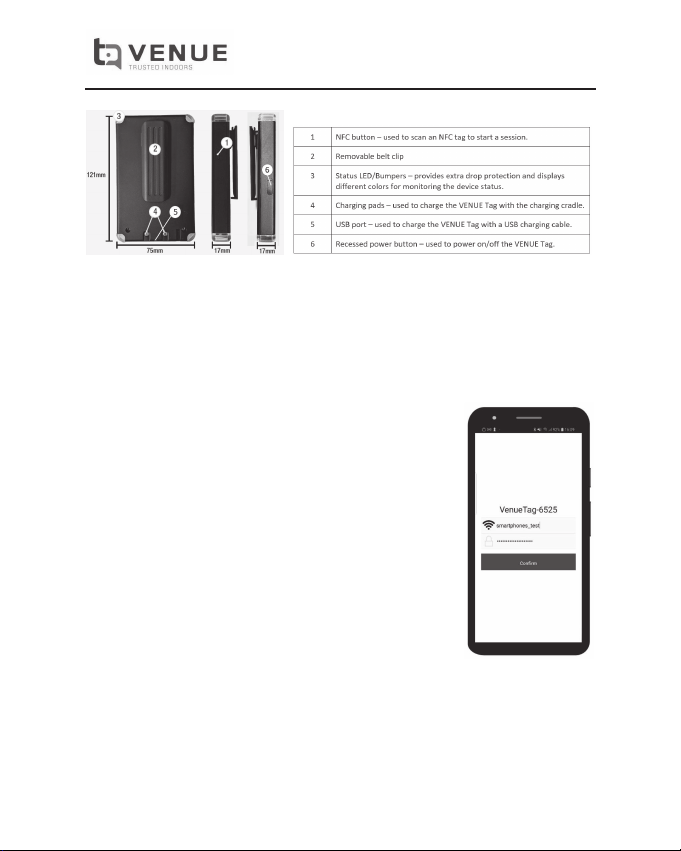
3. Connecng the VENUE Tag to Wi-Fi
1. Connect to the VENUE Tag’s Wi-Fi hotspot using an Android device
2. The hotspot SSID name will be: VenueTag-xxxx
3. Open the VENUE Android Wi-Fi conguraon app
4. Enter the Wi-Fi AP SSID/password and click “Conrm”
oThe VENUE Tag will get the Wi-Fi AP info, congure itself, reboot
and try to connect to the Wi-Fi AP congured.
4. OTA (Over-The-Air) Update
The VENUE Tag has the ability to update its FW through OTA (Over-The-Air) update.
When it is being charged in the charging cradle or through the USB port, the VENUE
Tag will check if any newer version of the soware is available. If new soware is available, it will automacally
download and update itself.
Note:
-When the VENUE Tag in the charging state, the LEDs will ash yellow at 0.5Hz (1 second on and 1 second o).
When the soware is being updated, the LEDs will ash blue at 1Hz (0.5 second on and 0.5 second o) unl
the process is done.
5. Addional Instrucons
Please refer to the VENUE Tag user guide for more detailed instrucons including:
-How to start a session
-How to stop a session
-VENUE Tag LED states

VENUE Tag – Quick Start Guide
AN-000380
Revision: 1.0
43K-200-2020R
Table of contents
Popular Network Hardware manuals by other brands

Matrix Switch Corporation
Matrix Switch Corporation MSC-HD161DEL product manual

B&B Electronics
B&B Electronics ZXT9-IO-222R2 product manual

Yudor
Yudor YDS-16 user manual

D-Link
D-Link ShareCenter DNS-320L datasheet

Samsung
Samsung ES1642dc Hardware user manual

Honeywell Home
Honeywell Home LTEM-PV Installation and setup guide


