vepa Presto RT User manual

Manual
Inline
Elektric sit-stand
adjustment system
T-leg and side panels
- Presto RT / RW / RW+
- Presto R- duo and 4-persons
- Presto HW
- Presto management

Introduction 3
Chapter 1 Technical specifications 4
Chapter 2 Precautions and safety instructions 5
Chapter 3 Description and composition of the product 7
Vepa sit-stand adjustment system general 7
Tops and carriers 7
Frame/legs 7
Assembly 7
Electrification/cabling 7
Chapter 4 Assembly, installation and usage workplace 8
Chapter 5 Description of operation and method of use 11
5.1 Initialisation of a new desk at first use 11
5.2 Initialisation sit/stand desk fitted with display with height reading 11
5.3 Initialisation sit/stand desk fitted with high/low controls without display 12
5.4 Adjusting the sensitivity of the lowering protection (anti-collision) of
sit/stand desk fitted with display with height reading 13
5.5 Adjusting the sensitivity of the lowering protection (anti-collision) of
sit/stand desk fitted with high/low controls without display 14
Chapter 6 Maintenance 16
Chapter 7 Decommissioning 17
Chapter 8 Disassembly, transport, demolition and recycling 18
Chapter 9 Faults and repairs 19
Table of contents
2

Introduction
Every Vepa product has been developed and manufactured in our own factories in the Netherlands. We have used our many
years of experience in development and production to create a product that matches your wishes as closely as possible. This
is how we are improving and further optimising our products on a daily basis.
This manual provides you with the instructions to install and maintain the chosen product in the best possible way so that
you will enjoy it for years to come. If, despite all the care and attention we give to our products, there is a problem with the
installation or use of our product, please contact our sales department +31(0)528297111. They can certainly help you solve
any problems you may have.
Changes and/or modifications to the product during installation or use of the product may only take place in consultation
with Vepa, but are at all times at the risk and expense of the person making the changes.
Quickstart
To initialize a newly assembled, not yet used desk, initialisation consists of the following steps:
- Press and hold the down arrow
. The desk will slowly go down. Note: press and hold the arrow until the desk is all the
way down and has risen a few inches.
- After this, the desk is initialised and ready for use.
- NOTE: the procedure described above can only be used once with a new, unused desk. After this first use, the description
under point 5.2 and beyond shall be followed.
For a complete description see chapter 5.
3

Chapter 1
Technical specifications
Vepa’s electrically adjustable sit/stand desks are available in different sizes, colours and décors as listed in our price list.
Please contact our sales department for a current version.
The Vepa electrically adjustable sit/stand desks have the following technical specifications:
- Adjustment range 65-130 cm
- Load 220-240V / 50-60 Hz
- Maximum power 2.9 A.
- Maximum output 300 W.
- Activation time: 7,5%. Max. 20 seconds max. load, 240 seconds rest.
- Adjustment speed depending on load approx. 40 mm/sec.
- Maximum load work top during adjustment 50 kg.
- Noise level ≤ 50 dB (A).
- Standard equipped with electronically controlled lowering protection (anti-collision).
- Standby power consumption ≤ 0.3 watts.
Any electrical accessories supplied by Vepa have the following technical specifications:
- Maximum allowed voltage 250 V.
- Maximum allowed power 16 A.
- Maximum allowed wattage 3500 W
4

Chapter 2
Precautions and safety
instructions
Warning: This symbol indicates potential health hazards if the instruction is not followed
correctly.
Warning: This symbol indicates that potential hazards may arise from the electrical system.
Warning: This symbol indicates that potential hazards may arise in connection with clamping
of, for example, limbs.
For safe use of the desk, it is necessary to read this manual completely before using the product.
For the system to function properly, it is of the utmost importance to carefully read and follow the installation instructions in
chapter 4.
The desks should be placed on a flat and stable floor.
Please make sure that the desk can freely move up and down and that any obstacles are
removed before using the desk. The minimum clearance around the worktop should be 25
mm. This to prevent possible clamping during adjustment.
It is not allowed to open the controls.
Make sure that during installation and during operation the power supply cable cannot
become trapped and can move freely enough. It should also be checked if the cables are of
sufficient length in relation to the range of adjustment.
5

During use:
In case of visible damage to the desk, it may not be used until it has been established whether or not the observed damage
prevents safe working.
The desk is intended as a height/adjustable worktop for use in a professional office
environment. Do not sit or stand on the desk during adjusting. There is a risk of personal
injury and permanent damage to the desk.
Ensure that the worktop is not subjected to a heavier load than stated in the technical
specification. There is a risk of irreparable damage to the system and a risk of personal
injury.
When the desk makes a non-normal noise during use, starts smoking and/or smells, cut off
the power supply immediately.
When using the desks, it is recommended to periodically check that the electrical supply
cables have not become trapped and can still move freely enough.
The product is intended for professional office use. Children may only adjust the desk in the presence of, and if instructed by,
an adult.
6

Chapter 3
Description and composition
of the product
Vepa sit-stand adjustment system general
The Vepa desk ranges meet all the latest criteria and demands for modern office furniture.
Thanks to the electric height adjustment, it is possible to switch comfortably between sitting and standing work. The furniture
is constructed around a cross beam on which the top carriers, legs and accessories can be mounted. The assembly of these
parts is very efficient thanks to an innovative screw-clamp connection. With a minimum of interchangeable components this
is an extremely friendly piece of furniture in terms of facilities.
Safety through anti-collision
The standard built-in electronically controlled ‘GyroSense’ sensor ensures that any obstacles, such as a seat rail underneath
the worktop, are detected when the worktop is raised or lowered. On contact with the obstacle, the controls respond by
moving a few inches in the opposite direction so that the obstacle can be removed.
Tops and carriers
The tops are in melamine chipboard, hpl or solid core. 18 or 25 mm thick. Tops are available as responsible certified PEFC™- or
FSC® wood. Available colours and dimensions are listed in the most recent price list.
The desk tops are already fitted with top carriers that are standard equipped with the possibility to mount a cable duct holder.
The centre-top carrier prevents bending of the top under load.
Assembly
Thanks to the unique construction of the legs in combination with the central traverse, the Vepa T-desks, duo H-frames and
side panels desks can be assembled quickly. The assembly via two allen screws in the tightening brackets forms a quick and
stable connection between legs and top. Since all components are made of steel, they can be assembled and disassembled
over and over again without loss of quality. Ideal for any (internal) moving.
Elektrification/cabling
The Vepa workplaces can optionally be equipped with a cable duct. This duct is fitted between the top carriers after
installation of the furniture and it facilitates an efficient and tidy storage of accessories such as power sockets, data
connectors, hubs and so on.
Final result of an assembled desk with T-legs and side panels.
7

Chapter 4
Assembly, installation and
usage workplace
The desks should be placed on a flat and stable surface.
Required components for 1 desk:
1. 2x T-leg or side panels Vepa sit-stand
2. 1x traverse
3. 1x top with pre-assembled top carriers, controls and display
4. 2x tightening brackets
Optional:
5. 2x cable duct holder on top carrier
6. 1x horizontal cable duct
1. 1. Slide both legs/panels in the traverse. Make sure that the cables are not trapped.
(Vepa desk with T-leg, bottom view)
(Vepa-desk with side panels, bottom view)
8

2. The legs with traverse can now be placed in the top carriers. Again, make sure that the
cables are not trapped.
3. Place the tightening brackets over the top carriers and tighten them properly with an
allen wrench.
NOTE:
Failure to tighten these brackets properly has a direct impact
on the stability of the desk and on the operation of the
lowering protection (anti-collision).
4. Assemble the height controls on the underside of the top..
(Only for version with controls underneath top)
9
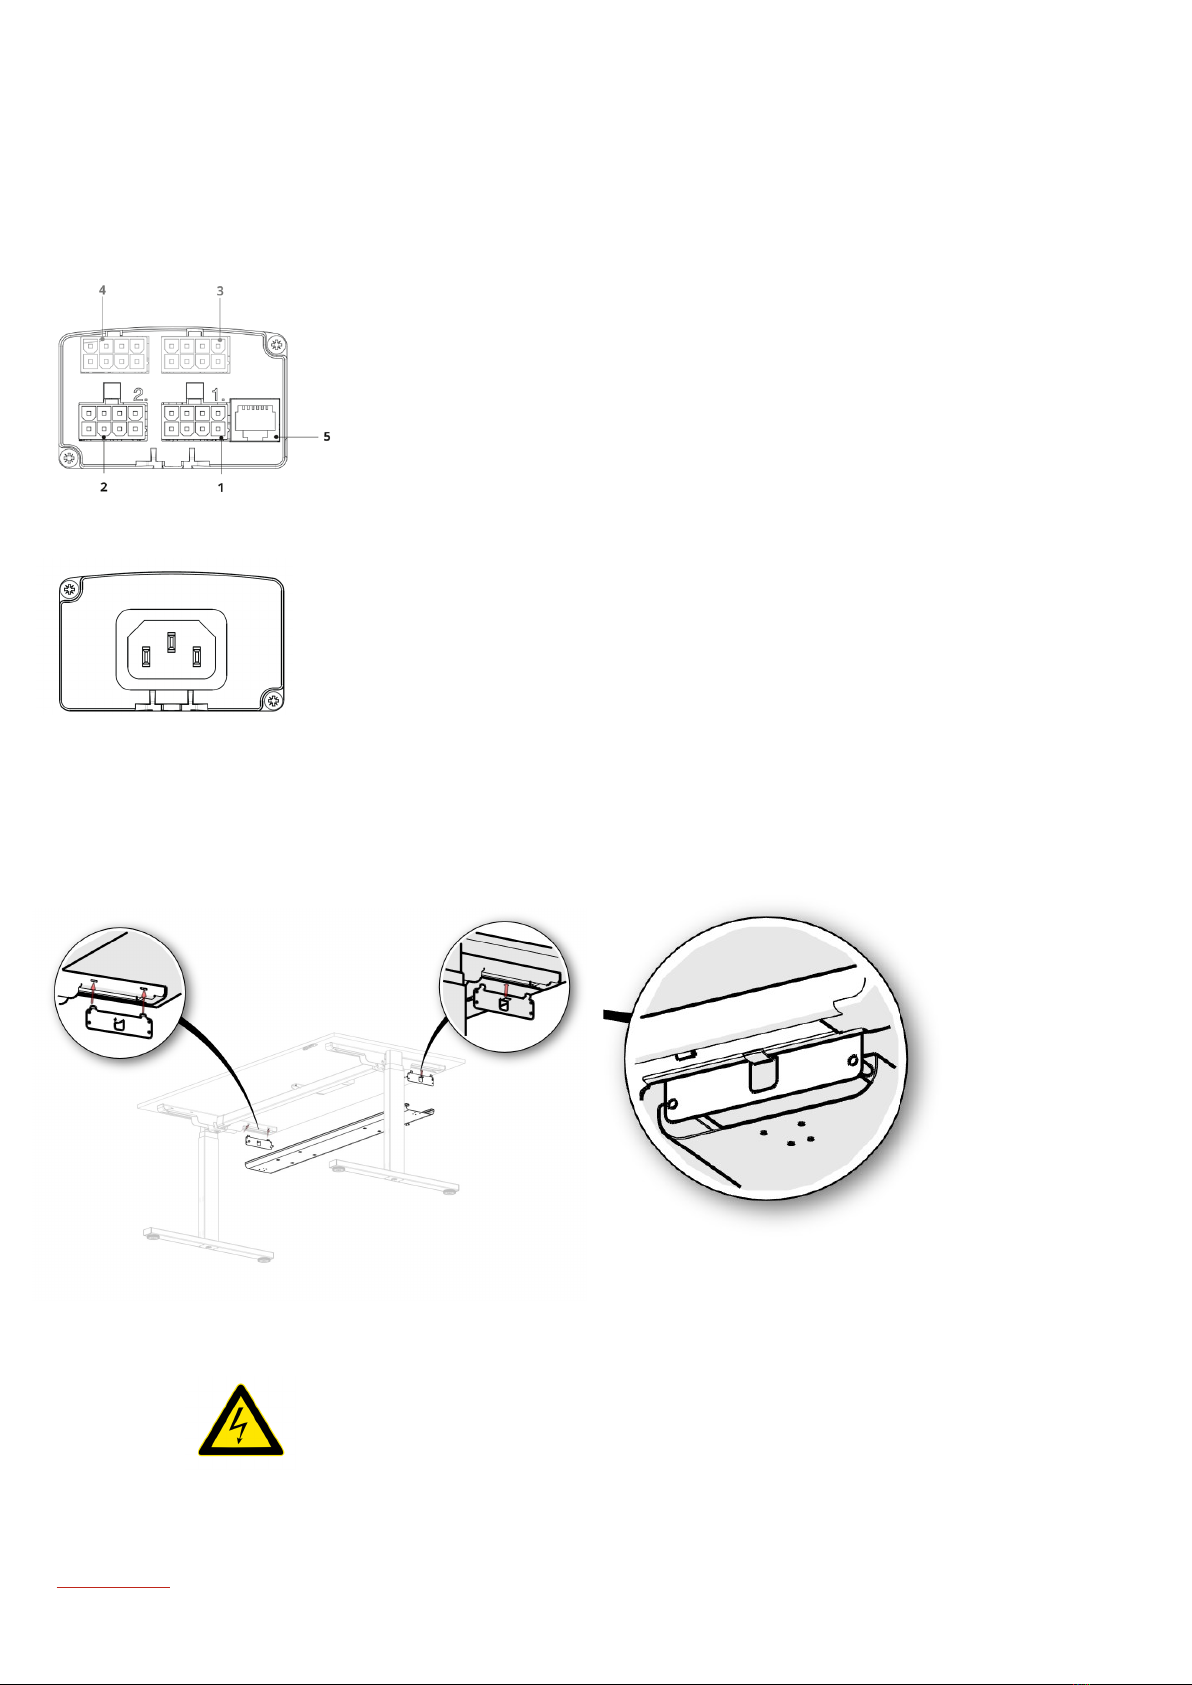
5. Connect the cables in accordance with enclosed diagram.
1. Motor cable 1 (cables are not numbered, random cable)
2. Motor cable 2
3. Motor cable3 (optional for desks with 3 legs)
4. Optional expansion
5. Connection for control panel/display (or, if you´ve been trained to do so,
a USB programming cable).
6. Connect the power supply cable on the other side of the controls and put all cables
neatly away.
Now turn the desk over.
7. Hook the cable duct holders in the designated grooves of the top carriers.
Hang the cable duct.
Electrification:
Before electrical connection and using the furniture, please check that the power supply
(ws) complies with national regulations.
Now perform an initialisation as described in chapter 5 (from page 11 onwards).
10

Chapter 5
Description of operation
and method of use
The Vepa sit/stand desks are equipped with an electrically operated motorised adjustment.
It is necessary to initialise the desk before it can be used for the first time. Usually, this is part of the job of the person
installing the workplace. However, initialisation may also be necessary in case of a power failure or if something else has
happened that has caused the controller to, for example, lose its position.
When the desk indicates an incorrect height, is skewed or no longer functions properly for any other reason, it must also be
reinitialised.
This process will reset the software and redetermine the desk position (lowest setting.
Method of operation:
= Raise desk
= Lower desk
5.1 Initialisation of a new desk at first use
To initialize a newly assembled, not yet used desk, initialisation consists of the following steps:
- Press and hold the down arrow
. The desk will slowly go down. Note: press and hold the arrow until the desk is all the
way down and has risen a few inches again.
- After this, the desk is initialised and ready for use.
- NOTE: the procedure described above can only be used once with a new, unused desk. After this first use, the description
under point 5.2 and beyond shall be followed.
5.2 Initialisation sit/stand desk fitted with display with height reading
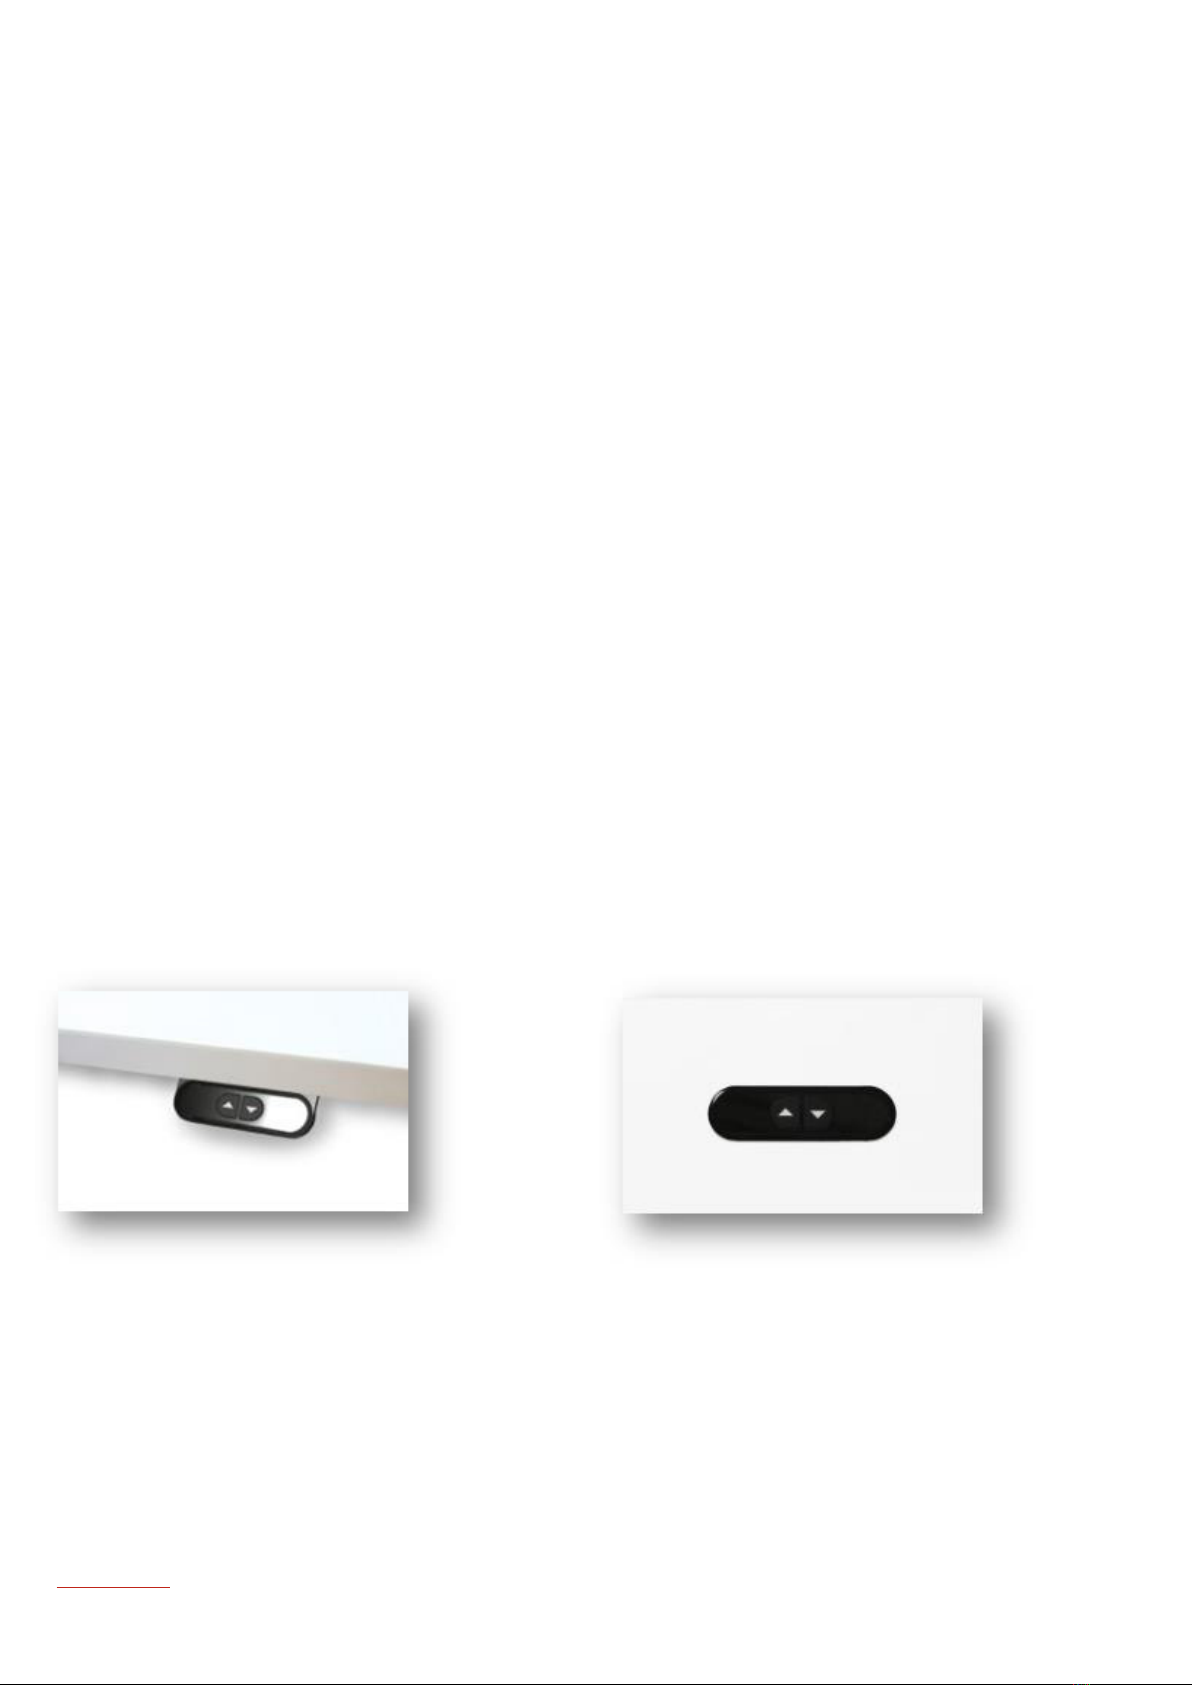
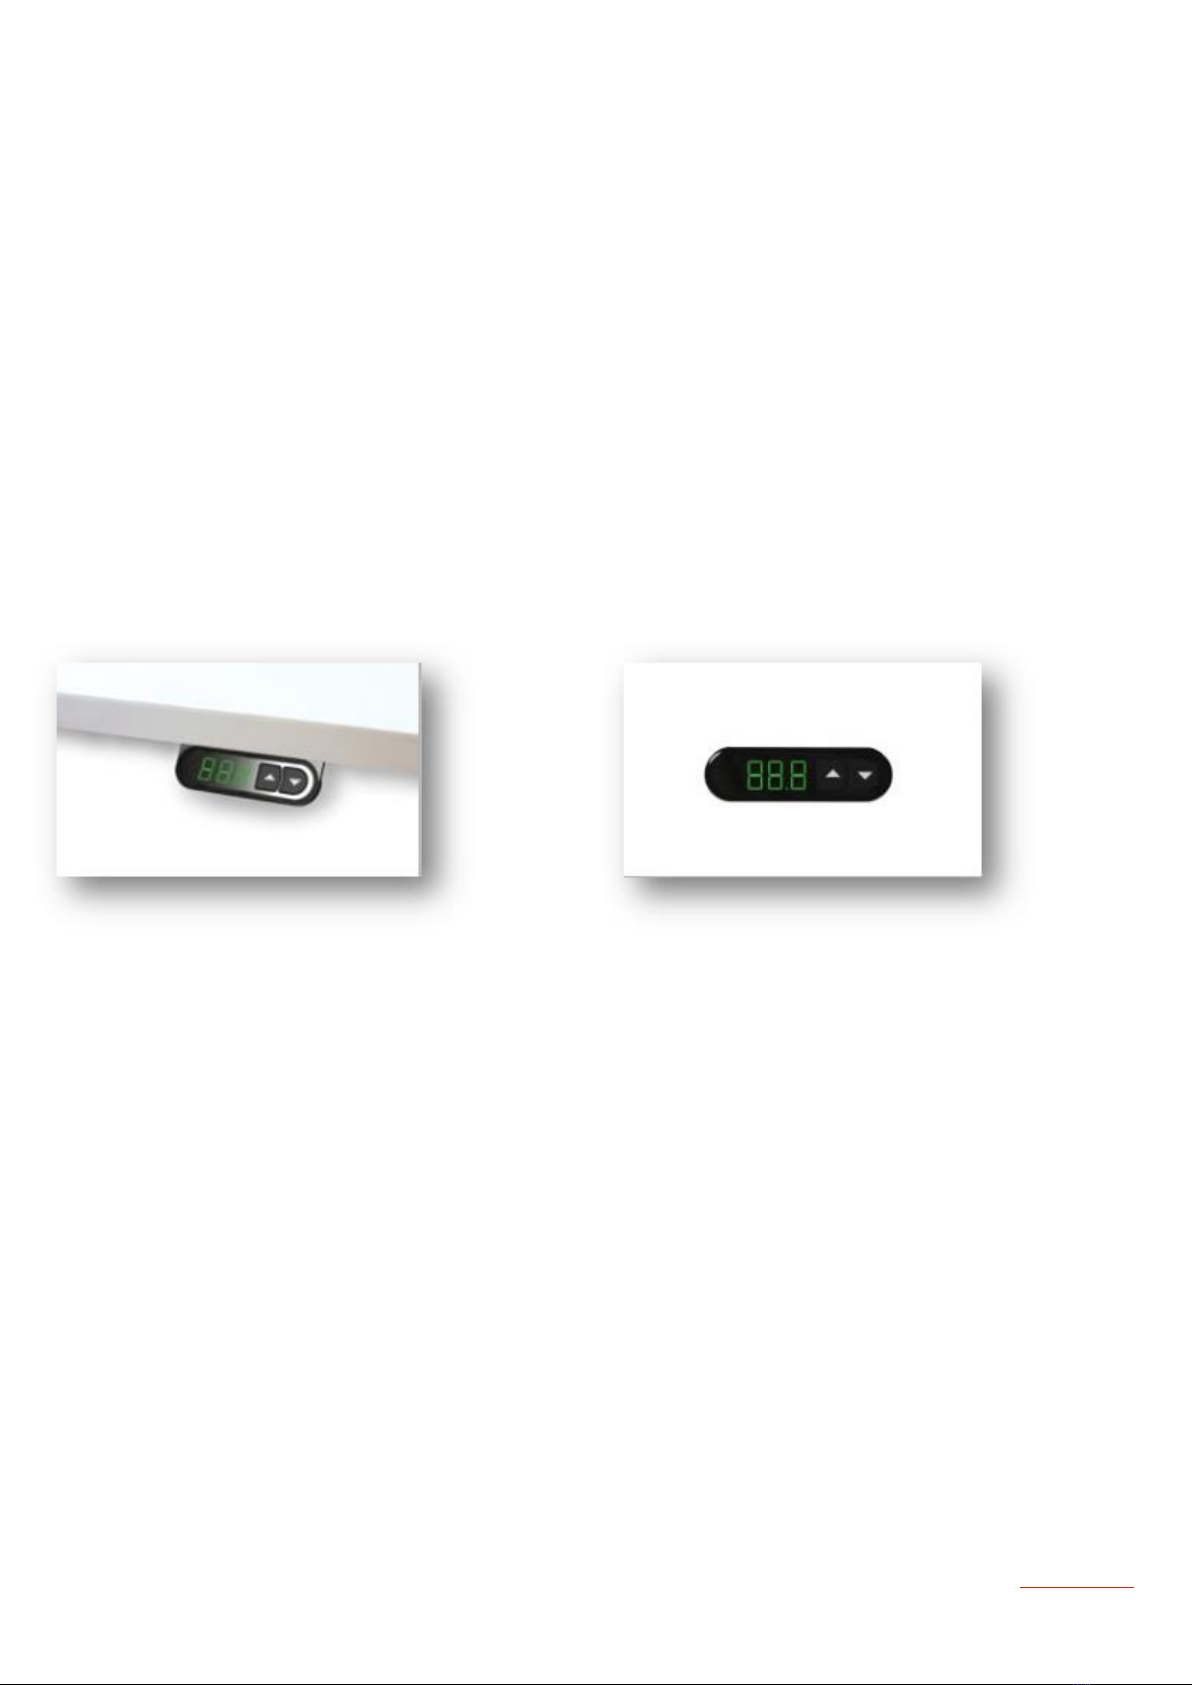
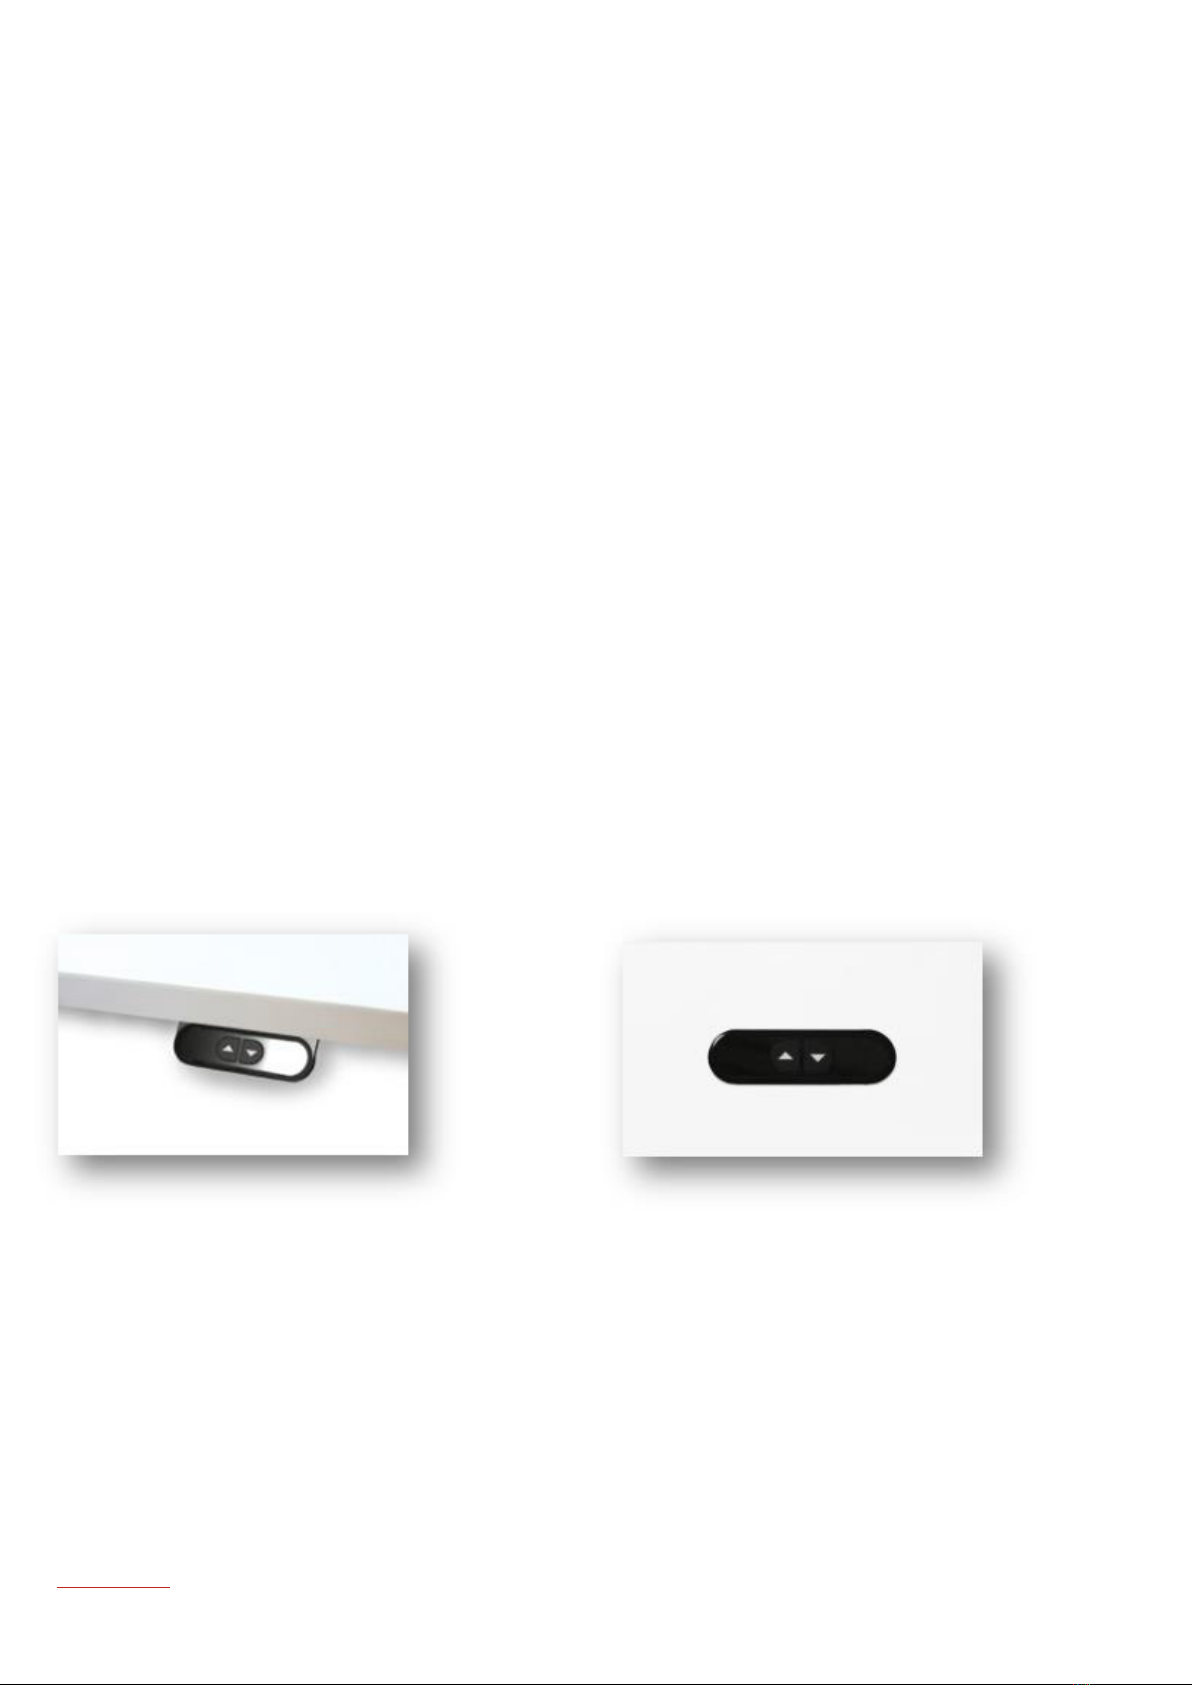
There are two types of displays with height readout available. To be fitted either in the worktop or underneath the worktop,
see images below. They function identical.
Controls underneath the top. Controls in the top..
The height indicator lights up when you press one of the arrows.
11
To initialise the desk the following steps must be taken:
- Press up arrow
4 times in rapid succession.
- When done properly you’ll hear a beep.
- After the beep the display will show the value P01.
- Now press the up or down arrow until the display will show the value P09.
- Now shortly press the down arrow. The display is now in reference mode and will show the following
value: - - -
- Then press and hold the down arrow
and the desk will slowly go down. Note: press and hold the arrow until the desk is
all the way down and has risen a few inches.
- When the desk height is readable again on the display, initialization has been successful and the desk can be (re)used.
Method of operation:
= Raise desk
= Lower desk
When you press one of the above buttons, the display will light up and show the currently set height. The readout will go into
sleep mode after approx. 10 seconds and will then no longer be readable. Press one of the keys shortly to make the readout
visible again.
5.3 initialisation sit/stand desk fitted with high/low controls without display
There are two types of high/low controls available. To be fitted either in the worktop or underneath the worktop, see images
below. They function identical.
Controls underneath the top Controls in the top
To initialise the desk the following steps must be taken:
- Press up arrow
4 times in rapid succession. When done properly you’ll hear a beep.
- Press down arrow
4 times in rapid succession. When done properly you’ll hear 4 consecutive beeps.
- Then press and hold the down arrow
and the desk will slowly go down. Note: press and hold the arrow until the desk is
all the way down and has risen a few inches.
- After this, the desk is will be horizontal and in the lowest position and can (again) be used.
Method of operation:
= Raise desk
= Lower desk
12
GyroSense:
The Vepa sit/stand desks are equipped with an electrically operated motorised adjustment. In addition, the desk control is
equipped as standard with a GyroSense that automatically detects any obstacles while adjusting the height of the worktop.
When the worktop detects an obstacle during the adjustment, the movement in the direction of the obstacle will stop and
reverse. The worktop will move approx. 3 cm. in the opposite direction. This can occur in both the upward and downward
movement. The purpose of this is to move the worktop to a position where it is free from the obstacle.
To change the sensitivity of the GyroSense please refer to the description below under point 5.4 and 5.5.
5.4: Adjustment of the sensitivity of the lowering protection (anti-collision) of sit/stand desk equipped
with display with height reading
There are two types of displays with height readout available. To be fitted either in the worktop or underneath the worktop,
see images below. They function identical.
Controls underneath the top. Controls in the top.
The height indicator lights up when you press one of the arrows.
The use of the desk can cause the height adjustment of the desk to run heavier or lighter over time. In both cases this could
promote unwanted activation of the lowering protection (anti-collision).
By default, the desk is set with a medium sensitivity (position 3).
By using the steps as described below, the setting can either be adjusted or improved.
- Press up arrow
4 times in rapid succession. When done properly you’ll hear a beep.
- After the beep the display will show the value P01.
- Now press the up or down arrow until the display will show the value P08.
- Now shortly press the down arrow
. The display is now in programming mode.
- The display now shows the set sensitivity by means of a value.
- The sensitivity can be changed by using the up arrow
.
13
Four settings are possible:
- (1) - The lowering protection is off.
- (2) - Highest sensitivity.
- (3) - Medium sensitivity.
- (4) - Low sensitivity.
After setting the desired sensitivity with the arrows, it must be confirmed by pressing the down arrow
once.
The newly set sensitivity in now activated.
The display has the option to show error codes for diagnostic feedback.
We refer to the table in chapter 9 for the most common error codes and possible solutions.
When you press one of the above buttons, the display will light up and show the currently set height. The readout will go into
sleep mode after approx. 10 seconds and will then no longer be readable. Press one of the keys shortly to make the readout
visible again.
5.5 Adjustment of the sensitivity of the lowering protection (anti-collision) of sit/stand desk equipped
with high/low controls without display
There are two types of high/low controls available. To be fitted either in the worktop or underneath the worktop, see images
below. They function identical.
Controls underneath the top Controls in the top
The use of the desk can cause the height adjustment of the desk to run heavier or lighter over time. This could promote
unwanted activation of the lowering protection (anti-collision).
By using the steps as described below, the setting can either be adjusted or improved.
- Press up arrow
4 times in quick succession, when done properly you’ll hear a beep.
- Press down arrow
3 times in quick succession, when done properly you’ll hear three consecutive beeps.
- You are now in the programming menu. Settings are made by pressing the down arrow
.
14

Four settings are possible:
- (1) - Switch off the lowering protection (anti-collision).
Press down arrow
once, followed by one beepl.
- (2) - Return to factory settings.
Press down arrow
twice, followed by two beeps.
- (3) - Set a medium sensitivity.
Press down arrow
three times, followed by three beeps.
- (4) - Set a low sensitivity.
Press down arrow
four times, followed by four beeps.
Check whether the desired sensitivity is accurate by touching the desk during movement of the worktop.
15

Chapter 6
Maintenance
Maintenance as described below can take place at own discretion and frequency.
For the cleaning and maintenance of Vepa office furniture we distinguish the following parts:
- Moving parts
- Desk tops in melamine, hpl and solid core.
- Metal parts epoxied (powder coated).
Moving parts:
The adjustment mechanism of the Vepa electrically adjustable sit/stand desks is completely maintenance-free and requires
no additional maintenance.
Desk tops in melamine, hpl and solid core:
If desired, the worktops can be wiped off with a soft cloth and, in case of more intensive soiling, with soapy water.
Avoid strong detergents, solvents and stain removers. Treatment with abrasives is strongly discouraged as it can lead to
irreparable damage. Please refer to the table below for an overview of the various types of stains.
Metal parts epoxied:
The epoxied metal parts can be cleaned in the same way as the desktops. See table below.
For the various types of stains on desktops and metal parts we recommend:
Type of stain Recommended detergent
Water based felt-pen Warm soapy water
Indelible felt-pen Turpentine or benzene
Ink stains Soapy water
Black ballpoint pen Soapy water
Shoe marks Soapy water
Wax Soapy water
Coffee Soapy water
Grease Warm soapy water
Other stains Turpentine, warm soapy water or benzene
16

Chapter 7
Decommissioning
In case of visible damage to the desk, it may not be used until it has been established whether the observed damage prevents
safe working.
When the desk makes a non-normal noise during use, starts smoking and/or smells, cut off the power supply immediately.
If there is reason to shut down the desk, it is sufficient to disconnect the power supply by pulling the power cord from the wall
socket.
17

Chapter 8
Disassembly, transport, demolition and
recycling
Disassembly:
When the desk has to be disassembled, you can carry out the assembly instruction as described in chapter 4 in reverse
order.
(Internal) Transport:
In the event of internal relocation or internal transport of the furniture, it is advisable to dismantle the desk in question into
manageable components.
You can use the assembly instructions as a guide. Experience shows that disassembling the following components is usually
sufficient:
- Top with top carriers, display and controls
- Crossbeam
- Legs/Side panels
- Cable duct
- Any accessories
Demolition and recycling:
When the product has reached the end of its life cycle, we recommend disassembling the product in the smallest possible
components. We have tried to take this into account during the development of the product so that as many components as
possible can be processed in the appropriate manner.
We distinguish the following recycle groups:
Item Component Recycle group
T-leg or side panel Tube Scrap metal
Base tube Scrap metal
Melamine side panel Chipboard processing
Spindle, engine and transmission Scrap metal and plastic recycling
Elektrification Cable duct underneath top Scrap metal
Top with frame Melamine top Chipboard processing
Top carrier and tightening brackets Scrap metal
Traverse Scrap metal
Controls Circuit board Scrap electronics
Plastic end caps Plastic recycling
Power cord and other cables Scrap cables
Display Plastic casing Plastic recycling
Circuit board Scrap electronics
Cable Scrap cables
18
Chapter 9
Faults and repairs
It may happen that something occurs during use causing the desk to not work any more.
We strongly recommend that you do not open components such as motors, controls and
displays yourself, but call in trained and authorised technicians.
In all cases, first check that the power supply is in order.
If the power supply is OK, check the display for error messages. The most common messages and possible solutions are
shown in the table below.
Error code storing mogelijke oplossing
con Communication problem. Restore the connection between control box and display..
- - - Initialisation position. Initialisation must take place, see chapter 5.
F01 EEPROM, error in the initialisation. Press any button on the display. If this does not work, disconnect
the power supply for at least 20 seconds.
F02 EEPROM, error in the initialisation. Press any button on the display. If this does not work, disconnect
the power supply for at least 20 seconds.
F03 EEPROM, reading error. Press any button on the display. If this does not work, disconnect
the power supply for at least 20 seconds.
F04 EEPROM, inconsistency. Press any button on the display. If this does not work, disconnect
the power supply for at least 20 seconds.
F05 Collision identified by GyroSense. Press any button on the display. If this occurs regularly, the
sensitivity of the system can be adjusted. See chapter 5.4 and 5.5
F06 Height of power level activates stop on
motor. Lower weight loading of desk. After several minutes the error code
will disappear and the desk will be ready for use.
F07 Height of power level activates stop on
motor. Lower weight loading of desk. After several minutes the error code
will disappear and the desk will be ready for use.
F08 Height of power level activates stop on
motor. Lower weight loading of desk.
Ensure smoother running of the legs.
F09 Maximum capacity of engine energy level
has been reached. (I2t) Overheating. Let the engines cool for at least 10 minutes.
F10 Maximum capacity of controls energy
level has been reached. (I2t) Overheating. Let the controls cool for at least 10 minutes.
F11 Maximum capacity of power supply
energy level has been reached.
Overheating.
Let the controls cool for at least 10 minutes.
F12 Maximum temperature outgoing energy
engines has been reached. Let the controls cool for at least 10 minutes.
F14 Maximum stroke of the spindles has been
reached. Controls will automatically go into initialisation mode, see chapter 5.
F15 Motor is overloaded or blocked. Lower weight loading of desk.
F17 Controls are overloaded. Press key to delete error message. If this does not help, disconnect
power for at least 20 seconds and and re-initialise the desk.
An initialisation or reset is described in chapter 5: Description of operation; method of use. (from page 9).
For faults that do not appear on the list or cannot be solved by yourself, please contact your Vepa dealer.
Any replacement parts can be purchased via the Vepa dealer.
19

02-2021 - subject to alterations and typing errors
vepa.nl |+31 (0)528 29 71 11 |info@vepa.nl
This manual suits for next models
3
Table of contents
Popular Indoor Furnishing manuals by other brands


sieper
sieper KHALIX installation instructions

PHI VILLA
PHI VILLA THD7-326-5901 Use and care guide

BROSA
BROSA Haruki Entertainment Unit Assembly guide

Wren
Wren TOWER UNIT 2070 Assembly guide

Julian Bowen Limited
Julian Bowen Limited Maine MAI111 Assembly instructions

NobleChairs
NobleChairs HERO DOOM EDITION Removal guide

Cypress Hills
Cypress Hills GREYSTONE AXCRGREY04 Assembly instructions

Classic Exhibits
Classic Exhibits MAGELLAN DESIGNS VK-1088 quick start guide

real living
real living GREY SWIVEL CHAIR HG-4301-1 Assembly instructions

Dorel
Dorel Ameriwood Industries 3579306PCOM manual

Idea Group
Idea Group Aqua SIDE Assembly instructions

CHITA
CHITA AC72901 Assembly manual