Verismo V?585 User manual

Operating Manual
EN

2 3
Contents
Introduction ����������������������������������������������������������������������������������������������������������������������������������������������������������������� 3
Important safeguards �������������������������������������������������������������������������������������������������������������������������������������������������� 4
Special safety instructions ������������������������������������������������������������������������������������������������������������������������������������������� 5
Verismo™System V∙585 overview�������������������������������������������������������������������������������������������������������������������������������� 6
Overview of LED symbols��������������������������������������������������������������������������������������������������������������������������������������������� 7
Getting started������������������������������������������������������������������������������������������������������������������������������������������������������������� 8
Preparing beverages���������������������������������������������������������������������������������������������������������������������������������������������������� 9
Daily cleaning������������������������������������������������������������������������������������������������������������������������������������������������������������� 10
Cleaning the machine (when prompted)�������������������������������������������������������������������������������������������������������������� 11–12
Descaling the machine (when prompted) ������������������������������������������������������������������������������������������������������������13–14
Changing the filter (when prompted) �������������������������������������������������������������������������������������������������������������������15–16
Manually enabling the cleaning, descaling or filter change functions ��������������������������������������������������������������������� 17
Parameter setting: Water hardness��������������������������������������������������������������������������������������������������������������������������� 18
Parameter setting: Water filter ���������������������������������������������������������������������������������������������������������������������������������� 18
Parameter setting: Auto-Off �������������������������������������������������������������������������������������������������������������������������������������� 19
Parameter setting: Cleaning interval������������������������������������������������������������������������������������������������������������������������� 20
Parameter setting: Temperature reduction ��������������������������������������������������������������������������������������������������������������� 21
Parameter setting: Long (lungo) espresso shot��������������������������������������������������������������������������������������������������������� 22
Evaporation of residual water ������������������������������������������������������������������������������������������������������������������������������������ 23
Frequently asked questions��������������������������������������������������������������������������������������������������������������������������������������� 24
Specifications and servicing �������������������������������������������������������������������������������������������������������������������������������������� 25
Disposal instructions�������������������������������������������������������������������������������������������������������������������������������������������������� 26
Notes�������������������������������������������������������������������������������������������������������������������������������������������������������������������������� 27
Verismo™System V·585 Operating Manual – Introduction
WARNING
Read ALL instructions before use to avoid injury�
Pay attention to warnings in this Operating Manual�
Keep this Operating Manual in a safe place for future reference�
For use by adults only�
Be diligent about emptying, cleaning and descaling as described in this Operating Manual�
Designed for beverage pods that bear the Verismo™System logo� Also compatible with other K-fee® System pods�

4 5
EN EN
Special safety
instructions
IMPORTANT
SAFEGUARDS
WARNING
When using electrical appliances, basic
safety precautions must always be
followed, including the following:
1. Read all instructions and use only in
accordance with these instructions.
This appliance is intended to be
used in household and similar
applications, such as staff kitchen
areas in shops, offices and other
working environments, farm houses,
by clients in hotels, motels, other
residential type environments,
and bed and breakfast type
environments.
2� Never place your fingers under
the spout while the appliance
is operating — this may result
in scalding. Never insert your
fingers in the pod opening — this
may result in injury.
3� Never open the lever on the
appliance during the brewing,
rinsing, cleaning or descaling
processes. Always keep the lever
in the closed / down position
while machine is operating.
4. Do not touch hot surfaces. Use
handles or knobs when available.
5. Never use a damaged or deformed
pod. Only use beverage pods
suitable for this appliance.
6. Never lift the appliance by its lever.
Never open or close the lever forcibly.
7. Never open the appliance or insert
objects into the appliance openings.
8. Never operate the appliance without
its drip tray or drip grating.
9. Do not overfill the water tank with
water.
10. Use only fresh and cold drinking
water in this appliance! Do not put
any other liquids or foods in the
water tank except as directed in the
cleaning and descaling instructions
in this manual.
11. The use of accessory attachments
not recommended by the appliance
manufacturer may result in fire,
electric shock or injury to persons.
12. Do not place on or near a hot gas or
electric hob, or in a heated oven. Do
not place near water, i.e., kitchen
sink.
13. Do not use outdoors.
14. To protect against fire, electric
shock and injury, do not immerse
appliance, cable or plug in water or
any other liquid.
15. This appliance is equipped with an
electrical cable having a grounding
wire with a grounding plug. Only
plug the appliance into a grounded
3-pin wall socket. In the event of an
electrical short circuit, grounding
reduces the risk of electrical shock.
Check if mains voltage matches the
specifications on the nameplate.
The warranty becomes null and void
if the appliance is plugged into an
incorrect mains voltage.
16. Do not, under any circumstances,
cut or remove the third (ground)
prong from the power cable or use
an adapter. Consult a qualified
electrician if the grounding
instructions are not completely
understood or if any doubt exists as
to whether the appliance is properly
grounded.
17. Turn off and unplug the appliance
before cleaning and maintenance.
Allow to cool before putting on or
taking off parts, and before cleaning
the appliance.
18. Do not operate appliance with a
damaged cable or plug or after
the appliance malfunctions or is
damaged in any manner. Contact
Starbucks customer service (see
page 25) to report any malfunctions
or damage to the appliance.
19. Do not let cable hang over the edge
of the table or the counter or touch
hot surfaces.
20. To disconnect, always turn any
control to “off” first, then remove
plug from wall socket.
21. The appliance is not to be used by
children and care should be taken to
ensure that children are kept away
from the appliance and properly
supervised when the appliance is in
use. Store the appliance and all of its
accessories out of reach of children.
The appliance is not designed to be
used by persons (including children)
with reduced physical, sensory
or mental capabilities, or lack of
experience or knowledge, unless
they have been given appropriate
supervision or instruction. Children
should be closely supervised to
ensure they do not play with the
appliance.
22. Refer to the instructions for use of
all cleaning and descaling agents
before use and comply with the
safety regulations. Do not turn off
appliance during rinsing or descaling
process.
23. Apart from normal use, cleaning,
descaling and external cleaning,
all other work such as repairs or
replacing the mains cable may only
be carried out by an authorised
Customer Service company in order
to avoid hazards.
24. In case of long periods of absence,
holiday, etc., the appliance must be
emptied, cleaned and the mains plug
must be removed from the socket.
SAVE THESE
INSTRUCTIONS
WARNING TO USERS
ANDPARENTS
DO NOT permit children to use
the appliance unless there is
adult supervision. Appliance
dispenses very hot water.
Important
safeguards SPECIAL SAFETY
INSTRUCTIONS
Warning symbols and words
The warning triangle appears in these
instructions where failure to comply with
the safety instructions may result in risks
to the user or the appliance.
WARNING: Extremely hot water
Don’ts: Do not reach inside
WARNING:
Electric shock
Avoid risk of electric shock
• Keep the appliance away from
moisture and splashing water.
• Donotcleanapplianceunderrunning
water or with a water jet.
• Neverpouranytypeofliquidontopof
the appliance.
• Neverunplugtheappliancebypulling
the mains cable.
• Nouserserviceablepartsinside.
• Do not cut or remove the third
(ground) prong from the power cable
or use an adapter.
WARNING
WARNING: Make sure the lever
is closed completely during use.
Extremely hot water runs through
the appliance when operating
(brewing, descaling, cleaning,
rinsing). To avoid the risk of scalding
or other injury, always keep the
lever in the closed / down position
while machine is operating. Do not
reach under the spout or remove the
drip tray.
•Take care when emptying the drip
tray. The water can be very hot.
• Thereisadangerofscaldingwhen
evaporating the residual water (the
steam temperature can be as high
as 120°C).
WARNING
Hygiene and cleaning
• Onlyusepodswithabest-bydatethat
has not yet expired.
• Storepodsinasuitablelocation.
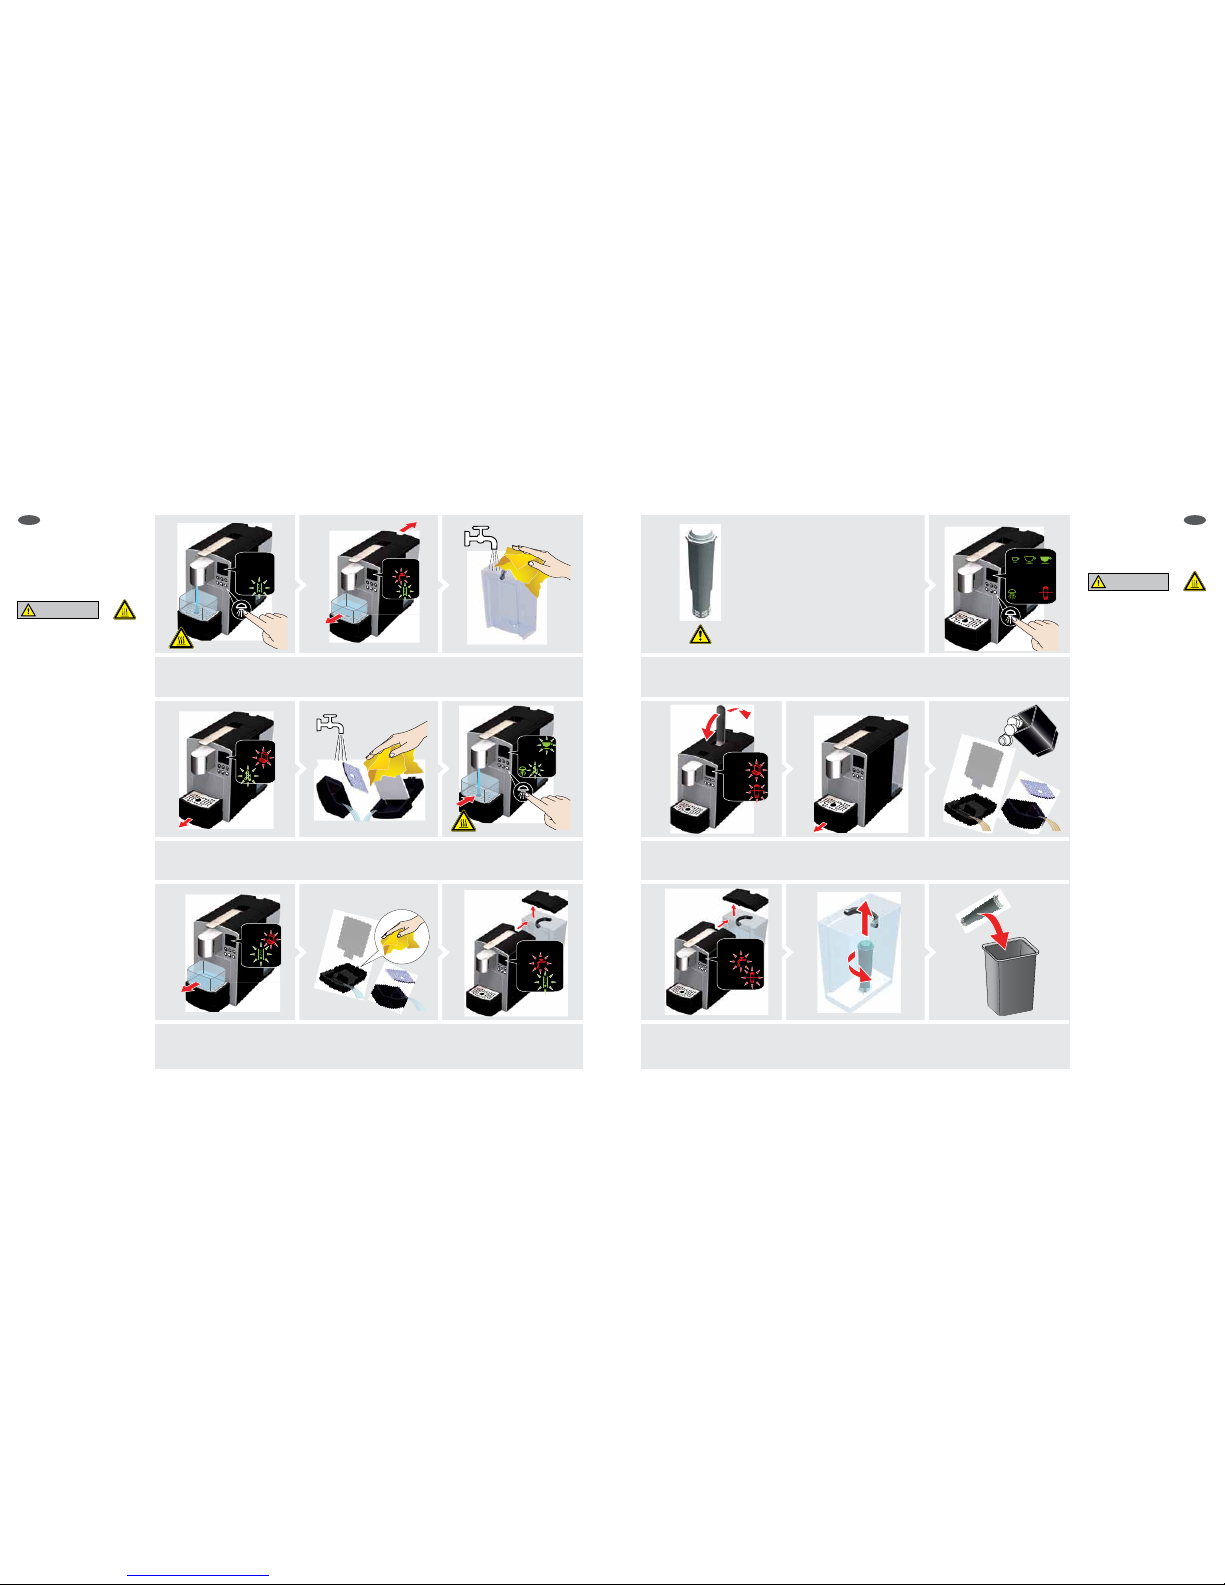
• Forhealthreasonsitisrecommended
to rinse the appliance five times
before first use and once after
each beverage is poured. Read
the instructions under “Cleaning the
Machine Every Day“ on page 10.
• Cleantheapplianceperiodicallyand
in accordance with the Operating
Manual to prevent hygiene risks.
• Onlyusecleaning/descalingagents
that are suitable for the appliance.
• Carefullyreadtheuserinstructions
about the cleaning and descaling
agents and comply with
the safety instructions.
Short cord instructions
A short electricity cable is provided to
reduce risk of entanglement or tripping
over a longer cable.
Information on Eco (Energy–Saving)
mode (Auto-Off)
The appliance returns to Eco (Energy–
Saving) mode if it is unused for more
than 30 minutes (factory setting).The
appliance uses considerably less energy
inthismode.Forexample,itusesless
than0.5W/h(thestandardoperating
amount of energy used).
CAUTION
CAUTION: There are four sharp
needles that puncture the Verismo™
System pods inside the pod opening.
To avoid risk of injury, do not put
your fingers in the pod opening.
WARNING:TOREDUCETHERISKOFFIRE
ORELECTRICSHOCK,DONOTREMOVETHE
BOTTOMCOVER.NOUSERSERVICEABLE
PARTS ARE INSIDE. REPAIR SHOULD BE DONE
BYAUTHORISEDSERVICEPERSONNELONLY.
WARNING
RISKOFFIREOR
ELECTRICSHOCK
DO NOT OPEN

6 7
EN EN
Overview of
LEDsymbols
1
2
7
3
9
10
4
8
6
11
12
13
14
5
EN Verismo™System V∙585
overview
1 Drip tray grate
2 Drip tray wall
3 Height-adjustable spout
4 Pod opening
5 Lever
6 Water tank
7 Water tank cover
8 Water filter (optional)
9 LED display
10 Controls
11 Used pod container
12 Connector
13 Lower drip tray
14 Upper drip tray
CAUTION
CAUTION: There are four sharp needles that
puncturetheVerismo™Systempodsinside
the pod opening. To avoid risk of injury, do
not put your fingers in the pod opening.
Symbol
Espresso
• The cup symbols flash green while appliance heats up.
• The cup symbols and the Rinse symbol light up green if appliance is ready.
• The respective cup symbol or the Rinse symbol flashes green as the desired
action isperformed.
Brewed
Milk
Rinse
°C
Temperature
Reduction
• Lights up green when temperature reduction is selected.
• Flashesgreenasbeveragepreparationispreparedwith
temperaturereduction.
• Brewing temperature can be reduced for espresso or brewed coffee to
approximately70°C/158°F.
Clean
Machine
• Lights up green if appliance needs to be cleaned. Set to every 100 beverage
preparations (factory setting).
• Flashesgreenasdesiredactionisperformed.
Descale
Machine
• Lights up green if appliance needs to be descaled.
• Flashesgreenasdesiredactionisperformed.
Empty
Used Pod
Container
• Symbol for used pods lights up red if used pod container and lower drip tray
need to be emptied.
• Approximately 30 pods fit in the used pod container.
• Theupperdriptrayhasacapacityofapproximately300ml/10.14oz;
thelowerdriptrayhasacapacityofapproximately500ml/16.91oz.
Fill
WaterTank
• Lights up red if water tank is empty.
• Thewatertankhasacapacityofapproximately3.5L/0.92gallons.
Replace
WaterFIlter
• Lights up red when water filter needs to be replaced
(after50Lwater/13.2gallons).
• Symbol stays lit until filter has been replaced.
Display of symbols:
°C
Espresso
On / Off
Button symbols:
Brewed
Temperature
Reduction
Milk
Rinse
°C

8 9
EN EN
NOTE: When inserting pods, please close
handle with one smooth motion. Avoid
back and forth movement of the handle or
hesitation when closing the lever, as this can
cause the pod to drop straight into the used
pod container without being punctured.
Do not remove the top foil lid or puncture
the pod.
Preparing
beverages
If appliance has been exposed to
temperatures below freezing, allow at least
three hours for the appliance to reach room
temperature before startup. A frozen or
extremely cold appliance may not operate
properly.
WARNING
WARNING: Make sure the lever is closed
completely during use. Extremely hot water
runs through the appliance when operating
(brewing, descaling, cleaning, rinsing). To
avoid the risk of scalding or other injury,
alwayskeeptheleverintheclosed/down
position while machine is operating. Do not
reach under the spout and do not remove the
drip tray.
°C
°C
with upper drip tray, or with lower drip tray.Adjust drip tray to desired cup size—
Lift lever and insert pod. Brewing in progress. To stop the
brewingprocess, press anybutton.
Wait until beverage stops pouring.
Beverage is ready.
Lift and close lever to eject pod. After preparing a beverage, press the
Rinse button once to dispense water to
thoroughly rinse out the machine.
°C
max
110 mm / 4.3 in max
160 mm /
6.3 in
°C
Adjust height of spout. Close lever
and choose beverage type (espresso,
brewed or milk).
1 A B
234
567
°C
°C
°C
°C
Fillwatertankwithfreshandcold
drinking water.
Remove water tank. Insert water tank.
PressOn/Offbuttonbriey
(1second).
Check operating voltage on rating
plate. Please read important
safeguards on page 4.
Close lever completely. Place a
heat-safe cup under spout.
Press the Rinse button to start rinsing
process.
Wait until rinsing process is finished.
Thenemptycup.Forrstuse:Repeat
steps 6–8 four more times to rinse the
machine thoroughly.
Appliance is ready for operation.
On
max
3.5 L / 118 fl oz
°C
°C
123
456
789
Please read the safety instructions before
the first use.
If you decide to use a water filter, screw filter
in water tank and rinse appliance with at least
200ml/6.76ozwater.Enablethesetting
“Filteravailable.”Referto“Parametersetting:
Water filter” on page 18.
Getting started
The spout can be moved either downward or
upwar d with the help of the sliding device (on
both sides of the spout).
WARNING
Danger of scalding: Do not open the lever
during the brewing process. Do not reach
under the spout.
See Quick Start Guide for more recipes.
CAUTION
CAUTION: There are four sharp needles that
puncturetheVerismo™Systempodsinside
the pod opening. To avoid risk of injury, do
not put your fingers in the pod opening.
WARNING
WARNING: Make sure the lever is closed
completely during use. Extremely hot water
runs through the appliance when operating
(brewing, descaling, cleaning, rinsing). To
avoid the risk of scalding or other injury,
alwayskeeptheleverintheclosed/down
position while machine is operating. Do not
reach under the spout and do not remove the
drip tray.

10 11
EN EN
Cleaning
themachine
(whenprompted)
Daily cleaning
Only use liquid detergents that are suitable
fortheVerismo™System.Visitourwebsitefor
moreinformation.
Lift and close lever. Remove drip trays with used pod
container.
(Before removing the drip trays, make sure
thatthe spoutis in its uppermost position.)
Remove and empty water tank.
The filter has to be removed
beforecleaning.
°C
Empty containers and then reinsert
into the appliance.
Insert water tank. Place a container
under spout.
After 100 beverage preparations, the appliance automatically prompts for
cleaning (factory setting).
Press the Rinse button for at least
3seconds. Remove the water filter.
1 2
345
678
Carefully read the instructions for using the detergent
and comply with all safety instructions.
Place a cup under spout. Push Rinse button briefly to rinse
theappliance.
Switch off appliance (or machine
will automatically shut off after
30minutes).
Empty cup.
Lift and close lever.
Press Off
min 3 sec
Take drip trays apart. Empty all containers. Clean and reassemble all parts.
°C
°C
°C
Remove drip trays, used pod container
and water tank.
(Before removing the drip trays, make sure
thatthe spoutis in its uppermost position.)
123
456
789
°C
Risk of damage: Only use a moist cloth and
if necessary a mild detergent (never use
abra sive detergent s). Do not wash parts of the
appliance in the dishwasher. Before inserting
the lower drip tray, dry the connector.
WARNING
WARNING: Make sure the lever is closed
completely during use. Extremely hot water
runs through the appliance when operating
(brewing, descaling, cleaning, rinsing). To
avoid the risk of scalding or other injury,
alwayskeeptheleverintheclosed/down
position while machine is operating. Do not
reach under the spout and do not remove the
drip tray. Take care when emptying the drip
trays and pod container. Residual water can
be very hot.
If the cleaning process is interrupted, the
appliance automatically returns to cleaning
mode when switched on again.
For health reasons itis recommendedto
maint ain the fac tory setting of the automatic
prompt for cleaning.
WARNING
WARNING: Make sure the lever is closed
completely during use. Extremely hot water
runs through the appliance when operating
(brewing, descaling, cleaning, rinsing). To
avoid the risk of scalding or other injury,
alwayskeeptheleverintheclosed/down
position while machine is operating. Do not
reach under the spout and do not remove the
drip tray.
Carefully read the instructions for using
the detergent and comply with all safety
instructions.
Fillwatertankwithdetergentand
water according to the cleaning
chemical manufacturer�s directions.
min
0.6 L /
20.29 fl oz

12 13
EN EN
Descaling
themachine
(whenprompted)
Cleaning
themachine
(whenprompted)
continued
The water hardness setting determines when the symbol for descaling lights up
in the display. (See page 18.)
Empty containers and then reinsert
into the appliance.
Fillwatertankwithdescalingagent
and water according to descaling
chemical manufacturer�s directions.
Insert water tank. Place a container
under spout.
Removeandemptywatertank.Filter
has to be removed before descaling.
Remove drip trays with used pod
container.
(Before removing the drip trays, make sure
thatthe spoutis in its uppermost position.)
Lift and close lever.
°C
Press the Rinse button for at least
3seconds.
1 2
345
678
Remove water filter.
min
0.6 L /
20.29 fl oz
Press the Rinse button. Rinses in
intervals until empty.
Remove drip trays with used pod
container.
(Before removing the drip trays, make sure
thatthe spoutis in its uppermost position.)
Removewatertank.Filltankwithfresh
drinking water and reinsert it.
Place a container under spout. Press
the Rinse button. Rinses until water
tank is empty.
Wait until rinsing process is finished,
then empty container.
Remove and empty drip trays, drying
connector on lower tray with a dry cloth.
Reinsert trays with pod container.
Clean water tank. Refill water tank
(min.0.3L/10.14oz)andreinsertit.
Wait until rinsing process is finished,
then empty container.
Empty and clean drip trays, drying
connector on lower tray with a dry cloth.
Reinsert trays with pod container.
910 11
12 13 14
15 16 17
WARNING
WARNING: Make sure the lever is closed
completely during use. Extremely hot water
runs through the appliance when operating
(brewing, descaling, cleaning, rinsing). To
avoid the risk of scalding or other injury,
alwayskeeptheleverintheclosed/down
position while machine is operating. Do not
reach under the spout and do not remove the
drip tray.
If the descaling process is interrupted, the
appliance automatically returns to descaling
mode when switched on again.
WARNING
WARNING: Make sure the lever is closed
completely during use. Extremely hot water
runs through the appliance when operating
(brewing, descaling, cleaning, rinsing). To
avoid the risk of scalding or other injury,
alwayskeeptheleverintheclosed/down
position while machine is operating. Do not
reach under the spout and do not remove the
drip tray.
Only use descaling agents that are suitable
fortheVerismo™System.Visitourwebsitefor
moreinformation.
Carefully read the instructions for using the descaler
and comply with all safety instructions.
Carefully read the instructions for using
the descaler and comply with all safety
instructions.

14 15
EN EN
Changing the filter
(whenprompted)
Descaling
themachine
(whenprompted)
continued
°C
Unscrew used water filter. Discard used water filter.
Ifsetting“Filteravailable”hasbeenactivated,theapplianceautomatically
promptsforwaterlterreplacementafter50L/13.2gallonswater.
Empty all containers and then reinsert.Remove drip trays with used pod
container.
(Before removing the drip trays, make sure
thatthe spoutis in its uppermost position.)
Lift and close lever.
Remove and empty water tank.
Press the Rinse button for at least
3seconds.
1 2
345
678
Press the Rinse button. Rinses in
intervals until empty.
Remove drip trays with used pod
container.
(Before removing the drip trays, make sure
thatthe spoutis in its uppermost position.)
Removewatertank.Filltankwithfresh
drinking water and reinsert it.
Wait until rinsing process is finished,
then empty container.
Remove and empty drip trays, drying
connector on lower tray with a dry cloth.
Reinsert trays with pod container.
Wait until rinsing process is finished,
then empty container.
Clean water tank. Refill water tank
(min.0.3L/10.14oz)andreinsertit.
Empty and clean drip trays, drying
connector on lower tray with a dry cloth.
Reinsert trays with pod container.
910 11
12 13 14
15 16 17
WARNING
WARNING: Make sure the lever is closed
completely during use. Extremely hot water
runs through the appliance when operating
(brewing, descaling, cleaning, rinsing). To
avoid the risk of scalding or other injury,
alwayskeeptheleverintheclosed/down
position while machine is operating. Do not
reach under the spout and do not remove the
drip tray.
The water filter symbol will continue to be
displayed in red until the filter has been
replaced.
If the water filter replacement is interrupted,
the appliance automatically returns to “filter
replacement“ mode when switched on again.
To prevent hygiene risks, it is recommended
to change the water filter every two months.
Place a container under spout. Press
the Rinse button. Rinses until water
tank is empty.
Carefully read the instructions for using the water
filter and comply with all safety instructions.
Only use a water filter that is suitable for
theVerismo™System.Visitourwebsite
for more information.

16 17
EN EN
The water filter symbol appears only if the
set ting "FIl ter availa ble" was pre viously
activated.
Manually enabling
the cleaning,
descaling or filter
changefunctions
Changing the filter
(when prompted)
continued
°C
°C
°C
Press the Rinse button for at least
3seconds.
Cleaningsymbolblinks.Forthe
cleaning process, please follow the
operating steps on pages 11–12.
Filtersymbolblinks.Forlter
replacement, please follow the
operating steps on pages 15–16.
To return to descaling function, press
the Rinse button briefly.
Descaling symbol blinks again
(program loop).
Switch off appliance to exit
programloop.
Descalingsymbolblinks.Forthe
descaling process, please follow the
operating steps on pages 13–14.
°C
Fornextfunction,presstheRinse
button briefly.
Fornextfunction,presstheRinse
button briefly.
123
456
789
Screw in new water filter. Place a container under spout.Refill water tank completely and
reinsert it.
Press the Rinse button. Remove drip trays with used pod
container.
(Before removing the drip trays, make sure
thatthe spoutis in its uppermost position.)
Appliance is ready for operation.Empty and clean drip trays. Wipe
connector on lower drip tray with
adrycloth.
Reinsert drip trays with pod container.
Appliance heats up.
°C
max
3.5 L / 118 fl oz
min
0.25 L /
8.45 fl oz
Wait until rinsing process is finished,
then empty container.
910 11
12 13 14
15 16 17
WARNING
WARNING: Make sure the lever is closed
completely during use. Extremely hot water
runs through the appliance when operating
(brewing, descaling, cleaning, rinsing). To
avoid the risk of scalding or other injury,
alwayskeeptheleverintheclosed/down
position while machine is operating. Do not
reach under the spout and do not remove the
drip tray.
After inserting the filter, check if setting
“Filter existing“ is activated. Refer to
instruc tions under “Parameter setting: Water
filter“ (see page 18). An already activated
setting remains active.

18 19
EN EN
Parameter setting:
Auto‑Off
The water hardness determines descaling
frequency.Foranoverviewtodeterminethe
range of water hardness, refer to page 24.
soft:150L/39.6gallons
medium-hard:100L/26.4gallons
hard:70L/18.5gallons
veryhard:40L/10.6gallons
Ifthesetting“Filteravailable”wasactivated,
the water hardness is set to soft water
(150L/39.6gallons)automatically.
Factorysetting:Nowaterlter
Parameter setting:
Water hardness
Parameter setting:
Water filter
Press Temperature Reduction button for
at least 3 seconds while the machine is
off but not unplugged (Eco mode).
Press button briefly again: Auto-Off
will be adjusted to 60 minutes.
Press button briefly again: Auto-Off
will be adjusted to 180 minutes.
Eco Mode
The appliance returns to Eco mode if it is unused for more than 30 minutes (factory setting).
We recommend this factory setting. The appliance uses considerably less energy in Eco mode
(lessthan0.5W/h)thanifitisalwaysreadyforoperation.
Press the Temperature Reduction
button for at least 3seconds to save
the setting.
°C
°C
°C
°C
°C
°C
°C
°C
°C
°C °C
Press button briefly again: Auto-Off
will be adjusted to 15 minutes.
Press button briefly again: Auto-Off
will be adjusted to 30 minutes
(factorysetting).
123
456
°C
°C
°C
°C
°C
°C
°C
123
456
123
Press the Rinse button for at least
3seconds while the machine is off but
not unplugged (Eco mode).
Press Espresso button for at least
3seconds while the machine is off
but not unplugged (Eco mode) for
nowaterfilter.
Press Espresso button briefly again.
Water filter is activated.
Press Espresso button for at least
3seconds to save the setting.
Press the Rinse button briefly for
softwater.
Press button briefly again for
medium-hard water.
Press button briefly again for
hardwater.
Press the Rinse button for at least
3seconds to save the setting.
Press button briefly again for very hard
water (factory setting).
EN
TheVerismo™SystemV·585includesanEco
mode setting (factory setting), which means
that the machine will automatically turn of f if
it is not used for 30minutes.

20 21
EN EN
Parameter setting:
Cleaning interval
Press the Brewed button for at least
3 seconds when the machine is off
but not unplugged (Eco mode).
Press Brewed button briefly again:
Cleaning interval will be extended to
300 preparations.
Press Brewed button briefly again:
Cleaning interval will be extended to
400 preparations.
Press Brewed button for at least
3seconds to save the setting.
°C
°C
°C
°C
°C
°C
Cleaning after 100 beverage
preparations (factory setting).
Press Brewed button briefly:
Cleaning interval will be extended
to200preparations.
123
456
CAUTION
CAUTION: There are four sharp needles that
puncturetheVerismo™Systempodsinside
the pod opening. To avoid risk of injury, do
not put your fingers in the pod opening.
Parameter setting:
Temperature
reduction
°C
°C
°C
°C
°C
°C
Open lever and insert Espresso or
Brewed pod. Close lever again.
Press Temperature Reduction button
again to switch off function.
After brewing the appliance is
readyagain.
Temperature Reduction is switched off.
Use the Temperature Reduction button to
reduce the brewing temperature for the
Espresso and Brewed beverages. Reduces
temperaturetoapproximately70°C/158°F.
Press Temperature Reduction button.
Place a container on drip tray.
Place a suitable cup or glass on drip
tray. Choose Espresso or Brewed
button.
Press Rinse button. Remove container
after rinsing.
1 2
345
678
WARNING
WARNING: Make sure the lever is closed
completely during use. Extremely hot water
runs through the appliance when operating
(brewing, descaling, cleaning, rinsing). To
avoid the risk of scalding or other injury,
alwayskeeptheleverintheclosed/down
position while machine is operating. Do not
reach under the spout and do not remove the
drip tray.

22 23
EN EN
Parameter setting:
Long (lungo)
espresso shot
This function evaporates and thus removes
residual water from inside the appliance. This
prevents residual water from freezing inside
the appliance.
Evaporation of
residual water
Reinsert empty water tank. Dry front of appliance by wiping with
a cloth.
Lift and close lever. Press and hold the Espresso and
Brewed buttons for at least 3 seconds.
Evaporation starts. Wait until evaporation is finished and
appliance is completely cool.
°C
Remove and empty water tank.
°C
°C
Let appliance warm up to room
temperature if necessary.
Depress button until desired amount is
poured. Maximum amount allowable is
60ml/2oz.Torevertbacktofactory
setting(30ml/1oz),depressbutton
again.Releaseafter30ml/1ozispoured.
123
4
7
5
8
6
20°C / 68°F
WARNING
WARNING: The steam temperature can reach
up to 120°C / 24 8°F. To avoid the ri sk of
scalding or other injury, do not reach under
the spout.
123
30 ml
1 fl oz
60 ml
2 fl oz
0 ml
(lungo)
(factory settings)
The machine can be reset to pour a larger espresso beverage (lungo shot). Insert Espresso pod and then hold
down the Espresso button until the liquid reaches the desired level in the cup. The maximum allowable amount
is60ml/2oz.Thenewpouringcapacityremainssaved(evenifpowerisinterrupted).
°C
°C
WARNING
WARNING: Make sure the lever is closed
completely during use. Extremely hot water
runs through the appliance when operating
(brewing, descaling, cleaning, rinsing). To
avoid the risk of scalding or other injury,
alwayskeeptheleverintheclosed/down
position while machine is operating. Do not
reach under the spout and do not remove the
drip tray.

24 25
EN EN
Specifications and
servicing
Frequently asked
questions
Eco Mode
The appliance returns to Eco mode if it is unused for more than 30 minutes (factory setting). We recommend this factory
setting.TheapplianceusesconsiderablylessenergyinEcomode(lessthan0.5W/h)thanifitisalwaysreadyforoperation.
220–240V,~50Hz,
maximum 1455 W
1.45m/4.75feet
Pmaximum275psi/19-bar
~3.5L/0.92gallon
~4.5kg/9.9lb
A
B
C
°C
A=200mm/7.87in
B=406mm/15.98in
C=316mm/12.4in
°C
maximum160mm/6.3in
min
max
10°C–45°C/50°F–113°F
°C
Approximately90°C/194°F
Noise emissions do not exceed 70 dB(A)
Designed for beverage pods that bear the
Verismo™Systemlogo.Alsocompatiblewith
otherK-fee®Systempods.
Overview of water hardness:
Hardness range Water hardness in mmol
1 (soft) < 1.3
2 (medium-hard) 1.3 – 2.5
3 (hard) 2.5 – 3.8
4 (very hard) > 3.8
Ask your local water company for information
about the water hardness. The water hardness
level entered in the appliance determines
the period between descaling for optimal
operation.
Why is there a delay before the drink is dispensed?
The machine is adjusting to the right temperature to make your beverage.
After using the milk pod, why isn’t the drink dispensing immediately after pressing the Espresso or Brewed buttons?
After a milk pod, the machine requires up to 8–10 seconds to heat to the required temperature. Wait until lights stop blinking, then push
Espressobutton.
How do I remove the pod container if it is jammed or overfilled?
Gently move the pod container back and forth while removing the container.
Why isn’t the beverage hot enough?
The machine may need to be descaled (refer to section “Descaling the Machine” on pages 13–14).
Why are all the buttons flashing at a fast rate for a prolonged period of time?
Tryswitchingoffthemachineandunpluggingthecordfromthewallsocket.Ifthisproblempersists,pleasevisitVerismo.com.
Why isn’t the drink dispensing properly?
Ensure the lever is pressed down completely. If necessary, descale the machine (refer to section “Descaling the Machine” on pages 13–14).
Why does the machine switch itself off suddenly when it is used a lot?
The machine switches itself off as protection against overheating. If this occurs, let the machine cool down for about 30 minutes before
using it again.
How do I reset appliance to factory settings?
Switchoffandunplugappliance.KeeptheRinsebuttonandtheMilkbuttonpressedandpluginappliance.Thenreleasebothbuttons.
What is the Eco mode?
The appliance returns to Eco mode if it is unused for more than 30 minutes (factory setting). The appliance uses considerably less energy in
Ecomode(lessthan0.5W/h)thanifitisreadyforoperation.
Telephone Number:
UnitedKingdom: +44(0)2088345050

26 27
EN EN
NotesDisposal
instructions
Thisappliancebearsthesignforwasteelectricalandelectronicequipment“WEEE”inaccordancewithEuropeanDirective2002/96.
MostWEEEisdisposedofwithgeneralwaste.Directive2002/96requiresmemberstatestominimisetheamountofWEEEwhichis
disposed of as general waste and to achieve a high level of separate collection of WEEE. Separate collection means that WEEE can be
recycled and this saves energy and resources and avoids hazardous materials going to landfill. The crossed-out wheelie bin symbol
means that you should not dispose of this machine in your dustbin with your general waste. You should dispose of this machine separately.
In helping to separately collect WEEE you will be playing a key role in ensuring that recycling takes place and thereby help to improve the
environment. You should dispose of this equipment at your public recycling facility.

K-fee is a registered trademark of K-fee System GmbH.
© 2012 STARBUCKS COFFEE COMPANY. ALL RIGHTS RESERVED. SJB12-21637
Visit us at Verismo.com
Verismo™System V·585 OOH 21
Swiss Engineered High-Pressure Technology
30094348
Other manuals for V?585
1
Table of contents
Other Verismo Coffee Maker manuals