Vermont Castings MX925 Instruction Manual

© 2018 by Vermont Systems, Inc. i
Installing an MX925
RecTrac/CYMS 10.3
February 20, 2018

ii © 2018 by Vermont Systems, Inc.
Copyright Information
© 2018 by Vermont Systems, Inc.
This document is the property of Vermont Systems, Inc. and is provided in conjunction with an
agreement between the customer and VSI for Licensed Software or Software as a Service (SaaS).
The document(s) and software referred to in this publication may not be copied, distributed,
electronically transmitted, posted on the web or altered in any way without the express written
consent of Vermont Systems, Incorporated. The information contained in this document is
subject to change without notice
Vermont Systems, Inc.
12 Market Place
Essex Junction, VT 05452
www.vermontsystems.com

Installing an MX925 with RecTrac/CYMS 10.3
RecTrac 10.3
© 2018 by Vermont Systems, Inc. 1
Installing an MX925 with RecTrac/CYMS 10.3
Considerations
•Signatures are no longer required for any sales under $25.00 for non-EMV
(swiped/manual key) transactions ONLY. Any sale amount above $25.00 will require a
signature and the MX925 will prompt the customer to sign.
•If it is an EMV transaction (card is being inserted to read the chip), then it will ALWAYS
prompt for a signature/pin on the reader.
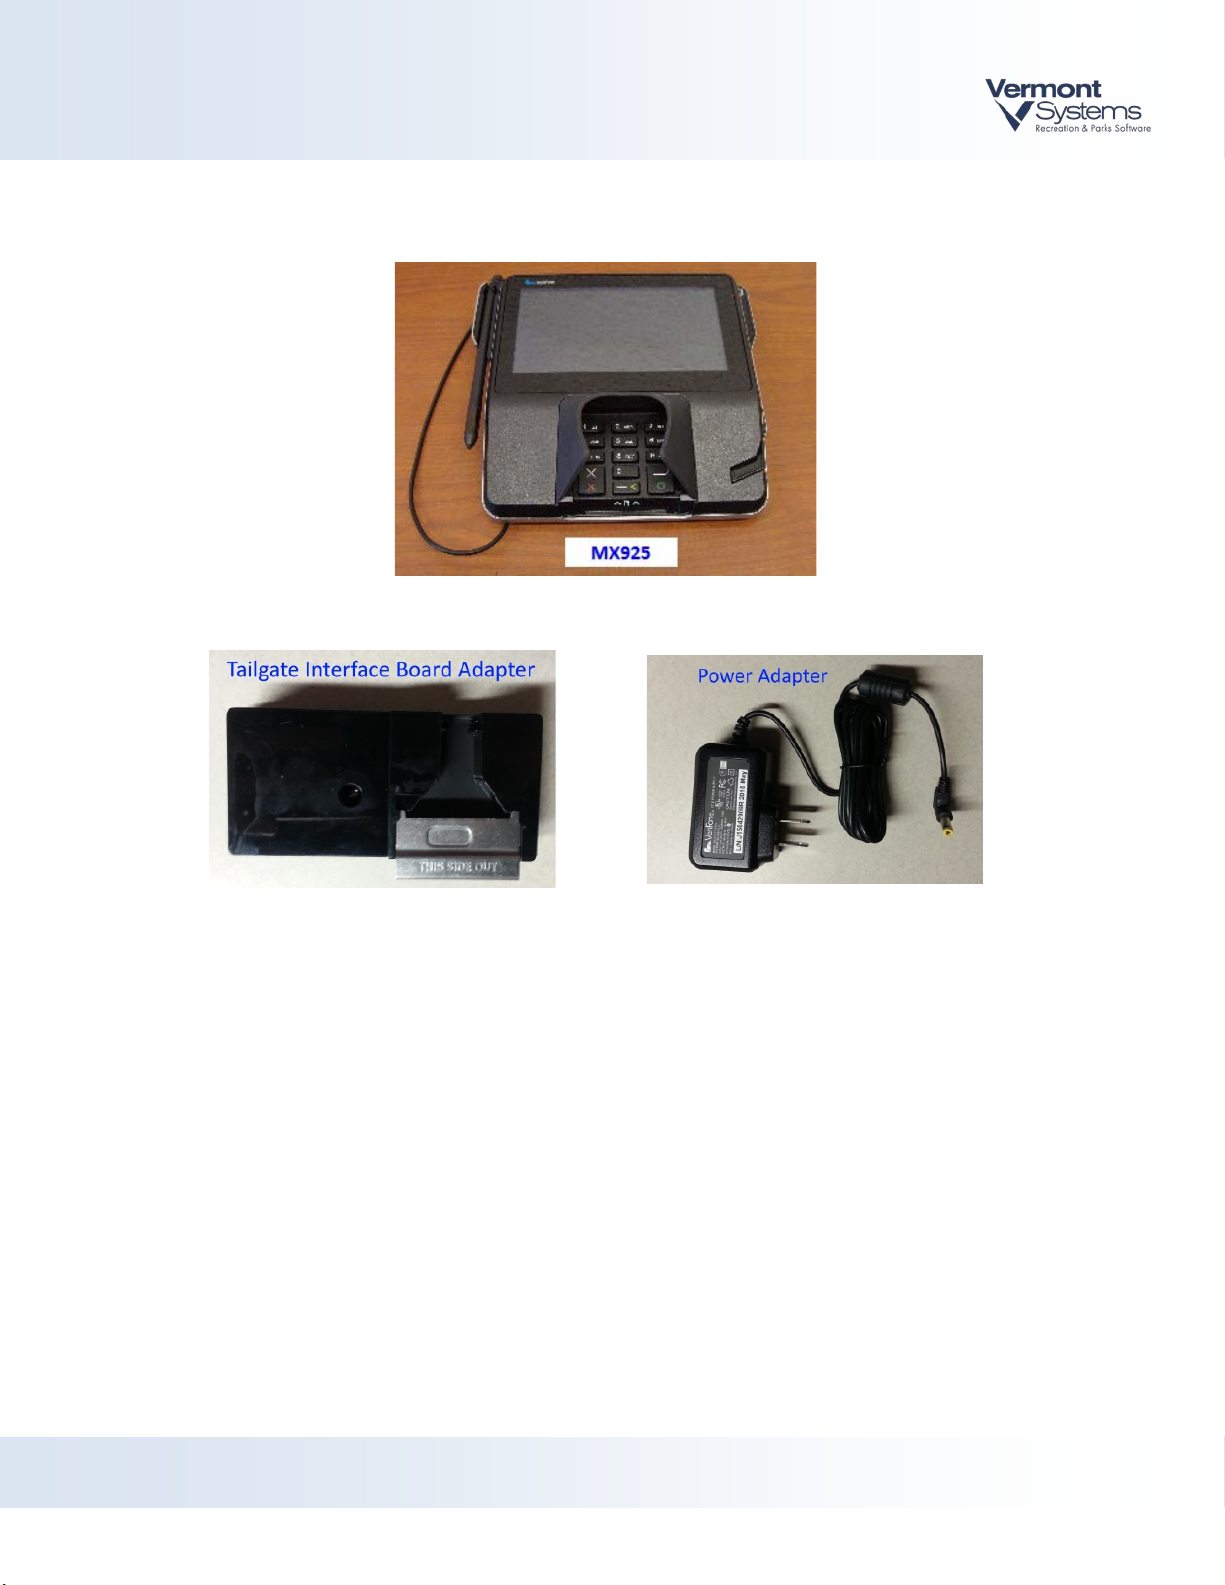
•The serial number of the MX925 is tied directly to the merchant account that is setup in
the VeriFone Point portal. This will be done prior to setting up and installing the MX925
the first time and communicated to you by VSI ASP. If you decide to change where a
MX925 is going to be deployed, you will need to contact VSI ASP and provide the S/N
of the unit that you want to change.
•In order to move an MX925 from one location to another, that device needs to be
unlinked from its current merchant account and then linked to the new one. This linkage
will be done by the VSI ASP team.
•DO NOT CLONE AN EXISTING POINT CREDITCARD DEVICE. Because you are pairing the
actual device record to the MX925 unit, cloning the device in RecTrac/CYMS will also
copy this MAC address registration and you cannot un-register it without breaking the
working device.
•For locations that do “card on file” transactions (auto debit billing, linking cards to an
open ticket tab), ALL card info on file will need to be re-linked after the switch over. A
Pin Pad dedicated to Auto Debit will be required. Chase Paymentech/POINT will
require a pin pad per merchant id and terminal id. You cannot share a retail pin pad
with a recurring/auto debit process.
•All existing MX830s need to be destroyed once the garrison is done using them.
Recommend keeping a handful of units for a few months. The old CPS will be in place
until the army has completely moved off from the legacy Payware Transact System.
•IMCOM G6 will remotely install new virtual servers for MS server 2012. VSI will then
follow up with a RecTrac/CYMS server migration to the new VMs and Progress 11. This
new configuration will allow both new mx925 POINT usage as well as legacy Payware
Transact mx830 processing.
•Two client files are needed in order to register a pin pad for use. The files are
assemblies.xml and BouncyCastle.Crypto.dll. VSI will provide the files. The garrison
should store on a share drive to make deployment easier. Files can be found at
ftp.vermontsystems.com. \File Updates And Drivers\VeriFone\Point. Obtain these
files before attempting the first pin pad setup.
Note: Disable HBSS on the POS terminal before attempting to register the pin pad
with the PC. HBSS can be re-enabled after the registration process is complete.

Installing an MX925 with RecTrac/CYMS 10.3
RecTrac 10.3
2 © 2018 by Vermont Systems, Inc.
Equipment You Will Receive from VeriFone

Installing an MX925 with RecTrac/CYMS 10.3
RecTrac 10.3
© 2018 by Vermont Systems, Inc. 3
Cables You Will Receive
Use the "Ethernet Purple Cable Switch" at locations that do not have a spare network drop at the
POS terminal. You will also need a patch cable.

Installing an MX925 with RecTrac/CYMS 10.3
RecTrac 10.3
4 © 2018 by Vermont Systems, Inc.
PAGE LEFT BLANK FOR DOUBLE-SIDED PRINTING

Hardware Setup
RecTrac 10.3
© 2018 by Vermont Systems, Inc. 5
Hardware Setup
1 After un-boxing everything, find the "Tailgate Interface Board Adapter." Remove the metal
guard from the back by sliding it out. Attach to the "Ethernet Purple Cable Switch" to the
"Tailgate Interface Board Adapter."
Note: Only one end of each cable will attach to the "Tailgate Interface Board
Adapter," and it can only plug in one way.
2 Once the cable is connected to the "Tailgate Interface Board Adapter," slide the metal guard
back into place. Now slide the "Tailgate Interface Board Adapter" into the back of the
MX925, under the metal bracket, until it snaps into place.
Note: The "Tailgate Interface Board Adapter" can only be inserted one way.
3 Connect the Ethernet cable to the unit.
•For the "Ethernet Purple Cable Switch:" Unplug the Ethernet cable from the POS
terminal. Plug that cable into the "ETHER 1" port on connector brick. Then plug one end
of the patch cable into the "ETHER 2" port on the connector brick and run the other end
into the Ethernet port on the POS terminal.
4 Remove the existing MX830 from the existing stand. Attach the MX925 to the new stand.
Line up the three bracket slots and slide it on, securing it with the existing wing screw.
5 Plug in the "Power Adapter" and attach it to the cable.
•For the "Ethernet Purple Cable Switch:" Plug the power connection into the connector
brick where it says +12VDC. The MX925 will power on.

Hardware Setup
RecTrac 10.3
6 © 2018 by Vermont Systems, Inc.
Connecting to Army Networks
Note: You can skip to Device Preamble Process by not plugging in the Ethernet cable
and assigning Ethernet information to the device “offline.” The steps below can be
used if an Ethernet already plugged in.
1 When first setting up the MX925 on the network you will see this screen. The MX925 gets
this error because it is set up to use DHCP to get network information. Army networks are
not set up to provide DCHP so we have to manually enter the network information.
2 Enter 159 simultaneously on the keyboard to get to the system administration screen.
3 Enter password of 166832

Hardware Setup
RecTrac 10.3
© 2018 by Vermont Systems, Inc. 7
4 Click the Administration tab •Communication tab •Network tab •Ethernet tab. You will see
the Mode = DHCP.
5 Click on the Mode line. Change the setting from "DHCP" to "StaticIP" and select OK.
6 The screen will change so you can enter the network configuration settings. Your settings
will probably be blank. To change the settings click on the line you want to edit. Enter
settings specific to your network.

Hardware Setup
RecTrac 10.3
8 © 2018 by Vermont Systems, Inc.
7 Click the Apply button when all of the settings are entered. You will see a pop-up that says,
“Reconfiguring Ethernet.”
8 Click the Home link at the top of the screen and then click the Run App button.
9 The application will start the Preamble Process where you will have to enter the network
information again.
Device Preamble Process
The device must now register and VeriShield keys must be synched. This commonly is referred
to as the preamble process.
1 The MX925 will boot up to the “Configure Network Settings” screen as seen here:

Hardware Setup
RecTrac 10.3
© 2018 by Vermont Systems, Inc. 9
Select “Static” network configuration
This will prompt for the following static IP settings:
Notes: All numbers need to be zero filled. For Example: an entry of 10.2.100.30
would be entered as 010.002.100.030.
You can run ipconfig /all from a command prompt on the POS terminal to find the
gateway and primary DNS IP's needed for this unit.
After entering in each IP, hit the enter key on the unit's keypad, which has the green circle
on it (bottom right on the keypad).
•IP address = IP you want the unit to have, determined by the GISO/NEC. Default
Gateway and Subnet Mask must be entered as well.
•Primary DNS = DNS IP address of your garrison.
Note: Make sure you press enter on the keypad and NOT the "Skip DNS" button on
the screen to complete DNS Entry.
•Secondary DNS = DNS IP address of your garrison.

Hardware Setup
RecTrac 10.3
10 © 2018 by Vermont Systems, Inc.
Note: Make sure you press enter on the keypad and NOT the "Skip DNS" button on
the screen to complete DNS Entry.
2 Once the network settings have been set, a screen will display that echoes the network IP
and setting type. If you receive a network error, then the unit is unable to get to the internet,
meaning the port is most likely blocked. Contact your local NEC.
3 Then a screen will display showing “Processing….” At this time, the device is performing a
registration command to get the Device Key. It is also running the VSP activation command,
which is enabling encryption. If this process is successful, then a screen showing “VSP Reg
Success” will show. If any “failure” messages appear at this time, then see the
Troubleshooting Section at the end of this document.
4 If Step 3 was successful, then the following screen will appear. Select Yes or Continue.
5 The device will then prompt for a card swipe. Swipe a credit card; any card will do. The
device is just confirming the account information is correct and it will run a sale for $1.00
and immediately void it. If this step fails, a message will display asking if you would like to
try again.
6 Once Step 5 succeeds, the device will display an informational screen and then eventually
display the idle screen, which contains the default IMCOM logo.

Hardware Setup
RecTrac 10.3
© 2018 by Vermont Systems, Inc. 11
If you receive a “Failed to get Device Key” error, then please call VSI ASP at 800-377-
7427 x3909. They will ensure the serial number of the MX925 is linked to an account.
You will also get this error if the pin pad can"t get to the internet.
Note: The MX925s come with tip processing disabled by default. If this unit is being
deployed at a location that will be taking counter tips, contact VSI ASP with the
applicable S/N and a package enabling counter tips will be installed remotely.

Hardware Setup
RecTrac 10.3
12 © 2018 by Vermont Systems, Inc.
PAGE LEFT BLANK FOR DOUBLE-SIDED PRINTING

RecTrac/CYMS Setup
RecTrac 10.3
© 2018 by Vermont Systems, Inc. 13
RecTrac/CYMS Setup
1 RecTrac/CYMS Server configuration – required for auto-debit to work.
•Browse to <path to>\vsi\dlc113
•Edit the startup.pf with Notepad.exe
•Replace -cpinternal ISO8859-1 with -cpinternal 1252
•Replace -cpstream ISO8859-1 with -cpstream 1252
•Save the file.
•Reboot the server.
2 Verify if the following folder exists on the POS terminal. If the folder does not exist, then
create it:
<x:>\<path to>\webclient\assemblies\
Examples:
C:\vsi\webclient\assemblies\ or
C:\Program Files (x86)\Progress Software\webclient\assemblies\
Put the files assemblies.xml and BouncyCastle.Crypto.dll into this folder. VSI will provide the
files. The garrison should store on a share drive to make deployment easier. Files can be
found at ftp.vermontsystems.com\File Updates And Drivers\VeriFone\Point.
Note: Disable HBSS on the POS terminal before attempting to register the pin pad
with the PC. HBSS can be re-enabled after the registration process is complete.
3 Browse out to <path to>\webclientapps\vsi\<application name>\ini\. Edit the rectrac.pf file
with Notepad.
Example path to the ini folder: c:\vsi\webclientapps\vsi\RecTracLAN\ini\
Verify that the parameter -cpinternal 1252 exists, if not add it to the end of the file.
Add the parameter -assemblies <path to> the assemblies directory you created
Example Assemblies: c:\vsi103\webclient\assemblies
Example Assemblies: C:\Program Files (x86)\Progress Software\webclient\assemblies
If you have multiple application name folders, edit all of the rectrac.pf files.

RecTrac/CYMS Setup
RecTrac 10.3
14 © 2018 by Vermont Systems, Inc.
4 Log into RecTrac/CYMS on the POS terminal. Go into Printer Device Maintenance. Create
credit devices. Finance prefers the 6 digit Chase TD number be part of the code so the
accounts are easy to match up with the Chase merchant reports. Sample V501301 (or use
site prefix 32501301)
In Printer Device Maintenance click the Add button. Select CreditCard as the New Type. Call
the new device something Finance will recognize (ex V501301), with a Subtype of VeriFone.
When you click OK on the new device screen you will see the configuration screen for the
new credit card device. Set the Payment Engine as PAYwareConnect-Point and the Account
Type as Normal Retail.

RecTrac/CYMS Setup
RecTrac 10.3
© 2018 by Vermont Systems, Inc. 15
New MX915/MX925 CC Device
Note: If this location is going to have multiple MX925s tied to the same merchant
account, EACH MX925 will need a unique credit card device in RecTrac/CYMS.
Suggest numbering them A, B, C etc. as needed and creating them all at once.
Example: V501301A, V501301B, V501301C, etc…. Save the Credit Device. You will
finish the setup in a future step.
5 Create a new Pin Pad device. In Printer Device Maintenance click the Add button. Select
PINPAD as the New Type. Call the new device “POINT," with a Subtype of MX915. When you
click OK on the new device screen you will see the configuration screen for the new pin pad
device. Use “MX925” as the description and set the Signature timeout to 2 seconds to start.

RecTrac/CYMS Setup
RecTrac 10.3
16 © 2018 by Vermont Systems, Inc.
Note: This device can be shared by any site since the only variable is the signature
timeout.

RecTrac/CYMS Setup
RecTrac 10.3
© 2018 by Vermont Systems, Inc. 17
6 Now go into Device Assignments and find the applicable workstation name. Highlight the
current CREDITCARD device linked and click Modify Device. Note the auth receipt printer
settings, as this will be needed in the new CREDITCARD device in the next step. If applicable,
note the tip Transcode being used (only needed if this location takes tips). Click Done.
MX830 Credit Card Device
Note: If you see an AUTH-RCPT device linked to this workstation, auth receipts are
controlled by this device and the settings in the CREDITCARD device can be ignored.
7 Highlight the current CREDITCARD device and click Remove Selected. Highlight the
PINPAD device and click Remove Selected.

RecTrac/CYMS Setup
RecTrac 10.3
18 © 2018 by Vermont Systems, Inc.
Note: The PINPAD device might be linked at the Menu Group level or even at the
Default level. You may need to remove it from higher levels in the device hierarchy
as you link the new one to the workstation. Leave the current PINPAD device linked
at the default level until ALL locations have been switched over to the new MX925
readers.
8 In the Device Type dropdown, select CREDITCARD and in Device to Add select the device
code that was created in step 4 above. Highlight the newly linked CREDITCARD device and
click Modify Device."
9 On the "VeriFone Core" screen, update the device description. Then update the "Auth
Copies," "Auth Printer" fields that you copied from the prior CREDITCARD device in step 6. If
there is an AUTH RCPT printer linked to this workstation, then you can ignore the Auth
Printer fields.
Notes: If this location takes tips, change the "Account Type" to "Restaurant" in the
drop down, enter in the applicable tip Transcode for this location, and then change it
BACK to “Normal Retail." This is important for tip locations.
If this location takes tips, then send a list of the MX925 serial numbers for this
pin pads will not ask the customer if they want to apply a tip. Once the pin pad is on
the network, VSI will need to push down a new configuration file that turns off debit
cards and turns on the option to ask the customer for a tip.
If this location takes tips, then verify how clerks receive their tip money. If they are
taking money out of the drawer at the end of their shift, then enable the Perform
Tender Exchangefield on the "Other Settings" Screen, lower left.
If this is an auto-debit pin pad, then enable the Check Household for Stored Cards
opiton on the "Other Settings" Screen, lower left.
Table of contents
Popular Card Reader manuals by other brands

Dazzle
Dazzle Digital Media High-Speed Reader/Writer user guide

Syris
Syris SYUR03N-U1 manual

Aft
Aft XM-37U quick start guide

Shenzhen Clou IOT Technologies Co., Ltd
Shenzhen Clou IOT Technologies Co., Ltd CL7206B5A user manual

Soyntec
Soyntec Nexoos 550 manual

IEI Technology
IEI Technology Enrollment Station installation instructions