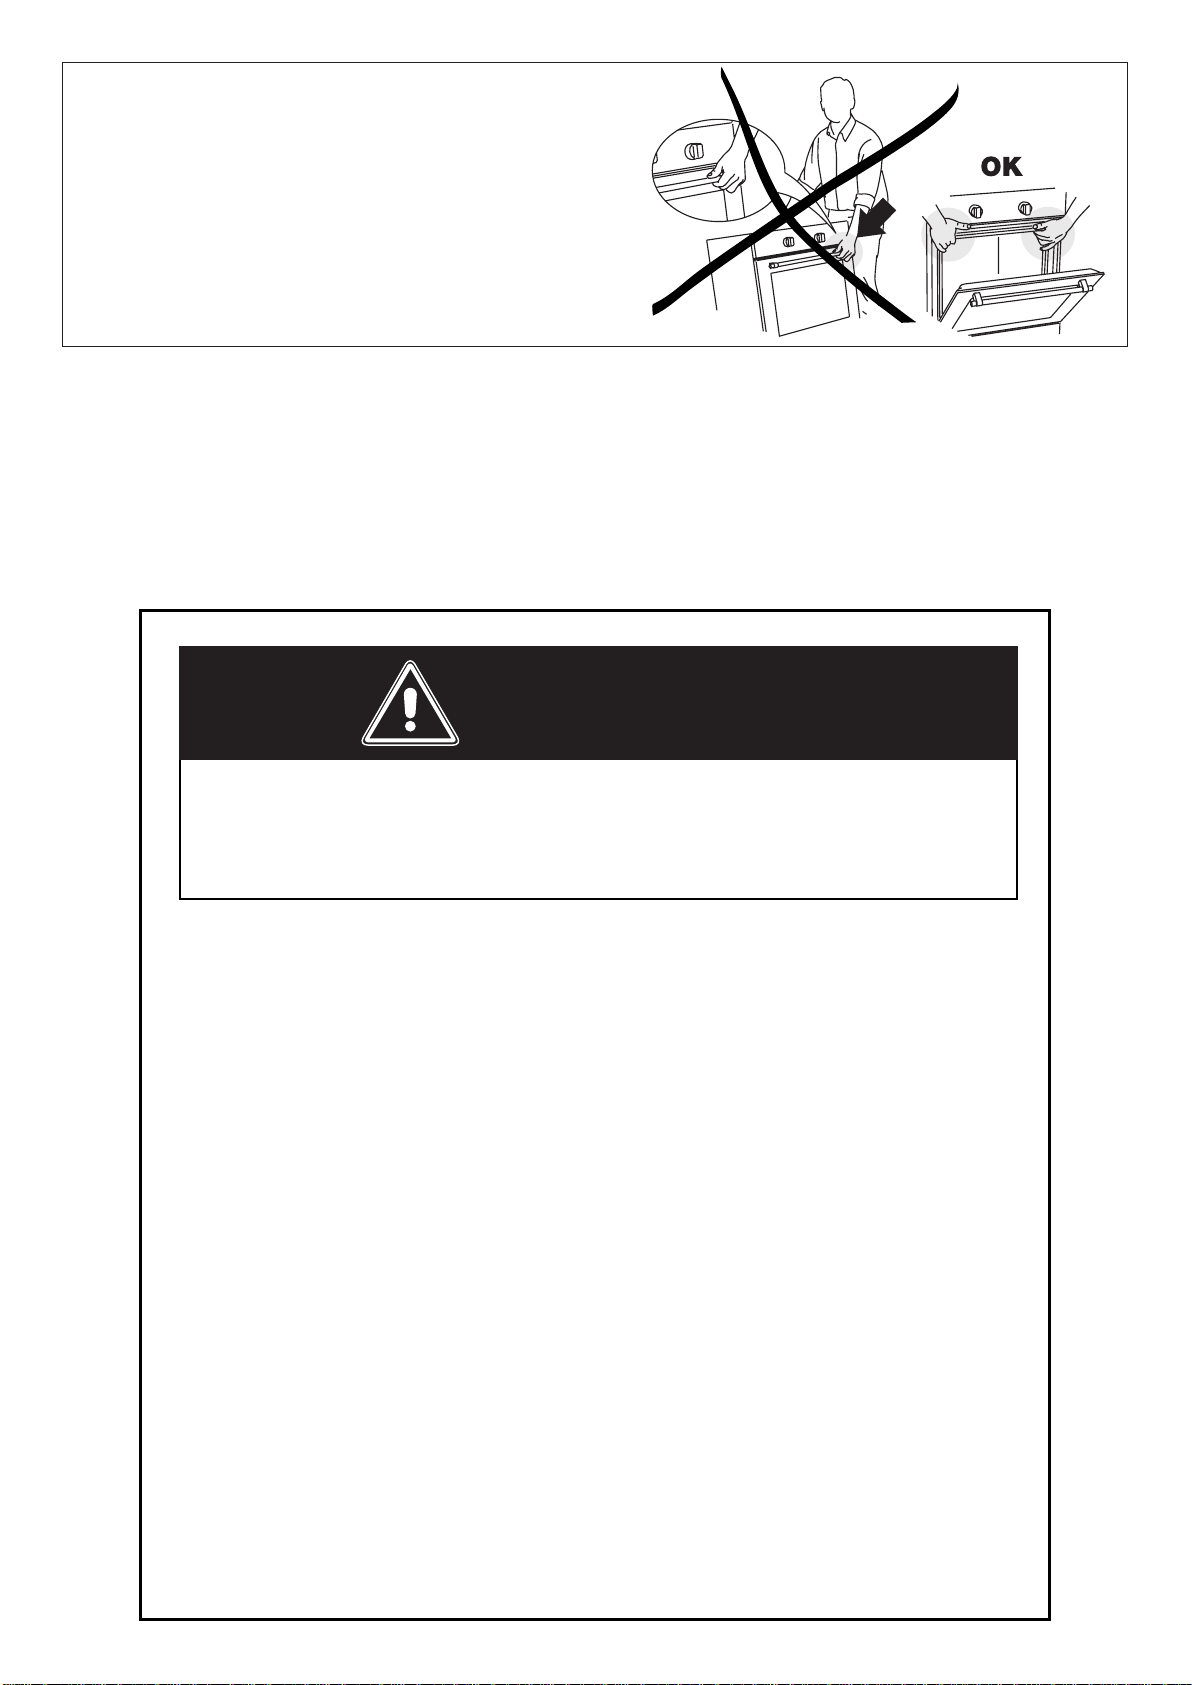
Verona VEBIG30N Series Operation instructions

BUILT-IN GAS OVEN
for residential use only
Models: VEBIG30N..
USERS OPERATING INSTRUCTIONS
IMPORTANT - PLEASE READ AND FOLLOW
• Beforebeginning,pleasereadtheseinstructionscompletelyandcarefully.
• Donotremovepermanentlyafxedlabels,warnings,orplatesfromtheproduct.Thismay
voidthewarranty.
• Pleaseobservealllocalandnationalcodesandordinances.
• Pleaseensurethatthisproductisproperlygrounded.
• Theelectricalplugshouldalwaysbeaccessible.
• The installer should leave these instructions with the consumer who should retain
for local inspector’s use and for future reference.
Installationmustconformwithlocalcodesorintheabsenceofcodes,theNationalFuelGas
CodeANSIZ223.1/NFPA54-Iatestedition.Electricalinstallationmustbeinaccordancewith
theNationalElectricalCode,ANSI/NFPA70-latesteditionand/orlocalcodes.
INCANADA:InstallationmustbeinaccordancewiththecurrentCAN/CGA-B149.1National
GasInstallationCodeorCAN/CGA-B149.2,PropaneInstallationCodeand/orlocalcodes.
ElectricalinstallationmustbeinaccordancewiththecurrentCSAC22.1CanadianElectrical
CodesPart1and/orlocalcodes.
INSTALLATIONINMANUFACTURED(MOBILE)HOME:Theinstallationmustconformwith
theManufacturedHomeConstructionandSafetyStandard,Title24CFR,Part3280[formerly
theFederalStandardforMobileHomeConstructionandSafety,Title24,HUD(Part280)]or,
when such standard is not applicable, the Standard for Manufactured Home Installations,
ANSI/NCSBCSA225.1,orwithlocalcodeswhereapplicable.
INSTALLATIONINRECREATIONALPARKTRAILERS:Theinstallationmustconformwith
stateorothercodesor,intheabsenceofsuchcodes,withtheStandardforRecreationalPark
Trailers,ANSIA119.5.
Installationofanygas-redequipmentshouldbemadebyalicensedplumber.Amanualshut-
offvalvemustbeinstalledinanaccessiblelocationinthegaslineexternaltotheappliancefor
thepurposeofturningonorshuttingoffgastotheappliance(InMassachusettssuchshutoff
devicesshouldbeapprovedbytheBoardofStateExaminersofPlumbers&GasFitters).
Ifanexternalelectricalsourceisutilized,theappliance,wheninstalled,mustbeelectrically
groundedinaccordancewithlocalcodesor,intheabsenceoflocalcodes,withthenational
ElectricalCode,ANSI/NFPA70.
R
THIS OVEN IS FOR RESIDENTIAL USE ONLY
Some models are supplied with a protective lm on steel and aluminium
parts.Thislmmustberemovedbeforeinstalling/usingtheappliance.

2
–Donotstoreorusegasolineorotherammablevaporsand
liquids in the vicinity of this or any other appliance.
–NEVER use this appliance as a space heater to heat or
warmtheroom.Doingsomayresultincarbonmonoxide
poisoningandoverheatingoftheappliance.
–WHAT TO DO IF YOU SMELL GAS:
• Donottrytolightanyappliance.
• Do not touch any electrical switch.
• Donotuseanyphoneinyourbuilding.
• lmmediately call your gas supplier from a neighbor’s
phone.Followthegassupplier’sinstructions.
• lf you cannot reach your gas supplier, call the re
department.
–Installation and service must be performed by a qualied
installer,serviceagency,orthegassupplier.
Iftheinformationinthismanualisnotfollowedexactly,
areorexplosionmayresultcausingpropertydamage,
personalinjury,ordeath.
WARNING !
Take care NOT to lift the
ovenbythedoorhandle.

3
This appliance is designed and manufactured solely for the cooking of domestic (household)
foodandinnotsuitableforanynonedomesticapplicationandthereforeshouldnotbeusedina
commercialenvironment.
Theappliancewarrantywillbevoidiftheapplianceisusedwithinanonedomesticenvironmenti.e.
asemicommercial,commercialorcommunalenvironment.
DearCustomer,
Thank you for having purchased and given your preference to our
product.
The safety precautions and recommendations reported below are
for your own safety and that of others. They will also provide a means
by which to make full use of the features offered by your appliance.
Please preserve this booklet carefully. It may be useful in future,
either to yourself or to others in the event that doubts should arise
relating to its operation.
This appliance must be used only for the task it has explicitly been
designed for, that is for cooking foodstuffs.Any other form of usage
is to be considered as inappropriate and therefore dangerous.
The manufacturer declines all responsibility in the event of dama-
ge caused by improper, incorrect or illogical use of the appliance.
WARNING: This product can expose you to chemicals including
formaldehyde, which is known to the State of California to cause cancer,
and lead, which is known to the State of California to cause birth defects or other
reproductive harm. For more information go to www. P65Warnings.ca.gov.

4
USER INSTRUCTIONS
GENERAL INFORMATION
1. Installationmustconformwithlocalcodesor,intheabsence
of local codes, with the National Fuel Gas Code, ANSI
Z223.1/NFPA54-LatestEdition,CAN/CGA-B149.1orCAN/
CGA-B149.2.
2. Installationinmanufactured(mobile)home:installationmust
conform with the Manufactured Home Construction and
Safety Standard, Title 24 CFR, Part 3280 [formerly the
Federal Standard for Mobile Home Construction and
Safety, Title 24, HUD (Part 280)] or, when such standard
is not applicable, the Standard for Manufactured Home
Installations, ANSI/NCSBCS A225.1, or with local codes
whereapplicable.
3. Installation in Recreational Park Trailers: installation must
conformwithstateorothercodesor,intheabsenceofsuch
codes, with the Standard for Recreational Park Trailers,
ANSIA119.5.
4. WARNING!!
Thisapplianceshallnotbeusedforspaceheating.This
informationisbasedonsafetyconsiderations.
5. AlIopeningsinthewallbehindtheapplianceandintheoor
undertheapplianceshallbesealed.
6. Keep appliance area clear and free from combustible
materials,gasoline,andotherammablevapors.
7. Donotobstructtheowofcombustionandventilationair.
8. Disconnect the electrical supply to the appliance before
servicing.
9. Whenremovingapplianceforcleaningand/orservice;
A. Shutoffgasatmainsupply.
B. DisconnectACpowersupply.
C. Disconnectgaslinetotheinletpipe.
D. Carefullyliftapplianceoutofcabinetcutout.
CAUTION:Theapplianceisheavy;usecareinhandling.
10. Electrical Requirement
Electrical installation should comply with national and local
codes.
11. Air Supply and Ventilation
Theinstallermustreferstolocal/nationalcodes.
12. Gas Manifold Pressure
Naturalgas-4.0”W.C.P.
LP/Propane-11.0”W.C.P.
13. Themisuseofovendoor(e.g.stepping,sitting,orleaningon
them)canresultinpotentialhazardsand/orinjuries.
WARNING!!
ELECTRICAL GROUNDING INSTRUCTIONS
Theoven must be electricallygroundedin accordance with
localcodesor,intheabsenceoflocalcodes,withtheNational
Electrical Code,ANSI/NFPA No. 70-latest edition, in Canada
Canadian Electrical Code.
InstallationshouldbemadebyaIicensedelectrician.
FOR PERSONAL SAFETY, THIS APPLIANCE MUST BE
PROPERLY GROUNDED.
Ifanexternalelectricalsourceisutilized,theinstallationmustbe
electrically grounded in accordance with local codes or, in the
absenceof localcodes, withthenational ElectricalCode,ANSI/
NFPA70.
This appliance is equipped with a three-prong grounding plug
(NEMA 5-15P) for your protection against shock hazard and
shouldbepluggeddirectlyintoaproperlygroundedsocket.
Do not under any circumstances cut or remove the third
(ground)prongfromthepowerplug.
REPLACEMENT PARTS
Only authorized replacement parts may be used in performing
service on the appliance. Replacement parts are available from
factory authorized parts distributors. Contact the nearest parts
distributorinyourarea.

5
KEEP ATTENTION!!
STAND AWAY FROM THE OPENING
BELOW THE CONTROL PANEL (SEE
FIGURE ABOVE). HOT AIR WHICH
ESCAPES CAN CAUSE BURNS TO
HANDS, FACE, END/OR EYES.
IMPORTANT PRECAUTIONS AND RECOMMENDATIONS
Afterhavingunpackedtheappliance,checktoensurethatitisnotdamaged.
Incaseofdoubt,donotuseitandconsultyoursupplieroraprofessionallyqualied
technician.
Packing elements (i.e. plastic bags, polystyrene foam, nails, packing straps, etc.)
shouldnotbeleftaroundwithineasyreachofchildren,asthesemaycauseserious
injuries. The packaging material is recyclable and is marked with the recycling
symbol .
• Donotattempttomodifythetechnicalcharacteristicsoftheapplianceasthis
maybecomedangeroustouse.
• Donotcarryoutcleaningormaintenanceoperationsontheappliancewithout
havingpreviouslydisconnecteditfromtheelectricpowersupply.
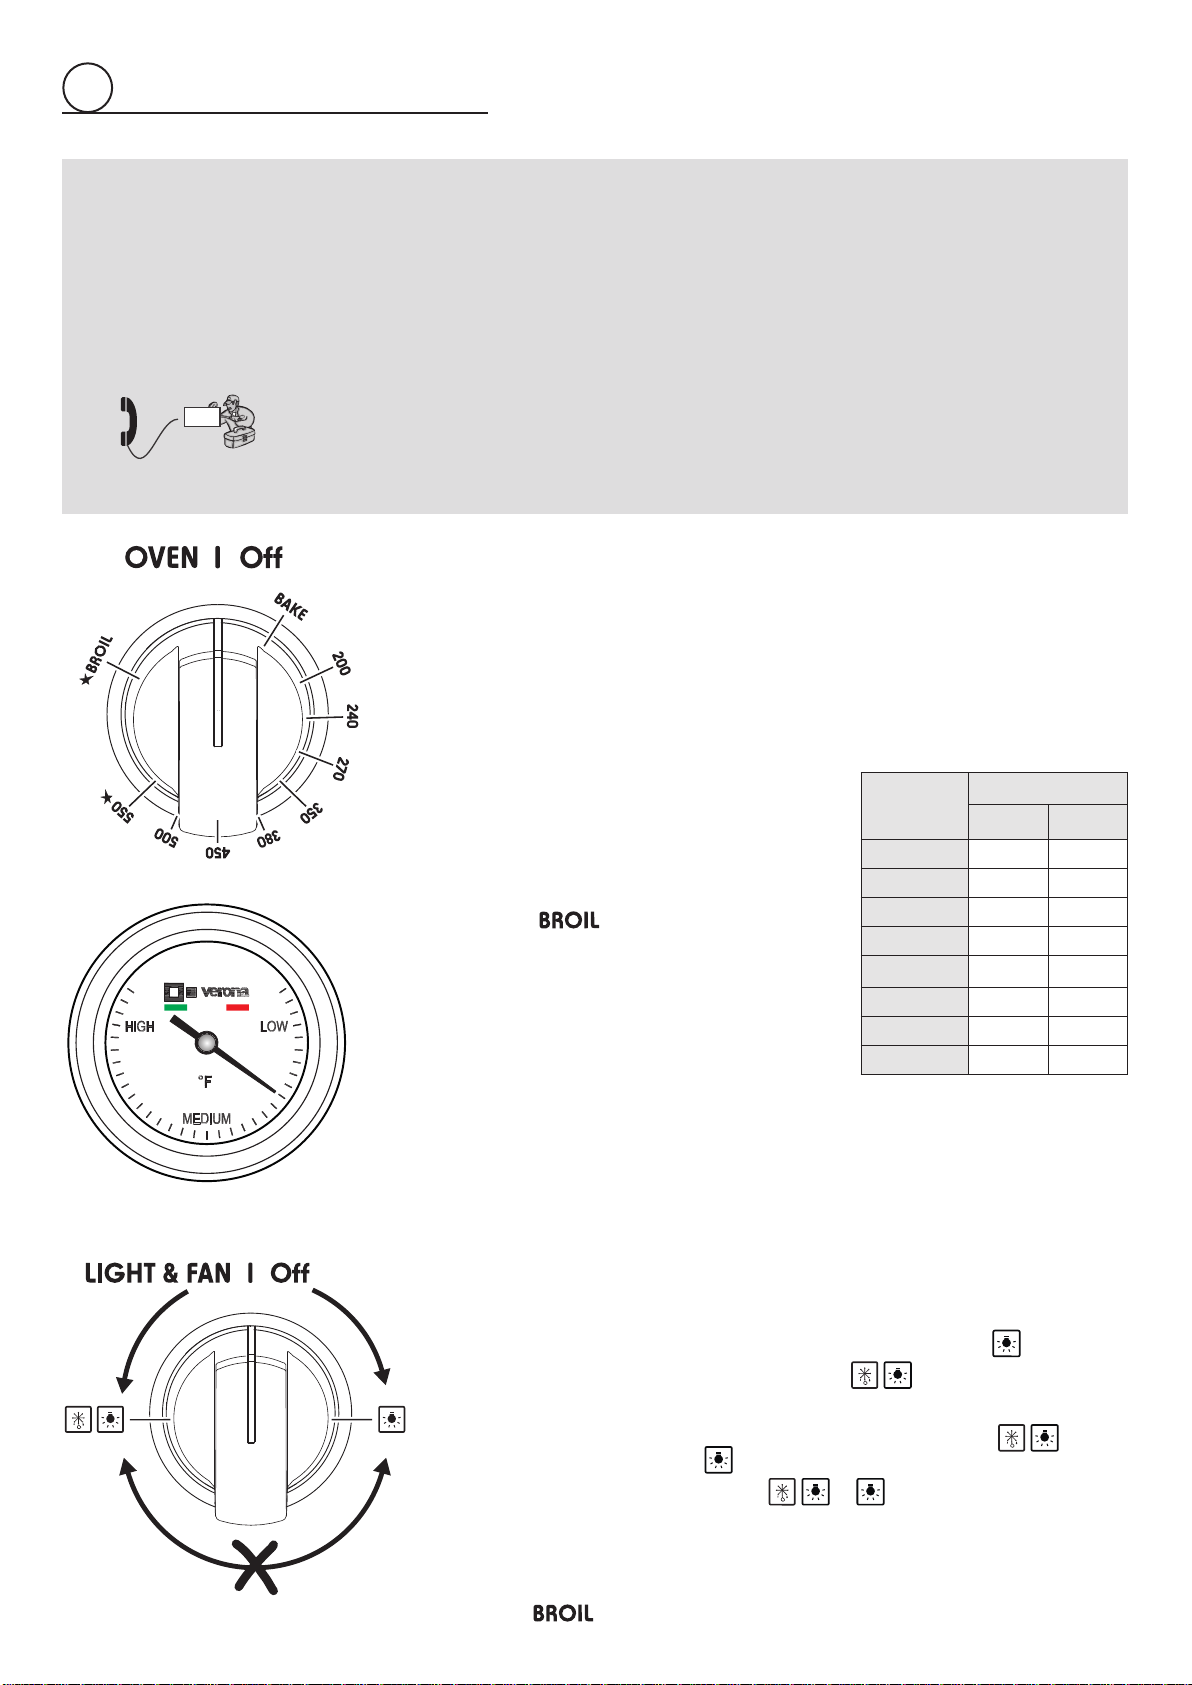
• Afteruse,ensurethattheknobsareinOffposition.
• Do not allow children or other incapable people to use the appliance without
supervision.
• During and after use of the oven, certain parts will become very hot. Do not
touchhotparts.
• Keepchildrenawayfromtheovenwhenitisinuse.
• Somemodelsaresuppliedwithaprotectivelmonsteelandaluminiumparts.
Thislmmustberemovedbeforeinstalling/usingtheappliance.
• Firerisk!Donotstoreammablematerialintheoven.
• Makesurethatelectricalcablesconnectingotherappliancesintheproximityof
theovencannotbecomeentrappedintheovendoor.
• Donotlinetheovenwallswithaluminiumfoil.Donotplaceshelves,broilerpan,
pansorothercookingutensilsonthebaseoftheovenchamber.
• Themanufacturerdeclinesallliabilityforinjurytopersonsordamagetoproperty
causedbyincorrectorimproperuseoftheappliance.
• To avoid any possible hazard, the appliance must be installed by qualied
personnelonly.Anyrepairsbyunqualiedpersonsmayresultinelectricshockor
shortcircuit.Inordertoavoidpossibleinjuriestoyourbodyortotheappliance,
do not attempt any repairs by yourself. Such work should be carried out by
qualiedservicepersonnelonly.
• Important!Theuseofsuitableprotectiveclothing/glovesisrecommendedwhen
handling,installingorcleaningofthisappliance.
• Danger of burns! The oven and cooking accessories may become very hot
during operation. Make sure children are kept out of reach and warn them
accordingly.Toavoidburnsusekitchenclothesandgloveswhenhandlinghot
partsorutensils.
• Stand away from the oven when opening oven door. Hot air or steam which
escapescancauseburnstohands,face,and/oreyes.
• Themisuseofovendoor(e.g.stepping,sitting,orleaningonthem)canresultin
potentialhazardsand/orinjuries.
• Nevercleantheovenwithahigh-pressuresteamcleaningdevice,asitmayprovokeashortcircuit.
• DONOTattempttolighttheovenorbroilburnerduringpowerfailure.
• Thisapplianceisintendedforuseinyourhousehold.Neverusetheapplianceforanyotherpurpose!
• If you should decide not to use this appliance any longer (or decide to substitute an older model), before disposing of it, it is
recommended that it be made inoperative in an appropriate manner in accordance to health and environmental protection
regulations,ensuringinparticularthatallpotentiallyhazardouspartsbemadeharmless,especiallyinrelationtochildrenwhocould
playwitholdappliances.Removethedoorbeforedisposaltoprevententrapment.
IMPORTANT PRECAUTIONS AND RECOMMENDATIONS FOR USE OF ELECTRICAL
APPLIANCES
Useofanyelectricalapplianceimpliesthenecessitytofollowaseriesoffundamentalrules.
Inparticular:
• Nevertouchtheappliancewithwethandsorfeet.
• Donotoperatetheappliancebarefooted.
• Donotallowchildrenordisabledpeopletousetheappliancewithoutyoursupervision.
Themanufacturercannotbeheldresponsibleforanydamagescausedbyimproper,incorrectorunreasonableuseoftheappliance.

6
CONTROL PANEL(Fig.1.1)
1. Gasoven/gasbroilcontrolknob
2. Ovenlight&fancontrolknob
3. Oventhermometer
Fig.1.1
CAUTION:
Gas appliances produce heat and humidity in
the environment in which they are installed.
Ensurethatthe cooking areaiswell ventilated
following national/local codes.
control panel
1
12 3
COOLING FAN MOTOR
Thisapplianceincorporatesasafetycoolingfanmotortoachieveoptimumefficiencyofthecontrols,ensurelowersurfacetempera-
turesaremaintainedandcooltheinternalcomponents.
Thecoolingfanmotorturnsonautomaticallywhenignitingtheovenorbroilburner.
Itmayrunon(forvariousminutes)evenaftertheovenorbroilburnerhasbeenturnedoff.
When the cooling fan motor is operating correctly
there is an air ow in the top area of the appliance
(below the control panel).
The oven can be used.
Operate the oven or broil as per instruction
manual.
1. Close the supply line manual shut-o valve.
Shut-o valve
“close” position
2. Disconnect the 3-prong ground plug.
3. Contact the After-Sales
Service.
In case of failure of the cooling fan motor during the
operation of the gas oven or gas broil, the oven or broil
burner is turned o automatically after a few minutes.
In that case do not use the oven or the broil.
Disconnect the appliance from the
gas/electrical mains and contact the After-
Sales Service.
The appliance cannot be used.
WARNING
VERY IMPORTANT NOTICE
COOLING FAN WARNING

7
2
USING THE OVEN FOR THE FIRST TIME
It is advised to follow these instructions:
– Furnishtheinterioroftheovenbyplacingthewireracksasdescribedatchapter
“Cleaning and maintenance”.
– Insert shelf and tray.
– Turn the oven on to the maximum temperature (position 550) to eliminate
possible traces of grease from the oven burner. The same operation should be
followed for broil burner.
– Switchofftheelectricalsupply,lettheovencooldown,thencleantheinteriorof
the oven with cloth soaked in water and detergent (neutral) then dry carefully.
Attention: the oven becomes
veryhotduringoperation.
Attention: the oven door
becomes very hot during
operation.
Keep children away.
WARNING:
The door is hot, use the
handle.
GENERAL FEATURES
The gas oven is provided with:
a) Oven burner, mounted on the lower part of the oven.
b) Broil burner, mounted on the upper part of the oven.
c) Fan motor which can be used in combination with the oven burner or separately
(without heating). It is not possible to use the fan motor in combination with
the broil burner: a safety device switches off the fan motor when the gas
oven/broil control knob is turned on broil position.
d)Lightthatilluminatestheoventoenablevisuallycontrollingthefoodthatiscooking.
N.B. When the oven is not
being used, set the control
knobs to their Off positions
andalsoclosethe gas shut-
off valve placed on the main
gassupplyline.
VERY IMPORTANT
The oven/broil shall be used
always with the oven door
closed.
OPERATING PRINCIPLES
Heating and cooking are obtained in the following ways:
a. by normal convection
The heat is produced by the oven burner.
c. by forced convection
Theheatproducedbytheovenburner isdistributed throughouttheovenbythe
fan. The hot air envelops the food in the oven, provoking a complete and rapid
cooking.
It is possible to cook several dishes simultaneously.
d. by radiation
The heat is irradiated by the infra red broil burner.
f. by ventilation (this is not a cooking function)
The food is defrosted by using the fan only without oven burner.
howtousethegasoven
Broilinglevel1st STEP
Broilinglevel2nd STEP
Ovencookinglevel3rd STEP
Ovencookinglevel4th STEP

8
2
Fig.2.1a
Fig.2.1b
OVEN THERMOSTAT
Thenumbersprintedonthecontrolknob(fig.2.1a)
indicatetheincreasingoventemperaturevalue(°F
-seealsotemperaturetableopposite).
To regulate the temperature, set the chosen
numberontothecontrolpanelindicator.
The position serves only to turn on the
broilburner.
OVEN THERMOMETER
The thermometer allows to have a general (non-exhaustive) indication of the oven
heatinglevel(LOW,MEDIUM,HIGH)(fig.2.1b).
Tosetthetemperature,alwaysrefertotheoventemperature(thermostat)controlknob.
OVEN BURNER
Itcarriesoutnormal“ovencooking”.
Thegasflowtotheburnerisregulatedbyathermostatwhichallowtomaintaintheoven
temperatureconstant.
Thecontrolofthetemperatureisassuredbyathermostaticprobepositionedinsidethe
oven.
The probe must be always kept in its housing, in a clean condition, as an incorrect
positionorencrustmentmaycauseanalterationinthecontrolofthetemperature.
OVEN LIGHT AND FAN MOTOR
Theovenlightandthefanmotorarecontrolledbyaswitchknobonthecontrolpanel
(fig.2.2).Tolightuptheovenlampturntheknobcounterclockwiseto position.
Tooperatethefanmotorturntheknobclockwiseto position.
InthissettingalsotheovenlampisOn.
WARNING:TheswitchknobcanbeturnedonlyclockwisefromOff to position
andcounterclockwisefromOff to position.
TheswitchknobDOESNOTTURNfrom to position(andviceversa).DO
NOT FORCE.
IMPORTANT NOTE: The fan motor can be used in combination only with the oven
burner.Asafetydeviceswitchesoffthefanmotorwhenthegasoven/broilcontrolknob
isturnedon position.
OK OK
NOT TURN
COOLING FAN MOTOR
This appliance incorporates a safety cooling fan motor to achieve optimum efficiency of the controls, ensure lower surface
temperaturesaremaintainedandcooltheinternalcomponents.
Thecoolingfanmotorturnsonautomaticallywhenignitingtheovenorbroilburner.
Itmayrunon(forvariousminutes)evenaftertheovenorbroilburnerhasbeenturnedoff.
IMPORTANT NOTES:
• DONOTattempttolighttheovenorbroilburnerduringpowerfailure.
• Incaseoffailureofthecoolingfanmotorduringtheoperationofthegasovenorgasbroil,theovenorbroilburner
isturnedoffautomaticallyafterafewminutes.Inthatcasedonotusetheovenorthebroilandcontacttheafter-
sales service.
SERVICE
• Donotattempttousetheovenorbroilifthecoolingfanmotorisdamaged.
• Whenthecoolingfanmotorisoperatingcorrectlythereisanairflowbelowthecontrolpanel.
Fig.2.2
KNOB
SETTING TEMPERATURE
°F °C
200 200 93
240 240 115
270 270 132
350 350 177
380 380 193
450 450 232
500 500 260
550 550 288

9
2
IGNITION OF THE OVEN BURNER
IMPORTANTNOTE: during ignition of the oven burner the fan motor shall be
switchedOff(LIGHT&FANcontrolknobinOff position-fig.2.2).
Thethermostatallowstheautomaticcontrolofthetemperature.
Thegasdeliverytotheovenburneriscontrolledbyatwowaythermostatictap(oven
andbroilburners)withflame-failuredevice.
Tolighttheovenburneroperateasfollows:
1)Opentheovendoortoitsfullextent.
WARNING: Risk of explosion! The oven door must be open during this
operation.
2)Presstheoven/broilcontrolknobrightdownandturncounter-clockwise(fig.2.3)to
maxposition550.
3)Checktheovenburnerhaslit;ifnot,turntheknobclockwisebacktoOffandrepeat
theprocedurefromstep2.
4) Once the oven burner has lit, close the oven door slowly and adjust the burner
accordingtothepowerrequired.
Iftheflameextinguishesforanyreason,thesafetyvalvewillautomaticallyshutoffthe
gassupplytotheburner.
Tore-lighttheburner, first turn the oven/broil controlknobtoposition Off, wait for at
least1minuteandthenrepeatthelightingprocedure.
VERY IMPORTANT NOTE: THE BURNER IGNITION PROCEDURE MUST ALWAYS
START WITH THE CONTROL KNOB IN THE OFF POSITION OR IT WILL NOT BE
POSSIBLE TO IGNITE THE BURNER.
TRADITIONALBAKING(OVENBURNERWITHOUTFAN
MOTOR)
Beforeintroducingthefood,preheattheoventothedesiredtemperature.
Foracorrectpreheatingoperation,itisadvisabletoremovethetrayfromtheovenand
introduceittogetherwiththefood,whentheovenhasreachedthedesiredtemperature.
Checkthecookingtimeandturnofftheoven5minutesbeforethetheoreticaltimeto
recuperatethestoredheat.
Recommended for:
Forfoodswhichrequirethesamecookingtemperaturebothinternallyandexternally,i.e.
roasts,spareribs,meringue,etc.
Fig.2.3
Doalwaysbakewithovendoorclosed.
Attention:theovendoorbecomesveryhotduringoperation.
Keep children away.

10
2
DEFROSTINGFROZENFOODS(ONLYFANMOTOR)
With the oven/broil burner control knob in
Off
position turn the LIGHT & FAN control
knob(fig.2.2)on position.
Onlythefanandtheovenlamp switchOn.Defrostingtakesplacebythefan,without
heating.
Recommended for:
Torapidlydefrostfrozenfoods;2.2lbs(1kg)requiresaboutonehour.
Thedefrostingtimesvaryaccordingtothequantityandtypeoffoodstobedefrosted.
CONVECTION BAKING WITH VENTILATION (OVEN BURNER
WITHFANMOTOR)
After lighting the oven burner switch on the fan motor by turning the LIGHT & FAN
controlknob(fig.2.2)on position.
Beforeintroducingthefood,preheattheoventothedesiredtemperature.
Foracorrectpreheatingoperation,itisadvisabletoremovethetrayfromtheovenand
introduceittogetherwiththefood,whentheovenhasreachedthedesiredtemperature.
Checkthecookingtimeandturnoff theoven5minutesbeforethetheoreticaltimeto
recuperatethestoredheat.
Itispossibletocookvariousdifferentfoodsatthesametime.Fish,cakesandmeatcan
becookedtogetherwithoutthesmellsandflavoursmixing.
Theonlyprecautionsrequiredarethefollowing:
-Thecookingtemperaturesmustbeascloseaspossiblewithamaximumdifferenceof
70-80°F(20-25°C)betweenthedifferentfoods.
-Differentdishesmustbeplacedintheovenatdifferenttimesaccordingtothecooking
time required for each one. This type of cooking obviously provides a considerable
savingontimeandenergy.
Recommended for:
For foods of large volume and quantity which require the same internal and external
degreeofcooking;forex:rolledroasts,turkey,legs,cakes,etc.

11
2
IGNITION OF THE BROIL BURNER
IMPORTANTNOTE: the fan motor cannot be used in combination with the broil
burner.Asafetydeviceswitchesoffthefanmotorwhenthegasoven/broilcontrol
knobisturnedon position.
Thebroilburnergeneratestheinfra-redraysforbroiling.
To light the broil burner operate as follow:
1) Open the oven door to the full extent.
WARNING:Riskofexplosion!
Theovendoormustbeopenduringthisoperation.
2)
Presstheoven/broilcontrolknobrightdownandturnclockwise(fig.2.4)tothe
position.
3) Check the broil burner has lit; if not, turn the knob counterclockwise back to Off and
repeat the procedure from step 2.
4) Once the broil burner has lit, close the oven door slowly.
Iftheflameextinguishesforanyreason,thesafetyvalvewillautomaticallyshutoffthe
gassupplytotheburner.
Tore-lighttheburner, first turn the oven/broil controlknobtoposition Off, wait for at
least1minuteandthenrepeatthelightingprocedure.
VERY IMPORTANT NOTE: THE BURNER IGNITION PROCEDURE MUST ALWAYS
START WITH THE CONTROL KNOB IN THE OFF POSITION OR IT WILL NOT BE
POSSIBLE TO IGNITE THE BURNER.
Doalwaysbroilwithovendoorclosed.
Attention:theovendoorbecomesveryhotduringoperation.
Keep children away.
Fig.2.4

12
2
4th STEP
Ovencookinglevel
3rd STEP
Ovencookinglevel
2nd STEP
Broilinglevel
1st STEP
Broilinglevel
Itisadvisabletohandlethe
oven accessories using
ovengloves.
WRONG
CORRECT
BROILING
Veryimportant:Thebroilburnermustalwaysbeusedwiththeovendoorclosed.
• Positiontheshelfontherstorsecondlevelfromthetop(g.2.5).
• Turnonthebroilburner,asexplainedintheprecedingparagraphsandletthe
broilburnerpreheatforabout5minuteswiththedoorclosed.
• Placethefoodtobecookedabovethebroilingpan.
• Introducethebroilingpanintheoven(g.2.6).Thebroilingpanshouldbeplaced
abovetheshelfanditshouldbecenteredwiththebroilburner(g.2.5).
Donotbroilwithoutusingthebroilingpan.
Important:Alwaysusesuitableprotectivegloveswheninserting/removingthe
broilingpan,shelves,pansonothercookingutensilsfromtheoven.
Fig. 2.5
Fig. 2.8
Fig. 2.7
Fig. 2.6

13
3
cleaningandmaintenance
GENERAL RECOMANDATION
• Important: Before any operation of cleaning and maintenance
disconnect the appliance from the electrical supply.
• Itisadvisabletocleanwhentheapplianceiscoldandespeciallyforcleaningthe
enamelledparts.
• Avoidleaving alkaline or acidicsubstances(lemonjuice, vinegar, etc.) on the
surfaces.
• Avoidusingcleaningproductswithachlorineoracidicbase.
• IMPORTANT:Theuseofsuitableprotectiveclothing/glovesisrecommended
whencleaningandmaintainingtheappliance.
• WARNING
Whencorrectlyinstalled,yourproductmeetsallsafetyrequirementslaid
downforthis type of product category. However special care should be
taken around the rear or the underneath of the appliance as these areas are
notdesignedorintendedtobetouchedandmaycontainsharporrough
edges,thatmaycauseinjury.
ENAMELLED PARTS
• Alltheenamelledpartsmustbecleanedwithaspongeandsoapywateronlyor
othernon-abrasiveproducts.
• Drypreferablywithamicrobreorsoftcloth.
• Acidicsubstanceslikelemonjuice,tomatosauce,vinegaretc.candamagethe
enameliflefttoolong.
PAINTED PARTS AND SILK-SCREEN PRINTED SURFACES
• Cleanusinganappropriateproduct.Alwaysdrythoroughly.
IMPORTANT: these parts must be cleaned very carefully to avoid scratching and
abrasion.Youareadvisedtouseasoftclothandneutralsoap.
STAINLESS STEEL ELEMENTS
• Stainlesssteelpartsmustberinsedwithwateranddriedwithasoftandclean
cloth.
• Fordifcultdirt,useaspecicnon-abrasiveproductavailablecommerciallyora
littlehotvinegar.
INSIDE OF OVEN
Theovenshouldalwaysbecleanedafterusewhenithascooleddown.
Thecavityshouldbecleanedusingamilddetergentsolutionandwarmwater.
Suitable proprietary chemical cleaners may be used after rst consulting with the
manufacturersrecommendationsandtestingasmallsampleoftheovencavity.
Abrasivecleaningagentsorscouringpads/clothsshouldnotbeusedonthecavity
surface.
NOTE:Themanufacturersofthisappliancewillacceptnoresponsibilityfordamage
causedbychemicalorabrasivecleaning.
Lettheovencooldownandpayspecialattentionnototouchthehotheating
elements inside the oven cavity.
WARNING !!
Donotstoreammablematerial
in the oven.
Do not use steam jet
cleaners because the
humidity could inltrate
intotheappliancemakingit
dangerous.
Do not use harsh abrasive
cleaners or sharp metal
scrapers to clean the oven
door glass since they can
scratch the surface, which
may result in shattering of
theglass.
WARNING
VERY IMPORTANT
Before any operation of
maintenance
disconnect
the appliance from the
electrical mains supply.
3-prongpolarized
ground-typeoutlet
ground
prong

14
OVEN FITTING OUT
• Assemblethewirerackstotheovenwallsusingthe
2screws(Fig.3.1).
• Telescoping sliding shelf support (g. 3.2): The
telescopicslidingshelfsupportmakesitsaferand
easiertoinsertandremovetheovenshelf.Itstops
whenitispulledouttothemaximumposition.
Important! When installing the sliding shelf
support,makesurethat:
- YouttheRHandLHslidingguidesonthewire
support(g.3.2).
- YoupresstheRHandLHslidingguidesagainst
thexingwires(gs.3.2a,3.2b).Youwillheara
clickasthesafetylocksclipoverthewire.
- You t the oven shelf above the sliding shelf
support(gs.3.2c,3.2d).
- You slide,ontheguidesinside theovencavity,
theslidingshelfsupportwiththeovenshelftted
above:
a. theovenshelfshallrunouttowardstheoven
door;
b. theshortbendonthewiresupportshallface
theinsideoftheoven;
c. theovenshelfmustbettedsothattheguard
railfacestheinsideoftheoven.
• Positionthebroilingpan
above the oven shelf
(seepage12).
• Todismantle,operatein
reverseorder.
To remove the RH and
LH sliding guides from
thewiresupport:
- Find the safety locks.
These are the tabs
thatclipoverthexing
wire (arrow 1 in g.
3.2e).
- Pull the safety locks
away from the xing
wire to release the
slidingguide(arrow2
ing.3.2e).
3
Fig. 3.1
LH
sliding
guide
RH
sliding
guide
Fixingwires
Guardrail
Longbend
Shortbend
Wiresupport
1
2
2
1
32
4 5
Fig. 3.2 Fig. 3.2a
Fig. 3.2c Fig. 3.2b
Fig. 3.2d Fig. 3.2e
IMPORTANT: The
oven shelf must
beusedonlywith
telescopic sliding
shelf support
correctly in place.
IT IS NOT
POSSIBLE to t
the oven shelf
directly on the
guides inside the
oven cavity.

15
3
A
B
AB
Fig. 3.3
REPLACING THE OVEN LIGHTS
WARNING: Ensure the appliance is switched off
beforereplacingthelamptoavoidthepossibility
of electric shock.
• Lettheovencavityandtheheatingelementsto
cooldown.
• Switchofftheelectricalsupply.
• Removetheprotectivecover“A”(g.3.3).
• Replace the halogen lamp “B” with a new
one suitable for high temperatures having the
following specications: 120 V, 60 Hz, G9 and
samepower(checkwattpowerasstampedinthe
lampitself)ofthereplacedlamp.
IMPORTANT WARNING: Never replace the
lamp with bare hands; contamination from
your ngers can cause premature failure.
Alwaysuseacleanclothorgloves.
• Rettheprotectivecover.
NOTE:Ovenbulbreplacementisnotcoveredbyyour
guarantee.
WRONG
CORRECT

16
3
REMOVING THE OVEN DOOR
IMPORTANT!
• Takecare,theovendoorisheavy.Ifyouhaveanydoubts,donotattempttoremove
thedoor.
• Makesuretheovenandallitspartshavecooleddown.Donotattempttohandle
thepartsofahotoven.
• Takeextremecare when handling the door.Avoidthe door and theglasspanes
bumpingagainstanysurface.Thismayresultinthedoordamageorglassshattering.
• Ifyounoticeanysignofdamageonanyoftheglasspanes(suchaschipping,or
cracks), do not use the oven. Call yourAuthorised Service Centre or Customer
Care.
• Important!
Alwayskeepasafedistancefromthedoorhinges,paying
special attention to the position of your hands.
Ifthe doorhingesare notcorrectlyhooked, theycould
unhookandclosesuddenlyandunexpectedlywithrisk
of injury.
Theovendoorcaneasilyberemovedasfollows:
1. Openthedoortothefullextent(g.3.4).
2. Openthelever“A”completelyontheleftandrighthinges(g.3.5).
3. Holdthedoorasshowning.3.6.
4. Gentlyclosethedooruntilleftandrighthingelevers“A”arehookedtopart“B”of
thedoor(gs.3.5,3.7).
5. Withdrawthehingehooksfromtheir
location following arrow “C” (g.
3.8).
6. Restthedooronasoftsurface.
REFIT THE DOOR
1. Holdthedoorrmly(g.3.9).
2. Insert the hinge tongues into the
slots, making sure that the groove
drops into place as shown in the
gure3.10.
3. Openthedoortoitsfullextent.
4. Fullyclosethelevers“A”ontheleft
and right hinges, as shown in the
gure3.11.
5. Closethedoorandcheckthatit is
properlyinplace.
B
A
C
Fig.3.8
Fig.3.6
Fig.3.7
Fig.3.5
Fig.3.4
Fig.3.9
Fig.3.10
A
Fig.3.11

17
3
DO’S AND DO NOT’S
• Doalwaysusetheovenwiththedoorclosed.
• Doalwaysbroilwiththeovendoorclosed.
• Donotusetheoventowarmorheataroom.
• Doreadtheuserinstructionscarefullybeforeusingtheovenforfirsttime.
• Do allow the oven to heat for about two hours, before using for the first time, in
ordertoexpelanysmellfromthenewoveninsulation, withoutthe introductionof
food.
• Docleanyourovenregularly.
• Doremovespillsassoonastheyoccur.
• Doalwaysuseovengloveswhenremovingfoodshelvesandtraysfromtheoven.
• Donotallowchildrenneartheovenwheninuse.
• Donotallowfatoroilstobuildupintheovenbase,orovenaccessories.
• Donotplacecookingutensilsorplatesdirectlyontotheovenbase.
• Donotbroilwithoutusingthebroilerpan.
• Donotplacehotenamelpartsinwater.Leavethemtocoolfirst.
• Do not allow vinegar, coffee, milk, saltwater, lemon or tomato juice to remain in
contactwithenamelparts(i.e.insidetheoven).
• Do not use abrasive cleaners or powders that will scratch the surface of the
stainlesssteelorpaintedsurfacesandtheenamel.
• Donotattempttorepairtheinternalworkingsofyouroven.
• Some models only:Doremovetheprotectivefilmbeforethefirstuse.
• Firerisk!Donotstoreflammablematerialintheoven.
FOR YOUR SAFETY
Under no circumstances should any external covers be removed for servicing or
maintenanceexceptbysuitablyqualifiedpersonnel.

18

19

Cod.1106113-ß0
The manufacturer cannot be held responsible for possible inaccuracies due to
printingortranscriptionerrorsinthepresentbooklet.
Themanufacturerreservestherighttomakeallmodicationstoitsproductsdeemed
necessaryformanufactureorcommercialreasonsatanymomentandwithoutprior
notice,withoutjeopardisingtheessentialfunctionalandsafetycharacteristicsofthe
appliances.
Other manuals for VEBIG30N Series
1
Table of contents
Other Verona Oven manuals

Verona
Verona VEBIEM3024SS User manual

Verona
Verona VCLFSGG 365 D Series Operation instructions

Verona
Verona VEBIEM241SS User manual

Verona
Verona VEBIG30N Series User manual

Verona
Verona VEBIE3024SS User manual

Verona
Verona VEBIEM301SS User manual

Verona
Verona VCLFSGG 365 D Series User manual

Verona
Verona VEBIEM241SS User manual

Verona
Verona VPFSGE365D Series User manual

Verona
Verona VEBIEM3030DSS User manual