VeryFit Smart Band User manual

SMART BAND
YOUR HEALTH TRACKER
VeryFit for heart rate
PRODUCT MANUAL

2
SMART BAND
YOUR HEALTH TRACKER
VeryFit for heart rate
PRODUCT MANUAL
ank for choosing the VeryFit for Heart Rate Smart Band. We are sure you are going to get
endless hours of use from it, all while you improve your lifestyle.
Your new Smart band can measure your daily activities with precision and accuracy. Clever
reminders allow you to improve your habits throughout the day. Simple things like getting up and
moving around, or watching calories you burn.
With a high-end and well-designed appearance, your new portable, multi-functional Smart Band
is perfect for: tracking steps, heart rate, distance measurement, calorie consumption management,
monitoring your sleep cycle, time displaying, sedentary reminder, or waking up (with a silent
wake alarm).
Your smart Band will become your perfect companion, by being with you everywhere you go, and
by keeping a virtual Activity and Health Record for your body.
Digital manual was emailed to the user and can also be found at www.etronicedge.com
To also see a video walk through about setting up your Smart Band,
visit our website. Contact us through Amazon or on our website.
Do not scan barcode on the box. Please visit the App Store or Google Play
store and manually download the app.
There are other Very Fit apps that have similar logo so make sure you
download VeryFit for Heart Rate.
NOTE:

3
Table of Contents
Step 1: Putting on your Smart Band p.4
• Securing your Smart Band
• Close Clasp
• Changing the wrist band
Step 2: Battery life & Charging p.5
• Determining your current battery level
• Charging your Smart Band
Quick Start Quide (pages 4-8)
Step 3: Setting up VeryFit for Heart Rate app p.6-9
• Getting Started
• Pairing your device
• Pairing with android
• Troubleshooting tips
Step 4: Syncing your data to Veryt for Heart Rate app p.10
Step 5: Smart Band Navigation p.10,11
• Tapping your Smart Band
• Viewing all day stats
• Tracking sleep
• Tracking a daily activity goal
• Tracking hourly activity
Flow Chart & Diagrams (pages 12-17)
• Introduction
• Personalization
• Statistics & Data
• Statistics Screens
• Device Screen
• User Screen
FAQ (page 18)
Cautions (page 19)

4
Quick start guide
Please be sure you are using either an Apple or Android device
Putting on your Smart Band
Step 1:
Securing your Smart Band
Put your wristband on so the screen is facing up on the
top of your wrist. Align both ends of the wristband so
they are directly overlapping each other with the clasp.
Close Clasp
Squeeze both the clasp and the wristband between your
thumb and forenger until secured. Do not wear your
Smart Band too tightly. e band may t a little sti at
rst, but it will get more comfortable with more use.
NOTE: If you’re having trouble, try securing the
wristband o your wrist to get a feel for how it securely
clasps and then try again on your wrist.
Changing the wristband
e wristband has two separate bands (top and bottom) that you can switch with dierent
colored bands. Contact us to nd out how to receive free colored bands.
Remove bottom strap
Remove top strap The strap can be tricky to
remove, so it is advised to
remove the strap with force
Pull the strap downward
and towards the direction
that the strap wants to go

5
Step 2: Battery Life & Charging
Your fully charged Smart Band has a battery life of up to 5 days. Note that battery life and
charge cycles vary with use, settings, and many other factors. Actual results will vary.
Determining your current battery level
You can always view your battery level on the home screen of your Smart Band where the time is
displayed in the top right corner of the Smart Band screen.
Critically low battery
Remove bottom strap
Connect to a USB port
Charging your Smart Band
Make sure the Smart Band device is charged and working normally before initial use. If the device
has low battery, connect it to DC (USB) port. Remove the bottom half of the band (under the menu
button) to reveal the charger. See below.
When the device is plugged into the USB port on your computer or any USB outlet, a red
light will appear on the bottom right hand corner of the Smart Band screen to show that it
is charging.
*IMPORTANT*
If your Smart Band doesn’t seem to be charging, try ipping it the other way in
the USB port (try with the screen facing upwards, then try with the screen facing
downwards). You can also try using a dierent USB port.
USB

6
Setting up VeryFit for Heart Rate
Step 3:
Getting Started
Find the “VeryFit for Heart Rate” app in one of these locations, depending on
your device:
• e Apple® App Store® for iOS devices such as an iPhone®
• e Google Play™ Store for Android devices such as the Samsung Galaxy®
and any other android operated phone
1.
Install the app. Note that you’ll need an account with the applicable store
before you can download even a free app such as VeryFit For Heart Rate.
2.
Pairing your device
When the app is installed, open it and then it will search for your Smart Band. Make sure that
your tracker is fully charged and within 2 meters of your device. You’ll be guided through
the process of pairing your device. Pairing makes sure the tracker and mobile device can
communicate with one another (sync their data).
Find your pairing device on the list, rst press
the check mark, then press “OK”.
Your Smart Band will vibrate to notify you that
it has been connected.
Make sure you are connected to Bluetooth on
your iOS or Android device. You can connect
by going into your “settings” panel on your
device and turning on Bluetooth.
Please make sure no one else is paired
with the device, or else the app will not
detect the Smart Band.

7
Android Pairing: STEPS
1. Delete any Veryt App you have on
your phone.
2. Re-install the app “Veryt for Heart
Rate” from the Google Play Store.
3. Swipe through intro pages until
reaching “Add Device” page.
Exit the app without trying to pair. 4. Open your phone settings 5. Open Applications

8
6. Open Application Manager
7. Open Veryt for Heart Rate
(In Applications) 8. Select Permissions 9. Turn on Storage
10. Turn on all Permissons
11.Open Veryt for Heart Rate
and refresh to search device
12. Select the device
that appears 13. Conrm Bind Device

9
14. You are now paired and can use the Smart Band
Troubleshooting tips
• Make sure your Bluetooth is connected to the device.
• If you are still having trouble connecting, you may want to go into your Bluetooth settings on your
phone and disconnect from the device that was used last time you used the app (or if someone else
used it) and try again.
• Successful pairing displays a Bluetooth symbol on the top le hand corner of the Smart Band screen.
• Be sure the Smart Band is in close range (2m) to your phone to ensure fast and ecient pairing and
data exchange.
• If you have paired the Smart Band with one phone, and are trying to pair with another phone, you
must either turn the Bluetooth o on the rst phone, or “Unpair” with it. is is because the advanced
Bluetooth version used in your Smart Band will try and auto pair with the last device it was connected
to.
• Be 100% sure the Smart Band is charged fully before attempting your rst pairing.

10
Step 4: Syncing your data to the VeryFit For Heart Rate app
Once you’ve set up and started using your Smart Band, you’ll need to make sure it regularly
transfers (syncs) its data to your device so you can track your progress. It will sync your exercise
history, analyze your sleep patterns, and more on your VeryFit dashboard. Sync data twice a day
is recommended. To sync data all you need to do is pull down on the main screen to refresh, and
you will see the syncing tab come up. Try to sync a few times a day to make sure all of your data is
being recorded in the app.
If the Tracker loses its Bluetooth connection with the phone, there is no need to worry. e Tracker
will still work and save all the data until it is ready to be re-connected and synced.
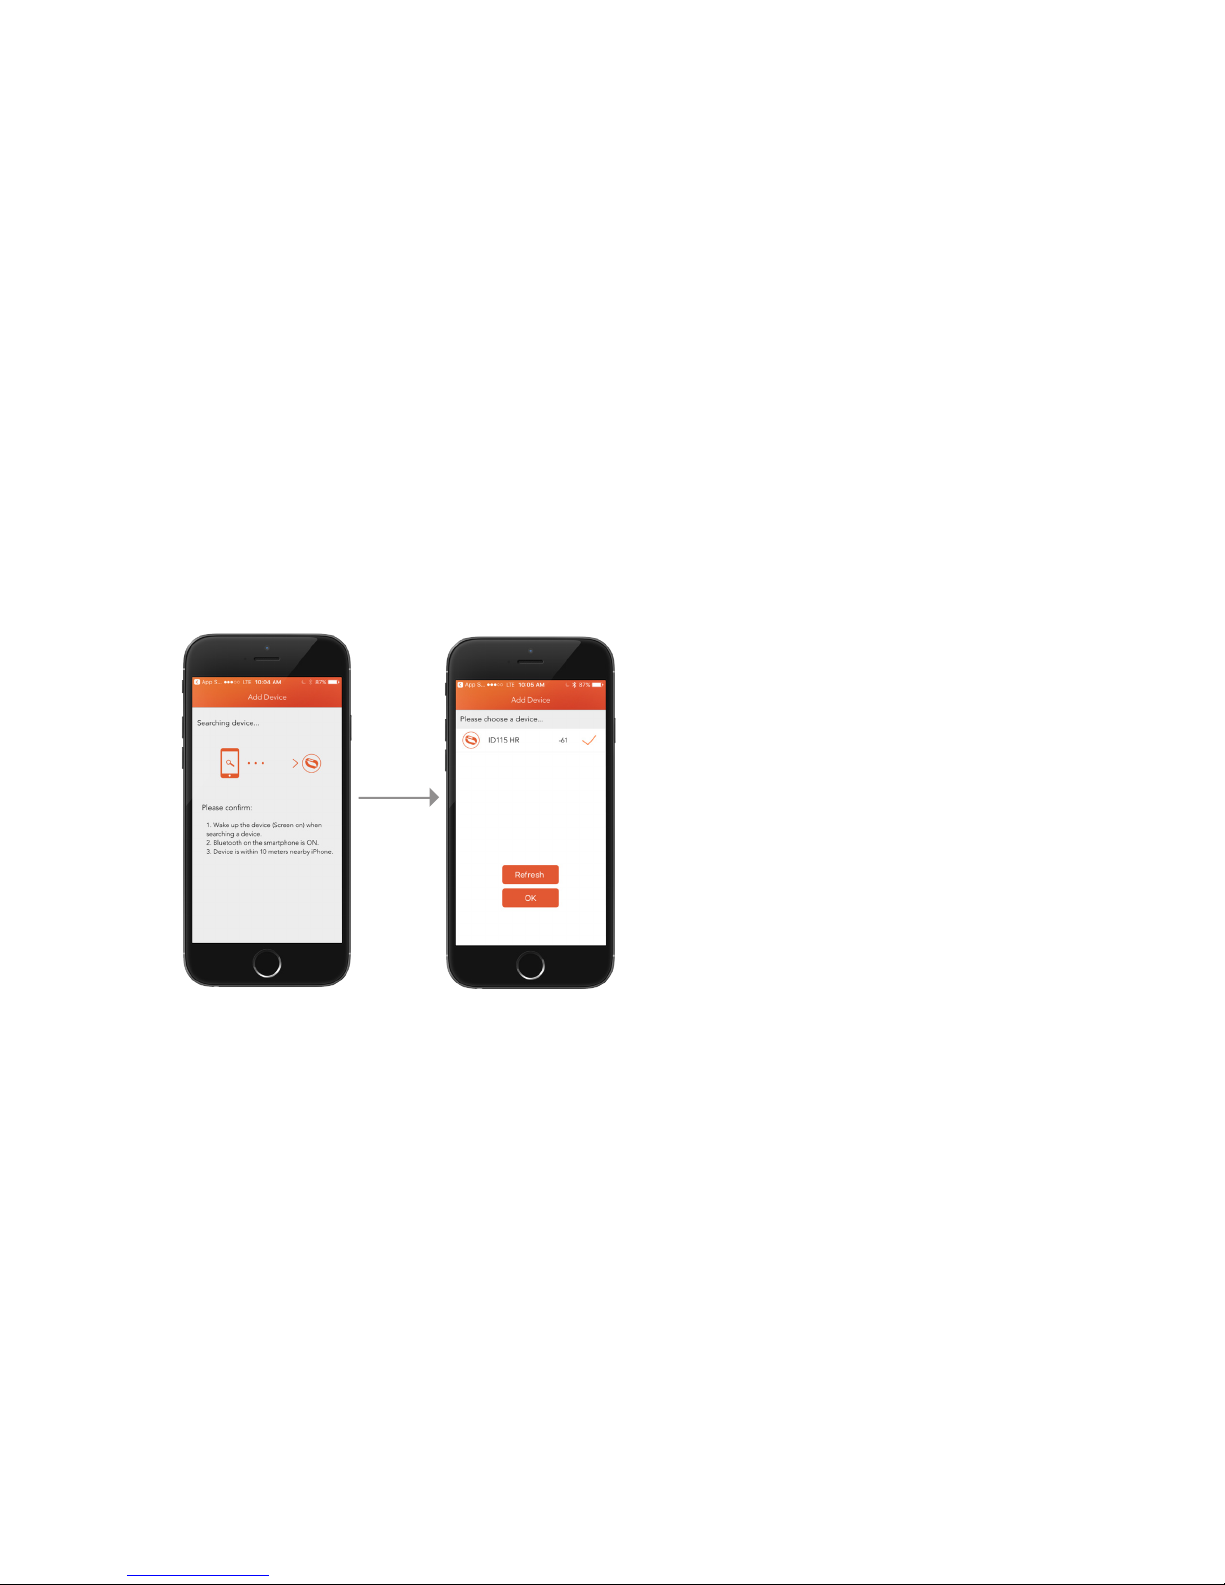
e VeryFit apps use Bluetooth Low Energy (BLE) technology to sync with your Smart Band. Each
time you open the app it will sync if the tracker is nearby, and the app will also sync periodically
throughout the day if you swipe down (refresh) on the “Mainpage.”
Step 5: Smart Band Navigation
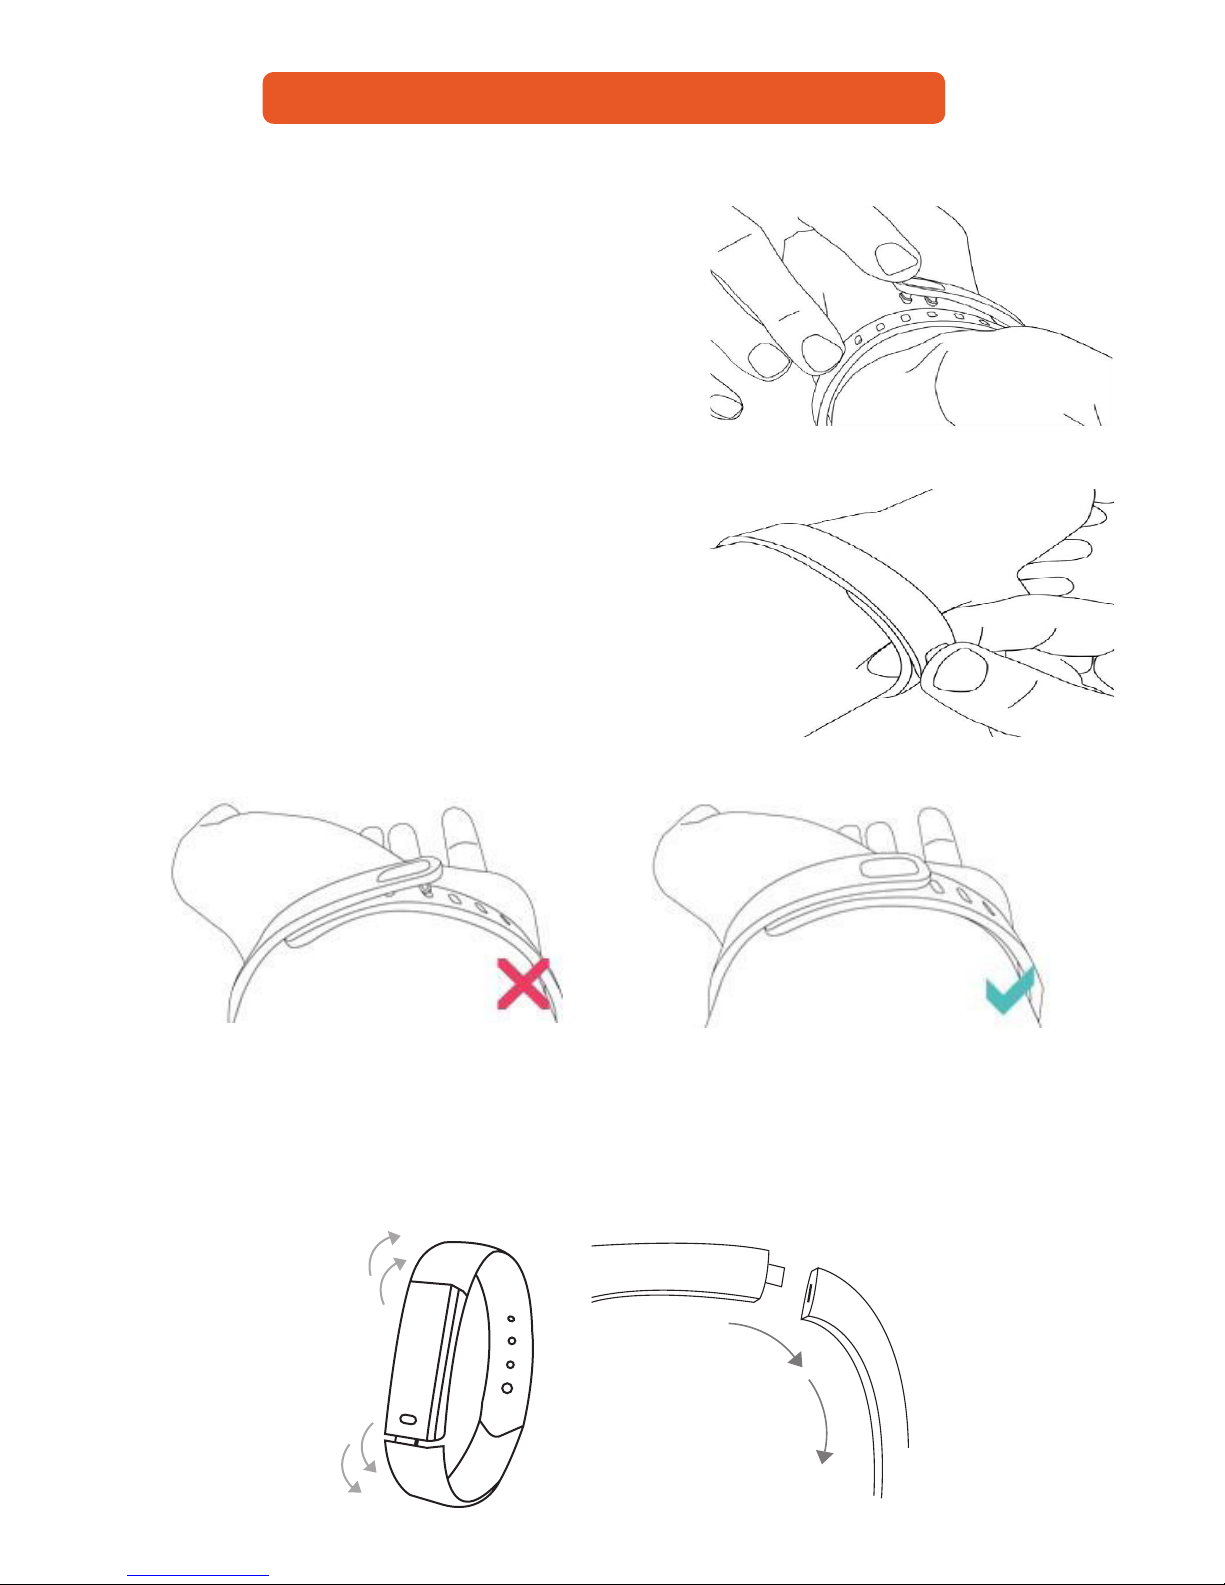
Tapping your tracker
For best results, tap your tracker where the display meets
the band on the oval shaped button on the bottom of
the screen.
e Smart Band does not respond to swipes;
it must be tapped
When you’re not using your Smart Band the display is
o. To wake it up:
• Single-tap your tracker.
• Turn your wrist towards you. is behavior, known
as Wrist Sense, can be turned o in your tracker
settings. (Refer to page -)
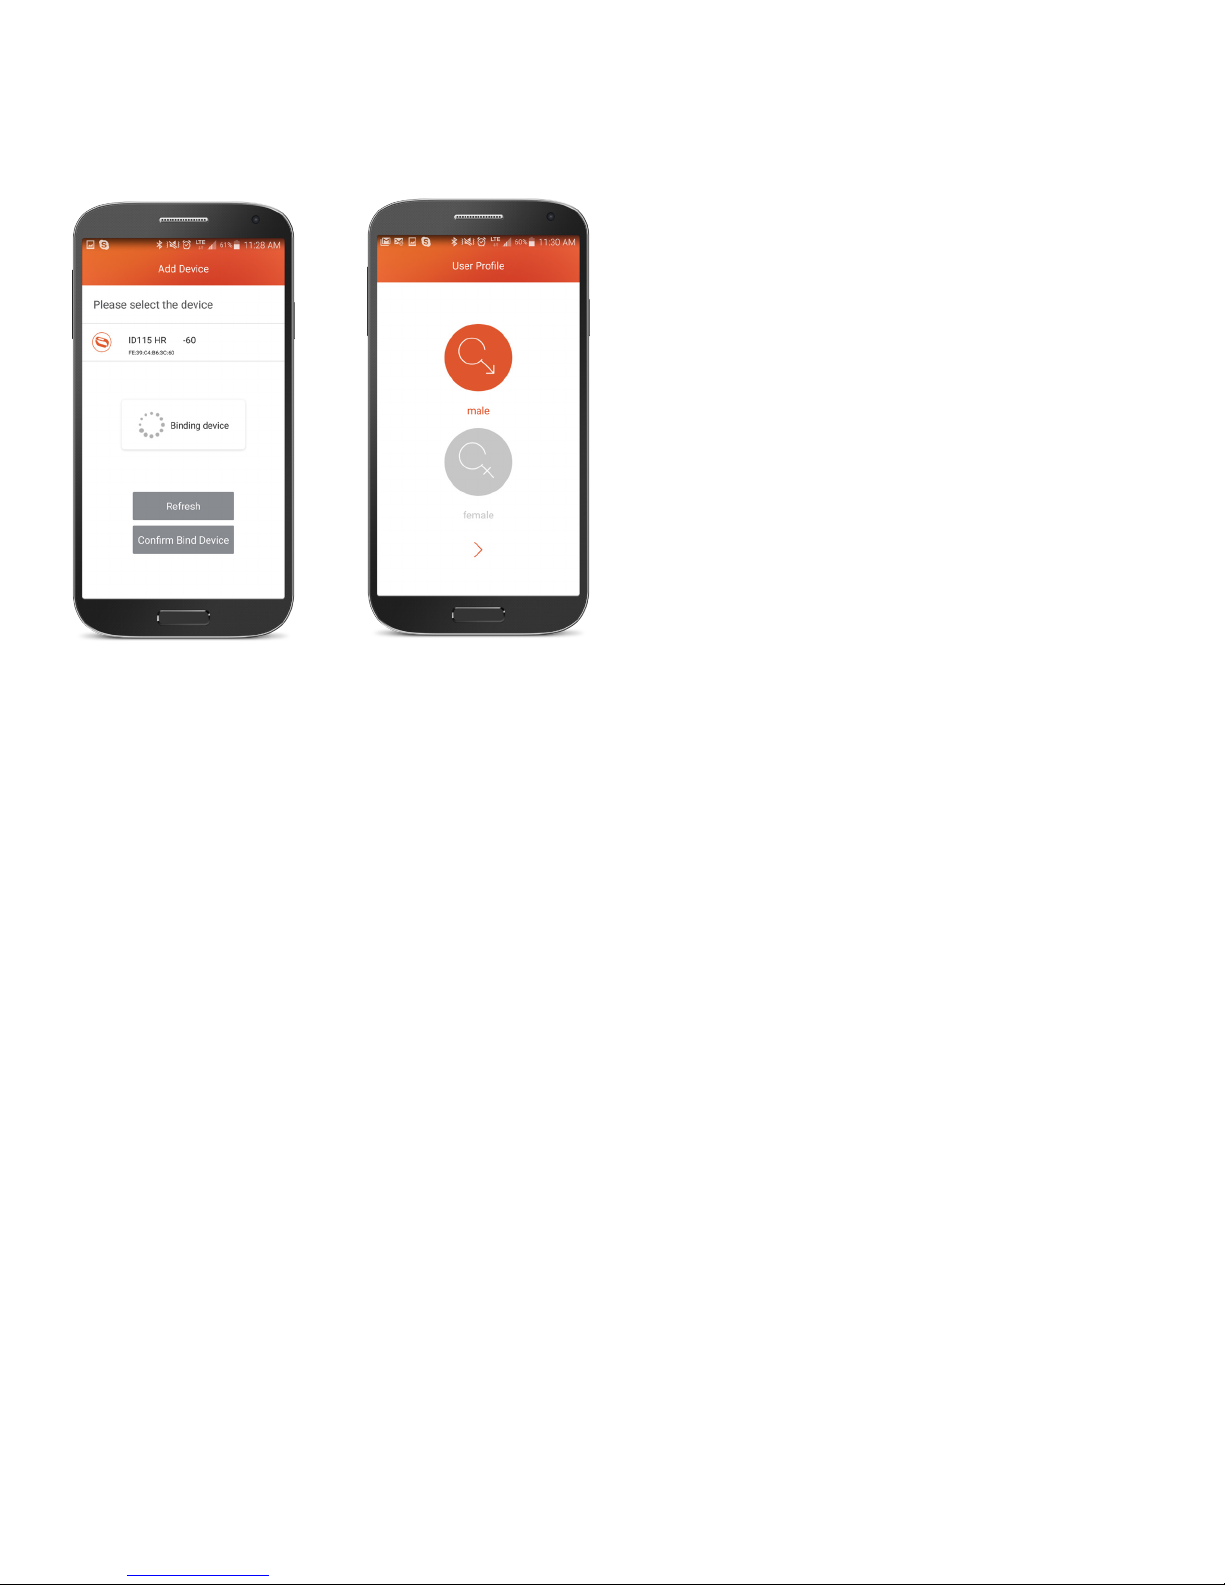
You will be guided through the process of personalizing your Smart Band. Note that the personal
information you’re asked during setup is used to calculate your basal metabolic rate (BMR), which
helps determine your estimated calorie expenditure.
Gender Birth Date Unit of measurement Height Sleep & Step target
Single-tap to ip through your stats. Stats include steps taken, distance covered, calories burned, and active
minutes. Tap and hold the button to start the stop watch feature.

11
Step 5: Tracking with your Smart Band
Viewing all-day stats
Tap your Smart Band to see these all-day stats
• Steps taken
• Distance covered
• Calories burned
• Active minutes
• Heart rate
ese stats will show the following screens:
Steps taken Distance covered Calories burned
Active minutes Heart rate
64
Tracking Sleep
e Smart Band automatically tracks the time you sleep and your movement during the night to
help you understand your sleep patterns. To track sleep, simply wear your Smart Band to bed.
You can customize your sleep goal per night in your settings and when you set up the app. You
can view your sleep data on your VeryFit app.
Tracking a daily activity goal
e Smart Band tracks your progress toward a daily activity goal of your choice. By default, your
goal is 10,000 steps per day. You can change the goal to distance traveled, calories burned or
active minutes and select the corresponding value of steps you prefer. For example, change the
target from 10,000 to 20,000 steps.
A goal progress bar helps keep you motivated. e dots in the bar shown below indicate that
you’re more than halfway to your goal.
Tracking Hourly Activity
e Sedentary alert helps keep you active throughout the day for better
health and tness. You can set the sedentary alert feature that will remind you to walk a certain
amount of steps at a certain time. (More details on page -)
You can nd more information about your hourly activity and stationary periods on
your Veryt for heart rate app.

12
Welcome screen
Bluetooth must be turned
on. Press “Ok” if you are
already connected. If not,
you can adjust this by
pressing “Settings”.
You can also adjust this in
your mobile device settings
under “Bluetooth”.
Proceed by turning Blue-
tooth on and nding the
Smart Band device in the
list of “My Devices”.
Turn on notications
for this app to receive
alerts on your
Smart Band.
You can do this by
pressing “Allow” when
this screen comes up,
or you can adjust it
in your mobile device
settings under
“notications”.
Swipe left through the three loading screens.
Find your pairing device on the list, rst press
the check mark, then press “OK”.
Your Smart Band will vibrate to notify you that
it has been connected.
Make sure you are connected to Bluetooth on
your iOS or Android device. You can connect
by going into your “settings” panel on your
mobile device and turning on Bluetooth.
Make sure that no one else is paired
with the device, or else the app will not
detect the Smart Band.
Below is a step by step ow chart of the screens that show how the app works.
Useful instructions will be shown beside the screens as well as key features and points that you
may have missed in the quick start up guide. Make sure Bluetooth is turned on in your mobile
settings and is not connected to any other devices when trying to pair.
Flow Chart & Diagrams
Introduction

13
Gender Birth Date
Unit of measurement;
preference Height
Daily step target
Daily sleep target
Activity data Sleep data Heart rate data
Imperial : Inches,
pounds, miles
Metric: Centimetres,
meters, kilograms,
kilometers
Personalization
Enter your personal settings and press the orange arrow on the bottom of each page to continue.
NOTE: ese settings can be adjusted later in the “User” page once the app is set up.
Statistics & Data
Aer setup is done, you will be taken to the “MainPage” where you can read all of your data that
your Smart Band will collect. By default, the app will show your Activity data screen rst. e three
categories of data are Activity, Sleep and Heart Rate. You can view all the information about the
statistics on the three pages below. See more information on the next page.
Weight

14
Analyze your sleep data Analyze your heart rate
The clasp represents whether or not you are
paired with the Smart Band. When the clasp
is not connected (as shown), that means you
are not paired with your device.
Share your statistics
through social media and
other online sources.
The details page allows you to view your
statistics from the past and includes the
following options; this week, this month
and this year.
Single tap the calendar icon in the top
left hand corner to ip through the
different options.
The device screen gives you
a list of different settings,
reminders and notications that
you can turn on or off on your
app and Smart Band.
See next page for details.
The user screen allows you to
adjust all of your system settings
including your target setting,
personal info and gives you the
option to connect to Apple Health
or Google Fit, depending on your
mobile device.
Statistics Screens
e diagram below shows the MainPage for the “Activity” statistics. e functions, buttons
and features are the same for the three categories; activity, sleep, and heart rate.
MainPage: Activity

15
Device Screen
is screen displays app features that can be turned on or o depending on your preference. is
includes alerts that will be notied on your Smart Band and/or your mobile device. You can access
this screen at any time. Turn on notications for this app to receive alerts on your Smart Band. You
can do this by pressing “Allow” when this screen comes up, or you can adjust it in your mobile device
settings under “notications”. NOTE: You will not receive notications to your Smart Band if you are
not connected during the time of the notications coming in.
Call Alert - View caller
ID of incoming calls right
on the Smart Band screen.
Turn on Call Alert by swiping icon to the right to turn green.
Switch the scale to “0” seconds to start vibrating as soon as
the call starts. The scale shows how many seconds before
the band will start vibrating to notify you of an incoming call.
We recommend to leave this setting at “ 0 “.
Tap the check mark on the top right corner to save settings.
Wait until it is nished loading before you leave the screen.
Sedentary Alert - Set
reminders for periods
of time of inactivity
Turn on Sedentary Alert by swiping icon to
the right to turn green. Now you can adjust
the scale to how many minutes of inactivity
until you should be notied. Select the start
and end times of the sedentary reminders
and then pick the days you would like to be
alerted. Keep in mind to set an end time or
the sedentary reminder will go off when you
are sleeping.
Tap the check mark on the top right corner
to save settings. Wait until it is nished
loading before you leave the screen.
Alarm Alert - Set silent
alarms on the Smart Band to
wake you up and not disturb
your partner.
Tap “ Add Alarm List “ to
add an alarm. Then tap
the “7:30 AM “ alarm that
appears to edit.
Now you can edit your rst alarm. Select what kind of alarm it will be. Then below
select the days you want the alarm to run. Next, select the time you want to the
alarm to run for those days. Lastly, hit the check mark at the top right corner to
save this alarm.
You can turn off or on your
saved alarms by swiping
the icon left or right (green
means on). To delete an
alarm you need to swipe
the time bar of the alarm to
the left until a garbage can
icon appears. Select the
garbage can icon to delete
the selected alarm.
SNS Alert - Receive
notications from other apps
on your Smart Band screen.
Set your phone up to take
a picture of yourself without
having to snap picture from
your phone. Select camera
mode in the app and it
will now be ready to take
a picture. Tap the menu
button on the smart band to
take a photo.
Take Photo - Set up camera
to use the Smart Band as a
remote to take pictures
Press “OK” to access
camera and “OK” on
the following pop-up to
access your photos.
Swipe icon to the right or left
to activate or deactivate
Wrist Sense: Allows the Smart Band
screen to light up every time you turn
your wrist to look at it.
Anti-lost Alert: Turn this on to have
your phone vibrate when you get 8
meters away from it.
Find Phone: Turn this on to get
notied when the Smart Band is
getting out of range from your phone.
SMS Alert: Turn this on to read
incoming text messages right on your
Smart Band screen.
See next page

16
See previous page
Auto Heart Rate - Select whether
the band will read your heart rate
automatically or when you choose to
manually have your BPM being read.
Select either Automatic or Manual
then be sure to click the check mark
in the top right corner to save.
Night Mode - Also known as Do Not
Disturb - this function turns off all
notications other than alarms for the
selected time range.
Tap Do Not Disturb and then swipe
the icon to the right until it turns
green. Then set your times below for
the period of time you do not want to
be disturbed. Make sure to tap the
check mark in the top right corner to
save this setting.
Wearing Way - You can
change whether you want
to wear your Smart Band on
your left or right wrist.
If you want to change the
wearing wrist, select either
left or right and tap the check
mark in the top right corner
to save your settings.
Display mode - View data on your
Smart Band screen either in landscape
(horizontal) or vertical mode.
Select display mode and then select
either Lan (Landscape) or Ver (Vertical)
mode to view your data. then select the
check mark in the top right corner to
save the mode. You will see the view
mode change on your Smart Band
screen immediately.
Landscape
Vertical
Heart Rate Zones - Select your
maximum heart rate mode.
Know your heart rate zones
during activity. You can even set a
maximum heart rate by swiping the
icon to the right. Then select your
maximum BPM that you want to be
notied when reached.
Device Upgrade - This will be the
latest version of the app, if there is
an app update, then you can simply
download it here.
Unbind - This is to disconnect
your Smart Band from your
mobile phone.

17
User Screen
is screen allows you to change or update any of your personal information that you added when
you rst installed the app. You are able to change your target settings, personal info, system settings
and you also have the option to connect with Apple Health or Google Fit, depending on your
mobile device. You can access this screen at any time.
Target Setting - You can change
your target sleep or step goals by
tapping here.
Adjust the scale to your
satisfaction and be sure to press
the check mark in the top right
corner to save your settings.
My Info - You can change or
update your info if you’d like.
To update your prole picture,
tap the circle with the human
gure in the middle. You have the
option to take a photo or chose
one from your photo gallery on
your mobile device.
Make sure you tap the check
mark in the top right hand corner
to save your settings.
System Setting - You can
change your unit of measurement
preference here, view the App.
version, Restart/reboot your
device or you can give feedback
about the app.
If you request to give feedback,
press “Report a Problem/technical
problem” and you can compose
an email. Make sure you press
“send” when you are done writing
your message.
Change the unit of
measurement and
press “conrm” to
save settings.
If you are experiencing
some technical
difculties, you can
reboot your app. Press
“Conrm Reboot”.
Connect to Apple Health
on Iphone or Google Fit on
Android.

18
FAQ
Q1. How do I reset the Smart Band?
A1. You can reset the Smart Band by going into your User Page and then system settings to select
Reboot Device.
Q2. Is the Smart Band waterproof or water resistant?
A2. e Smart Band is water resistant which is splash proof and sweat proof. It should never be
fully submerged under water.
Q3. Does it work and track data when it is away from the phone and
not connected?
A3. Yes it tracks data when the phone is not connected. It will continue to track data for 24 hours.
en when the phone is near you can sync all the data over to the app by pulling down on the
main screen in the app.
Q4. Does it read miles or kilometers?
A4. It can do both and you can adjust this in the Smart Band app settings located in the User tab
under “Unit Set”.
Q5. How do I activate Sleep mode?
A5. Sleep mode activates automatically. When you wake up in the morning sync your data over
and it will save your sleep patterns.
Q6. How do I charge this Smart Band?
A6. To charge this Smart Band you need to pull the band o that is closest to the home button
on the smart band. there will be a USB port on the one side of the Smart Band that you will then
insert into a computer or any USB outlet to charge.
Q7. Is it compatible with Windows phones?
A7. is Smart Band only works with Apple IOS or Android cellular devices.
Q8. Will it work with tablets?
A8. is Smart Band only works with Apple IOS or Android cellular devices.
Q9. My Smart Band has been working ne but now all of the sudden
nothing is syncing?
A9. ere is a few solutions to this problem. First please go into your Device page and Unbind the
device. en rebind and pair the two devices again. en sync again. If this still does not work
to sync over data then please delete the Bluetooth Setting in your phone settings and re-pair the
Smart Band to the phone. If this does not work then please go into your User settings and reboot
the device under System settings. is will save all your data and just reboot the device to start
fresh. Last thing please try is to delete the VeryFit for Heart rate app o your phone and delete the
Bluetooth ID for the Smart Band from your phone. en re-install the app and re-pair the process
all over again.
Q10. How do I change the time format on my Smart Band screen.
A10. e Smart Band will replicate what ever time format you are using on your phone. if you
want 24 hour time format on your Smart Band then you must change your phone to 24 hour
format rst.

19
CAUTIONS
• To reduce skin irritation, follow four simple wear and care tips:
(1) Keep it clean;
(2) keep it dry;
(3) don’t wear it too tight;
(4) give your wrist a rest by removing the band for an hour aer extended wear.
If you notice any skin irritation, remove your device. If symptoms persist longer than 2-3 days aer
removing the device, consult your doctor.
• Do not use abrasive cleaners to clean your Smart Band product.
• Remove your Smart Band if it feels warm or hot.
• Do not wear your Smart Band while charging it.
• Do not charge your Smart Band while it is wet.
• Do not place your Smart Band in a dishwasher, washing machine, or dryer.
• Do not leave your Smart Band in direct sunlight for an extended period of time.
• Do not expose your Smart Band to extremely high or low temperatures.
• Do not use your Smart Band in a sauna or steam room.
Table of contents
Other VeryFit Fitness Tracker manuals