ÐÓÑÑÊÈÉ ÐÓÑÑÊÈÉ
20 21
ÂÍÈÌÀÍÈÅ! Ïåðåä ïåðâûì âêëþ÷åíèåì òùàòåëüíî âûìîéòå êðûøêó
è ñóøèëüíûå ñåêöèè ïðèáîðà, êàê îïèñàíî â ðàçäåëå "Î×ÈÑÒÊÀ",
à òàêæå ïðî÷èòàéòå êàê íóæíî ïðàâèëüíî óñòàíàâëèâàòü ñóøèëüíûå
ñåêöèè íà ïðèáîð, êàê îïèñàíî â ðàçäåëå "ÑÁÎÐÊÀ ÑÓØÈËÜÍÛÕ
ÑÅÊÖÈÉ".
1. Ïîëîæèòå ïðîäóêòû íà ñóøèëüíûå ñåêöèè.
Ïîìíèòå, ÷òî ïîòîê ãîðÿ÷åãî âîçäóõà, êîòîðûé ñóøèò ïðîäóêòû,
äîëæåí ñâîáîäíî öèðêóëèðîâàòü â ïðèáîðå. Ïîýòîìó íå êëàäèòå
íà ñóøèëüíûå ñåêöèè ñëèøêîì ìíîãî ïðîäóêòîâ è íå íàêëàäûâàéòå
ïðîäóêòû äðóã íà äðóãà.
Ïðèìå÷àíèå: âñåãäà íà÷èíàéòå âûêëàäûâàòü ïðîäóêòû ñ âåðõíåé
ñåêöèè äî íèæíåé.
2. Óñòàíîâèòå ñóøèëüíûå ñåêöèè íà ïðèáîð (ñì. ðàçäåë "ÑÁÎÐÊÀ
ÑÓØÈËÜÍÛÕ ÑÅÊÖÈÉ") è ïîëîæèòå íà íèõ âåðõíþþ êðûøêó.
Óáåäèòåñü, ÷òî âî âðåìÿ ðàáîòû âåðõíÿÿ êðûøêà íàõîäèòñÿ íà
ïðèáîðå.
3. Âñòàâüòå ñåòåâîé êàáåëü ïðèáîðà â ðîçåòêó - LED äèñïëåé
íà÷íåò ìèãàòü.
Âî âðåìÿ íàæàòèÿ, óäåðæèâàéòå èõ íà íåñêîëüêî ñåêóíä.
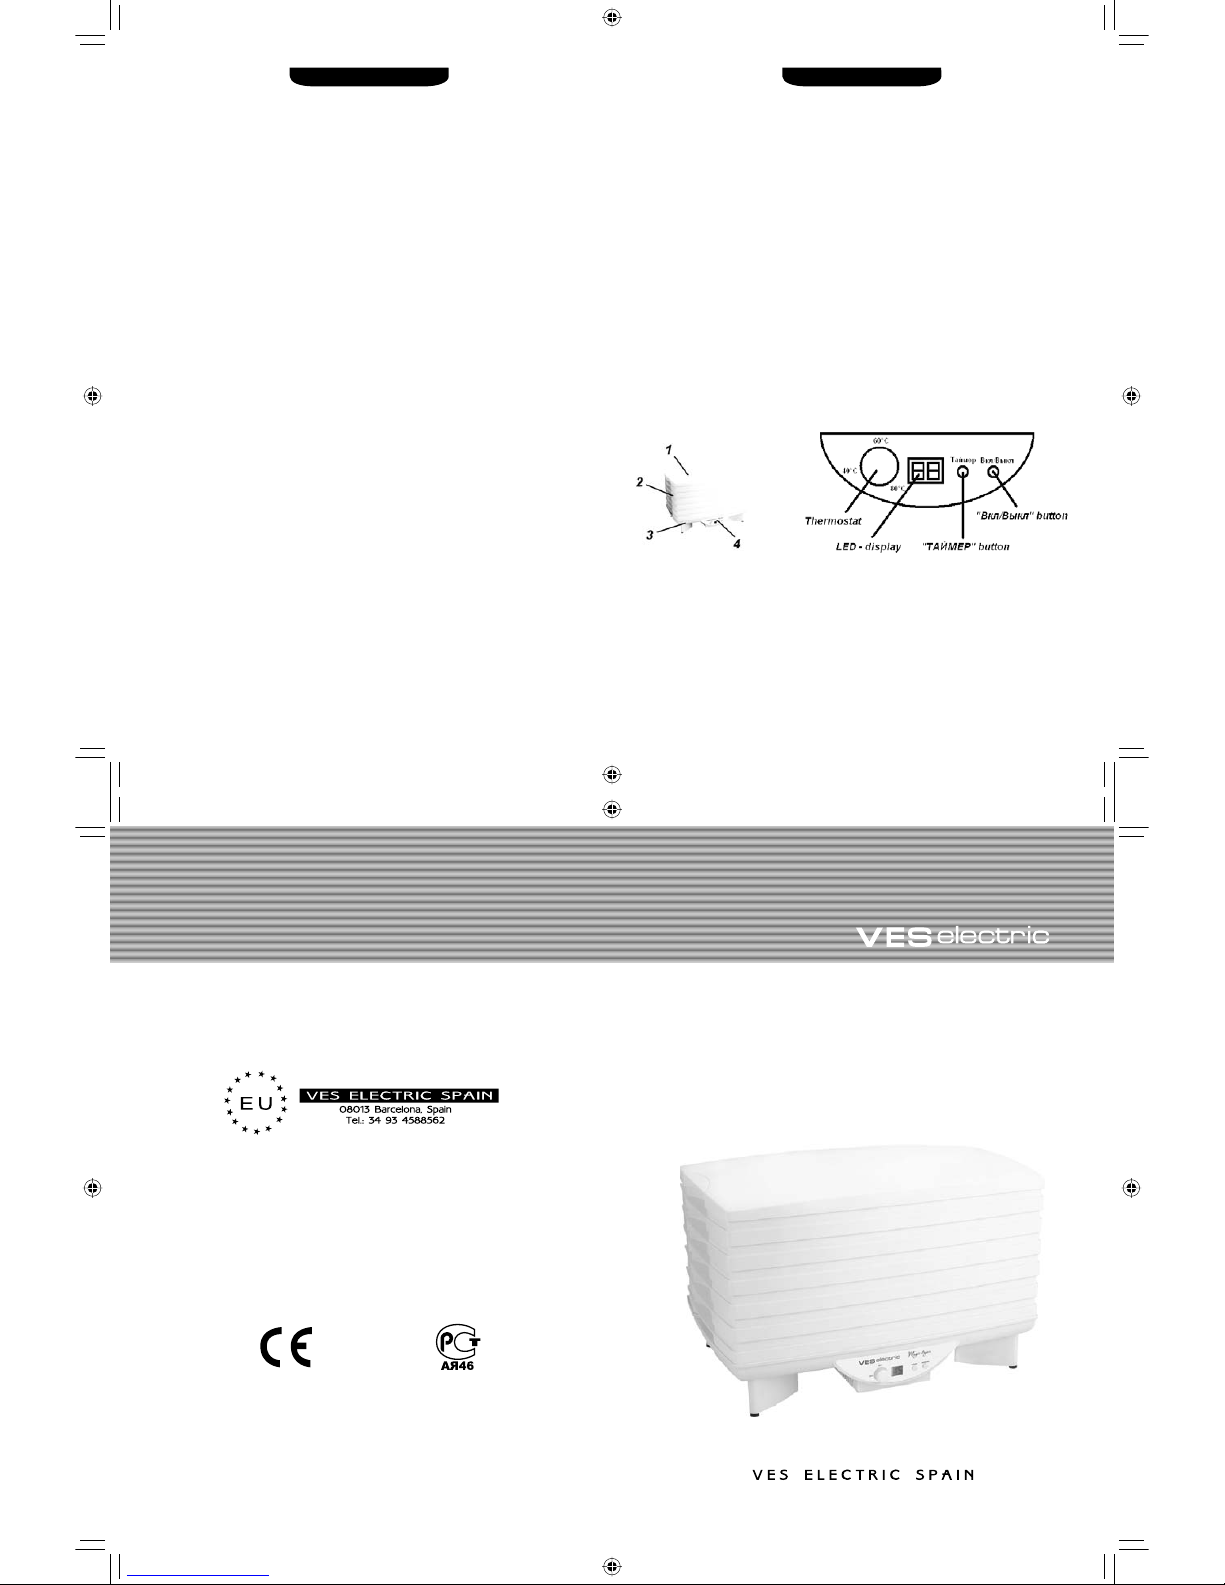
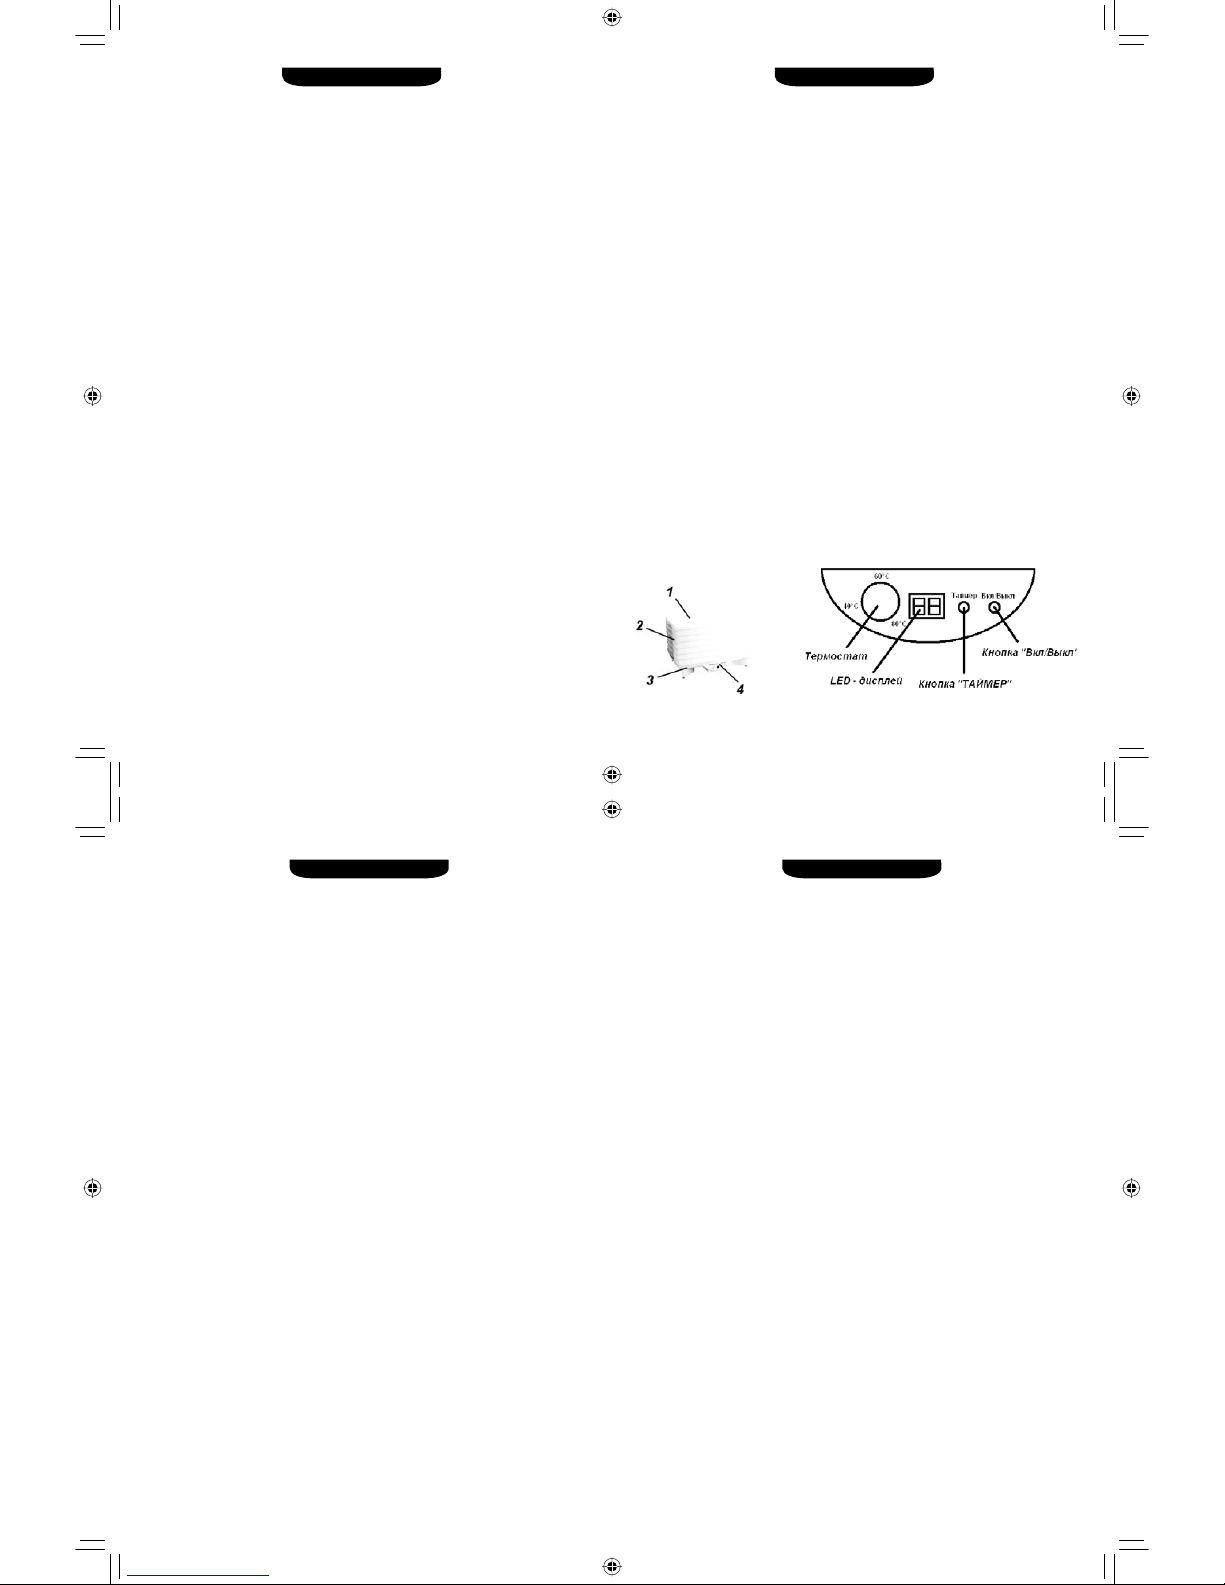
4. Ñ ïîìîùüþ òåðìîñòàòà óñòàíîâèòå íåîáõîäèìóþ òåìïåðàòóðó
(â ïðåäåëàõ îò 40°C äî 80°C). Äëÿ óâåëè÷åíèÿ òåìïåðàòóðû
ïîâåðíèòå òåðìîñòàò ïî ÷àñîâîé ñòðåëêå, äëÿ ñíèæåíèÿ - ïðîòèâ
÷àñîâîé.
Ïðèìå÷àíèå: óñòàíîâèòå íèçêóþ òåìïåðàòóðó è êîðîòêîå âðåìÿ
ñóøêè äëÿ òîíêèõ/ìàëåíüêèõ êóñî÷êîâ ïðîäóêòà èëè åñëè ïðîäóêòû
ðàçëîæåíû íå íà âñåõ øåñòè ñóøèëüíûõ ñåêöèÿõ, à òîëüêî íà
íåñêîëüêèõ. Óñòàíîâèòå âûñîêóþ òåìïåðàòóðó è äëèòåëüíîå âðåìÿ
ñóøêè äëÿ òîëñòûõ/áîëüøèõ êóñî÷êîâ èëè ïðè çàãðóçêå ïðîäóêòàìè
âñåõ øåñòè ñåêöèé. Òåðìîñòàò òàêæå ìîæåò ïðèãîäèòüñÿ äëÿ
óäîáñòâà êîíòðîëÿ óðîâíÿ âëàæíîñòè â ïðîäóêòå áëèæå ê êîíöó
ïðîöåññà ñóøêè.
5. Óñòàíîâèòå íåáîõîäèìîå äëÿ ñóøêè âðåìÿ íà òàéìåðå
îáðàòíîãî îòñ÷åòà, íàæèìàÿ íà êíîïêó "ÒÀÉÌÅÐ". ×èñëî íà
LED-äèñïëåå áóäóò îòðàæàòü êîëè÷åñòâî ÷àñîâ, â òå÷åíèå
êîòîðûõ áóäåò ïðîèçâîäèòüñÿ ñóøêà. Ïî îêîí÷àíèè ýòîãî âðåìåíè
ïðèáîð àâòîìàòè÷åñêè âûêëþ÷èòñÿ. Íàæèìàÿ êíîïêó "ÒÀÉÌÅÐ",
óñòàíîâèòå ïðîäîëæèòåëüíîñòü ñóøêè îò 1 äî 72 ÷àñîâ. Äëÿ
óñêîðåíèÿ óñòàíîâêè âðåìåíè óäåðæèâàéòå êíîïêó "ÒÀÉÌÅÐ".
Ñóøèòå ïðîäóêòû, ðóêîâîäñòâóÿñü ðåêîìåíäàöèÿì, îïèñàííûì â
ñîîòâåòñòâóþùåì ðàçäåëå äàííîé èíñòðóêöèè.
Ïðèìå÷àíèå: åñëè â ïðîöåññå ñóøêè Âû õîòèòå óâåëè÷èòü/
óìåíüøèòü âðåìÿ ñóøêè, ñíà÷àëà íàæìèòå êíîïêó "ÂÊË/ÂÛÊË"
÷òîáû âûêëþ÷èòü ïðèáîð, óñòàíîâèòå íåîáõîäèìîå êîëè÷åñòâî
âðåìåíè, íàæèìàÿ íà êíîïêó "ÒÀÉÌÅÐ". Çàòåì íàæìèòå íà êíîïêó
"ÂÊË/ÂÛÊË" äëÿ ïðîäîëæåíèå ðàáîòû.
6. Äëÿ âêëþ÷åíèÿ ïðèáîðà íàæìèòå êíîïêó "ÂÊË/ÂÛÊË". LED-
äèñïëåé íà÷íåò ìèãàòü, ñèìâîëèçèðóÿ î òîì, ÷òî ïðèáîð íà÷àë
ñâîþ ðàáîòó. Òàêæå Âû óñëûøèòå çâóê ðàáîòàþùåãî â ïðèáîðå
âåíòèëÿòîðà. LED-äèñïëåé áóäåò ïîêàçûâàòü âðåìÿ (÷àñû è
ìèíóòû), îñòàâøååñÿ äî çàâåðøåíèÿ ïðîöåññà ñóøêè.
Ïðèìåð: åñëè íà LED-äèñïëåå îòîáðàæàåòñÿ öèôðà "2", à çàòåì
öèôðà "46", ýòî îçíà÷àåò, ÷òî äî îêîí÷àíèÿ ðàáîòû ïðèáîðà
îñòàëîñü 2 ÷àñà 46 ìèíóò.
Ïðèìå÷àíèå: åñëè Âû íå óñïåëè âûñóøèòü ïðîäóêòû â òå÷åíèå
îäíîãî äíÿ, Âû ìîæåòå ïðîäîëæèòü ñóøêó íà ñëåäóþùèé äåíü.
 ýòîì ñëó÷àå íåäîñóøåííûå ïðîäóêòû íåîáõîäèìî õðàíèòü â
ïèùåâîì êîíòåéíåðå/ïîëèýòèëåíîâîì ïàêåòå â ìîðîçèëüíèêå âî
èçáåæàíèè ïîð÷è ïðîäóêòîâ.
7. Ïî èñòå÷åíèè óñòàíîâëåííîãî íà òàéìåðå îáðàòíîãî îòñ÷åòà
âðåìåíè, ïðèáîð àâòîìàòè÷åñêè âûêëþ÷èòñÿ. Òàêæå Âû ìîæåòå
âðó÷íóþ îñòàíîâèòü ðàáîòó ïðèáîðà, íàæàâ íà êíîïêó "ÂÊË/
ÂÛÊË".
8. Âûòàùèòå ñåòåâîé êàáåëü èç ðîçåòêè.
Äàéòå ïðîäóêòàì îñòûòü. Ïîìåñòèòå âûñóøåííûå ïðîäóêòû â
ïîëèýòèëåíîâûé ïàêåò èëè òàðó äëÿ õðàíåíèÿ è ïîëîæèòå åå â
õîëîäèëüíèê (áîëåå ïîäðîáíî î õðàíåíèÿ âûñóøåííûõ ïðîäóêòîâ
Âû ìîæåòå ïðî÷èòàòü â ðàçäåëå "ÕÐÀÍÅÍÈÅ").
ÐÓÑÑÊÈÉ ÐÓÑÑÊÈÉ
2322
ÑÁÎÐÊÀ ÑÓØÈËÜÍÛÕ ÑÅÊÖÈÉ
Âñå ñóøèëüíûå ñåêöèè äîëæíû áûòü óñòàíîâëåíû â òîì ïîëîæåíèè,
êîòîðîå óêàçàíî íà êàðòèíêå ñíèçó - øèðîêîå îñíîâàíèå äîëæíî
áûòü ñíèçó.
1) Ïîëîæèòå îäíó ñóøèëüíóþ ñåêöèþ íà ðàáî÷óþ ÷àñòü.
2) Ñâåðõó ïîëîæèòå äðóãóþ ñóøèëüíóþ ñåêöèþ.
3) Àíàëîãè÷íûì îáðàçîì óñòàíîâèòå îñòàâøèåñÿ ñåêöèè íà
ïðèáîð.
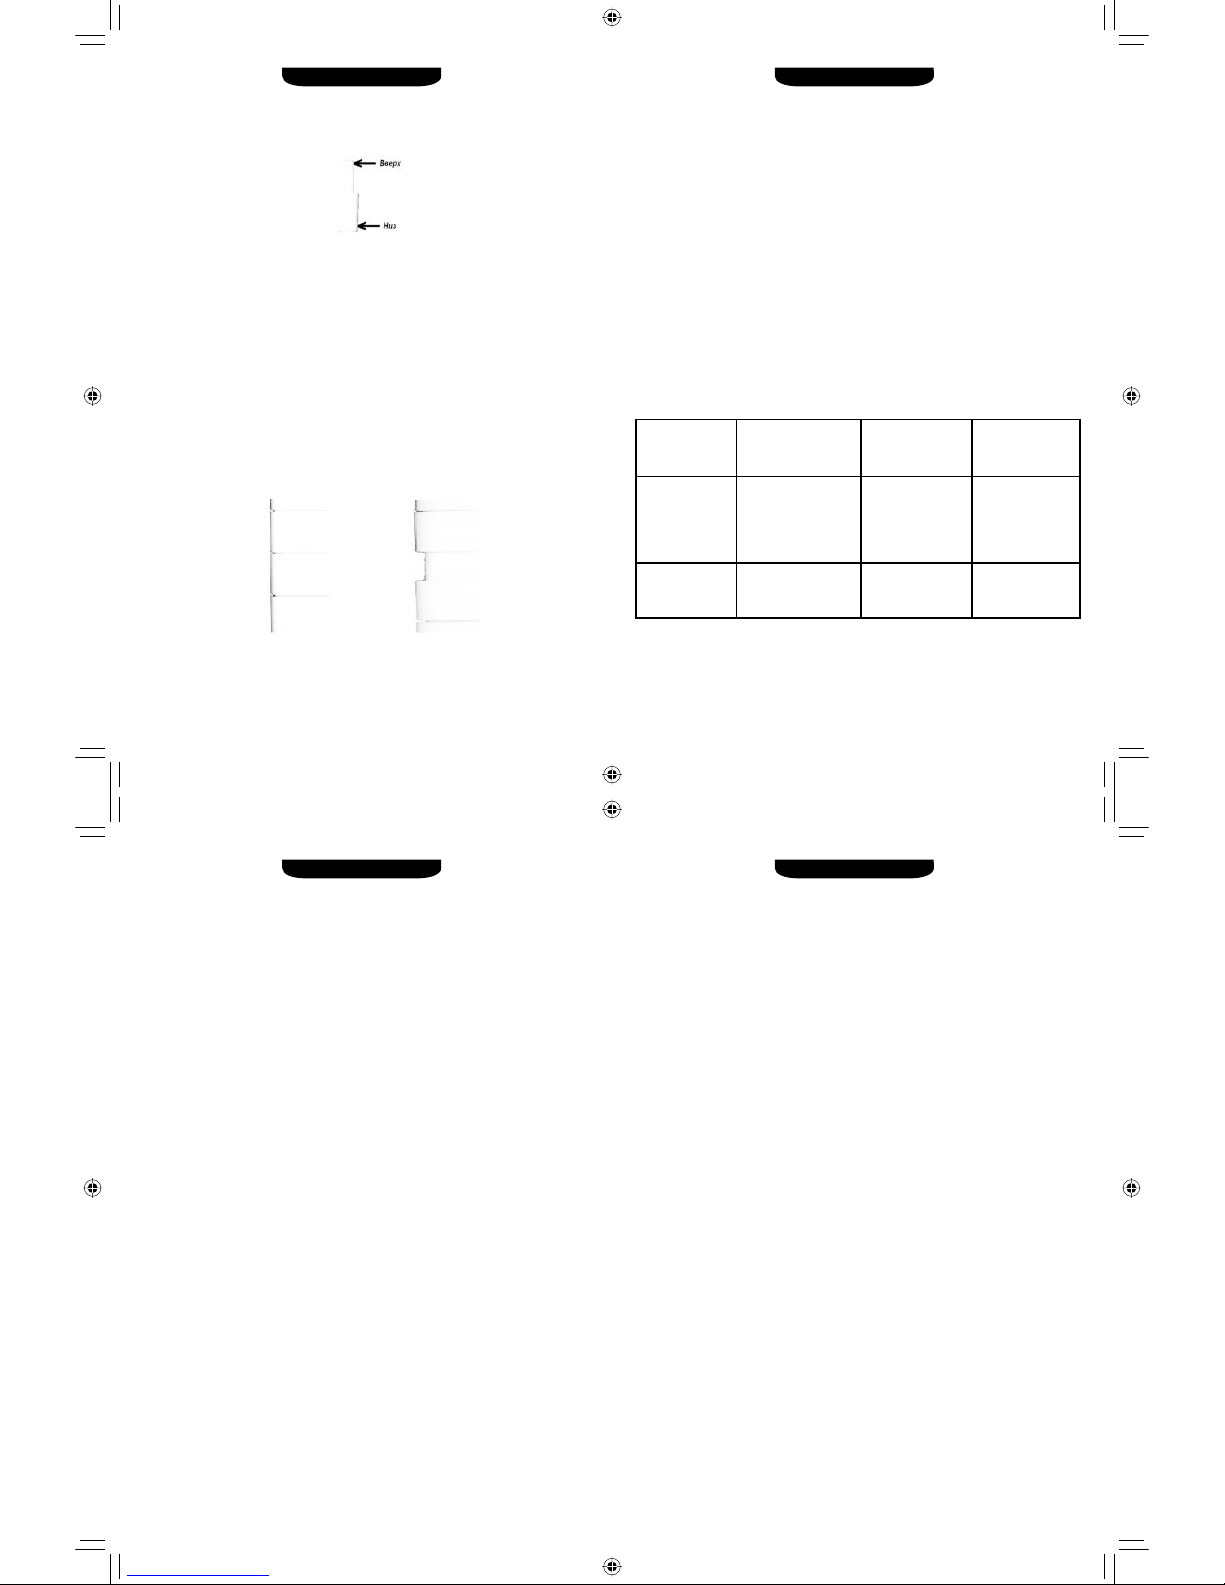
ÐÅÃÓËÈÐÎÂÊÀ ÑÓØÈËÜÍÛÕ ÑÅÊÖÈÉ ÏÎ ÂÛÑÎÒÅ
Ñóøèëüíûå ñåêöèè ìîãóò áûòü îòðåãóëèðîâàíû ïî âûñîòå â äâóõ
ïîëîæåíèÿõ - íîðìàëüíîì è âûñîêîì. Íîðìàëüíîå ïîëîæåíèå
íåîáõîäèìî äëÿ ïðîäóêòîâ òîëùèíîé äî 2 ñì, à âûñîêîå ïîëîæåíèå
- äëÿ ïðîäóêòîâ òîëùèíîé äî 3 ñì. Äëÿ ïåðåõîäà â íîðìàëüíîå
ïîëîæåíèå ïîâåðíèòå ñåêöèþ â íàïðàâëåíèè ïî/ïðîòèâ ÷àñîâîé
ñòðåëêè òàê, ÷òîáû ñåêöèè ïëîòíî ïðèæàëèñü äðóã ê äðóãó (ñì.
ðèñóíîê 1). Äëÿ ïåðåõîäà â âûñîêîå ïîëîæåíèå, ïîâåðíèòå ñåêöèþ
ãîðèçîíòàëüíî íà 180° ïî íàïðàâëåíèþ ïî/ïðîòèâ ÷àñîâîé ñòðåëêè
è ïîëîæèòå íà ïðåäûäóùóþ ñåêöèþ. Ñåêöèè äîëæíû âñòàòü êàê
ïîêàçàíî íà ðèñóíêå 2.
Âî âðåìÿ ðàáîòû ïðèáîðà ðåêîìåíäóåòñÿ êëàñòü íà íåãî âñå 6
ñóøèëüíûõ ñåêöèé, íåñìîòðÿ íà òî, åñòü ëè íà êàæäîé ñåêöèè
ïðîäóêòû èëè íåò.
Ïðèìåðû:
1) ïðîäóêòû ëåæàò íà ïåðâîé ñâåðõó ñåêöèè, îñòàëüíûå 5 ñåêöèè
ïóñòû. Óáåäèòåñü, ÷òî âåðõíÿÿ êðûøêà íàõîäèòñÿ íà ïðèáîðå.
2) ïðîäóêòû ëåæàò íà ïåðâûõ 2 âåðõíèõ ñåêöèÿõ, îñòàëüíûå
4 ñåêöèè ïóñòû. Óáåäèòåñü, ÷òî âåðõíÿÿ êðûøêà íàõîäèòñÿ íà
ïðèáîðå.
ÏÐÅÄÂÀÐÈÒÅËÜÍÀß ÎÁÐÀÁÎÒÊÀ ÔÐÓÊÒÎÂ
Ïðåäâàðèòåëüíàÿ îáðàáîòêà ïîçâîëÿåò ñîõðàíèòü íàòóðàëüíûé
öâåò, âêóñ è àðîìàò ôðóêòîâ.
Âîò íåñêîëüêî ïîëåçíûõ ñîâåòîâ êàê ïðàâèëüíî ïîäãîòîâèòü ôðóêòû
ê ñóøêå:
Âîçüìèòå 1/4 ñòàêàíà ñîêà (æåëàòåëüíî íàòóðàëüíîãî). Ïîìíèòå,
÷òî èñïîëüçóåìûé ñîê äîëæåí ñîîòâåòñòâîâàòü ïðèãîòàâëèâàåìîìó
ôðóêòó. Íàïðèìåð, äëÿ ÿáëîê èñïîëüçóéòå ÿáëî÷íûé ñîê.
Ñîê ñìåøàéòå ñ 2 ñòàêàíàìè âîäû. Çàòåì ïîãðóçèòå ïðåäâàðèòåëüíî
îáðàáîòàííûå ôðóêòû (ñì. "Òàáëèöó ïîäãîòîâêè ôðóêòîâ ê ñóøêè")
â ïðèãîòîâëåííóþ æèäêîñòü íà 2 ìèíóòû.
Òàáëèöà ïîäãîòîâêè ôðóêòîâ ê ñóøêå.
Íàèìåíî-
âàíèå
Ïîäãîòîâêà Ïîêàçàòåëü
ãîòîâíîñòè
ôðóêòà
Âðåìÿ, ÷àñû
(ïðèáëè-
çèòåëüíî)
Àáðèêîñ Ïîðåæüòå íà
ïîëîâèíêè
èëè êðóæêàìè,
óäàëèòå
êîñòî÷êó
Ìÿãêèé 12-38
Àïåëü-
ñèíîâàÿ
êîðêà
Ïîðåæüòå íà
äëèííûå ïîëîñêè
Ëîìêèé 8-16
ðèñ. 1 ðèñ. 2