Vesta Precision C20v User manual


1
TABLE OF CONTENTS
IMPORTANT SAFETY INFORMATION.................................................2
VACUUM PACKAGING GUIDELINES ...............................................3
PRODUCT COMPONENTS................................................................5
FEATURES AND OPTIONS..................................................................7
BEFORE FIRST USE… ..........................................................................9
Filling the Vacuum Pump.................................................................. 9
Draining the vacuum pump .......................................................... 10
OPERATING INSTRUCTIONS............................................................12
MAINTENANCE...............................................................................15
TROUBLESHOOTING .......................................................................16
ERROR CODES AND TROUBLESHOOTING ....................................17
TECHNICAL PARAMETERS ..............................................................18
LIMITED WARRANTY AND AFTER SALES SERVICE .......................19
Returns .............................................................................................. 19
Exchanges........................................................................................ 19
Warranty Replacements ................................................................ 20
Damaged and Defective Items.................................................... 21
What Does This Limited Warranty Not Cover?............................. 21

2
IMPORTANT SAFETY INFORMATION
When using this electrical appliance, basic safety precautions
should always be followed including:
1. Read and understand all instructions.
2. Operate the appliance indoors only on a dry, stable, hard
surface.
3. Do not use the appliance near a heat source, on a hot
surface, or in wet conditions.
4. To protect against electrical shock, do not immerse any part
of the appliance in water or other liquid.
5. Unplug the appliance from the wall outlet when not in use
and before cleaning.
6. Always unplug the device using the plug and never pull on
the cord.
7. Do not operate the appliance if the cord or plug are
damaged.
8. Do not operate the appliance if it malfunctions or is
damaged.
9. Use this appliance for its intended use only.
10. Children should not use this appliance. When in use around
children, close supervision by an adult is necessary and the
appliance should be kept out of their reach.
11. This appliance is not intended for use by people with
reduced physical, sensory or mental capabilities or who lack
experience with cooking appliances.
12. Do not use an extension cord with this product.
13. Always use only food-grade, plastic pouches or pouch
material, recommended by the manufacturer as suitable for
cooking. Use only appropriately sized pouches and do not
overfill the pouch.

3
VACUUM PACKAGING GUIDELINES
•Follow all food safety regulations as outlined by the FDA at
www.FDA.gov.
•Vacuum packaging is NOT a substitute for canning.
•Vacuum packaging is NOT a substitute for refrigeration or
freezing.
•Vacuum packaging cannot reverse the deterioration of
foods.
•Some fruits and vegetables may release gases, known as
outgassing. When vacuum packaging these fruits and
vegetables, outgassing can cause the vacuum to be
gradually lost over time. Blanching or freezing before
vacuum packaging helps prevent outgassing from
occurring.
NOTE: Due to the risk of anaerobic bacteria, soft cheeses,
fresh mushrooms, and alliums (garlic, onions, leeks, etc.)
should never be vacuum packaged.
•It is critical that safe food handling and storage procedures
are followed. You can reduce the growth of microorganisms
by storing foods at temperatures below 40°F (4°C) or
freezing at 0°F (-32°C). Freezing will not kill microorganisms
but reduces their chance to grow. For long-term food
storage, always freeze foods that have been vacuum
packaged.
NOTE: Beef and other proteins may look darker after being
vacuum packaged. This appearance is due to the removal
of oxygen and is not an indication of spoilage.
•Before vacuum packaging liquids such as broths, soups, or
stews, pre-freeze the item in a dish, bowl or ice tray until solid.
Remove the frozen liquid and vacuum package before
storing in your freezer until ready to use.

4
Food Storage and Safety Information
Storage
Foods
Typical
Storage
Vacuum
Packaging
Frozen
Meat 6 months 15-20 months
Fish, Seafood 6 months 10-12 months
Dried fruit,
Coffee
beans
6-9 months 18-24 months
Refrigerated
Meat 2-3 days 12-13 days
Fish, Seafood 2-3 days 6-8 days
Cooked
meat 2-3 days 10-14 days
Eggs 2-3 days 30-50 days
Vegetables 2-3 days 7-10 days
Dry
Bread 1-2 days 6-8 days
Cookies 4-6 months 12 months
Noodles 5-6 months 12 months
Rice 5-6 months 12 months
Flour 4-5 months 12 months
Crackers 3-4 months 12 months
Coffee 2-3 months 12 months
Tea 5-6 months 12 months
Powdered
Milk 1-2 months 12 months

5
PRODUCT COMPONENTS
①②③④⑤
1. Vacuum chamber lid 2. Air Vent
3. Power Switch 4. Control Panel 5. Lid lock

6
⑥⑦
6. Oil pump fill window
7. Oil inspection window
7
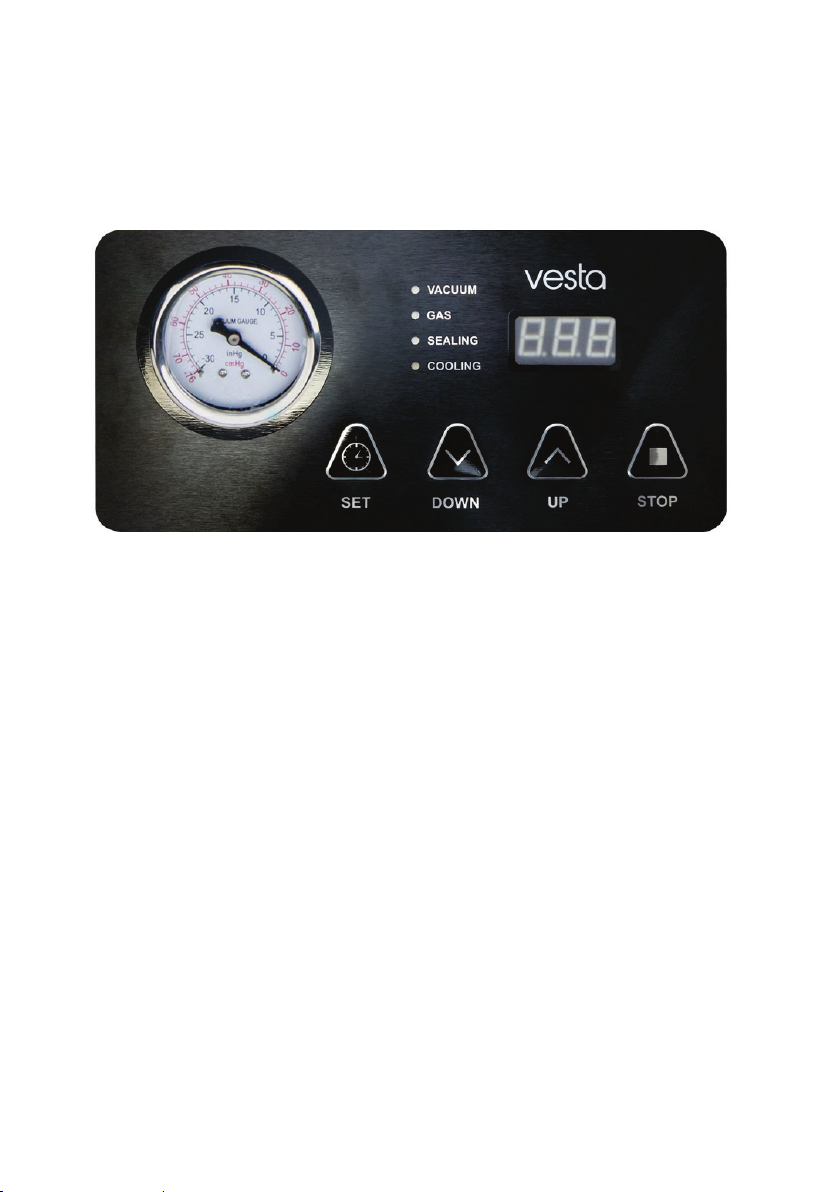
FEATURES AND OPTIONS
1. Power Switch
After the machine is plugged in, the LED display will show “OFF”
and the C20v will be in Power Saving mode. Turn the Power
Switch to “On” and the LED display will show “CLO” if the lid is
closed or “ON” if the lid is open. Now the machine is ready to
operate. After using the machine, turn the Power Switch to “OFF”
before unplugging the machine.
2. Stop
During any operation, press the “Stop” button to cancel any
process.

8
3. Set
When the lid is open, press this button to change between the
vacuum, gas, seal, or cooling time. Press the button “∧” or “∨”
to increase or decrease each setting.
Note: There is no Gas option on the C20v at this time.
4. Vacuum Gauge
Shows the vacuum level inside the vacuum chamber.
5. Indicator light
When the lid is open, the indicator light references the setting
displayed on the LED display.
Note: There is no Gas option on the C20v at this time.
During operation, the indicator light flashes when that process
is active.
6. LED Display
1. Shows the vacuum/seal/cooling time depending on the
operation or setting being adjusted.
2. If the lid is closed and no operation is engaged, it will display
“CLO”.
7. Adjusting buttons Up and Down (“∧” “∨“)
When the lid is open, press the button “∧” or “∨” to adjust the
value for each setting.

9
BEFORE FIRST USE…
Filling the Vacuum Pump
Filling the oil pump is required
before the first use
, when the oil
level is below the minimum oil level, or if performance is seriously
reduced. The oil needs to be replaced after 25 hours of the first
use and then after every 60 hours of use.
Use only SAE 10/ISO 32 or SAE 20/ISO 68 grade vacuum pump
oil.
Steps for filling:
1. Remove the oil pump fill window with a screwdriver to
expose the oil pump fill cap.
2. Unscrew the cap on the oil filling port of the oil pump with
the wrench provided.
3. Using a small bottle, squeeze oil into the pump to a level.
between 1/2 to 3/4 of the oil inspection window.
4. Tighten the nut on the oil filling port after filling.
5. Replace the oil pump fill window to complete the process.
Table of contents
Other Vesta Precision Food Saver manuals


