manuals.online logo
Brands
  1. Home
  2. •
  3. Brands
  4. •
  5. Vetus
  6. •
  7. Measuring Instrument
  8. •
  9. Vetus TACH B 4000 User manual

Vetus TACH B 4000 User manual

100 mm (3 15/16”)
+
–
Installatie Installation Installation Installation Instalación Installazione
+
–
1 2 3
4
TACH B/N/W 4000
TACH B/N/W 5000
Installatieinstructies
Installation instructions
Einbauanleitung
Instructions d’installation
Instrucciones de instalación
Istruzioni per il montaggio
Copyright © 2016 Vetus b.v. Schiedam Holland 090437.01
TACHOMETERS
42 (1 5/8“)
16 ( 5/8“)
ø 114 (4 1/2“ DIA.)
0.5 - 20 (1/32 - 3/4“)
63 (2 1/2“)
ø 100 (3 15/16 “ DIA.)
*) Benodigde inbouwdiepte
Required build-in depth
Erforderliche Einbautiefe
Profondeur d’encastrement nécessaire
Profundidad necesaria de incorporación
Profondità di montaggio necessaria
Afmetingen Dimensions Abmessungen Dimensions Dimensiones Dimensioni
5
2090437.01 vetus® Tachometers TACH B/N/W 4000 / TACH B/N/W 5000
Adjusting the tachometer
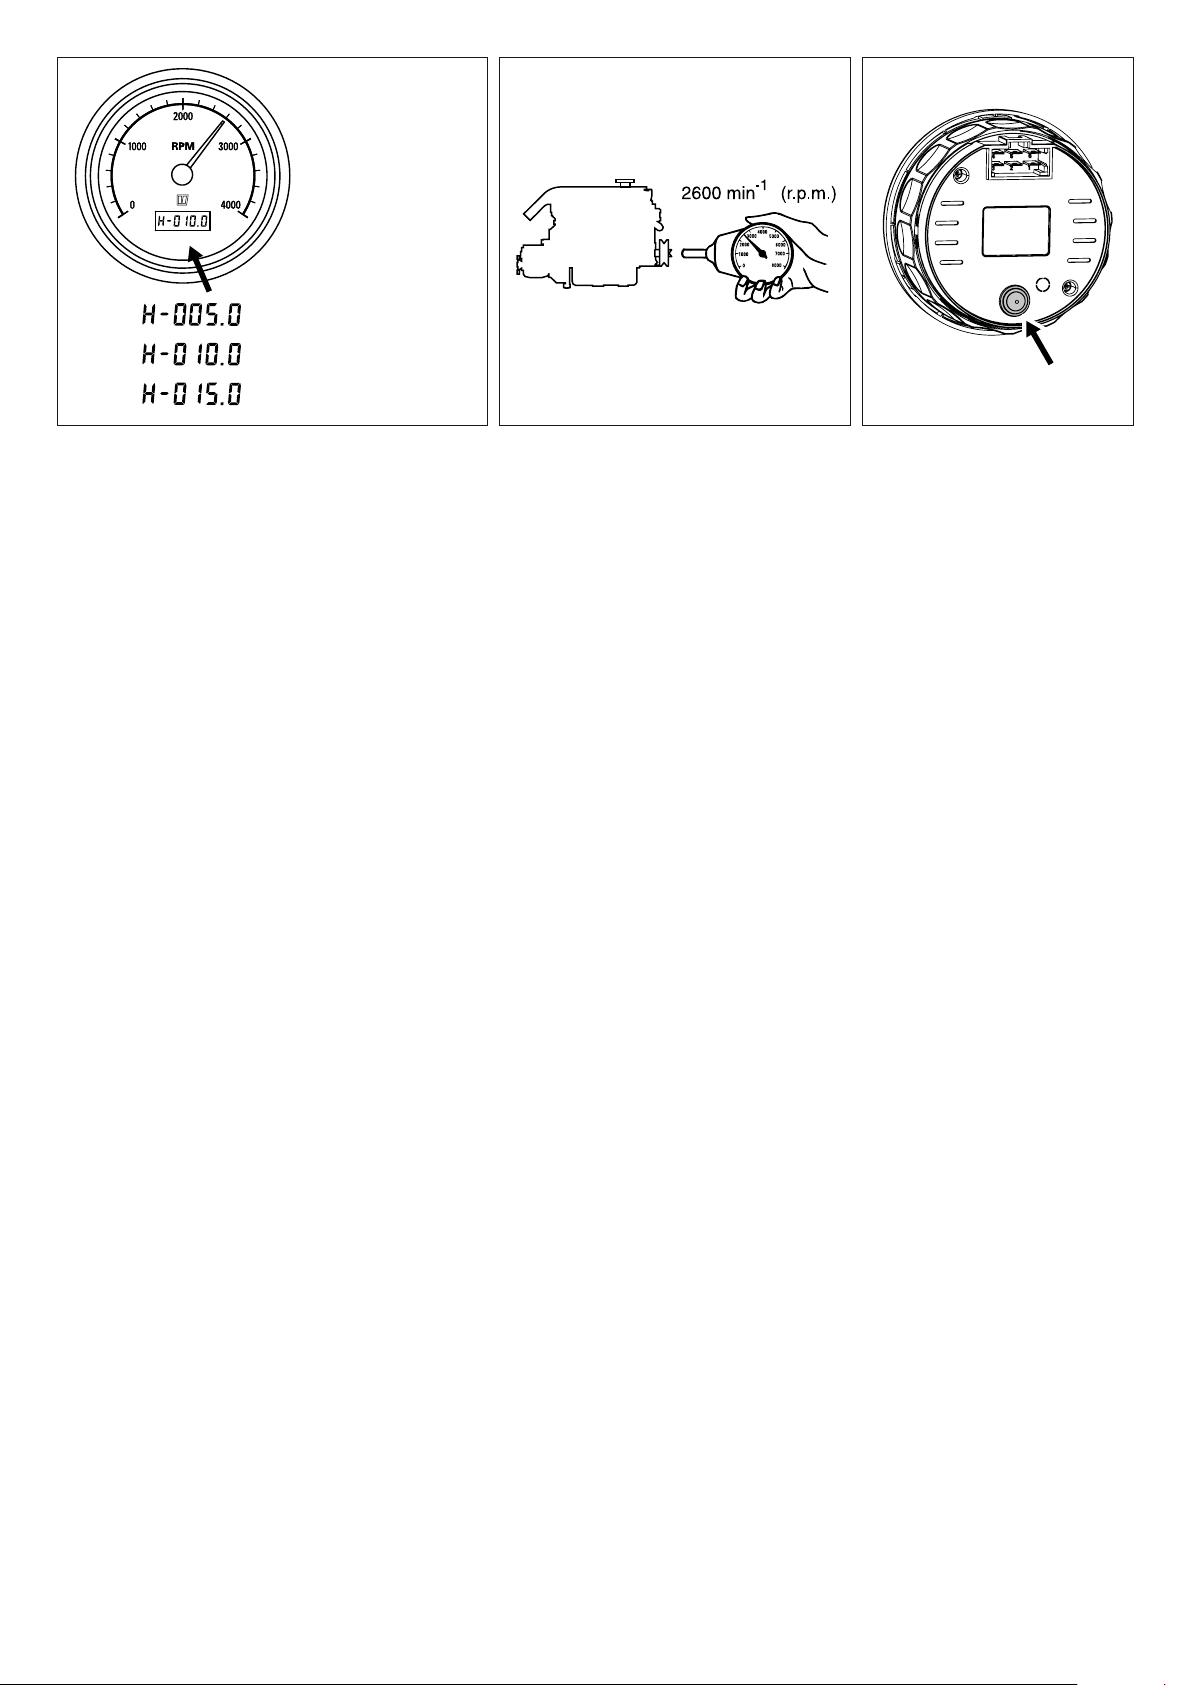
When installed the tachometer should be adjusted. Start the engine
and allow it to run at 2,600 rpm. Check engine speed with a hand ta-
chometer on the crank shaft pulley. Adjust the tachometer until it indi-
cates the same rpm.
Range: 100 Hz @ 4,000 rpm - 25 kHz @ 4,000 rpm.
( H‐005.0 up to H‐250.0 )
• Press the button (A) and keep it pressed, after 3 seconds the ta-
chometer enters the setting mode. Note, if the button is released for
3 seconds it will exit the setting mode.
• Again press the button and keep it pressed, the pointer will move
to indicate a higher speed. Release the button and again press the
button now the pointer will move to indicate a lower speed. The
setting is displayed in the hour counter display, range 1.0 to 250.
The longer you press the button the faster changing of the setting
will take place.
• Release the button after you get the indication you want, and the
setting will be saved automatically after 3seconds. It is always pos-
sible to enter a new setting.
500 Hz @ 4000 rpm
1000 Hz @ 4000 rpm
1500 Hz @ 4000 rpm



A
Afregelen van de toerenteller
Na installatie dient de toerenteller te worden afgeregeld. Start de mo-
tor en laat deze bijv. 2600 omw/min draaien. Controleer het motortoe-
rental met een handtoerenteller op de krukassnaarschijf. Regel de toe-
renteller zo af dat deze het gelijke aantal omw/min aanwijst.
Instelbereik: 100 Hz @ 4000 omw/min - 25 kHz @ 4000 omw/min.
( H‐005.0 tot H‐250.0 )
• Druk de toets (A) in en houdt deze gedurende 3 seconden inge-
drukt, de toerenteller bevindt zich nu in de instelmode. Let op, als
de toets hierna gedurende 3 seconden niet wordt ingedrukt wordt
de instelmode weer verlaten.
• Druk de toets weer in en houdt deze ingedrukt, de wijzer zal nu een
hoger toerental aan gaan wijzen. Laat de knop los en druk deze op-
nieuw in, de wijzer zal nu aan lager toerental aan gaan wijzen. De
instelling wordt in getallen weergegeven in het urenteller display
van 1.0 tot 250. Hoe langer de toets wordt ingedrukt des te sneller
het wijzigen van de instelling gaat.
• Laat de toetst los nadat de gewenste waarde is ingesteld, de instel-
ling wordt automatisch na 3 seconden opgeslagen. De instelling
kan altijd weer gewijzigd worden.
Réglage du compte-tours
Le compte-tours doit être réglé après son installation. Mettre en
marche le moteur et laisser tourner à 2600 t/mn par exemple. Contrôler
la vitesse du moteur avec un compte-tours manuel placé sur la poulie
de vilebrequin. Régler le compte-tours de façon à ce qu’il indique le
même nombre de t/mn.
Champ de réglage : 100 Hz @ 4000 t/mn - 25 kHz @ 4000 t/mn.
( H‐005.0 á H‐250.0 )
• Appuyez sur le bouton (A) et maintenez-le appuyé pendant 3 se-
condes, le compte-tours se trouve alors en mode réglage. Attention,
si le bouton n’est pas pressé pendant 3 secondes, vous n’entrez pas
en mode réglage.
• Appuyez de nouveau sur le bouton et maintenez-le appuyé, l’ai-
guille indiquera un nombre de tours plus élevé. Relâchez le bou-
ton et rappuyez dessus, l’aiguille va acher maintenant un nombre
de tours plus bas. Le réglage est indiqué en chires sur l’écran du
compteur d’heures, de 1.0 à 250. Plus le bouton est pressé long-
temps, plus la vitesse de réglage est élevée.
• Relâchez la touche une fois que la valeur souhaitée est atteinte, le
réglage sera enregistré automatiquement au bout de 3 secondes. Le
réglage peut être remodié à tout moment.
Tachometer einstellen
Nach der Installation muß der Tachometer abgestimmt werden. Lassen
Sie den Motor an, und lassen Sie ihn bei z.B. 2600 U/Min. laufen. Kont-
rollieren Sie die Motordrehzahl mit einem Handdrehzahlmesser an der
Kurbelwellenriemenscheibe. Stellen Sie den Tacho so ein, daß er die
gleiche Anzahl Umdrehungen pro Min. anzeigt.
Einstellbereich: 100 Hz bei 4000 U/Min. - 25 kHz bei 4000 U/Min.
( H‐005.0 bis H‐250.0 )
• Taste (A) drücken und 3 Sekunden gedrückt halten. Der Drehzahl-
messer bendet sich nun im Einstellmodus. Achtung: Wird die Taste
danach 3 Sekunden lang nicht betätigt, wird der Einstellmodus wie-
der verlassen.
• Die Taste erneut drücken und gedrückt halten. Der Zeiger gibt jetzt
eine höhere Drehzahl an. Die Taste loslassen und erneut drücken.
Nun gibt der Zeiger eine niedrigere Drehzahl an. Die Einstellung
wird im Stundenzähler-Display in Zahlen von 1,0 bis 250 angezeigt.
Je länger die Taste gedrückt gehalten wird, desto schneller läuft die
Änderung der Einstellung.
• Die Taste nach Einstellung des gewünschten Werts loslassen. Die
Einstellung wird dann nach 3 Sekunden automatisch gespeichert.
Die Einstellung kann jederzeit erneut geändert werden.
090437.01 3
vetus® Tachometers TACH B/N/W 4000 / TACH B/N/W 5000
Ajuste del cuentarrevoluciones
Después de su instalación, es preciso ajustar el cuentarrevoluciones.
Arrancar el motor dejándolo en marcha con un régimen de, por ejemplo,
2.600 rev/min. Controlar el número de revoluciones con un cuentarrevo-
luciones manual en el disco de correa del cigüeñal. Ajustar el cuentarre-
voluciones de forma que indique el mismo número de rev/min.
Alcance de ajuste: 100 Hz @ 4.000 rev/min 25 kHz @ 4.000 rev/min.
( H‐005.0 a H‐250.0 )
• Pulse la tecla (A) y manténgala pulsada durante 3 segundos, el con-
tador de revoluciones se encuentra ahora en el modo de congura-
ción. Atención: si deja de pulsar esta tecla durante 3 segundos, se
abandona del modo de conguración.
• Vuelva a pulsar la tecla y manténgala pulsada, la aguja indicará aho-
ra una revolución superior. Suelte la tecla y vuelva a pulsarla, la agu-
ja indicará ahora una revolución inferior. La pantalla del contador de
horas muestra el valor de la conguración en cifras, del 1.0 al 250.
Mientras más tiempo mantenga pulsada la tecla, más rápidamente
podrá modicar la conguración.
• Suelte la tecla cuando haya congurado el valor deseado, la con-
guración se almacenará automáticamente después de 3 segundos.
Siempre podrá volver a modicar la conguración.
Regolazione del contagiri
Dopo l’installazione è necessario regolare il contagiri. Avviare il moto-
re e farlo girare a 2600 giri/min. Controllare il numero di giri con un
contagiri manuale sul disco dentellato dell’albero motore. Regolare il
contagiri in modo che indichi lo stesso numero di giri/min.
Portata di regolazione: 100 Hz @ 4000 giri/min 25 kHz @ 4000 giri/min.
( H‐005.0 a H‐250.0 )
• Premete il pulsante (A) e tenetelo premuto per 3 secondi per ac-
cedere alla modalità di regolazione del contagiri. Attenzione, se il
pulsante non viene toccato nei 3 secondi successivi, la modalità di
regolazione viene chiusa automaticamente.
• Premete nuovamente il pulsante e tenetelo premuto: la lancetta
indicherà un numero di giri superiore. Rilasciate il pulsante, poi pre-
metelo nuovamente: la lancetta indicherà un numero di giri inferio-
re. L’impostazione viene visualizzata in cifre da 1.0 a 250 sul display
del contatore orario. Più a lungo tenete premuto il pulsante più ra-
pida sarà la modica delle impostazioni.
• Una volta impostato il valore desiderato, rilasciate il pulsante. L’im-
postazione viene salvata automaticamente dopo 3 secondi. L’impo-
stazione può sempre essere modicata.
Let op
Als de spanning van de toerenteller wordt uitgeschakeld terwijl de mo-
tor draait dan gaat de wijzer niet terug naar de 0-stand.
De wijzer blijft in die stand staan tot de spanning weer wordt inge-
schakeld.
Urenteller
De urenteller geeft het aantal bedrijfsuren met een nauwkeurigheid
van 0,1 uur aan.
Note
If the voltage of the tachometer is switched o while the engine is run-
ning the pointer does not return to the 0-position.
The pointer remains in that position until the power is switched on
again.
Hour counter
The hour counter shows the number of hours with an accuracy of 0.1
hour.
Achtung
Wenn die Stromzufuhr zum Drehzahlmesser abgeschaltet wird, wäh-
rend der Motor läuft, geht der Zeiger nicht mehr auf Position 0 zurück.
Der Zeiger bleibt in derselben Stellung stehen, bis die Stromzufuhr
wieder eingeschaltet wird.
Stundenzähler
Der Stundenzähler gibt die Anzahl der Betriebsstunden mit einer Ge-
nauigkeit von 0,1 Stunden an.
Attention
Si l’alimentation électrique du compte-tours est interrompue alors que
le moteur tourne, l’aiguille ne revient pas en position 0.
L’aiguille reste à sa position jusqu’à ce que le courant soit rétabli.
Compteur horaire
Le compteur horaire indique le nombre d’heures de service avec une
précision de 0,1 heure.
Atención
Si se desactiva la corriente del contador de revoluciones con el motor
en marcha, la aguja no regresará a la posición “0”.
La aguja permanecerá en esa posición hasta que se vuelva a activar la
corriente.
Contador de horas
El contador de horas indica el número de horas de funcionamiento con
una precisión de 0,1 horas.
Attenzione
Se si toglie la tensione al contagiri mentre il motore gira, la lancetta non
torna sullo“0”.
La lancetta rimane in posizione no al ritorno dell’alimentazione.
Contatore orario
Il contatore orario indica le ore di lavoro con una precisione di 0,1 ora.
vetus b.v.
FOKKERSTRAAT 571 - 3125 BD SCHIEDAM - HOLLAND - TEL.: +31 10 4377700
TELEFAX: +31 10 4372673 - 4621286 - E-MAIL: [email protected] - INTERNET: http://www.vetus.com
Printed in China
090437.01 2016-04
B
30 15
2
5
6
123
654
4
A
1
3
12/24 V
W
1Toerenteller/uren-
teller
Tachometer/Hour
Counter
Tachometer/Stun-
denzähler
Compte-tours/comp-
teur horaire
Cuentarrevolucio-
nes/contador de
horas
Contagiri/contaore
2
3-fase wissel-
stroomdynamo
met W-aansluiting
3-phase alter-
nating current
dynamo with
W-connector
Dreiphasen-Wech-
selstromdynamo
mit W-Anschluß
Dynamo à courant
alternatif triphasé avec
raccordement W
Alternador trifásico
con conexión W
Dinamo trifasica a
corrente alternata con
allacciamento a W
3 Contactslot Key switch Zündschloss Contacteur d’allumage Contacto Contatto con la chiave
4 Lichtschakelaar Light Switch Lichtschalter Interrupteur d’éclairage Interruptor de la luz Interruttore della luce
A geel yellow gelb jaune amarillo giallo
Brood red rot rouge rojo rosso
5 Zekering Fuse Sicherung Fusible Fusible Fusibile
6Accu Battery Batterie Batterie Batería Batteria
Aansluitschemas Wiring diagrams Anschlussskizzen
Schémas de raccordement Esquemas de conexiones Schemi di collegamento
Een tweede toerenteller kan direct parallel
aan de eerste worden aangesloten.
A second tachometer can be connected in
parallel to the rst.
Ein zweiter Tachometer kann direkt parallel
am ersten angeschlossen werden.
Un deuxième compte-tours peut être raccor-
dé en parallèle au premier.
Se puede conectar en paralelo directamente
al primero un segundo cuentarrevoluciones.
Al primo contagiri dierenziale se ne può
eventualmente collegare un secondo in pa-
rallelo.

This manual suits for next models

5

Other Vetus Measuring Instrument manuals

Vetus AMPMETER User manual

Vetus

Vetus AMPMETER User manual

Vetus WR-18 User manual

Vetus

Vetus WR-18 User manual

Vetus LNVOLT12 User manual

Vetus

Vetus LNVOLT12 User manual

Vetus Meteo Liner User manual

Vetus

Vetus Meteo Liner User manual

Vetus LNTACH User manual

Vetus

Vetus LNTACH User manual

Popular Measuring Instrument manuals by other brands

iBike Gen III operating instructions

iBike

iBike Gen III operating instructions

Indu-Sol Proftest II user manual

Indu-Sol

Indu-Sol Proftest II user manual

ENDEVCO 7255A instruction manual

ENDEVCO

ENDEVCO 7255A instruction manual

TESTO 108 instruction manual

TESTO

TESTO 108 instruction manual

Johnson Matthey TRACERCO PED-IS user manual

Johnson Matthey

Johnson Matthey TRACERCO PED-IS user manual

B-I Inductrial BI-SM2004 manual

B-I Inductrial

B-I Inductrial BI-SM2004 manual

Hesai Pandar128 user manual

Hesai

Hesai Pandar128 user manual

Levenhuk ERMENRICH REEL GA50 user manual

Levenhuk

Levenhuk ERMENRICH REEL GA50 user manual

Thermo Scientific appliedbiosystems SeqStudio Flex Series user guide

Thermo Scientific

Thermo Scientific appliedbiosystems SeqStudio Flex Series user guide

Supertech agroline Farmpoint instruction manual

Supertech agroline

Supertech agroline Farmpoint instruction manual

MKS Granville-Phillips Mini-Convectron 275... instruction manual

MKS

MKS Granville-Phillips Mini-Convectron 275... instruction manual

AQUASOL AP-CL-01 user guide

AQUASOL

AQUASOL AP-CL-01 user guide

Amprobe TACH20 Warranty and services guide

Amprobe

Amprobe TACH20 Warranty and services guide

BlueTees 3 MAX+ user manual

BlueTees

BlueTees 3 MAX+ user manual

FRC DFA400 instruction manual

FRC

FRC DFA400 instruction manual

Unipulse TM500 Operation manual

Unipulse

Unipulse TM500 Operation manual

Laurus Rad-id user manual

Laurus

Laurus Rad-id user manual

AfiMilk AfiFree 155i installation manual

AfiMilk

AfiMilk AfiFree 155i installation manual

manuals.online logo
manuals.online logoBrands
  • About & Mission
  • Contact us
  • Privacy Policy
  • Terms and Conditions

Copyright 2025 Manuals.Online. All Rights Reserved.