manuals.online logo
Brands
  1. Home
  2. •
  3. Brands
  4. •
  5. VIBIA
  6. •
  7. Landscape Lighting
  8. •
  9. VIBIA Boxes 4600 User manual

VIBIA Boxes 4600 User manual

SUPPLIED MATERIAL
MATERIAL SUMINISTRADO
GELIEFERTES MATERIAL
TECHNICAL SPECIFICATIONS ESPECIFICACIONES TÉCNICAS TECHNISCHE DATEN
Boxes
Design by Xuclà
ASSEMBLY INSTRUCTIONS
INSTRUCCIONES DE MONTAJE
MONTAGEANLEITUNG
4.
2. 3.
4600
1
Big allen key / Lla e allen grande / Großer Inbusschlüssel 1 un.
2
Median allen key / Lla e allen mediana / Mittlerer Inbusschlüssel 1 un.
3
Small allen key / Lla e allen pequeña / Kleiner Inbusschlüssel 1 un.
4
Lamp structure / Estructura luminaria / Leuchten-Struktur 1 un.
4600.
Net Weight / Peso Neto / Netto-Gewicht 6,2 Kg
1 x HCI G8,5 230V 20W
50 Hz
Class I. Product with an additional protection cable (grounds).
Clase I. Aparato con un cable protector adicional (toma de tierra).
Klasse I. Apparat mit zusätzlichen Schutzleiter (Erdkabel).
Dust-tight product. Protected against water trickles.
Producto totalmente estanco al pol o. Protegido contra los chorros de
agua.
Staubdicht. Schutz gegen das Eindringen on Strahlwasser.
Product that CAN be in contact with normally-flammable materials
(wood or others).
Está permitido que producto con este distinti o esté en contacto con
materiales normalmente inflamables (maderas u otros).
Es ist erlaubt Produkte mit diesem Etikett auf normal entflammbaren
Oberflächen (Holz usw.) zu montieren.
Alternating current
Corriente alterna
Wechselstrom
Before assembling and installing this roduct, carefully
read the following:
Antes de roceder al montaje e instalación de esta
luminaria, leer detenidamente las siguientes
consideraciones.
Bevor Sie mit der Montage dieser Leuchte beginnen,
sollten Sie die folgenden Hinweise in aller Ruhe lesen und
berücksichtigen.
-Switch of the mains before installing the lamp. -Desconectar el suministro eléctrico antes de proceder a la
instalación de la luminaria.
- Schalten Sie or dem elektrischen Anschluss den Strom ab.
-Always use the recommended bulb -Utilizar siempre la bombilla recomendada. -Benutzen Sie immer das empfohlene Leuchtmittel.
-to fix the lamp to the ground, choose the most adequate plugs
and screws depending on the surface.
-Para fijar la luminaria al suelo elegir los elementos de fijación
mas adecuados en función del soporte de instalación.
-Für die Leuchte fix auf dem Boden, wählen Sie für die
orgesehene Vorrichtung das dafür geeigneste
Begestigungsmaterial.
-Before the installation, make sure the installation surface will
not be damaged. If this happens, it will be the installator´s
responsibility.
-Asegurarse antes de realizar esta operación que no se
producirán daños irreparables en el soporte de instalación. En
caso contrario la responsabilidad será del instalador.
-Vergewissern Sie sich or diesem Prozess, dass die
Vorrichtung hierduch nicht dauerhaft beschädigt wird. Im
entgegengesetzten Falle wäre der Installateur hierfür
erantwortlich.
-We recommend reading the manual before installaing the
lamp. Keep this instructions for future reference since thei
contain Information on bulb replacing and maintenance.
-Recomendamos leer el manual antes de iniciar la instalación
de la luminaria. Guardar estas instrucciones para futuras
consultas, contienen información acerca del mantenimiento y o
sustitución de las bombillas.
-Wir empfehlen or Montagebeginn die Anleitung zu lesen.
Bewahren Sie die Anleitung für etwaige zukünftige Fragen auf,
da sie Informationen über Instandhaltung und
Leuchtmitteltausch beinhaltet.
Caution / Precaución / Vorsicht
EN
D
ES
1.
ASSEMBLY INSTRUCTIONS
INSTRUCCIONES DE MONTAJE MONTAGEANLEITUNG
1.
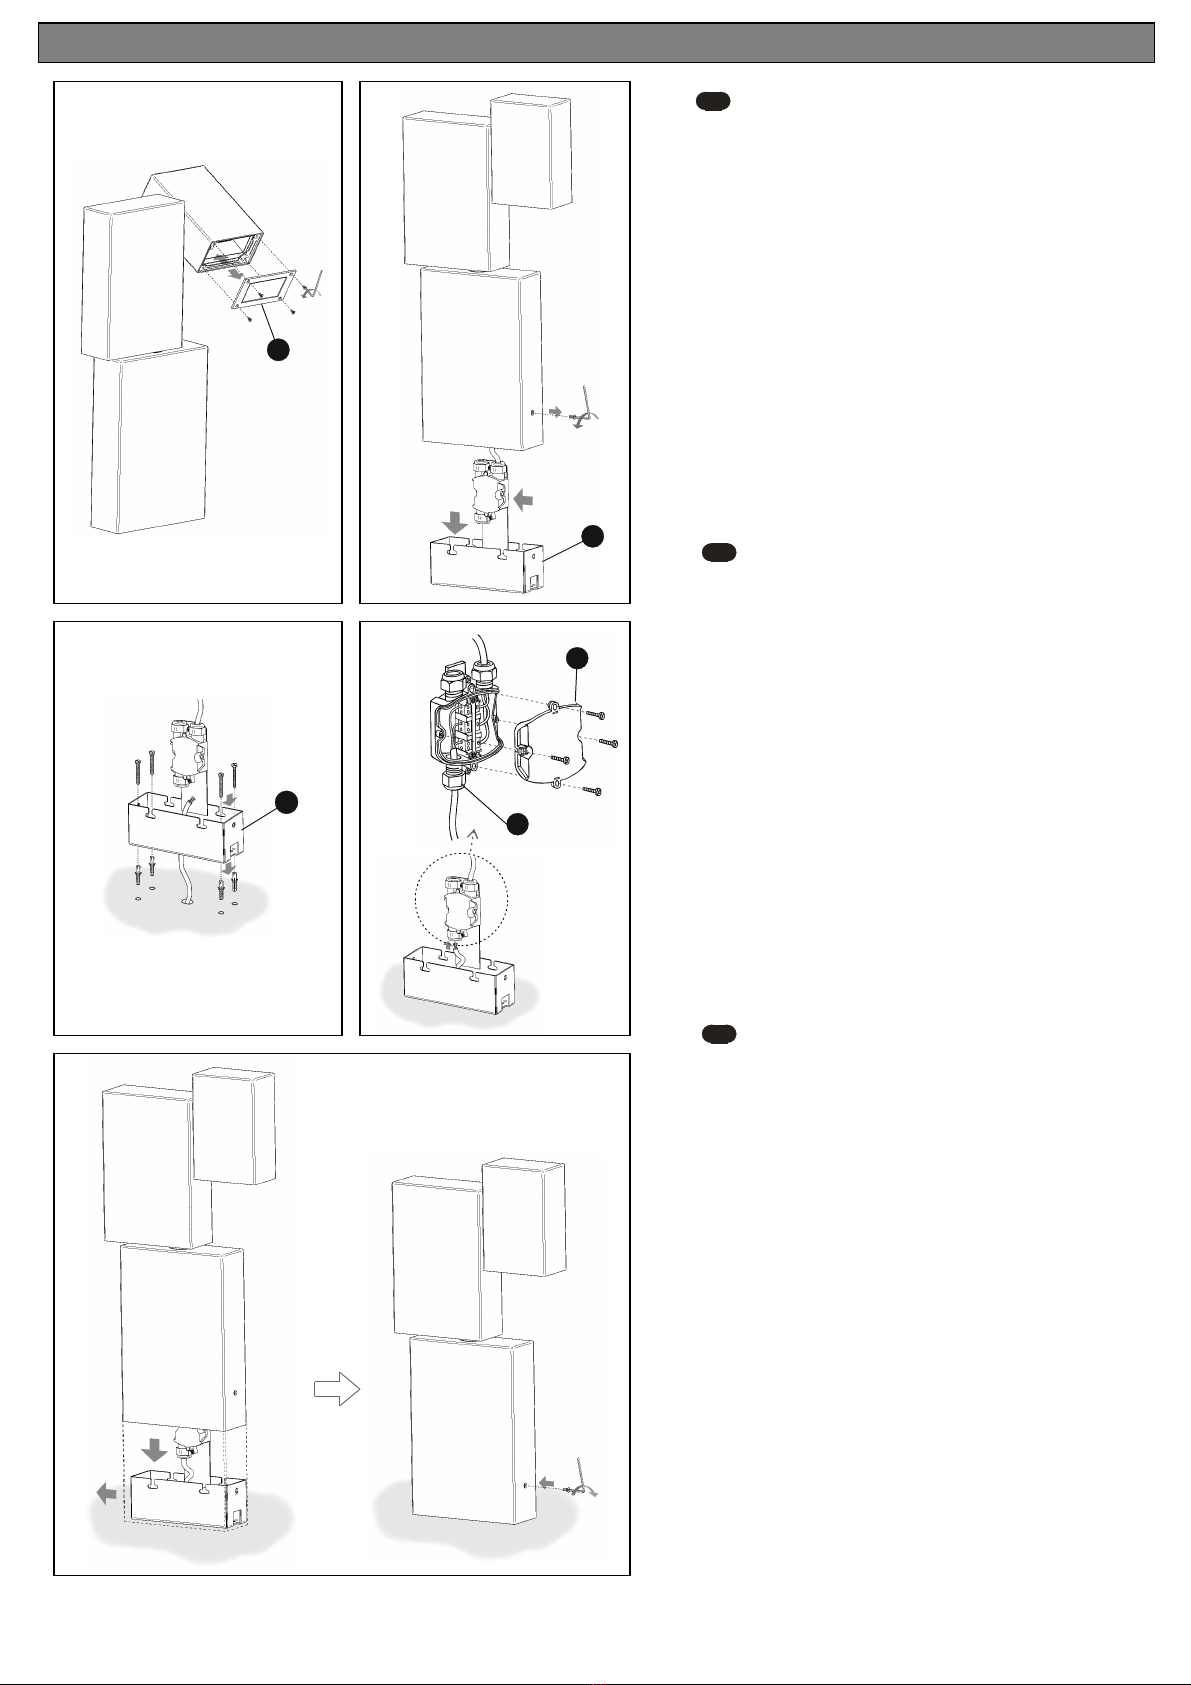
Para instalar la bombilla, primero desmontar la tapa (A) desenroscando
los 4 tornillos con lla e allen mediana suministrada, proceder y ol er a
montarla apretando uniformemente los tornillos hasta hacer tope.
2. Extraer el tornillo lateral con la lla e allen grande suministrada, para
poder extraer el conjunto (B), tal como indican las flechas.
3. Pasar el cable de su instalación por el agujero central y fijar el conjunto
(B) al suelo utilizando los tornillos y tacos más adecuados (no
suministrados).
4. Para realizar la conexión a la red eléctrica, primero desmontar la tapa
(C) quitando los 4 tornillos. Segundo, aflojar el prensacables (D) para
poder introducir el cable de su instalación y realizar la conexión en las
regletas. Por último ol er a montar la tapa (C) con los 4 tornillos, y apretar
fuertemente el prensacables.
NOTA: El modelo a preparado para ser conectado directamente a una
toma de corriente cumpliendo un IP 66. El cable utilizado debe ser de
goma o superior tipo H05 RN-F de entre 5 y 10 mm. de diámetro.
5. Vol er a montar el cuerpo tal como indican las flechas y roscar el tornillo
lateral con la lla e allen grande suministrada.
EN
ES
D
1.
Zum Einsetzen des Leuchtmittels zunächst die Abdeckung (A)
abmontieren, indem Sie die 4 Schrauben mit dem mitgelieferten mittleren
Inbusschl ssel abschrauben, dann das Leuchtmittel einsetzen und die
Abdeckung wieder anbringen, indem Sie die Schrauben gleichmäßig bis
zum Anschlag festdrehen.
2. Lösen Sie nun mithilfe des mitgelieferten großen Inbusschl ssels die
seitliche Schraube und nehmen Sie den Pfeilen folgend das Innenteil (B)
heraus.
3. F hren Sie das Stromkabel durch die mittlere Öffnung und befestigen
Sie das Innenteil (B) am Boden. Verwenden Sie hierf r die am besten
geeigneten Schrauben und D bel (nicht im Lieferumfang enthalten).
4. F r den Stromanschluss zunächst die Abdeckung (C) abmontieren,
entfernen Sie hierzu die 4 Schrauben. Lösen Sie nun die Kabelklemmen
(D), um dann das Kabel einzuf hren und die Verbindung an den Leisten
herzustellen. Zuletzt die Abdeckung (C) mit den 4 Schrauben wieder
anbringen und die Kabelklemmen festdrehen.
HINWEIS: Das Modell ist f r den direkten Anschluss an eine Steckdose
mit Schutzgrad IP 66 konzipiert. Das verwendete Stromkabel muss
mindestens eine Gummiummantelung des Typs H05 RN-F mit einem
Durchmesser zwischen 5 und 10 mm aufweisen.
5. Bringen Sie den Pfeilen folgend den Leuchtenkörper wieder an und
ziehen Sie die seitliche Schraube mit dem mitgelieferten großen
Inbusschl ssel fest.
1.
To install the bulb, first remo e the co er (A) by undoing the 4 screws
using the medium-sized allen key supplied, fit the bulb and then replace
the co er, tightening the screws e enly until they are in as far as they will
go.
2. Remo e the side screw using the large allen key supplied, so as to be
able to remo e assembly (B), as shown by the arrows.
3. Run the power cable through the hole in the centre and fix assembly
(B) to the floor using suitable screws and plugs (not supplied).
4. To make the connection to the power supply, first remo e the co er (C)
by taking out the 4 screws. Second, loosen the cable gland (D) so as to
be able to insert your mains power cable and make the connection in the
terminal block. Finally, replace the co er (C) with the 4 screws, and
tighten the cable gland firmly.
NOTE: The model is supplied ready for direct connection to an IP 66-
compliant power point. The cable used must be H05 RN-F rubber or
better, between 5 and 10mm in diameter.
5. Replace the body as shown by the arrows and tighten up the side
screw with the allen key supplied.
A
1
3
IMPORTANT NOTICE:
Switch of the mains before installing the lam .
IMPORTANT
E:
Desconectar el suministro eléctrico antes de realizar la instalación
de la luminaria.
WICHTIG:
Schalten Sie den Strom ab. bevor Sie die Leuchtenmontage
realisieren.
B
1
st
2
nd
3
rd
2
B
C
D
4
3
rd
1
st
2
nd
5
GRUPO T DIFFUSION S.A. Barcelona, 72-74. 08820 El Prat de Llobregat (Barcelona - Spain)
Nacional Tel 934 796 970. Fax 934 796 973. Internacional Tel +34 934 796 971. Fax +34 934 782 026
www. ibia.es grupo-t@grupo-t.com
-Use a slightly-wet cotton cloth for cleaning.
-Para limpiar la luminaria, usar un paño de algodón
ligeramente humedecido en agua.
-Zur Reinigung der Leuchte nutzen Sie einen leicht
angefeuchteten Baumwoll-Lappen.
-In case of malfunction or damage, please contact
the retailer who sold the lamp.
-En caso de a ería o incidente con la luminaria,
contactar directamente con el establecimiento en
que se adquirio.
-Im Falle des Ausfalls oder einer Fehlfunktion der
Leuchte setzen Sie sich direkt mit dem Unternehmen in
Verbindung bei dem Sie die Leuchte bezogen haben.
Maintenance / Mantenimiento / Instandhaltung
EN DES
180º
180º
E
180º 180º
F
ASSEMBLY INSTRUCT
IONS INSTRUCCIONES DE MONTAJE MONTAGEANLEITUNG
6
EN
ES
D
6.
The head (E) can rotate through 180º in either direction, and
the middle section (F) can also turn 180º, also in either direction.
7. If you whish to fix the head (E) in place, tighten the stud on the
top of the joint as shown in the diagram using the small allen key
supplied.
6
.
La cabeza (E) puede efectuar un mo imiento de rotación de
180º en cualquiera de las dos direcciones y el cuerpo intermedio
(F) tiene la posibilidad de giro de 180º también en ambas
direcciones.
7. Si se desea bloquear la cabeza (E), apretar según se e en el
dibujo con la lla e allen pequeña suministrada la espiga superior
de la rotula.
6.
Der Leuchtenkopf (E)
kann in jede beliebige
der beiden
Richtungen bis zu 180º gekippt werden, das Mittelst ck (F) ist
ebenfalls um 180º in beide Richtungen drehbar.
7. Zum Feststellen des Leuchtenkopfes (E) die obere
Stiftschraube – wie auf der Abbildung zu sehen – mit dem kleinen
mitgelieferten Inbusschl ssel festziehen.
7

Other VIBIA Landscape Lighting manuals

VIBIA Bamboo 4803 User manual

VIBIA

VIBIA Bamboo 4803 User manual

VIBIA Brisa User manual

VIBIA

VIBIA Brisa User manual

VIBIA Brisa 4630 User manual

VIBIA

VIBIA Brisa 4630 User manual

Popular Landscape Lighting manuals by other brands

LIGMAN VIE-80001 installation manual

LIGMAN

LIGMAN VIE-80001 installation manual

LIGMAN NYB-30132 installation manual

LIGMAN

LIGMAN NYB-30132 installation manual

B-K lighting UL Series installation instructions

B-K lighting

B-K lighting UL Series installation instructions

Holm rPollux-13 Installation notes

Holm

Holm rPollux-13 Installation notes

Volt LED Top Dog Tommy Light installation instructions

Volt

Volt LED Top Dog Tommy Light installation instructions

LIGMAN NYB-30266 installation manual

LIGMAN

LIGMAN NYB-30266 installation manual

LIGMAN LUNAR 3 installation manual

LIGMAN

LIGMAN LUNAR 3 installation manual

Heitronic Berlin 2 Installation and operating instructions

Heitronic

Heitronic Berlin 2 Installation and operating instructions

Up-shine Lighting UP-ML06-6W Technical application guide

Up-shine Lighting

Up-shine Lighting UP-ML06-6W Technical application guide

Paradise Datacom GL28220 quick start guide

Paradise Datacom

Paradise Datacom GL28220 quick start guide

Unique Lightscaping Jupiter 3' lead 12v Assembly/installation instructions

Unique Lightscaping

Unique Lightscaping Jupiter 3' lead 12v Assembly/installation instructions

Meyer Fluxa A 8 271 3.1 Mounting instructions

Meyer

Meyer Fluxa A 8 271 3.1 Mounting instructions

Wetelux 92 15 16 Original instructions

Wetelux

Wetelux 92 15 16 Original instructions

unios Spectrum SPIKE LIGHT manual

unios

unios Spectrum SPIKE LIGHT manual

LIGMAN TU-10156-1 installation manual

LIGMAN

LIGMAN TU-10156-1 installation manual

Kasco marine WaterGlow LL1020 owner's manual

Kasco marine

Kasco marine WaterGlow LL1020 owner's manual

Effekta TWINLED manual

Effekta

Effekta TWINLED manual

LIGMAN KIOS 3 installation manual

LIGMAN

LIGMAN KIOS 3 installation manual

manuals.online logo
manuals.online logoBrands
  • About & Mission
  • Contact us
  • Privacy Policy
  • Terms and Conditions

Copyright 2025 Manuals.Online. All Rights Reserved.