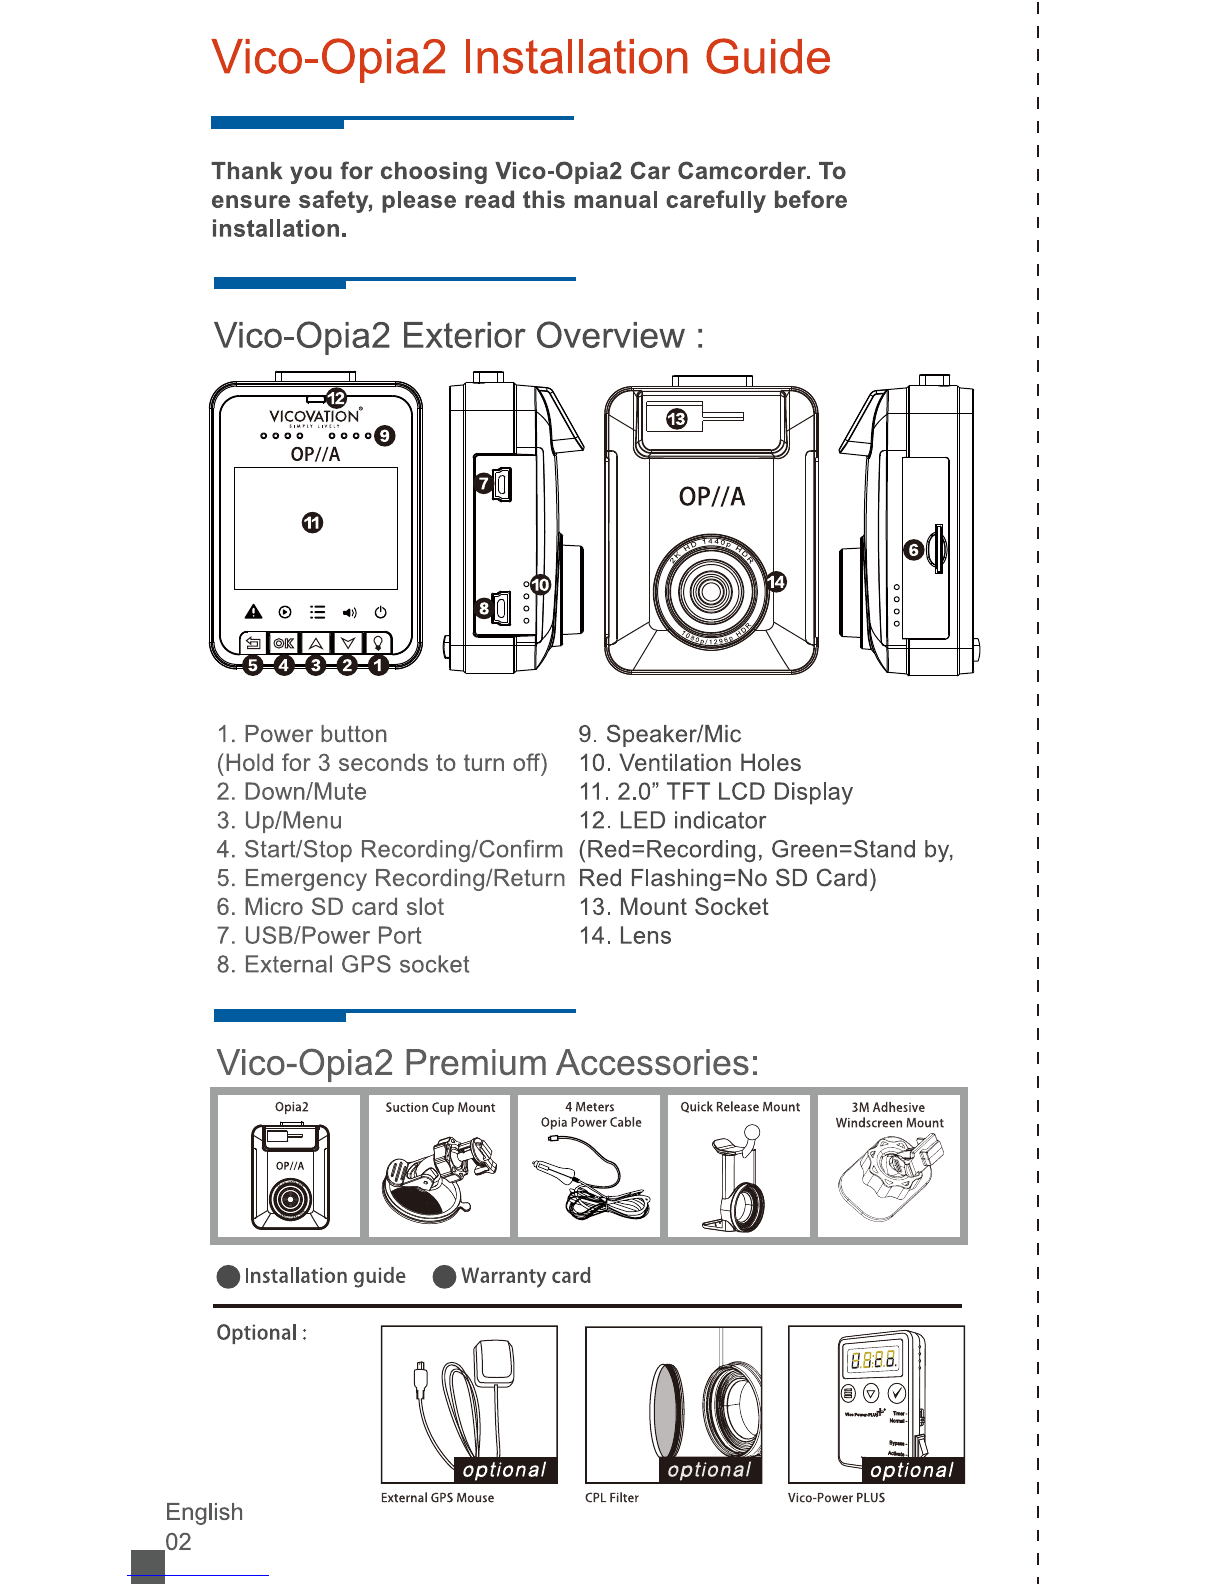
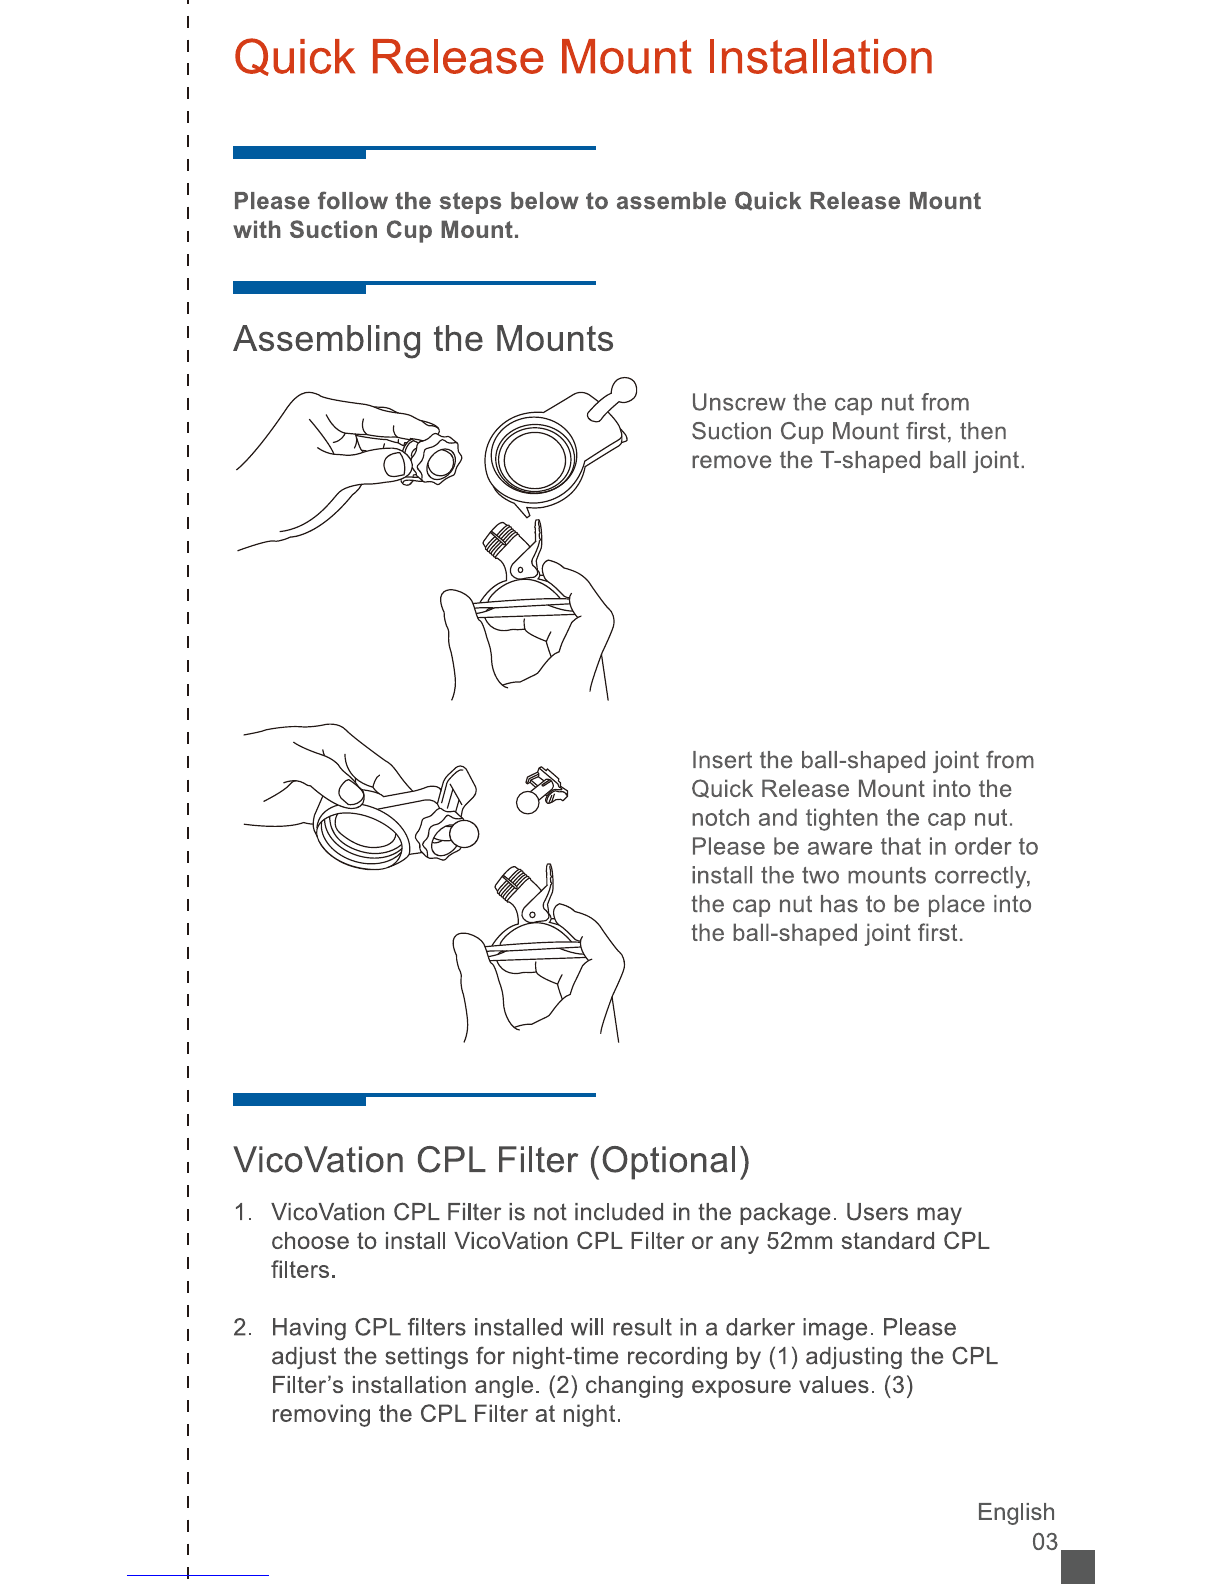
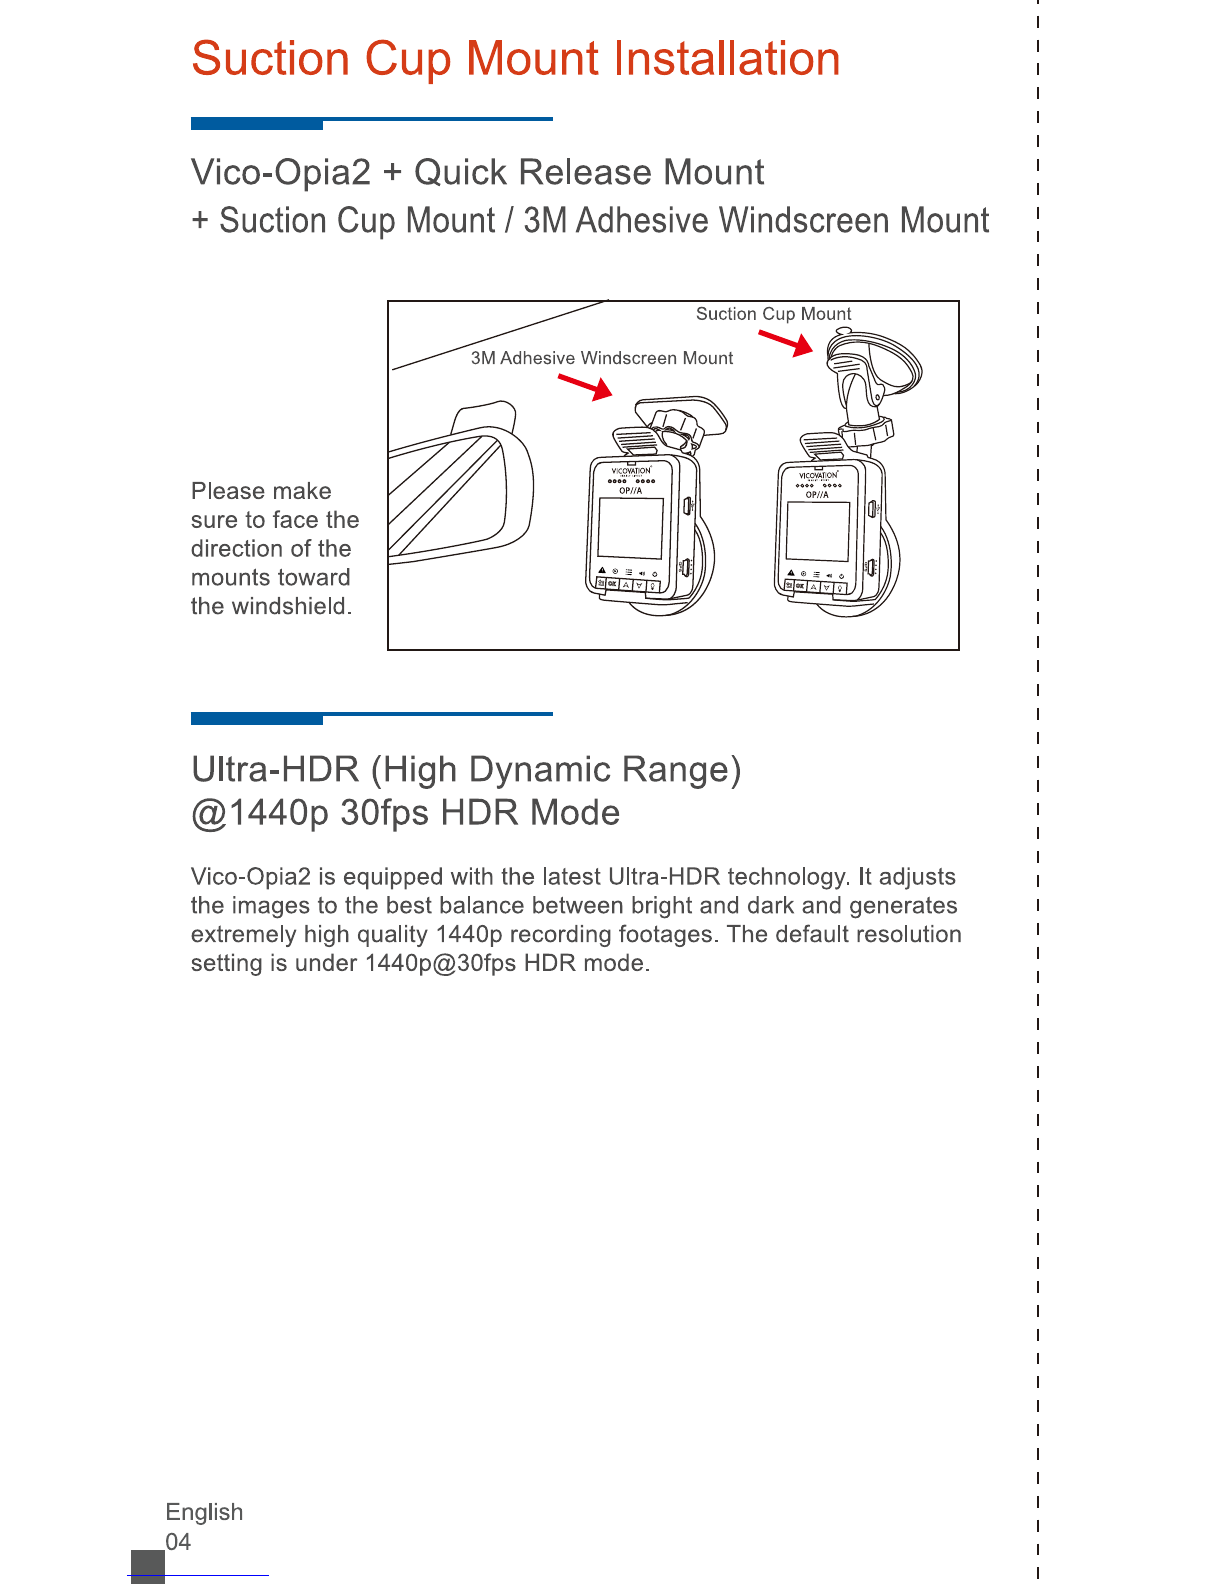
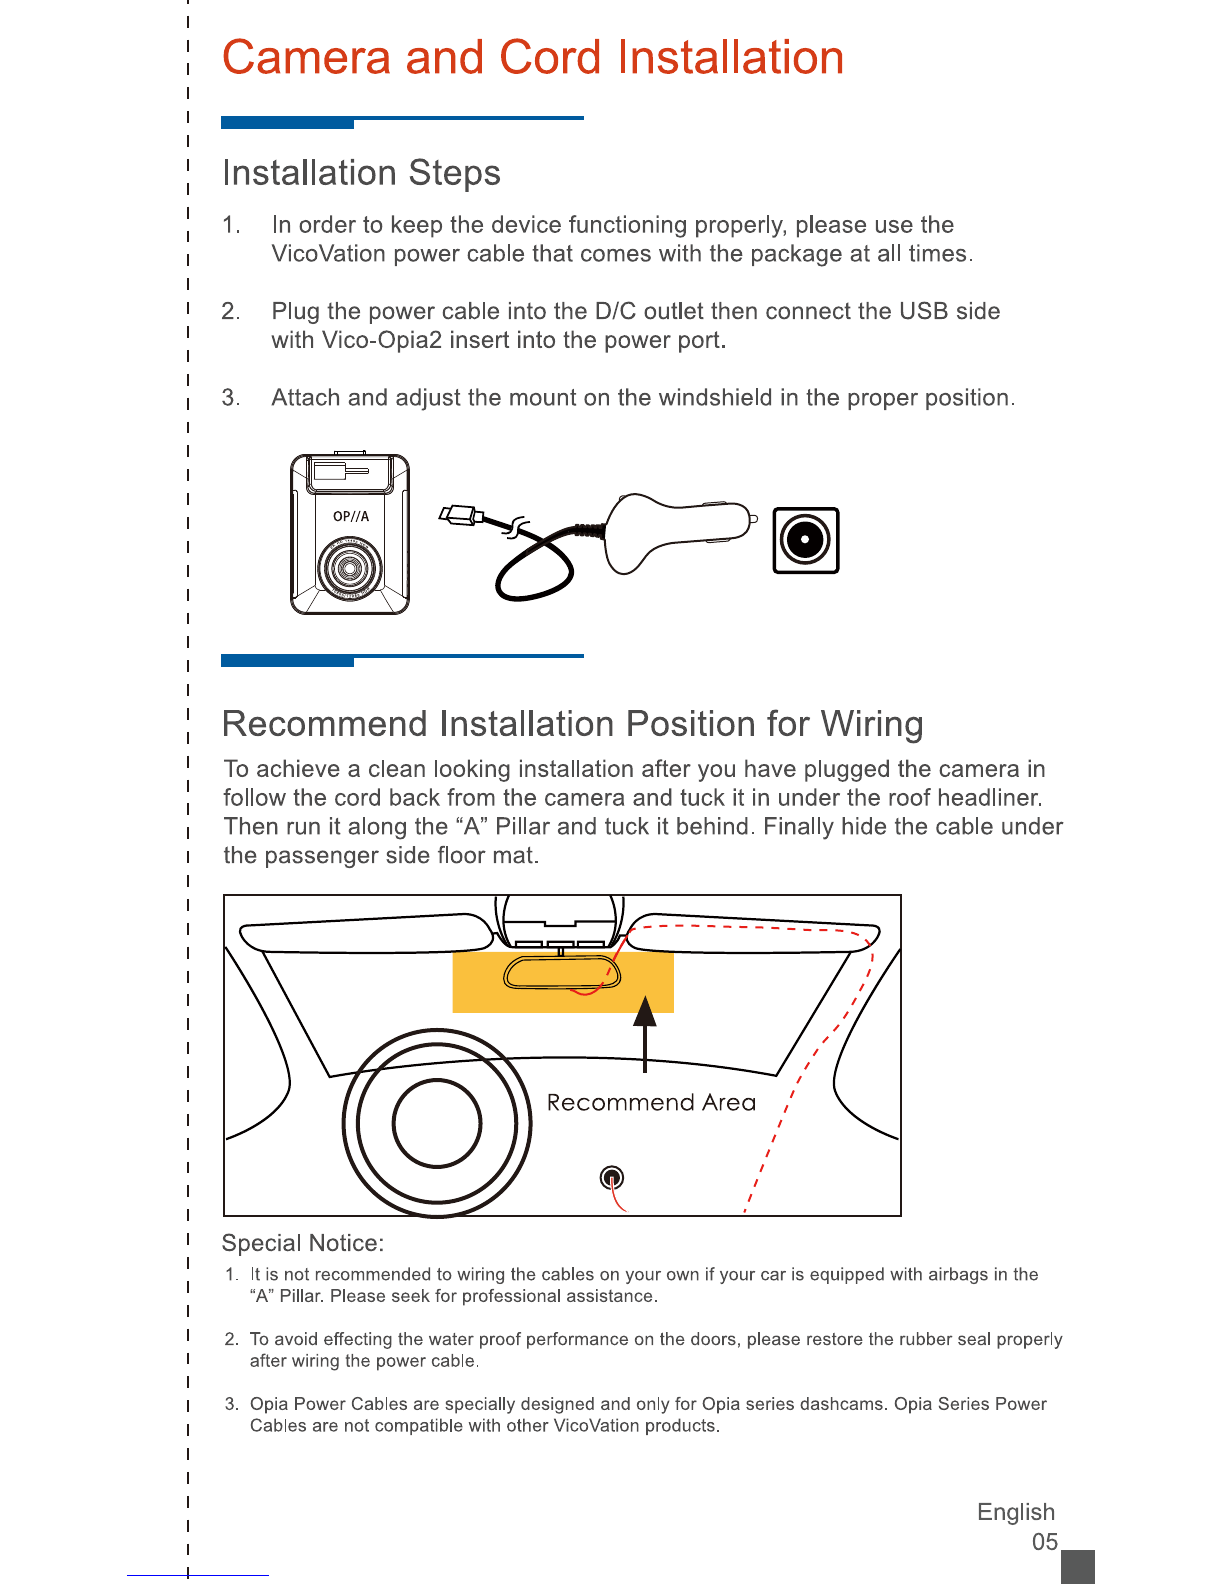
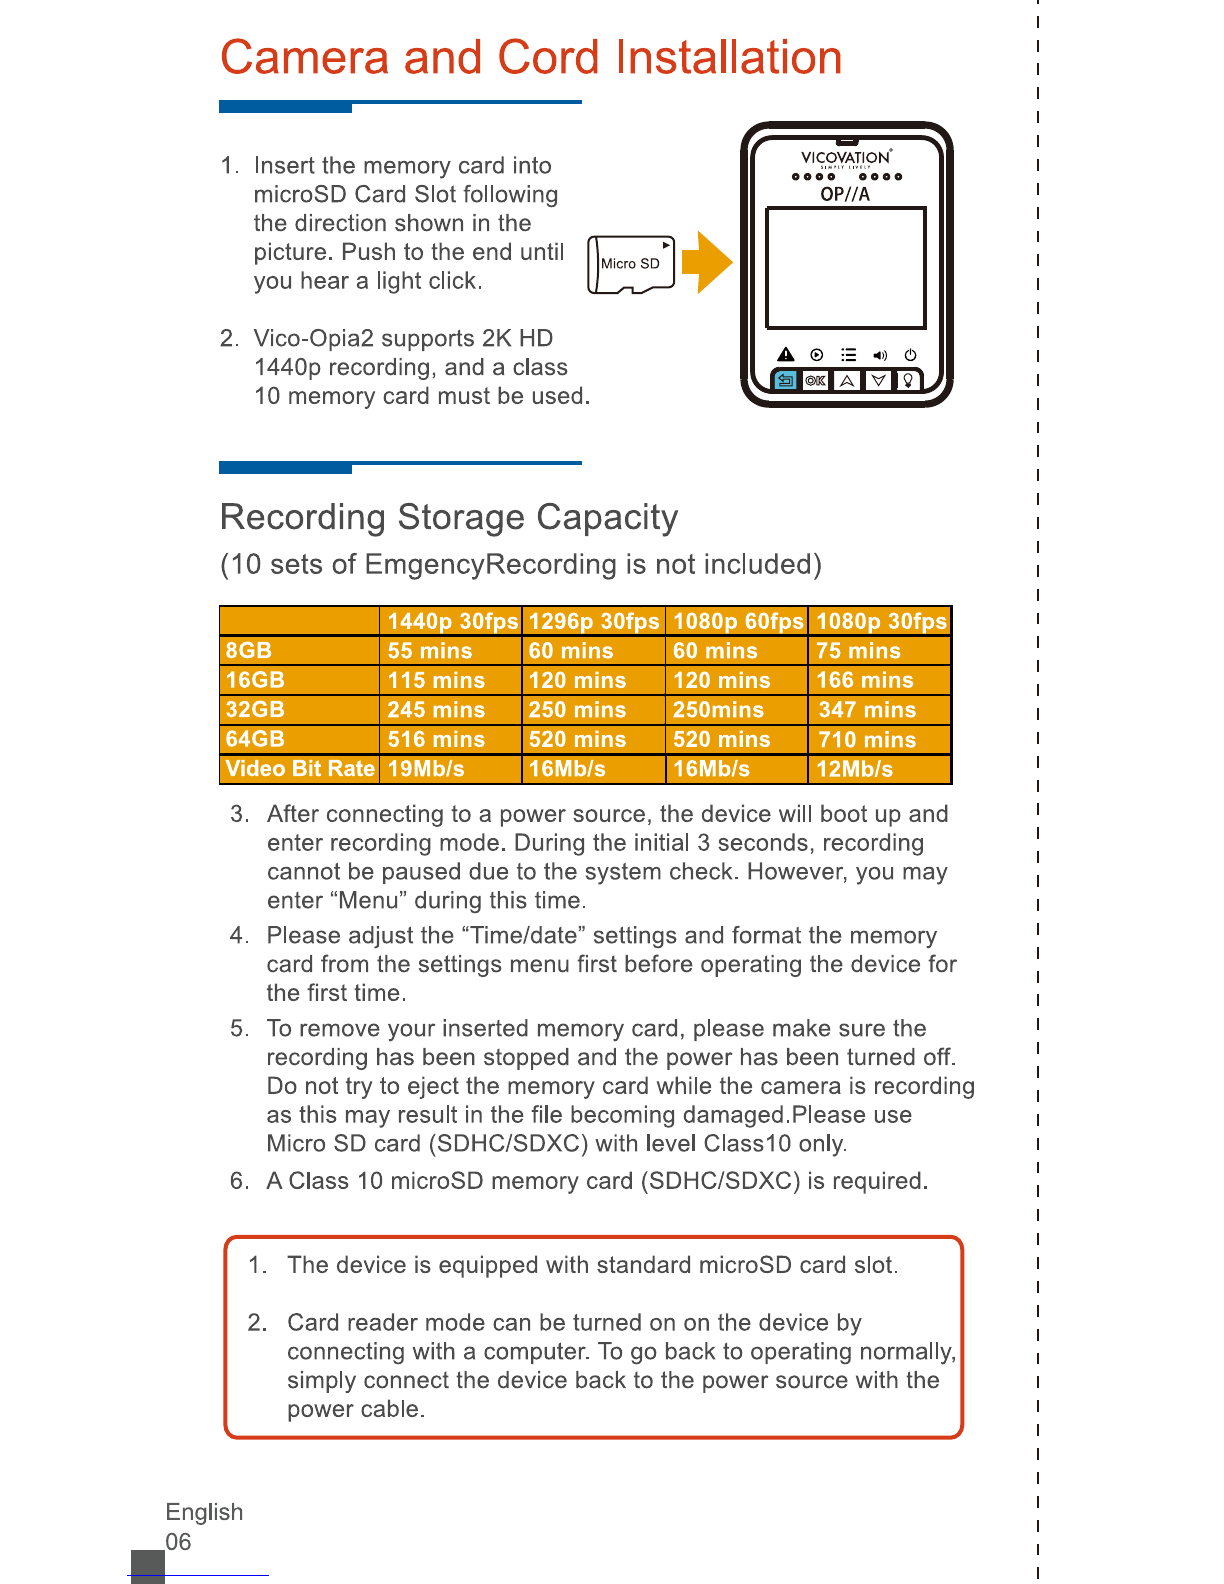
Vicovation Vico-Opia 2 Premium User manual

VICgVATION
_
OP//A
-
PREM/UM
PACK
Vico-Opia
2
Premium
Pack
Installation
Guide
71-IT
M
pill
l
2KULTRA-HDHDR
ÿ
AMBARELLA
A12
ÿ
HIGHSPEED
FULL
HD
ÿ
rai
high
dynamic
range
I
2560X1
440p
INSIDE
ÿÿÿ1920
X
1080/60FPS
1440p/1296p

Index
English
02
28
01

Vico-Opia2
Installation
Guide
Thank
you
for
choosing
Vico-Opia2
Car
Camcorder.
To
ensure
safety,
please
read
this
manual
carefully
before
installation.
9.
Speaker/Mic
10.
Ventilation
Holes
11.
2.0"
TFT
LCD
Display
12.
LED
indicator
(Red=Recording,
Green=Stand
by,
Red
Flashing=No
SD
Card)
13.
Mount
Socket
14.
Lens
0
Installation
guide
0
Warranty
card
Optional
optional
English
02
OP//
A
OP//A
©
Vico-Opia2
Exterior
Overview
:

Quick
Release
Mount
Installation
Assembling
the
Mounts
VicoVation
CPL
Filter
(Optional)
1
.
VicoVation
CPL
Filter
is
not
included
in
the
package.
Users
may
choose
to
install
VicoVation
CPL
Filter
or
any
52mm
standard
CPL
filters.
2.
Having
CPL
filters
installed
will
result
in
a
darker
image.
Please
adjust
the
settings
for
night-time
recording
by
(1)
adjusting
the
CPL
Filter's
installation
angle.
(2)
changing
exposure
values.
(3)
removing
the
CPL
Filter
at
night.
English
03,

Suction
Cup
Mount
Installation
Vico-Opia2
+
Quick
Release
Mount
+
Suction
Cup
Mount
1
3M
Adhesive
Windscreen
Mount
Cup
Mount
Please
make
sure
to
face
the
direction
of
the
mounts
toward
the
windshield.
Ultra-HDR
(High
Dynamic
Range)
@1440p
30fps
HDR
Mode
Vico-Opia2
is
equipped
with
the
latest
Ultra-HDR
technology.
It
adjusts
the
images
to
the
best
balance
between
bright
and
dark
and
generates
extremely
high
quality
1440p
recording
footages.
The
default
resolution
setting
is
under
1440p@30fps
HDR
mode.
English
04

Camera
and
Cord
Installation
Installation
Steps
1
.
In
order
to
keep
the
device
functioning
properly,
please
use
the
VicoVation
power
cable
that
comes
with
the
package
at
all
times.
2.
Plug
the
power
cable
into
the
D/C
outlet
then
connect
the
USB
side
with
Vico-Opia2
insert
into
the
power
port.
3.
Attach
and
adjust
the
mount
on
the
windshield
in
the
proper
position.
Recommend
Installation Position
for
Wiring
To
achieve
a
clean
looking
installation
after
you
have
plugged
the
camera
in
follow
the
cord
back
from
the
camera
and
tuck
it
in
under
the
roof
headliner.
Then
run
it
along
the
"A"
Pillar
and
tuck
it
behind.
Finally
hide
the
cable
under
the
passenger
side
floor
mat.
Recommend
Area
Special
Notice:
1
.
It
is
not
recommended
to
wiring
the
cables
on
your
own
if
your
car
is
equipped
with
airbags
in
the
"A"
Pillar.
Please
seek
for
professional
assistance.
2.
To
avoid
effecting
the
water
proof
performance
on
the
doors,
please
restore
the
rubber
seal
properly
after
wiring
the
power
cable.
3.
Opia
Power
Cables
are
specially
designed
and
only
for
Opia
series
dashcams.
Opia
Series
Power
Cables
are
not
compatible
with
other
VicoVation
products.
English
05_

Camera
and
Cord
Installation
Insert
the
memory
card
into
microSD
Card
Slot
following
the
direction
shown
in
the
picture.
Push
to
the
end
until
you
hear
a
light
click.
Vico-Opia2
supports
2K
HD
1440p
recording,
and
a
class
10
memory
card
must
be
used.
OP//A
Recording
Storage
Capacity
(10
sets
of
EmgencyRecording
is
not
included)
8GB
1440p
30fps
55
mins
1
296p
30fps
60
mins
1080p
60fps
60
mins
1080p
30fps
75
mins
16GB
115
mins
120
mins
120
mins
166
mins
32GB
245
mins
250
mins
250mins
347
mins
64GB
Video
Bit
Rate
516
mins
19Mb/s
520
mins
16Mb/s
520
mins
16Mb/s
710
mins
12Mb/s
3.
After
connecting
to
a
power
source,
the
device
will
boot
up
and
enter
recording
mode.
During
the
initial
3
seconds,
recording
cannot
be
paused
due
to
the
system
check.
However,
you
may
enter
"Menu"
during
this
time.
4.
Please
adjust
the
"Time/date"
settings
and
format
the
memory
card
from
the
settings
menu
first
before
operating
the
device
for
the
first
time.
5.
To
remove
your
inserted
memory
card,
please
make
sure
the
recording
has
been
stopped
and
the
power
has
been
turned
off.
Do
not
try
to
eject
the
memory
card
while
the
camera
is
recording
as
this
may
result
in
the
file
becoming
damaged.
Please
use
Micro
SD
card
(SDHC/SDXC)
with
level
ClasslO
only.
6.
A
Class
10
microSD
memory
card
(SDHC/SDXC)
is
required.
1
.
The
device
is
equipped
with
standard
microSD
card
slot.
2.
Card
reader
mode
can
be
turned
on
on
the
device
by
connecting
with
a
computer.
To
go
back
to
operating
normally,
simply
connect
the
device
back
to
the
power
source
with
the
power
cable.
English
.06

What's
the
Life
Expectancy
of
a
Memory
Card?
One
of
the
most
important
reasons
to
have
a
Dashcam
installed
in
a
car
is
to
keep
it
recording
in
case
something
unexpected
happens.
Therefore,
you
should
pay
attention
to
your
memory
card
as
much
as
you
care
about
the
quality
of
your
Dashcam.
There
are
more
than
20
memory
card
brands
out
there.
We
recommend
you
to
buy
from
more
well-known
and
reliable
ones.
If
possible,
you
need
to
format
your
memory
cards
on
a
regular
basis.
Most
of
SDHC/SDXC
cards
on
the
market
are
TLC
(Triple-Level
Cell)
type.
They
are
hugely
applied
on
smartphones,
digital
cameras,
and
tablets.
Their
rewrite
cycles
(TLC)
are
limited,
and
it's
lower
than
MLC
(Multi-Level
Cell)
and
also
cheaper.
Most
people
care
about
the
specifications,
image
quality,
and
price
when
it
comes
to
choosing
a
Dashcam.
Usually,
when
you
purchase
a
Dashcam,
the
package
already
includes
a
memory
card.
Therefore,
the
importance
of
selecting
a
good
memory
card
is
commonly
ignored.
If
you
were
to
purchase
your
own
memory
card,
make
sure
you
read
the
required
class
(usually
Class
10)
and
maximum
supported
size
(usually
32G
or
64G)
of
your
Dashcam
first.
Also,
keep
in
mind
that
memory
cards
have
limited
rewrite
cycles
so
they
are
considered
as
consumables.
TLC
memory
cards
have
limited
rewrite
cycle
for
about
500
to
1000
times.
In
other
words,
after
going
through
the
cycle
for
more
than
500
times,
chance
of
the
memory
card
to
be
broken
will
be
hugely
increased.
More,
memory
card
can
be
broken
in
any
time
after
going
through
the
cycle
more
than
1000
times.
Unlike
TLC
memory
on
smartphones,
memory
cards
on
Dashcams
are
constantly
being
written
(recording).
The
higher
the
read/write
frequency,
the
shorter
of
memory
card
life-time.
There
are
more
and
more
MLC
memory
cards
for
users
to
choose
nowadays.
Users
may
consider
going
for
higher
price
MLC
memory
cards
to
have
a
better
performing
experience
on
Dashcams.
English
O7,

Please
be
aware:
memory
cards
have
limited
rewrite
cycles
so
they
are
considered
as
consumables!
Brand
new
memory
cards
surely
wouldn't
make
a
difference
at
first,
but
you
will
be
able
to
see
the
bad
ones
from
the
good
ones
though
out
time.
Using
poor
quality
memory
cards
could
lead
to
crushing,
stuck
in
the
standby
mode,
or
continuously
restarting.
Periodically
check
your
memory
cards:
ÿ
1.
Manually
perform
a
format
once
a
month.
Always
format
your
memory
card
from
the
Dashcam
before
you
use
it
for
the
first
time!
After
using
the
memory
card
for
a
while,
the
flash
storage
gets
fragmented
because
of
the
constantly
writing
and
rewriting.
Manually
format
once
a
month
will
help
to
improve
the
data
writing
performance.
ÿ
2.
Avoid
direct
exposure
to
the
sunlight.
Normally,
the
operating
temperature
of
memory
card
is
under
60°C
(MOT).
It
is
recommended
to
keep
your
device
in
the
glove
box
during
summer.
Exposing
Dashcam
in
the
direct
sunlight
may
lead
to
damage
of
memory
card
and
Dashcam
both.
Any
electronic
device
shall
avoid
direct
sun
exposure
and
high
temperature.
ÿ
3.
Check
if
your
recorded
files
are
broken
or
in
fragments
with
a
computer.
Checking
video
data
in
memory
through
computers
to
see
if
all
footages
records
normally.
Switch
to
a
new
memory
card
if
you
find
anything
abnormal,
like
damage
files,
or
unable
to
read
from
memory
cards.
ÿ
4.
Format/Deep-Scan
with
a
computer
with
ScanTool.
This
might
take
some
time
but
performing
this
deep
scan
can
determine
whether
your
memory
card
is
healthy
or
not.
Please
make
sure
to
format
the
memory
card
again
after
inserting
back
into
the
Dashcam.
English
.08

Recommendations
and
notifications:
ÿ
1.
Replacing
with
a
new
card
after
using
the
same
one
for
two
years.
Memory
cards
nowadays
are
almost
half
of
the
price
(maybe
even
lower)
comparing
to
years
ago.
The
life
expectancy
of
memory
cards
would
decrease
because
of
the
increasing
number
on
the
rewrite
cycles.
If
you
are
not
sure
whether
your
memory
card
is
TLC
(Triple-Layer
Cell)
or
MLC
(Multi-Level
Cell),
please
simply
replace
a
new
one
after
two
years.
*
2.
DO
NOT
eject
your
memory
card
without
a
safe
shut
down
on
your
Dashcam
first.
If
you
eject
your
card
while
the
footages
are
still
being
saved
onto
memory
card,
file
damaging
and
date
lost
could
be
occurred.
In
the
event
of
car
accidents,
make
sure
DashCam
has
been
power-off
safely
before
you
eject
the
memory
card
from
DashCam.
ÿ
3.
Always
have
a
backup
memory
card
in
your
car,
in
case
the
other
one
fails.
It's
always
nice
to
have
a
backup,
in
case
of
accidents.
ÿ
4.
If
you
find
anything
unusual
about
your
memory
card
or
in
doubt,
replace
with
a
new
one
immediately.
Memory
cards
are
fairly
cheap
nowadays.
Don't
wait
on
replacing
a
new
memory
card
if
you
are
not
sure
if
your
memory
card
is
working
right
or
not.
Better
safe
than
sorry.
ÿ
5.
DO
NOT
share
the
memory
card
you
use
on
Dashcam
with
your
smartphone
or
other
devices.
The
format
type
of
the
memory
card
could
be
changed
when
you
apply
it
onto
your
cell
phone
due
to
the
operating
system
requirements.
This
could
lead
to
malfunctioning
on
your
DashCam.
Our
Top
Choices
The
following
SD
card
brands
have
been
tested
and
are
compatible
with
our
cameras:
ADATA,
Kingston,
Transcend,
SanDisk
(16G-64G
max
and
must
be
rated
class
10
or
higher).
English
09,

Main
Display
Icons
Recording
Mode
Interface
1
.
Icons
on
the
upper
bar
(from
left
to
right):
1.
Red
Dot
Recording
Indicator
2.
Current
Time
3.
Recording
Resolution
4.
G-Sensor
Function
Indicator
5.
GPS
Tracking
Function
Indicator
6.
Emergency
Recording
Saved
Files
2.
Icons
on
the
lower
bar
(from
left
to
right):
1.
Emergency
Recording
Function
in
Progress
2.
Normal
Recording
Function
Activating
3.
Menu
Key
4.
Voice
Recording
On
/
Off
Hotkey
5.
Power
On
/
Off
Hotkey
Menu
Interface
Menu
Interface
1
.
Video
Settings
2.
Function
Settings
3.
Display
Settings
4.
Audio
Settings
5.
Playback
Settings
6.
System
Settings
VG&
2/"~"\
@
©
@
video
Function
Display
Audio
Playback
System
English
.10

Main
Settings
Video
Settings
Change
video
recording
resolutions
and
exposure
values.
ÿ
I*
Vklpp
Punctiarÿ
DI*pJiy
Resoiulkrii
1440p30fps
Expose
Value
°l
Audio
PMybKft
Syitom
Function
Settings
Change
G-Sensor
sensitivity
(default:
Off)
and
External
GPS
Mouse
related
settings.
s
@
a
VKJoo
[ÿjjiccipn
Display
®)
s
®
1.
GPS
related
settings
can
only
be
activated
when
External
GPS
Mouse
is
installed
correctly.
Please
wait
until
the
GPS
signal
is
fully
acquired
for
these
settings
to
become
available.
2.
GPS
signal
is
acquired
automatically
every
time
the
device
is
powered
up
with
an
external
GPS
Mouse
connected.
3.
After
successfully
acquiring
the
GPS
signal,
a
green
arrow
will
be
displayed
in
the
upper
right
corner
to
confirm
GPS
functions
are
activated.activated.
English
11.

External
GPS
Mouse
(Optional)
Settings
LDWS
(Lane
Departure
Warning
System)
After
the
current
vehicle
speed
reaches
the
set
value
leaving
the
current
lane
will
cause
the
device
to
beep
to
notify
the
driver
and
an
alert
icon
will
show
up
on
the
screen.
LDWS
FCWS
(Forward
Collision
Warning
System)
When
the
current
speed
reaches
the
set
value
while
the
distance
with
the
car
in
the
front
is
less
than
the
safety
distance
(5-7
meters),
the
device
will
notify
the
drivers
with
a
beep
sound
and
an
alert
icon
will
show
up
on
the
screen.
FCWS
LDWS
/
FCWS
Calibration
The
device
has
to
be
calibrated
to
improve
the
accuracy
on
LDWS
and
FCWS.
After
turning
LDWS
and
FCWS
on
and
returning
to
the
normal
recording
mode,
a
red
baseline
will
show
up
on
screen.
Please
align
the
red
baseline
with
your
horizon.
The
baseline
will
disappear
in
30
seconds.
-
3ÿ1
-
3?
Please
installed
the
device
in
the
middle
of
the
windshield
to
ensure
the
best
performance.
English
J
2

Smart
Parking
Surveillance
(Required
Vico-Power
PLUS)
Smart
Parking
Surveillance
(SPS)
function
can
be
unlocked
by
having
Vico-Power
PLUS
(VPP)
installed.
SPS
will
monitor
your
car
while
it
is
stationary
from
impacts
or
sabotage.
Video
recording
will
be
activated
by
Motion
Detection.
Camera
will
switch
to
Standby
Mode
automatically
if
no
motion
is
detected
to
conserve
memory
space.
During
Standby
Mode,
no
recordings
will
be
made.
SPS
will
be
automatically
activated
when
turned
on
and
G-Sensor
inside
detects
no
movement
made
by
vehicle
for
5
minutes.
Special
Notice:
Full
time
SPS
requires
a
constant
power
source.
Normal
ACC
is
not
meant
to
provide
full
time
power
supply
to
camera
when
engine
turned
off.
To
enable
SPS,
it
requires
constant
power
from
the
car
battery
while
engine
off
(ACC
off).
Some
cars
provide
constant
power
through
the
accessory
socket,
and
others
do
not.
If
your
car
does
not,
or
you
would
like
it
wired
in
directly,
it
is
recommended
to
find
a
professional
auto
electronics
shop
to
make
sure
it
is
wired
in
properly.
Avoid
Using
External
Power
Banks
for
Smart
Parking
Surveillance:
During
summer
time,
the
temperature
inside
a
car
can
reach
a
very
high
level
and
using
a
power
bank
under
such
high
temperature
could
result
in
explosions
due
to
the
lithium
batteries
inside.
Smart
Parking
Surveillance
Settings:
After
turning
on
Smart
Parking
Surveillance
(default
is
Off):
1-)
Smart
Motion
Detection
Sensitivity:
High
/
Medium
/
Low
Sensitivity
levels
of
Motion
Detection
under
SPS:
Red
LED
light
indicates
Recording
Mode
is
triggered
by
Motion
Detection
(Active
Mode,
recording).
Green
LED
light
indicates
no
motion
is
detected
(Standby
Mode,
not
recording).
2-)
Smart
Time-Lapse
Video:
Every
1
Second
/
10
Seconds
/
60
Seconds:
After
entering
Smart
Parking
Surveillance,
the
device
will
automatically
take
a
picture
at
the
selected
interval
of
time(1s/10s/60s)
and
create
a
time-lapse
video
to
document
the
things
happening
in
front
of
the
vehicle.
3-)
LCD
Covert
Mode:
On
/
Off
The
screen
may
be
turned
on
or
off
when
Recording
is
triggered
by
Motion
Detection
during
SPS.
The
screen
is
set
to
be
both
off
while
standing
by
(no
recording)
and
activated
(recording)
by
default.
Vico
Power-PLUS
Your
Best
Smart
Car-Battery
Powe
English
13.

Smart
Parking
Surveillance
(Required
Vico-Power
PLUS)
Smart
Parking
Surveillance:
Working
Behavior
During
normal
recording
mode
with
Smart
Parking
Surveillance
turned
ON.
I
G-Sensor
detects
the
vehicle
has
stopped
moving
for
5mins
(no
movements).
Entering
Smart
Parking
Surveillance
standby
mode
with
screen
off.
I
Smart
Motion
Detection
ÿ
When
the
device
detects
a
change
in
the
position
of
an
object
relative
to
its
surrounding
in
the
front,
a
video
recording
will
be
triggered.
The
footage
contains
the
entire
event
triggered
by
the
motion
detector.
When
no
objects
are
detected
by
the
device,
the
device
turns
into
standby
mode
with
screen
off.
Smart
Time-Lapse
Video
The
device
will
automatically
take
a
picture
at
the
selected
interval
of
time(1s/10s/60s)
and
create
a
time-lapse
video.
When
G-Sensor
senses
movement
from
the
vehicle,
it
automatically
switches
back
to
Normal
Recording
ÿ
Mode
ÿ
Back
to
normal
recording
J
4
Smart
Parking
Surveillance
and
G-Sensor's
sensitivity
settings:
G-Sensor's
sensitivity
settings
are
only
related
to
Emergency
Recording
function.
Having
G-Sensor
turned
off
would
not
affect
Smart
Parking
Surveillance.
English
,14

Smart
Parking
Surveillance
(Required
Vico-Power
PLUS)
Differences
between
Smart
Motion
Detection
and
Smart
Time-Lapse
Video
:
f
When
does
it
work
Recording
Methods
Saved
content
Smart
Motion
Detection
Initiates
recording
when
movements
are
detected.
Video
recording
Saved
content
every
triggered
event
recorded
during
Smart
Parking
Surveillance.
.Smart
Time-lapse
\
Video
Takes
pictures
at
the
selected
interval
of
time
and
create
videos.
Videos
combined
with
photos
Videos
combined
with
images
captured
during
J
Smart
Parking
Surveillance./
Smart
Time-lapse
Video
Day
Time
Parking
Smart
Parking
Surveillance
Mode
Day
Time
Driving
Normal
Recording
Mode
(Hi
(9)
@
Smart
Parking
Surveillance
Day
Time
Driving
Normal
Recording
Mode
Night
Time
Parking
Smart
Parking
Surveillance
Mode
English
15
Smart
Motion
rv~*
—
—

Smart
Parking
Surveillance
(Required
Vico-Power
PLUS)
Normal
ÿ
Activate
•
Novation*
Vico-Power
PLUS
(VPP)
is
a
Battery
Discharge
Prevention
device
that
connects
to
the
car
battery
(Fuse
Box).
It
continuously
provides
power
to
Dashcam
after
engine
is
turned
off
and
monitors
car
battery
status
at
the
same
time.
When
VPP
detects
car
battery
status
has
reached
the
set
level,
it
stops
supplying
power
to
the
Dashcam
(cut-off)
to
prevent
car
battery
from
going
dead
(drained
out).
VPP
is
equipped
with
built-in
temperature
sensors
and
features
over-heating
protection.
This
device
is
compatible
with
any
Dashcam
or
Blackbox
DVR.
Battery
Protections
1
.
Low
voltage
protection
2.
Over-temperature
protection
3.
Auto
shutdown
timer
4.
Overcurrent
&
Impulse
current
protection
English
.16

Low
Voltage
protection:
Power-PLUS
will
periodically
auto-detect
your
battery
voltage
status,
to
cut-off
the
power
if
the
voltage
drops
below
the
configured
value
(11.
6/1
1.8/1
2.0/12.2/1
2.4V
or
23.2/23.4/23.6/23.8/24/24.2/24
.4/24.6V)
to
prevent
car
battery
becoming
excessively
discharged.
Over
Temperature
protection:
During
Summer
daytime,
inner
car
temperature
raise
extremely
high
if
you
left
your
car
outside
with
direct
sunlight.
Over
temperature
operation
might
damage
your
dash
cam.
Power-PLUS
built-in
thermo
sensor
will
cut-off
power
if
temperature
exceeded
setup
value.
(407
45750755760765°C)
*
(104°F/
113°F/
122°F/
131°F/
140°F/
149°F)
Timer
protection:
If
you
switch
into
Timer
mode,
Power-PLUS
will
cut-off
power
when
time
out,
based
on
your
setup
schedule
(2/6/1
2/24/48/72hrs).
Over
Current/Surge
protection:
Power-PLUS
will
detect
abnormal
over
current
status
and
cut-off
power
to
prevent
any
damage
on
dash
cam
device.
Additionally,
Power-PLUS
built
in
with
an
extra
fuse
box
(2A),
to
have
extra
protection
if
anything
goes
wrong
as
incorrect
installing
or
short
circuit.
Built-in
Digital
Display/
Backlight
LED,
easier
to
monitor/control
Backlight
LED
enables
users
to
have
clear
display
of
car-battery
voltage
n
monitoring
and
setup
control,
even
at
night.
It's
easier
to
setup
configuration
with
3
handy
control
buttons
with
clear
LED
friendly
display.
Multi
Input
Power
Type,
DC12V/24V
all
in
one
No
matter
your
car
is
running
DC12V
or
24V
battery,
Power-PLUS
will
auto-detect
the
voltage
input
to
display
different
programmable
menu
setting.
It's
automatic.
Multi-Swtich
to
Select
Normal
mode
and
Timer
mode
Normal
mode
provides
low
voltage
and
over
temperature
protection
at
the
same
time.
Timer
mode
provides
original
both
low
voltage
and
over
temperature,
also
additional
timer
cut-off
when
schedule
time
out.
There
is
a
switch
on
the
right
side
of
Power-PLUS
for
you
to
switch
under
different
condition.
Programmable
Setting,
fitting
your
car
environment
Users
can
select
it's
own
suitable
parameter
in
different
cut-off
voltage,
temperature,
and
time.
It's
all
clearly
displayed
in
comprehensive
menu
and
friendly
user
interface.
English
17,
EES

External
GPS
Mouse
(Optional)
Settings
Speed
Alert
Users
may
select
to
set
the
value
between
80/90/1
00/1
10/1
20/1
30km.
When
the
driving
speed
is
faster
than
setting,
the
device
will
alert
the
drive
with
a
beep
warning
sound
and
an
alert
icon
to
be
displayed
on
the
screen.
Speed
Cameras
Alert:
This
feature
is
currently
only
available
in
Taiwan
GPS
Signal
GPS
locating
requires
at
least
3
signal
bars
from
satellites
to
be
working
properly.
As
shown
in
the
picture,
there
are
5
bars
of
signal
from
5
satellites.
Different
colors
indicate
different
strength
on
GPS
signal.
Green:
Great
(40dB
or
above)
Yellow:
Normal
(30~40dB)
Red:
Medium
(20~30dB)
Dark
Red:
Bad
(20dB
or
below)
After
successfully
complete
GPS
locating,
the
screen
will
display
a
Green
Arrow
icon
on
the
top
bar
to
confirm.
Speed
Alert
1
.
Please
be
aware
that
windscreen
films
that
contain
metal
material
and
tall
buildings
may
have
an
effect
on
GPS
signal
receiving.
2.
You
may
also
enter
Menu->
Function
to
monitor
the
locating
state.
3
normal
signal
bars
are
required.
English
18
ij
u
is
frt
22
s
17
!J3Qq
V
-
j&.Q75S10N

Display
Settings
Screen
Saver
Default
is
Always
ON.
Users
may
change
to
15
seconds,
1
minute,
3
minutes,
or
5
minutes.
After
the
device
has
been
powered
on,
the
screen
can
be
set
to
OFF
(Sleep
Mode)
accordingly.
The
screen
can
be
woken
up
by
pressing
ON
&
OFF
button.
LCD
Brightness
Default
is
Standard.
Can
be
adjusted
to
LOW.
Time
Stamp
Date
and
time
will
be
embedded
at
the
bottom
left
of
the
videos.
Default
setting
is
ON.
Vico-Tag
Users
may
customized
characters
to
be
embedded
next
to
Time
Stamp.
Vertical
Flip
Default
is
OFF.
This
feature
is
for
special
installing
purposes.
Horizontal
Flip
Default
is
OFF.
This
feature
is
for
special
installing
purposes.
X
_
01
102
LCD
AutO
Oil
Ahvdyi
ON
LCD
Urighlnew
Standard
Ootn
Stamp
VTcO'TaSJ
Image
IrwtJve
rz
D[
A
T
o
0
UiiDl.ny
m
cj
®
)
Audio
Playback
System
English
19
Table of contents
Other Vicovation Dashcam manuals

Vicovation
Vicovation Marcus 4 Manual

Vicovation
Vicovation Vico-Opia2 User manual

Vicovation
Vicovation Vico-Marcus 5 Dual User manual

Vicovation
Vicovation Vico-Marcus 1 User manual

Vicovation
Vicovation Vico-Marcus 3 User manual

Vicovation
Vicovation Vico-WF1 User manual

Vicovation
Vicovation Vico-Marcus 3 Technical manual

Vicovation
Vicovation Vico-Marcus 4 Manual

Vicovation
Vicovation Vico-WF1 User manual

Vicovation
Vicovation VICO-MF3 User manual