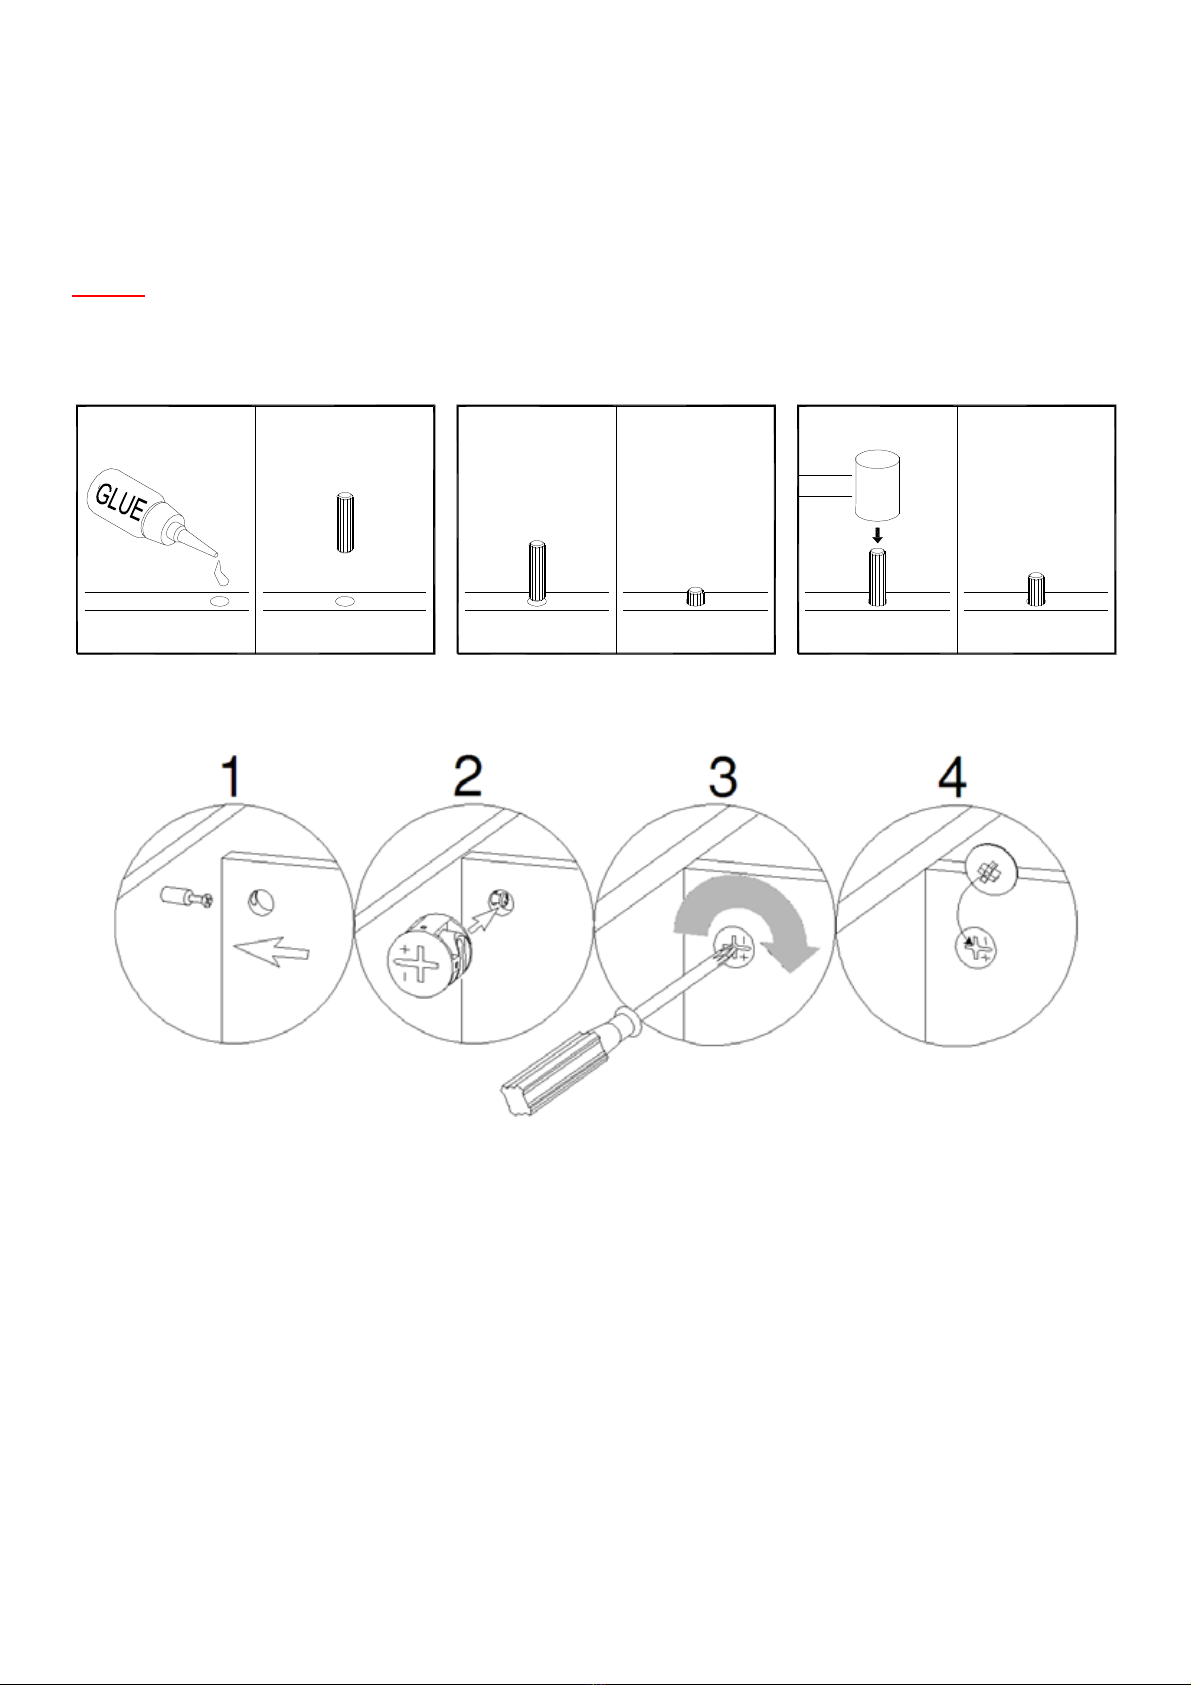
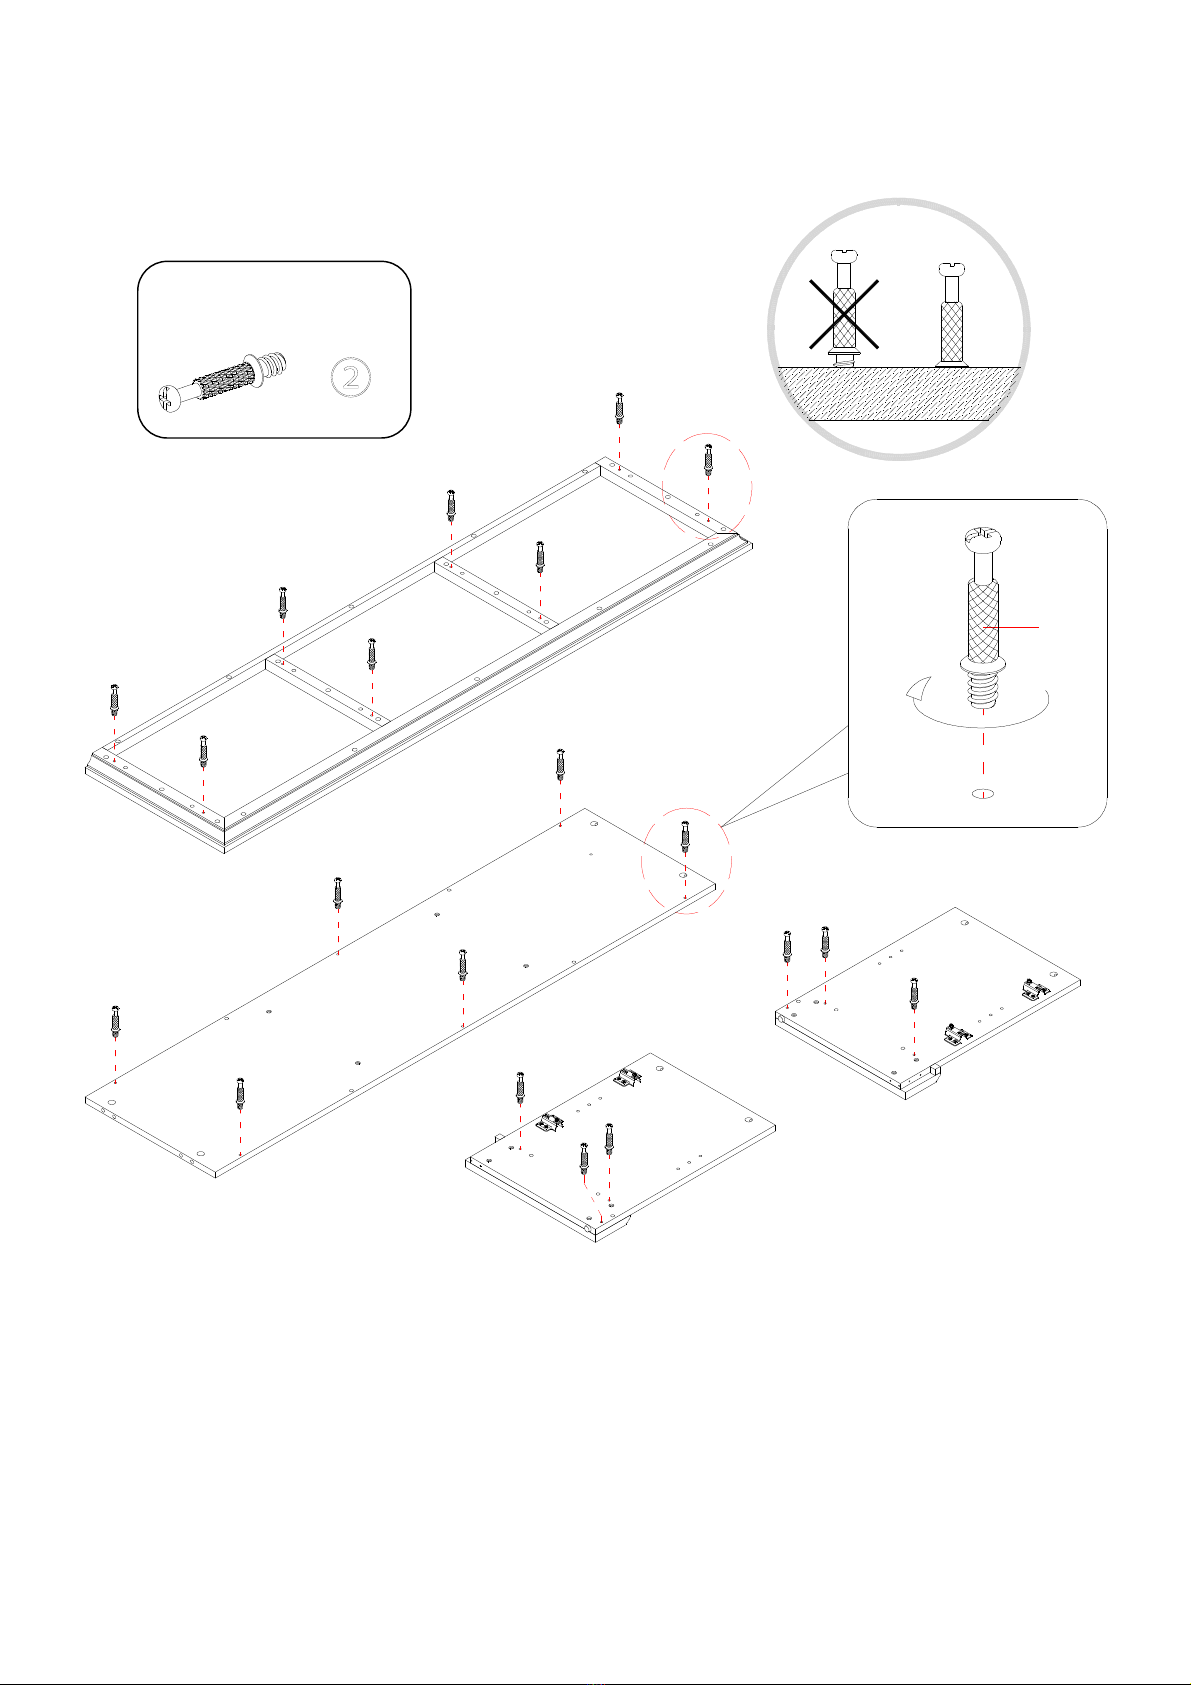
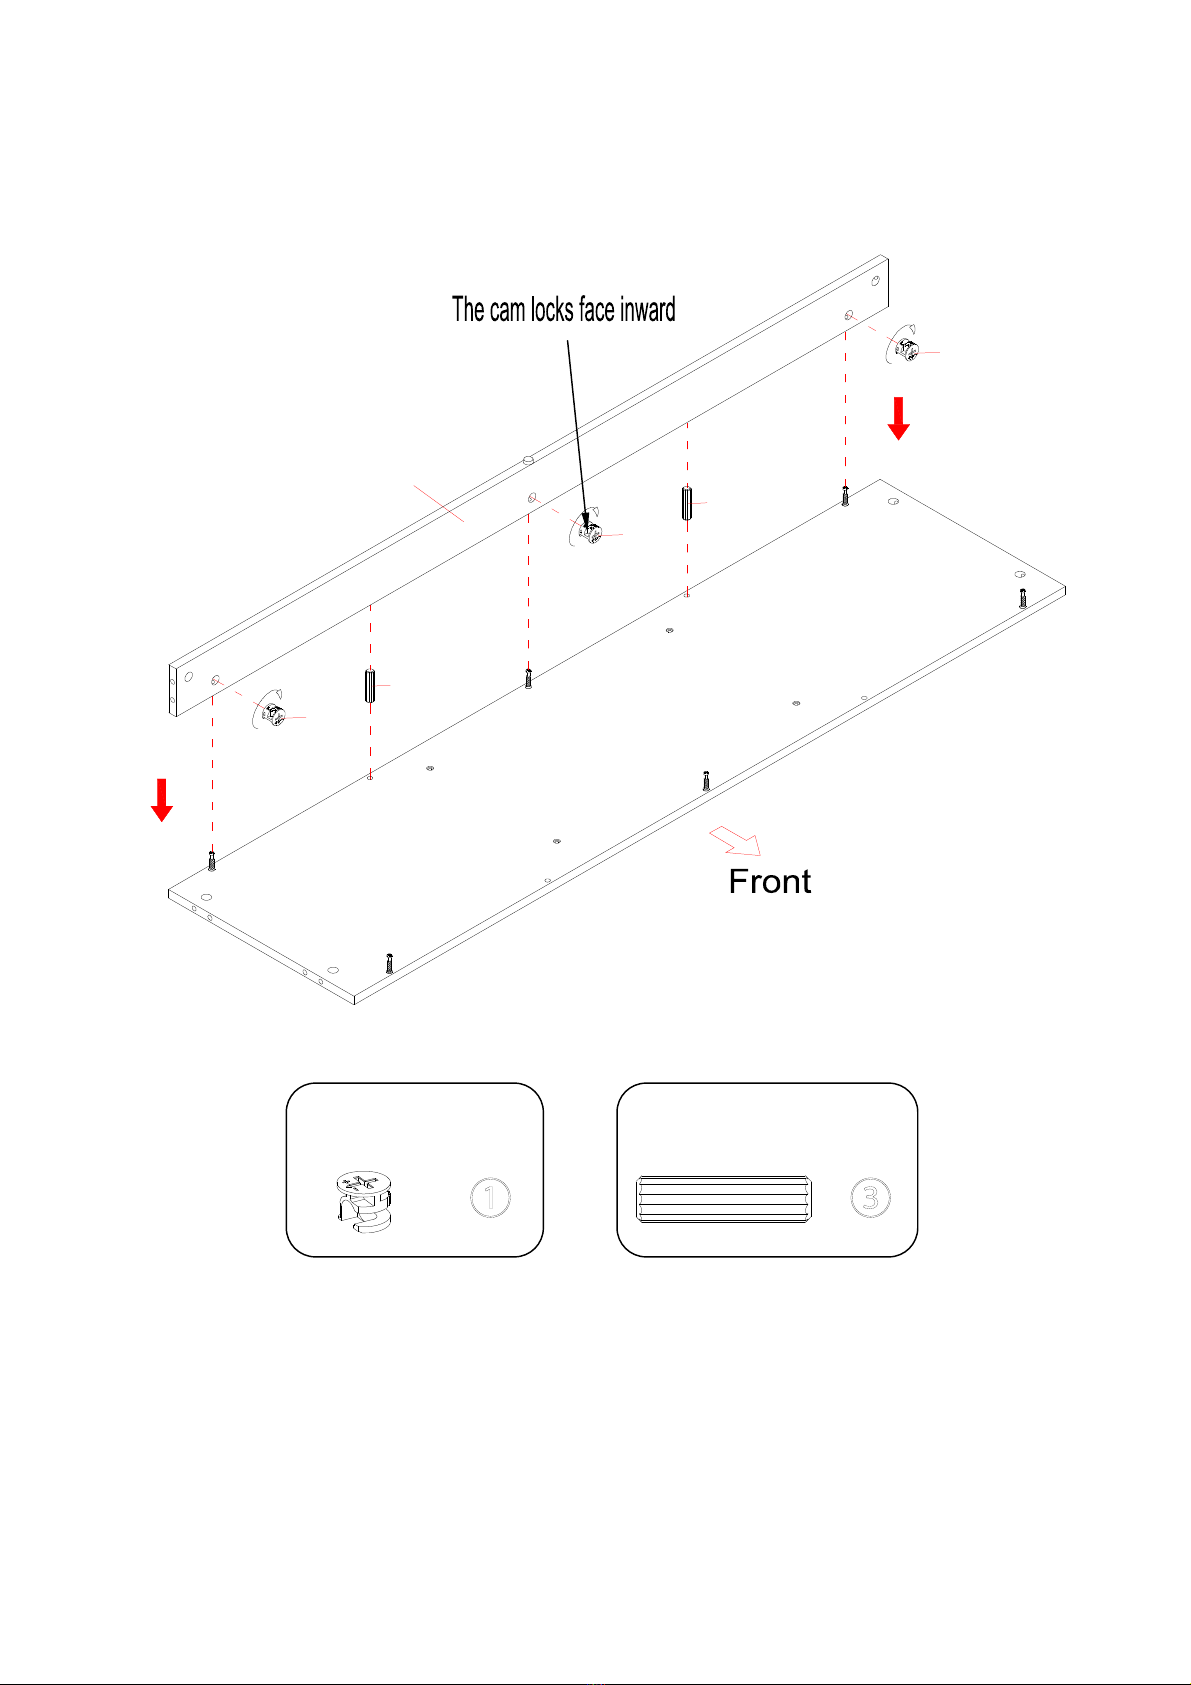
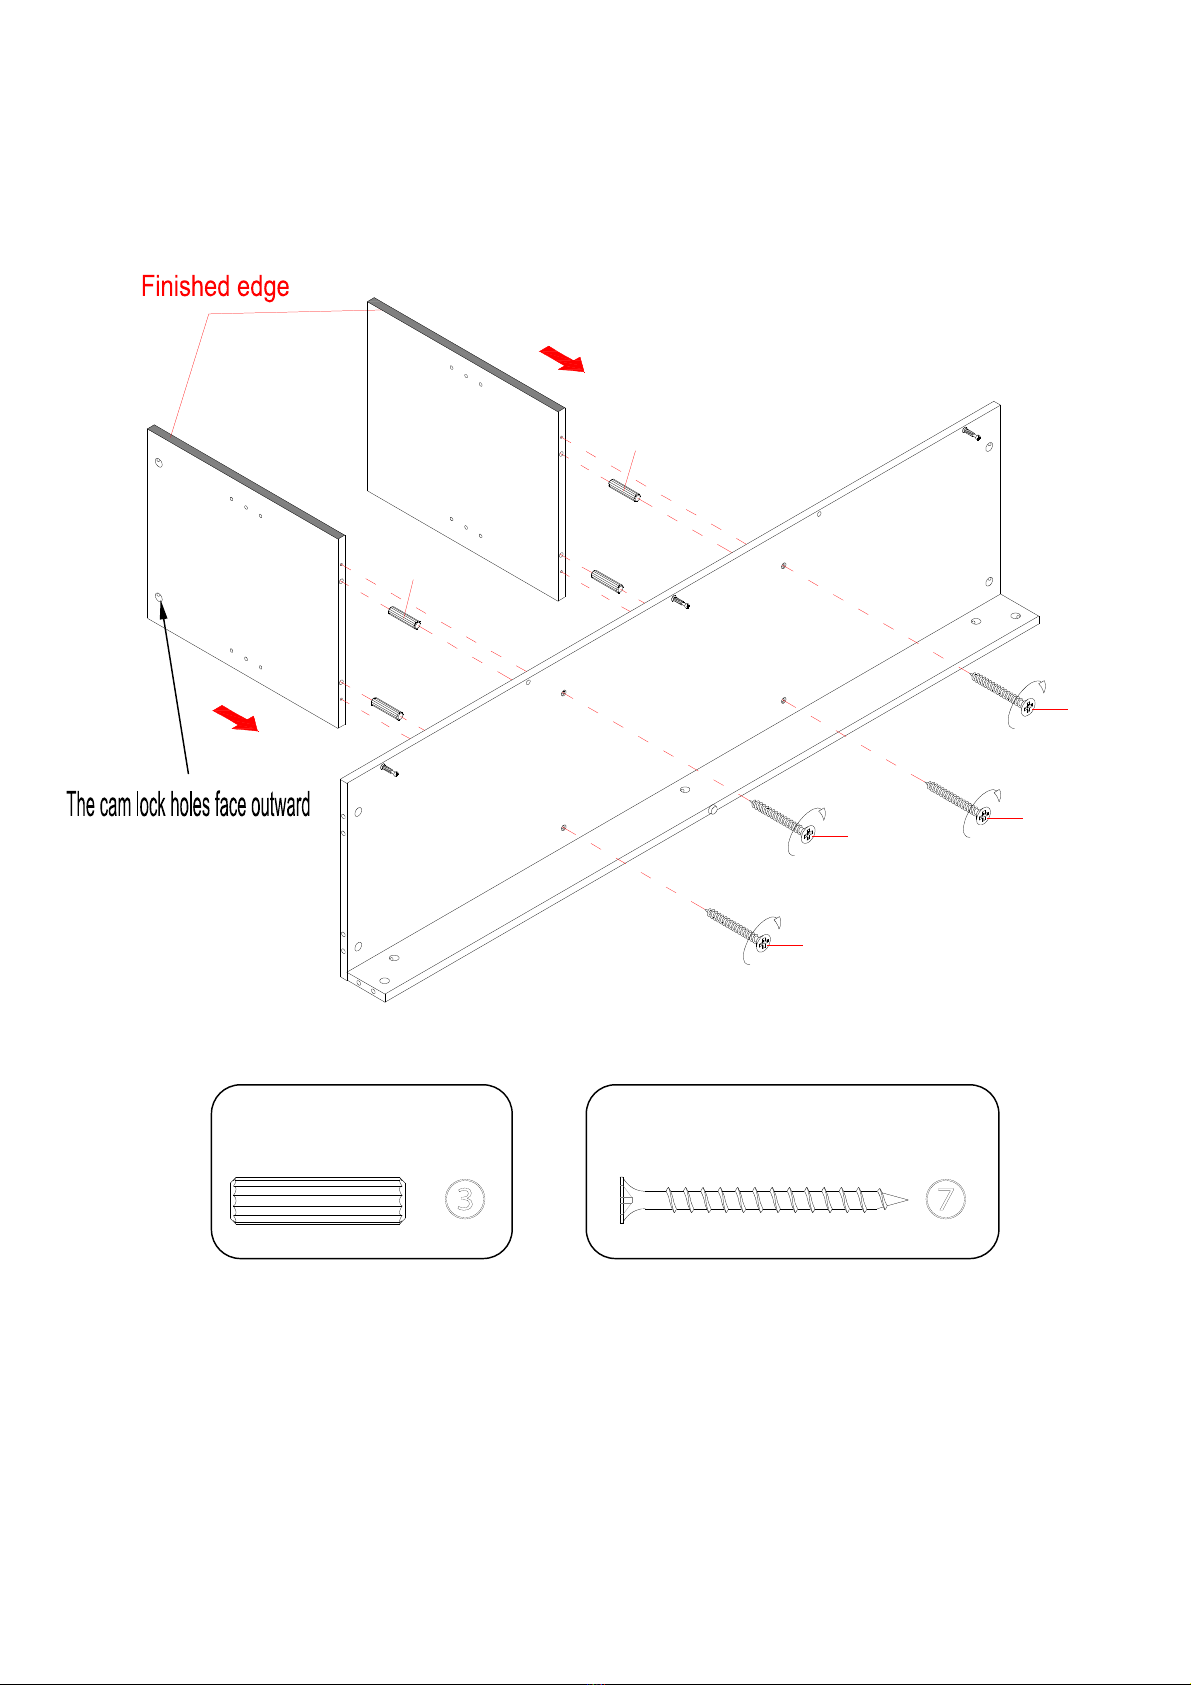
Vidao VW60C User manual

VW60CLEDOM
ASSEMBLY INSTRUCTIONS
Important! Read all warnings before starting assembly.
For technical assistance or troubleshooting please
call 1-855-998-4326 or visit www.sibrandssupport.com
Maximum Weight Capacity:
Top Shelf: 135 Lbs
Middle Shelves: 50 Lbs Each
Bottom Shelves: 50 Lbs Each

2
READ THIS FIRST!
Read all of the warnings and cautions con-
tained in this manual before assembly.
• Do not attempt to assemble this product if
you do not understand the instructions.
• Contact a professional if you have any
doubts about safe and secure TV furniture
assembly.
• Check all the parts carefully to make sure
there are no missing or damaged parts.
• Improper assembly may result in damage
to your TV, property, and personal injury.
• This product is intended only to support a
television of the indicated size and weight
combination. Using this product to support
televisions heavier than the maximum
weight capacity can damage product and
cause personal injury.
• Schoenfeld International Inc. and VIDAO
are not responsible for any personal injury
or product damage due to mishandling,
incorrect mounting, incorrect assembly or
incorrect use of this product.
CHILD SAFETY WARNINGS
How and where you use your television
stand is extremely important for Child Safety
As you set up and use your new product,
keep all of these safety tips in mind
• Don't let children climb on or play with
entertainment system furniture and TVs.
• Remember that children can become
excited while watching a program, espe-
cially on a "larger than life" TV. Make sure
to place or install the TV stand where it
cannot be pushed, pulled over, or knocked
down.
• Make sure that you route all cords and
cables so that they cannot be pulled or
grabbed by curious children.
WARNINGS
• This product is intended only to support a
television of the indicated size and weight
combination. Using this product to support
televisions or other products heavier than
the maximum weight capacity can damage
equipment and cause personal injury.
• Schoenfeld International Inc. and VIDAO
are not responsible for any personal injury
or product damage due to mishandling,
incorrect mounting, incorrect assembly or
incorrect use of this product.
• Do not force the bolts into the hole or use
an electric drill to fasten any bolts. This
could damage the equipment or cause
personal injury.
• A large television requires two people to lift.
Schoenfeld International and VIDAO are
not responsible for equipment damage or
personal injury due to mishandling.

3
FOR YOUR SAFETY, PLEASE FOLLOW
THESE PRECAUTIONS:
• Always remove the TV and other equipment
from the furniture prior to moving the
assembled unit
• Be careful when moving the assembled furni-
ture when there is equipment of any kind
located on the furniture as this may cause the
shelves and other parts to become unstable
and fall.
• When in use, this furniture must be placed on
a flat, level and solid surface.
• Do not lean on or place any force on the TV
when it is on the TV stand.
• Do not climb or step on the stand.
• Do not bang into or place your own weight on
the gsheves
• Do not place any items on the shelves or
mounts which may exceed the maximum
weight limits.
• Always place the heaviest component (except
for your TV) on the bottom shelf
Schoenfeld International Inc. and VIDAO will
not be responsible for failure to assemble as
directed or for the improper assembly, use or
handling of this stand.
VEILLER Á RESPECTER CES MESURES DE
PRECAUTION!
• OUJOURS ENLEVER LE TÉLÉVISEUR ET
AUTRE ÉQUIPEMENT AVANT DE DÉPLACER
LE MEUBLE ASSEMBLÉ.
• DÉPLACER LE MEUBLE AVEC PRÉCAU-
TION UNE FOIS QUE LE PLATEAU EN
VERRE A ÉTÉ POSÉ OU LORSQU’IL Y A DU
MATERIEL PLACÉ SUR LE MEUBLE CAR
CELA PEUT CAUSER LE DÉCROCHEMENT
ET LA CHUTE DES PLATEAUX ET AUTRES
ÉLÉMENTS.
• DURANT L’UTILISATION, LE MEUBLE DOIT
ÉTRE POSÉ SUR UNE SURFACE PLATE,
SOLIDE ET HORIZONTALE.
• NE PAS S'APPUYER CONTRE LE TÉLÉVI-
SEUR LORSQU'IL EST POSÉ SUR LE
MEUBLE.
• NE PAS GRIMPER NI MARCHER SUR LE
MEUBLE.
• NE PAS TAPER NI S'APPUYER SUR LE
PLATEAU EN VERRE.
• Schoenfeld International Inc. y VIDAO
decline toute responsabilité en cas
d’assemblage non conforme aux instructions
ou pour l’assemblage, l'utilisation ou la
manutention incorrects de ce meuble.
POR SU SEGURIDAD TENGA LAS SIGUIEN-
TES PRECAUCIONES:
• SIEMPRE QUITE EL TELEVISOR Y
CUALQUIER OTRO EQUIPO DEL MUEBLE
ANTES DE MOVER LA UNIDAD ARMADA.
• TENGA CUIDADO AL MOVER LA UNIDAD
ARMADA UNA VEZ INSTALADO EL ESTANTE
DE VIDRIO Y/O CUANDO HAYA ALGUN
EQUIPO EN EL MUEBLE YA QUE ESTO
PODRÍA AFLOJAR EL ESTANTE Y OTROS
ARTÍCULOS Y HACER QUE SE CAIGAN.
• EL MUEBLE DEBE ESTAR UBICADO EN
UNA SUPERFICIE PLANA, SÓLIDA Y NIVE-
LADA CUANDO SE LO ESTE UTILIZANDO.
• NO INCLINE EL TELEVISOR CUANDO
ESTE EN EL SOPORTE PARA TV.
• NO SE SUBA NI SE PARE SOBRE EL
SÓPORTE.
• NO GOLPEE EL ESTANTE DE VIDRIO NI SE
APOYE CON SU PESO SOBRE EL MISMO.
• Schoenfeld International Inc. y VIDAO
no se hara responsable en caso de que no
se instale la base segun las instrucciones,
ni de la instalación, uso o manejo incorrectos
de esta base.

4
IMPORTANT
Before you begin: Open, identify and count all parts prior to assembly. Lay out parts on a flat and non-
abrasive surface. You will need the parts identified on page 5 and 6 of this instruction manual.
NOTE:IT IS VERY IMPORTANT TO USE GLUE WITH DOWELS. EXCESS GLUE CAN BE WIPED
OFF WITH DAMP CLOTH.
Insert the Dowel at least half way by tapping lightly with a rubber mallet, IF NECESSARY.
CAM LOCK SYSTEM OPERATION
HOWTHE KNOCK DOWN (KD) ASSEMBLY SYSTEM WORKS
1. Screw the Cam Bolt into the threaded inserts on the panel. Connect both panels together; making sure Cam
Bolt goes into the pre-drilled hole on the end of panel for Cam Lock.
2. Insert the Cam Lock into the pre-drilled large hole on the panel. Make sure the arrow on the face of Cam
Lock faces out and points towards Cam Bolt.
3. Take a Phillips screwdriver and rotate the Cam Lock clockwise to lock the Cam Bolt in place.
4. Plug the Cam Lock Cover into the cross slot of the Cam Lock to conceal the Cam.
X
X
FINAL

5
Parts and Hardware List
Please read completely through the instructions and verify that all listed parts and hardware are present
before beginning assembly.
A- Top Panel (Qty. 1) B- Bottom Panel (Qty. 1)
C- Left Side Panel (Qty. 1) D- Left Partition Panel (Qty. 1)
E- Right Side Panel (Qty. 1) F- Right Partition Panel (Qty. 1)
G- Bottom Front Molding (Qty. 1) H- Bottom Front Stretcher (Qty. 1) I- Bottom Back Stretcher (Qty. 1)
J- Back Panel (Qty. 1) K- Door (Qty. 2) L- Middle Adjustable Shelf (Qty. 1)
M- Side Adjustable Shelf (Qty. 2) N- Stop Rail (Qty. 1)

6
Parts and Hardware List
Please read completely through the instructions and verify that all listed parts and hardware are present
before beginning assembly.
(1) Cam Lock (2) Cam Bolt (3) M8 x 30 mm Wood Dowel
(Qty. 20+1 extra) (Qty. 20+1 extra) (Qty. 22+1 extra)
(4) M8 x 20 mm Wood Dowel (5) M3.5 x 15 mm Flat HeadScrew (6) M4 x 25 mm Screw
(Qty. 4+1 extra) (Qty. 8+1 extra) (Qty. 8+1 extra)
(7) M4 x 50 mm Screw (8) M3.5 x 15 mm Washer Head Screw (9) Cam Lock Cover
(Qty. 8+1 extra) (Qty. 24+1 extra) (Qty. 8+1 extra)
(10) Shelf Pin (11) Knob (12) Knob Bolt
(Qty. 12+1 extra) (Qty. 2) (Qty. 2)
(13) Triangle Metal Plate (14) Floor Leveler (15) Rubber Bumper
(Qty. 2) (Qty. 2) (Qty. 4+1 extra)
Glue (Qty. 1) Touch-up Pen (Qty. 1) Tipping Restraint Hardware Kit (Qty. 2)
(Included in plastic bag)
Tools required: Phillips screwdriver and rubber mallet (not provided).

7
1. Unpack the unit and confirm that you have all the hardware and required parts. Assemble the unit on a
carpeted floor or the empty carton to avoid any scratching.
2. Securely screw the Cam Bolts (2) into the designated small holes on the Top Panel (A), Bottom Panel
(B) and Side Panels (C and E) using a Phillips screwdriver.
Cam Bolt
(20 used in this step)
②
B
E
2
A
C

8
3. Attach the Bottom Back Stretcher (I) to the Bottom Panel (B) with two 30 mm Wood Dowels (3) and
three Cam Locks (1).
3
1
3
1
1B
Cam Lock
(3 used in this step)
①
M8 x 30 mm Wood Dowel
(2 used in this step)
③
I

9
4. Attach the Partition Panels (D and F) to the Bottom Panel (B) with four 30 mm Wood Dowels (3) and
four 50 mm Screws (7) as shown.
F3
7
B
D
7
3
7
7
M8 x 30 mm Wood Dowel
(4 used in this step)
③
M4 x 50 mm Screw
(4 used in this step)
⑦

10
5. Attach the Left Side Panel (C) to the Bottom Panel (B) and Bottom Back Stretcher (I) with three 30 mm
Wood Dowels (3) and three Cam Locks (1).
6. Repeat the same procedure to attach the Right Side Panel (E) at the opposite end.
M8 x 30 mm Wood Dowel
(6 used in this step)
③
Cam Lock
(6 used in this step)
①
E
C
B
1

11
7. Attach the Bottom Front Stretcher (H) to the Bottom Panel (B) with two 30 mm Wood Dowels (3) and
three Cam Locks (1) as shown.
1
B
H
Cam Lock
(3 used in this step)
①
M8 x 30 mm Wood Dowel
(2 used in this step)
③

12
8. Fasten the Bottom Front Stretcher (H) to the Side Panels (C and E) with four 50 mm Screws (7).
7B
H
C
E
7
M4 x 50 mm Screw
(4 used in this step)
⑦

13
9. Attach the Bottom Front Molding (G) to the Bottom Front Stretcher (H) with four 20 mm Wood Dowels
(4) and eight 25 mm Screws (6).
6
4
6
G
H
H
G
M8 x 20 mm Wood Dowel
(4 used in this step)
④
M4 x 25 mm Screw
(8 used in this step)
⑥

14
10. Using the pilot holes as a guide, fasten two Triangle Metal Plates (13) at the bottom joints between Side
Panels (C and E) and Bottom Front Stretcher (H) with eight 15 mm Flat Head Screws (5).
G
C
E
5
13
Triangle Metal Plate
(2 used in this step)
M3.5 x 15 mm Flat Head Screw
(8 used in this step)
13
5

15
11. Screw two Floor Levelers (14) into the installed Triangle Metal Plates (13).
14
14
Floor Leveler
(2 used in this step)
14

16
12. Attach the Top Panel (A) to the vertical panels (C, D, E and F) with eight 30 mm Wood Dowels (3) and
eight Cam Locks (1).
A
C
E
F
M8 x 30 mm Wood Dowel
(8 used in this step)
③
Cam Lock
(8 used in this step)
①

17
13. Now, go back and securely tighten all the Cam Locks and the Screws. Make sure that all the parts are
tight and there are no gaps between the parts. This will help keep the unit square.
14. Unfold the Back Panel (J) and align the pre-drilled holes against the upper long edge with the pilot
holes on the back stretcher of the Top Panel (A). Attach the Back Panel (J) in place using the provided
Washer Head Screws (8).
M3.5 x 15 mm Washer Head Screw
(24 used in this step)
⑧
J
J
E
C
A
8

18
15. Stand the unit upright.
16. Insert the Shelf Pins (10) into the desired holes in the sides of the compartments. Make sure you place
the four Shelf Pins in the same level so the shelf is not tilted. Tilt and rest the Adjustable Shelves (L and
M) onto the Shelf Pins (10) with the end notches of the Shelf fit onto the Shelf Pins properly.
F
C
E
D
A
L
M
M
10 10
L/M
Shelf
Pin
(12 used in this step)
⑩

19
17. Attach one Knob (11) to the front side of each Door (K) with the provided Knob Bolt (12).
11
12
K
x 2
Knob Bolt
(2 used in this step)
Knob
(2 used in this step)
11 12
How to adjust the European adjustable hinges on doors
Shipping may cause doors to go out of alignment. If you find that the doors need to be adjusted slightly,
turn the appropriate screw, as illustrated below:
1 - TO ADJUST DOOR FORWARD OR BACKWARD.
2 - TO ADJUST DOOR TO RIGHT OR TO LEFT.
3 - TO ADJUST DOOR UP OR DOWN.
1
2

20
18. Pick up one Door (K) and attach the extended Hinge Arms to the Hinge Bases installed on Left Side
Panel (C). Loosen the bolt on the back of Hinge Base for an easy fit. Align and insert the “U” slot on
Hinge Arm under the bolt head on the back of Hinge Base. Make sure that both door hinges engage and
function properly. Tighten the bolt on the Hinge Base to lock the hinges in place.
19. Repeat the same procedure to attach the other Door (K) to the Right Side Panel (E).
20. Open and close the doors to make sure they are aligned and shut correctly. If necessary, adjust the
screws for a good fit. Refer to the hinge sticker on the door for adjustment.
E
K
K
1
A
1
2
C
Table of contents
Other Vidao Indoor Furnishing manuals
Popular Indoor Furnishing manuals by other brands

Argos
Argos Slim Media Storage With Cupboard 143/9618 Assembly instructions

fantastic furniture
fantastic furniture Bridge manual

Walker Edison
Walker Edison BDBADME Assembly instructions

Otto
Otto COMO 1K1F Assembling Instruction

Coaster
Coaster Neve 193863B1 Assembly instructions

Argos
Argos 739/0146 Assembly instructions