Videoseven PL900 X User manual

EN-1
○○○○○○○○○○
User’s Manual
Projector
. English .
FCC Notice
This equipment has been tested and found to comply with the limits for a Class B
digital device, pursuant to part 15 of the FCC Rules. These limits are designed to
provide reasonable protection against harmful interference in residential installation.
This equipment generates, uses and can radiate radio frequency energy and if not
installed and used in accordance with the instructions, may cause harmful
interference to radio communications. However, there is no guarantee that
interference will not occur in a particular installation. If this equipment does cause
harmful interference to radio or television reception, detectable by turning the
equipment in question off and on, the user is encouraged to try to correct the
interference by one or more of the following measures:
Reorient or relocate the receiving antenna
Increase the distance between the equipment and the receiver
Connect the equipment into an outlet on a circuit different from that to which the
receiver is connected
Or consult the dealer or an experienced radio/TV technician for help
This device complies with Part 15 of the FCC Rules. Operation is subject to following
two conditions:
1.This device may not cause harmful interference, and
2.This device must accept any interference that may cause undesired operation.

EN-2
○○○○○○○○○○
User’s Manual
Projector
Important Information About Your Projector
Please read the following important information about your projector.
Important Safety Information
Warning:
Never look into the projector lens when the lamp is switched on as the bright light
can damage your eyes. Never let children look into the lens when it is on.
Never open any covers on the projector except the lamp and filter covers. Dangerous
electrical voltages inside the projector can cause severe injury. Except as
specifically directed in this User’s Manual, do not attempt to service this product
yourself. Refer all servicing to qualified service personnel.
Keep the plastic packing materials (from the projector, accessories and optional
parts) out of the reach of children as these bags may result in death by suffocation.
Be particularly careful around the small children.
The projector is equipped with ventilation slots. Do not block or place anything
near these slots, or internal heat build-up may occur, causing picture degradation
or damage to the projector.
Caution:
When you replace the projector lamp, never touch the new bulb with your bare
hands. The invisible residue left by the oil on your hands may be shorten the bulb
life. Use a cloth or gloves to handle the new bulb.
Do not point the laser pointer directly to the people's eyes (especially small
children). There is a danger of injuiry to the eyes. So keep the Remote Controller
out of the reach of children.

EN-3
○○○○○○○○○○
User’s Manual
Projector
. English .
Safety Instructions
Always follow these safety instructions when setting up and using the projector:
1.Do not place the projector on an unstable stand or table.
2.Do not use the projector near water or sources of heat.
3.Use accessories only as recommended.
4.Use the type of power source indicated on the projector.
If you are not sure of the type of power available, consult your dealer.
5.Insert the projector’s three-pin plug into a properly grounded socket.
6. Do not handle the plug or projector with wet hands.
7.Always take the following precautions when handling the plug. Failure to do so
may result in shock, damage, or fire.
Ensure the plug is free of dust before inserting it into a socket.
Ensure that the plug is inserted into the socket securely.
8.Do not overload wall sockets, extension cords, or power strips as this
may cause fire or electric shock.
9.Do not place the projector where the cord can be stepped on as this may result in
fraying or damage to the lead or the plug. Be alert to tripping hazard.
10. Unplug the projector from the wall socket before cleaning. Use a damp cloth for
cleaning the exterior of the projector. Do not use liquid or aerosol cleaners.
11. The projector is equipped with ventilation slots. Do not block or place anything
near these slots, or internal heat build-up may occur, causing picture degradation
or damage to the projector.

EN-4
○○○○○○○○○○
User’s Manual
Projector
CONTENTS
Projector Features and Controls
Projector
Control Panel
Remote Controller
Button Function
Getting the Most Out of Your Projector
Remote Controller
Auto Off Mode
Sleep Mode
Control Panel
Setup
Unpacking the Projector
Setting Up the Projector
Connecting to a Computer
Connecting to a Video Source
Using the Projector
Turning the Audio/Visual (A/V) Equipment On and Off
Turning the Projector On and Off
Focusing and Positioning the Screen Image
Operational Indicator
Projector Control Menus
Accessing the Main Menu
Changing a Menu Setting
Menu Options
Input Menu
Image Menu
Computer Menu
Audio Menu
6
6
7
8
8
9
9
9
9
9
10
10
11
12
12
13
13
13
14
14
15
15
15
16
16
18
20
21

EN-5
○○○○○○○○○○
User’s Manual
Projector
. English .
Misc Menu
Option Menu
Reset Menu
Maintenance
Cleaning the Lens
Cleaning the Projector Housing
Cleaning the Air Filter
Replacing the Lamp
Technical Specifications
Appendix A
Preset Signals
HDTV Preset Signals
22
24
26
27
27
27
28
29
30
31
31
32

EN-6
○○○○○○○○○○
User’s Manual
Projector
Projector Features and Controls
Projector
1.Zoom ring
2.Focus ring
3.Lens
4.Ventilation slots
(exhaust)
5.Height adjustment
6.Front IR remote
controller sensor
7.Speakers
8.Control Panel including
Lamp Power button
9.AC power socket
10.Power switch
11.Rear IR remote controller sensor
12.Security lock receptacle
13.Control port (PS2 & USB)
14.DVI connector
15.Computer IN
connector
16.S-video input
17.Y connector
18.Cb connector
19.Cr connector
20.Audio input jacks (L & R)
21.Composite Video input jack
1
2
3
4
5
6
7
8
9
10
11
12 13
14
15
16
17
18
20
19
21

EN-7
○○○○○○○○○○
User’s Manual
Projector
. English .
Control Panel
LED
(POWER) Power LED indicator - indicates power to projector.
LAMP Lamp LED indicator - indicates lamp power.
Button Function
POWER Turns the projector and lamp ON and OFF.
MENU Displays (or hides) the on-screen control menus.
SELECT Selects the desired menu choice.
ENTER Confirms a menu selection.
AUTO Automatically adjusts frequency and phase.
INPUT Manually selects input source.
KEYSTONE (+ & - ) Adjusts trapezoidal distortion (+ & -) of the projection that
may occur depending on the vertical projection angle.

EN-8
○○○○○○○○○○
User’s Manual
Projector
Remote Controller
Button Function
POWER Turns on the projector and lamp ON and OFF.
MENU Displays (or hides) the on-screen control menus.
LASER Fires laser pointer (press and hold).
WINDOW Adjusts window size in PIP mode.
AUTO Automatically adjusts frequency and phase.
(To adjust manually - on Computer Menu, adjusts the setting
on Tracking, Sync, PosiH, PosiV to fine tune)
COMPUTER Selects computer input signal (computer,DVI,HDTV).
VIDEO Selects video input signal (YCbCr, S-Video, Video).
PIP Picture-in-Picture : displays a second image window.
POINTER Displays pointer icon on the screen.
Confirms the current setting.
ESC Deselects the current setting and exit a menu.
KEYSTONE Adjusts trapezoidal distortion of the projection that may occur
depending on the vertical projection angle.
VOLUME Adjusts the volume of the projector’s speakers.
FREEZE Freezes the current graphics and
video image on the screen.
BLANK Cuts off the screen temporarily.
D ZOOM Digitally zooms the current image
window.
MUTE Cuts off the sound temporarily.
LANGUAGE Selects the desired OSD (On-screen
Display) language.
SLEEP Automatically turns off the projector lamp
after a specified time period (even if a
source is present).
CURSOR It can be used as a navigation
CONTROLLER controller to navigate the projector
menus. If your projector is equipped
with an optional mouse link cable,
this pad will function as a remote mouse
for your PC.
CURSOR
CONTROLLER

EN-9
○○○○○○○○○○
User’s Manual
Projector
. English .
Getting the Most Out of Your Projector
The projector has a full set of features that allow you to control the settings for video,
audio, power management, display parameters, and much more.
To derive the greatest utility from your projector, read this section for a quick summary
of the important features.
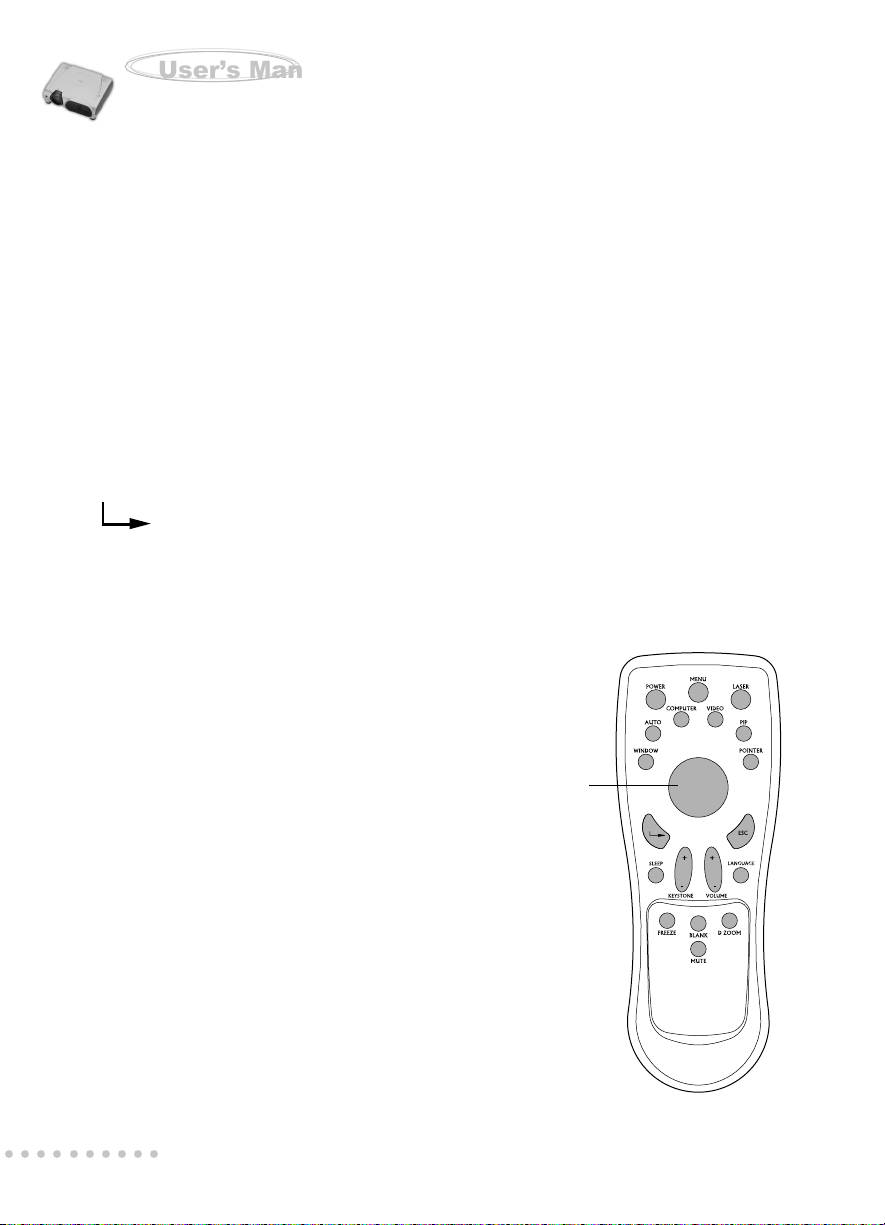
Remote Controller
The buttons on the remote controller allow direct and immediate control of the most
commonly used features including source selection, display modes, PIP, keystone
adjustment, volume control, video freeze-frame, zoom, video blanking, audio muting
and power control. Remote controller buttons can also be used for advanced functions
and to access the projector’s menu system. The remote controller can even be used
as a remote mouse for your computer, and also includes a laser pointer.
Auto Off Mode
The auto off mode conserves electricity by automatically turning off the lamp if the
projector does not receive input signal for a specified period (30 minutes). In the
auto off mode, the lamp is turned off, conserving electricity, cooling the projector and
extending the life of the lamp. Use the Power button on either the remote controller
or the projector control panel to turn the projector on again if it has powered off.
Sleep Mode
The sleep mode conserves electricity by automatically turning off the lamp if the
projector’s lamp is on continuously for specified period (1 to 3 hours). In the sleep
mode, the lamp is turned off, conserving electricity, cooling the projector and extending
the life of the lamp. Use the Power button to turn the projector on and off.
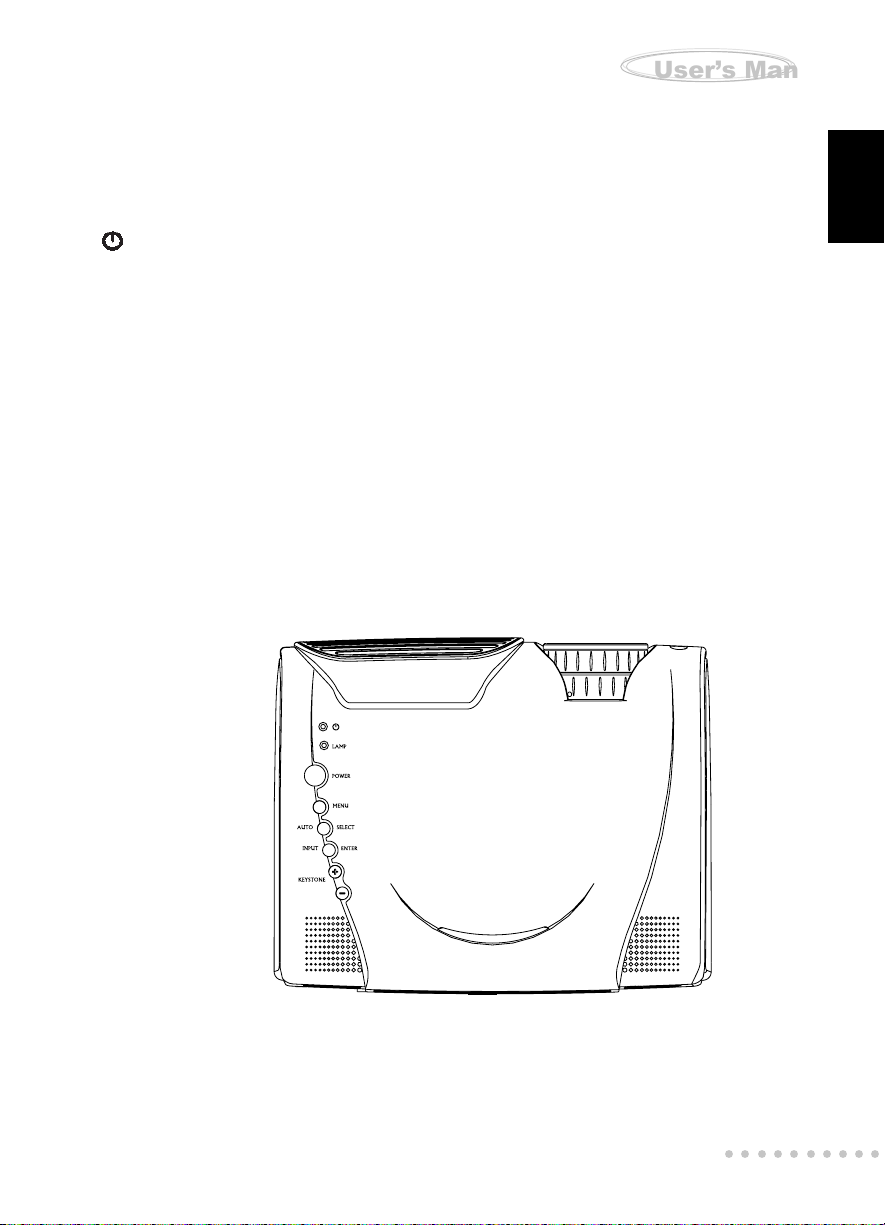
Control Panel
The control panel buttons on the top of projector offer access to advanced functions,
such as adjusting the brightness and contrast for computer images.

EN-10
○○○○○○○○○○
User’s Manual
Projector
Setup
This section tells you how to unpack and set up your projector and connect it to other
equipment. The projector must be connected to a computer or a video source such
as a video tape deck, camcorder, digital camera or laser disk player in order to make
a projection.
You may want to connect the projector to both your computer and a video source, or
set up the projector for one or more of the following:
Connect the mouse cable to use the remote control as a wireless mouse.
Provide audio for one or both image sources. The audio source can be the
computer, video source, or another device such as a stereo.
Unpacking the Projector
When you unpack the projector, make sure you have all these components:
Projector
Projector carrying case
Remote Controller (IR)
2 AAA batteries for the Controller
Power cord
Computer cable
S Video cable
A/V composite cable (RCA type for composite video & audio)
Lens cap
User’s manual
(The following cables are optional accessories)
Audio cable
HDTV to D-SUB (When using HDTV as input signal)
Mouse cable (for PS/2)
Mouse cable (for USB)
DVI cable
Component Video cable
Many of the above optional items may not be required for your particular installation.
Retain packaging materials in case you need to move or ship the projector in the
future. It should always be transported in its original protective packaging.

EN-11
○○○○○○○○○○
User’s Manual
Projector
. English .
Setting Up the Projector
1.Place the projector on a sturdy, level surface within five feet of the computer or
video source.
Caution:
Do not hold the projector by the lens. This can damage the lens.
2.Place the projector the correct distance from the screen. The distance between
the projector and the screen determines the actual image size. Use the general
guidelines below to determine the correct distance.
Distance between the
screen and the center of the lens
Projection Size (Diagonal) 40” 50” 70” 100” 150” 200” 300”
Projection Distance[mm] 1640 2060 2900 4160 6260 8350 12550
Lens at WIDE position
Projection Distance[mm] 2150 2690 3780 5420 8140 10870 16350
Lens at TELE position
3.When replacing batteries on the Remote Controller, take the following precautions:
Do not recharge used batteries or expose batteries to fire or water.
Replace batteries as soon as they run down. If the batteries leak, wipe away the
fluid with a soft cloth. If battery fluid gets on your hands, wash them immediately.
Remove the batteries if you will not be using the remote controller for a long
period of time.

EN-12
○○○○○○○○○○
User’s Manual
Projector
Connecting to a Computer
The projector will always project at XGA (1024 x 768) resolution for XGA projector.
However, you can connect the projector to a computer source capable of displaying
VGA (640 x 480), SVGA (800 x 600), XGA(1024 x768) or SXGA (1280 x 1024) resolutions.
The projector will resize VGA, SVGA, and SXGA inputs for XGA projection. The types of
computers supported by this projector include:
IBM compatible laptop, notebook or desktop PCs (PC compatibles)
Macintosh desktop computers (including Quadra®, Centris®, and Power Mac (with
separate Sync: RGB HV), and Apple PowerBooks with video-out capability,
including all 160, 165, 180 and 500 series PowerBooks (separate Sync: RGB HV)
Connecting to a Video Source
You can connect the projector to almost any common video source - VHS player,
DVD player, camcorder, laser disc player or any other compatible video image source.
The projector can accept composite, component, or S-Video signals. Composite
video is characterized by a single-pin “RCA-type” video jack, usually colored yellow.
Component video (YCbCr) is less common and features three “RCA-type” video
jacks, typically colored red, green, and blue. S-Video is readily identified by a single
connector with four small pins.
You can connect the projector simultaneously to composite, component, and S-
Video sources. You can select which video source to project using the control panel
or remote controller. If the Auto Search feature is ON (see later sections of this
manual), the projector will automatically detect and select a source. The projector
supports both NTSC and PAL video formats. The projector will automatically detect
and identify the video format. Note, however, whereas the projector can accept
multiple simultaneous sources it can only accept one video format at a time.
Note: The projector is not compatible with a cable TV-style coaxial “F” connector.

EN-13
○○○○○○○○○○
User’s Manual
Projector
. English .
Using the Projector
This section describes projector operations:
Turning equipment on and off
Adjusting the screen image
Projector controls
Checking the status of the projector
Turning the Audio/Visual (A/V) Equipment On and Off
Always turn on the projector and related A/V equipment in the following order.
1.Projector
2.Computer
3.Video source
4.Audio source
Turning the Projector On and Off
1.Connect the power cord to the projector.
2.Insert the power plug into a wall outlet.
3.Remove the projector lens cap.
4.Turn on the power switch on the back of the projector.
5.Press the power button on the remote control or control panel. When lamp LED
indicator lights in green, the projecting image gets full illumination.
Warning: Never look into the lens when the lamp is on. This can damage your eyes.
It is especially important that children are not allowed to look into the lens.
6.To turn off the projector, press the
power button. A message will appear
on the screen for about 3 seconds:
7.Press the power button once again
(to turn off the power) while the
message is still showing on the
screen.

EN-14
○○○○○○○○○○
User’s Manual
Projector
Focusing and Positioning the Screen Image
After an image appears on the screen, check to see if it is in focus and whether it fits
properly on the screen.
To adjust the focus of the image, rotate the focus ring, which is the outer ring on
the projector’s lens.
To adjust the size of the image, rotate the inner zoom ring. Zooming out to make
the image larger or zooming in make it smaller on the screen.
Operational Indicator
There are two LEDs on the top of the projector, the Power LED and the Lamp LED.
They provide valuable information about the projector.
LED TYPE COLOR STATUS MEANING
Power LED Green Solid The projector is powered and ready.
Power LED Red Flashing The projector system has some
problems with its fan, so the projector cannot
start up.
Lamp LED Green Solid The lamp is in good condition and is
projecting at maximum brightness.
Lamp LED Green Flashing The lamp is close to its end of life, but
the lamp is still operational.
Lamp LED Red Solid The lamp has reached its end of life and
must be changed soon. The lamp will
continue to operate until it fails. Change
the lamp and reset the lamp time counter.
If the lamp is off, then the ballast will
become malfunction.
Lamp LED Yellow Flashing The projector is shutting down. The fan
motor is cooling the lamp for shutdown.
Do not unplug the power cable or turn
the power switch off before the Lamp
LED turns off. The fan motor will turn off
when the lamp has cooled.
Lamp LED Red Flashing Temperature is too high. The lamp will
turn off.

EN-15
○○○○○○○○○○
User’s Manual
Projector
. English .
Projector Control Menus
The Seven projector menus enable you to setup and control your projector:
Input menu controls the input signal selection.
Image menu controls the image, such picture adjustment, Gamma adjustment
and separate image color(Yellow, Red, Green, Blue) adjustment.
Computer menu controls the computer input signal adjustment.
Audio menu controls audio features, such as the volume level and mute option.
Misc menu enables you to set various projector features such as Freeze, PIP,
Lamp life and etc.
Option menu enables you to set various projector options.
Reset menu returns all settings to their factory defaults.
Accessing the Main Menu
The projector menus can be accessed using either the Projector Control Panel or
the Remote Controller.
To display the Main menu, press the Menu button.
The Main menu appears:
Changing a Menu Setting
To change a menu setting using the Remote Controller:
1.Press the desired button or the MENU button.
2.Navigate to an option menu by pressing the cursor controller button:
3.To change the option setting, press the + or – button (Keystone or Volume button).
4.Press the ENTER button to confirm the menu selection.
5.Press the ESC button to exit the current menu.

EN-16
○○○○○○○○○○
User’s Manual
Projector
To change a menu setting using the Projector Control Panel:
1.Press the MENU button.
Press MENU once again to hide the menu (acts as the ESC button on the Remote
Controller).
2.To select option menu, press the SELECT button (acts as the menu controller
button on the Remote Controller).
3.To change the specific setting, press the + or – button (Keystone button).
4.Press the ENTER button to confirm the menu selection.
Note:
SPECIAL KEY BUTTON – Keystone, Mute, Volume
If the Menu status is ON, use the – or + button for adjustment.
If the Menu status is OFF, use the Special key button itself for adjustment.
Menu Options
The following menus are described in this section in detail:
Input
Image
Computer
Audio
Misc
Option
Reset
Input Menu
This menu allows to specify the
signal source that you wish to
project. This is particularly useful
if you have several sources (video
and/or computer) connected to your
projector.

EN-17
○○○○○○○○○○
User’s Manual
Projector
. English .
1.Press the MENU button.
2.Use the cursor controller button(Remote Controller) or the SELECT button
(Projector Control Panel) to select the Input Menu. Once Input Menu is highlighted,
press the ENTER button.
3.Use either the cursor controller button(Remote Controller) or the SELECT button
(Projector Control Panel) again to choose sub-menu Computer/Video/PIP.
The following table provides detail of the available sub-menu choices:
Menu Sub-menu Description
Computer Computer input signal.
Computer Signal from computer. (desktop or notebook)
DVI Signal from DVI(Digital Visual Interface) device.
HDTV Signal from HDTV(High Definition TV - a high-
resolution TV standard, which is part of the group
of digital TV standards introduced in USA in late
1998).
Video Video input signal.
YCbCr Component video signal.
S-Video S-video signal.
Video Composite video signal.
PIP Displays additional image window on-screen.
Computer Computer display only.
Video on Places a small video window in the foreground
Computer with the computer display in the background.
Computer on Places a small video window in the foreground
Video with the video display in the background.
Video Video display only.
PBP Computer and video is displayed side-by-side,
( PBP - Picture by Picture)
4.To select the desired feature in the sub-menu Computer/Video/PIP, use the – or +
button.
5.Press the ESC button (Remote Controller) or the MENU button(Projector Control
Panel), to exit from the current menu.

EN-18
○○○○○○○○○○
User’s Manual
Projector
Image Menu
This menu and sub-menus provide precise control of the projected image including:
brightness, contrast, intensity, saturation, sharpness(computer signal), sharpness
(video signal), tint, gamma (computer signal), gamma (video signal) and color channel
balancing (Y, R, G, B).
Image Main Menu Picture Sub-menu
Independent Color Control Gamma Sub-menu
(ICC) Sub-menu
1.Press the MENU button.
2.Use the cursor controller button(Remote Controller) or the SELECT button
(Projector Control Panel) to select Image Menu. Once Image Menu is highlighted,
press the ENTER button.
3.Use either the cursor controller button(Remote Controller) or the SELECT button
(Projector Control Panel) again to choose from the Picture/Gamma/ICC sub-menus.
Highlight the sub-menu of choice and press the ENTER button.

EN-19
○○○○○○○○○○
User’s Manual
Projector
. English .
The following table provides detail of the available sub-menu choices:
Menu Sub-menu Description
Picture Adjusts the properties of the projected image.
Brightness The higher the setting, the brighter the projection.
The lower the setting, the darker the projection.
Contrast The higher the setting, the greater the contrast.
The lower the setting, the lower the contrast.
Intensity The amount of white contained in a color.
The higher the setting, the whiter the image.
The lower the setting, the less whiter the image.
Saturation The strength of a color especially the degree to
which it lacks its complimentary color.
The higher the setting, the stronger color strength.
The lower the setting, the weaker color strength.
Sharpness The higher the setting, the sharper the computer’s
(Computer) projection. The lower the setting, the softer the
computer’s projection.
Sharpness The higher the setting, the sharper the video’s
(Video) projection. The lower the setting, the softer the
video’s projection.
Tint (Video) Adjusts the projection between red and green color.
Gamma Selects a gamma correction curve.
Gamma1 Preset gamma curve.
Gamma2 Natural tones (HDTV).
Text Contrast black and white. Suitable for images that
are predominantly text.
ICC Adjusts independent color control(ICC).
ICC_Y Adjusts yellow.
ICC_R Adjusts red.
ICC_G Adjusts green.
ICC_B Adjusts blue.
4.To adjust the desired display attribute in the sub-menus, use the – or + button.
5.Press the ESC button(Remote Controller) or the MENU button(Projector Control
Panel) to exit from the current menu.

EN-20
○○○○○○○○○○
User’s Manual
Projector
Computer Menu
This menu is used for fine tuning the synchronization between the projector and a
computer input signal. If you are experiencing difficulty synchronizing the projector
with your computer, this feature may help to optimize the interface.
1.Press the MENU button.
2.Use the cursor controller button(Remote Controller) or the SELECT button
(Projector Control Panel) to select Computer Menu. Once Computer Menu is
highlighted, press the ENTER button.
3.Use either the cursor controller button(Remote Controller) or the SELECT button
(Projector Control Panel) again to choose from the Tracking, Sync, or Position
sub-menus.Highlight the sub-menu of the choice and press the ENTER button.
The following table provides detail of the available sub-menu choices:
Menu Description
Tracking Adjusts the horizontal tracking.
Sync Adjusts the dot phase of the input signal.
Adjusts the picture to where it looks best.
PosiH Adjusts the horizontal position.
PosiV Adjusts the vertical position.
4.To adjust the desired display attribute in the sub-menus, use the – or + button.
5.Press the ESC button(Remote Controller) or the MENU button(Projector Control
Panel) to exit from the current menu.
Table of contents
Other Videoseven Projector manuals