Follow the general warnings and the safety norms listed at the beginning of the text and keep to
all the instructions given under all circumstances.
The installation and set-up of the water heater must be carried out by a competent person in conformity with the applicable
norms in force and with any provisions set forth by local authorities and public health bodies.
The heater must be fitted with reliable grounding. Do not use the heater without any reliable grounding. Do not connect the
grounding wire to the zero line or water pipe.
The appliance heats water to a temperature below boiling point. It must be linked up to a mains water supply according to the
appliance performance levels and capacity.
Before connecting the appliance, it is first necessary to:
■Check whether the appliance characteristics (please refer to the data plate) meet the customer’s requirements.
■Make sure the installation conforms to the IP degree (of protection against the penetration of liquids) of the appliance according
to the applicable norms in force.
■Read the instructions provided on the packaging label and on the appliance data plate.
■Make sure the water tank is filled with water before turning on the appliance, manufacturer shall not be held responsible for any
damage and warranty shall be void if failure to do so.
This appliance is designed to be installed only inside buildings in compliance with the applicable norms in force.
Furthermore, installers are requested to keep to the following advice in the presence of:
■Damp: do not install the appliance in closed (unventilated) and damp rooms.
■Sunlight: do not expose the appliance to direct sun rays, even in the presence of windows.
■Dust/vapor/gas: do not install the appliance in the presence of particularly dangerous substances such as acidic vapor, dust or
those saturated with gas.
■Electrical discharges: do not install the appliance directly on electrical supplies that aren’t protected against sudden voltage
jumps.
In the case of walls made of bricks or perforated blocks, partition walls featuring limited static, or masonry different in some way
from those stated, you first need to carry out a preliminary static check of the supporting system.
The wall-mounting fastening hooks must be designed to support a weight that is three times higher than the weight of the water
heater filled with water.
Local norms could set forth restrictions regarding the installation in a bathroom environment. Therefore keep to the minimum
distances foreseen by the applicable norms in force.
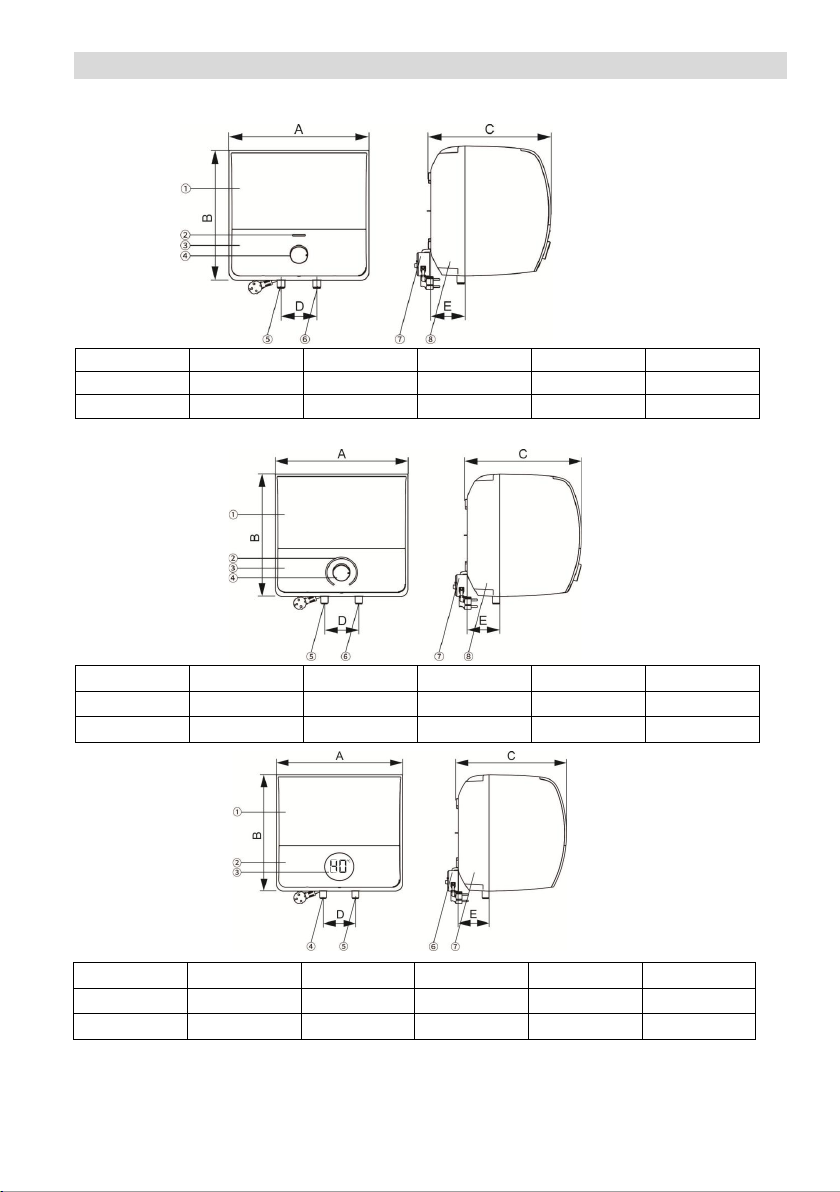
Installation steps
Cube type
1. Installing the expansion-bolt hooks
Drill two ø10 x 85 mm holes in the wall. Insert
expansion tubes into the holes, place the screws
through the hanging plate, and tighten the
screws with a screwdriver. Ensure hanging plate
is positioned vertically upward.
2. Remove baffles plate from hanging holes
Pry up the plastic baffle plates on the back of the
water heater that are covering the hanging holes
with a slotted screwdriver. Keep hanging holes
visible.
3. Hanging water heater
Lift the water heater, align its hanging holes with the hanging plate hooks. Fit the hanging holes onto hanging
plate hooks. Pull down the water heater to ensure secure installation.
Clearance space should be provided around the water heater as shown in the figure, to facilitate installation
and maintenance operation.
Appliance installation
7
The appliance should be installed not too far from the point of use to limit heat dispersion along the piping.
Allow for a clearance of at least 50 cm to provide access to the electrical components, thus facilitating the maintenance
activities.
≥ 80mm
≥ 80mm
≥ 160mm
≥ 80mm


 null")
 null")


 Operation and maintenance instructions")