Vietex Media VTX-Atom CCU-U User manual

1 VTX-Atom CCU-U - Manual
VTX-Atom CCU-U –Operating Manual
1- Introduction
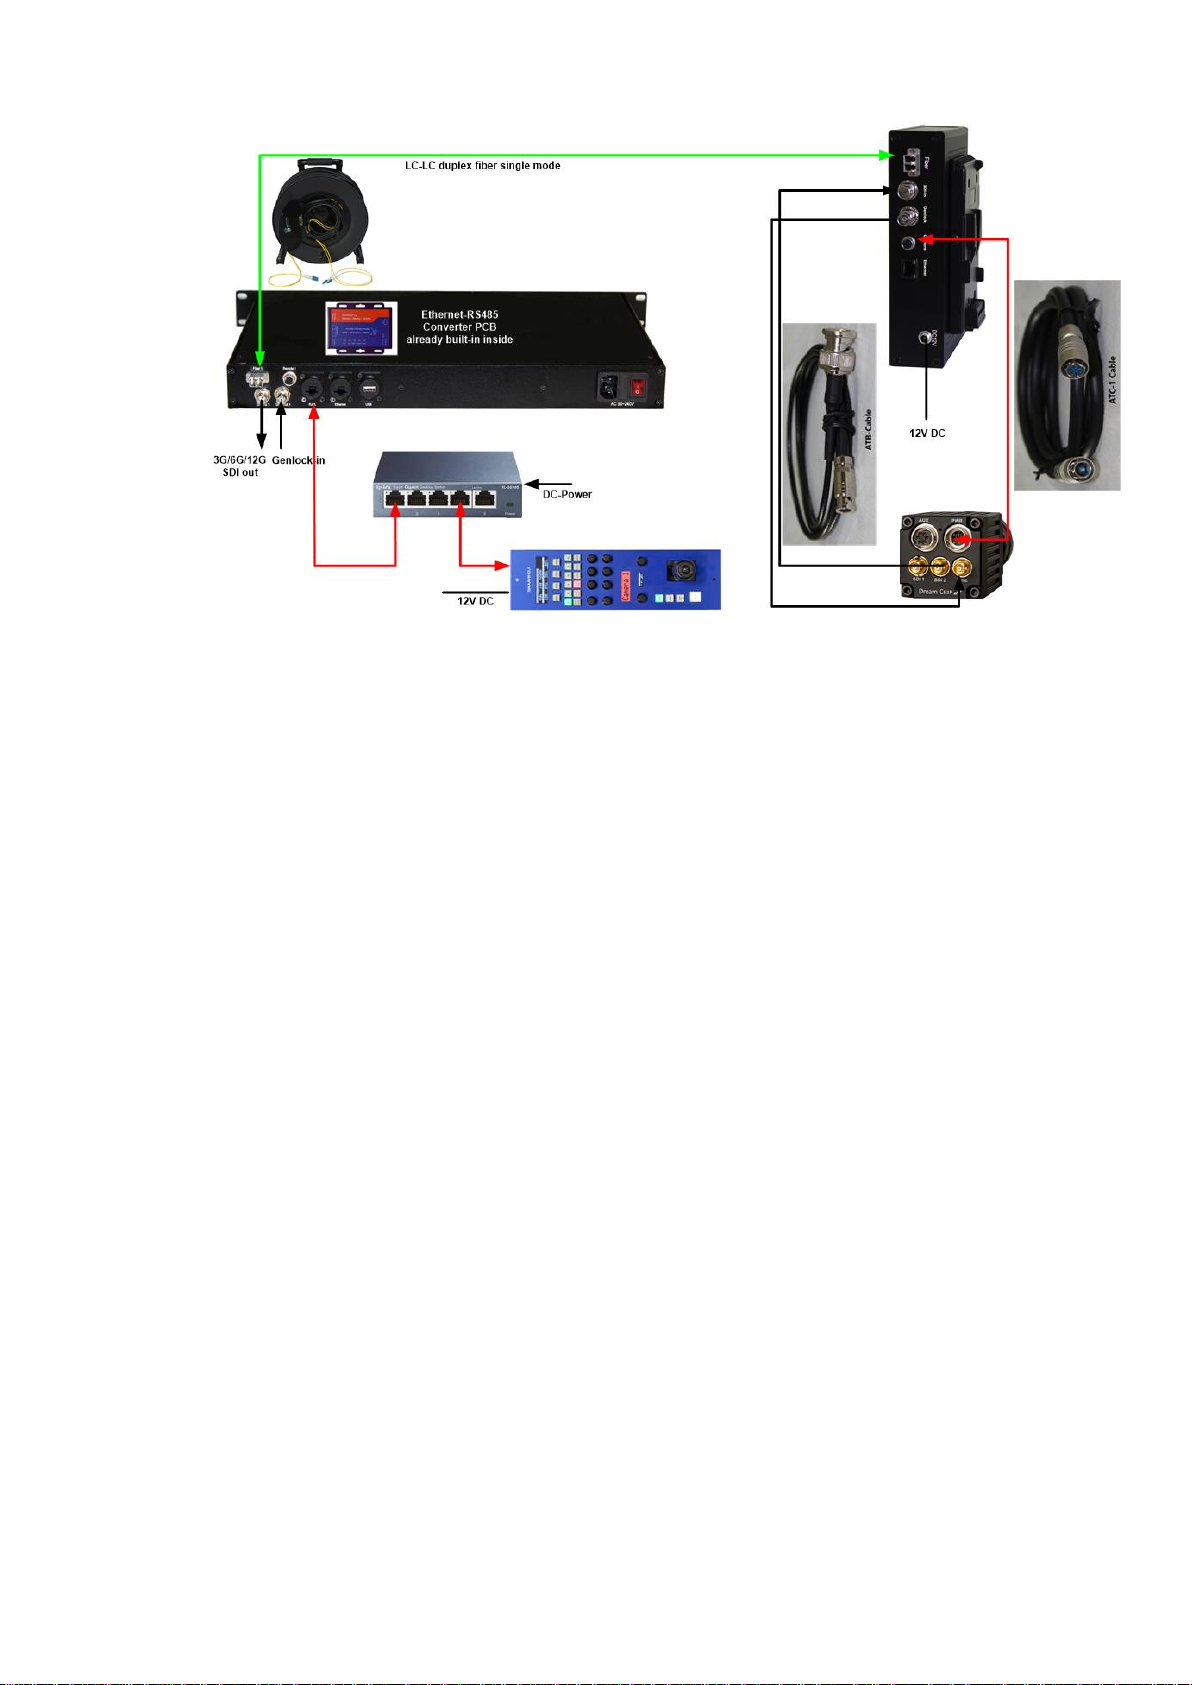
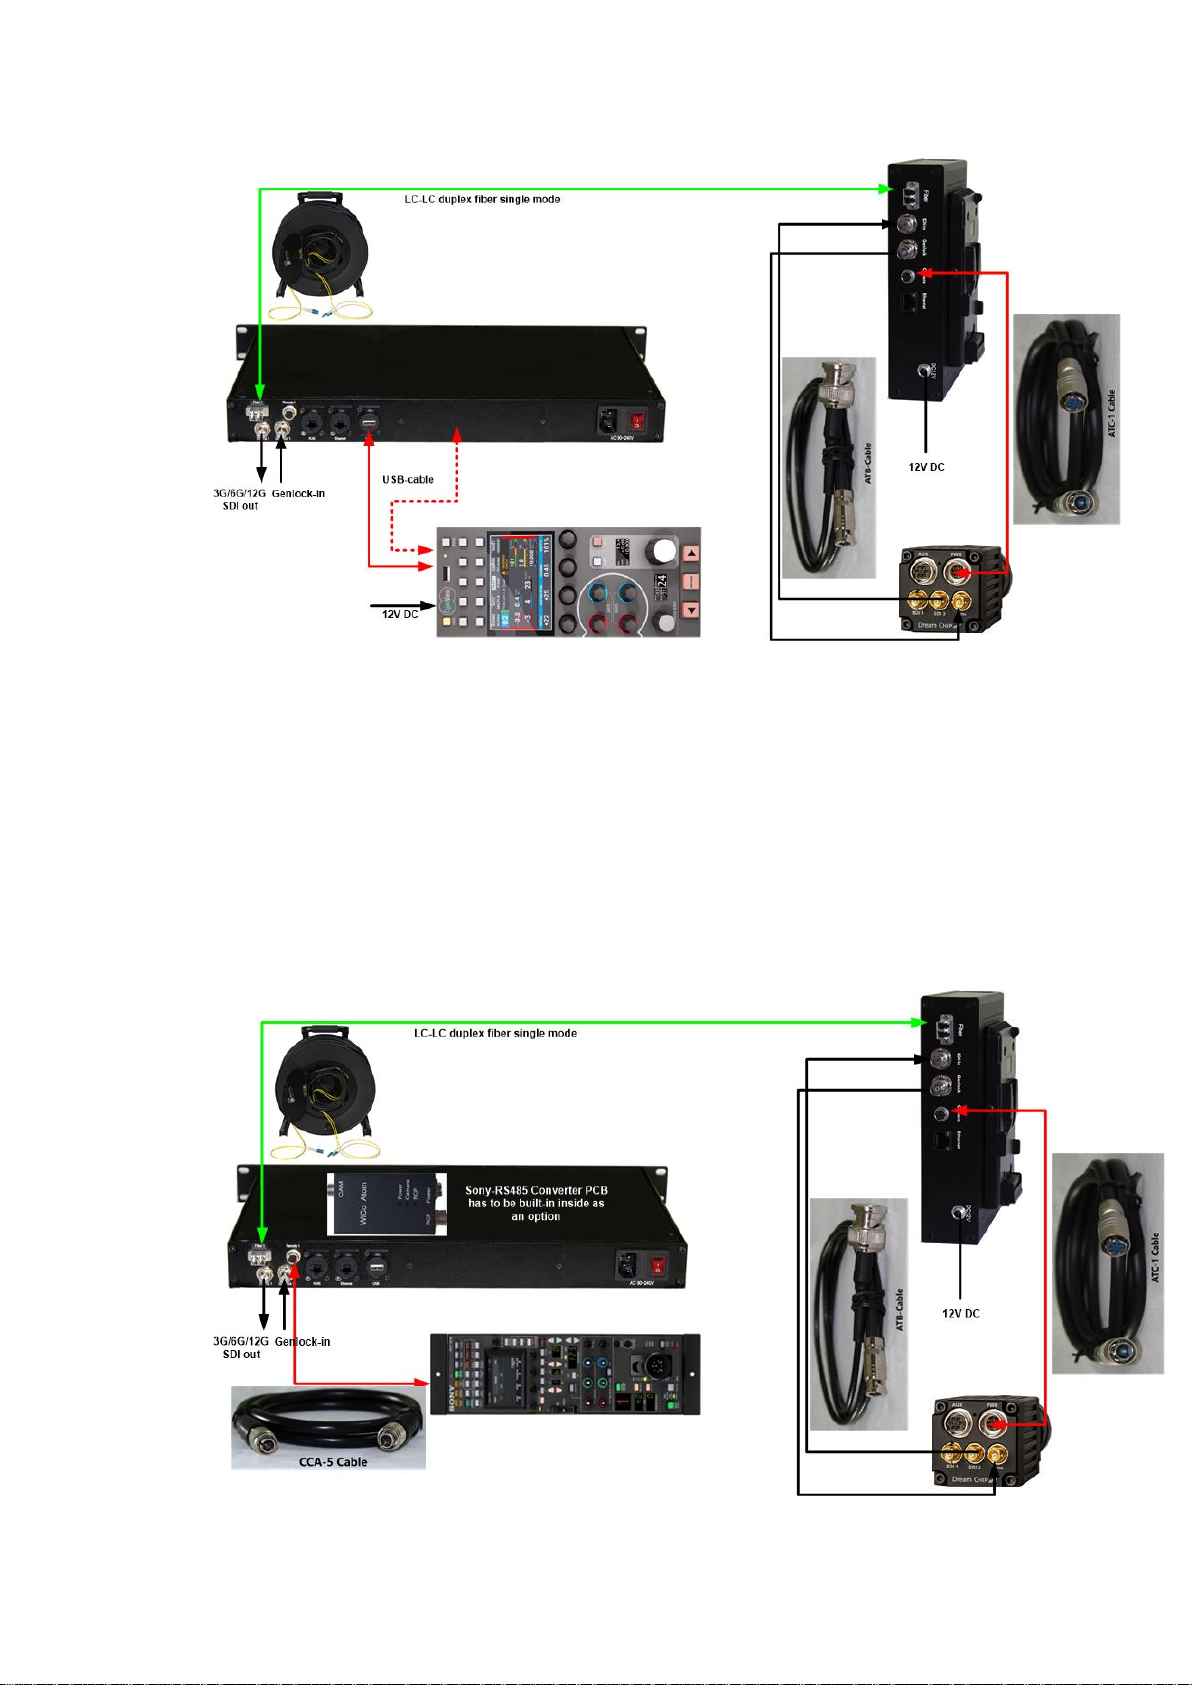
The VTX-Atom CCU-U (Universal) from Vietex Media is the professional-level
optical CCU for the Atom One cameras from Dream Chip Technologies (www.Atom-
One.de ). The target of this high-level bidirectional transceiver system are Atome one
cameras in autonomous operation with genlock and with additional PTZ robotic
head.
The system supports all formats of SDI-Signals from SD to HD, 3G, 6G and 12G as
well as RS-485 control over 20km.
The 19” 1HU base unit offers enough space for two CCU incl. all necessary
converters, such as: Wico, CIO or USR-TCP232-converter. These built-in solutions
saves a lot of external wiring and power supplies
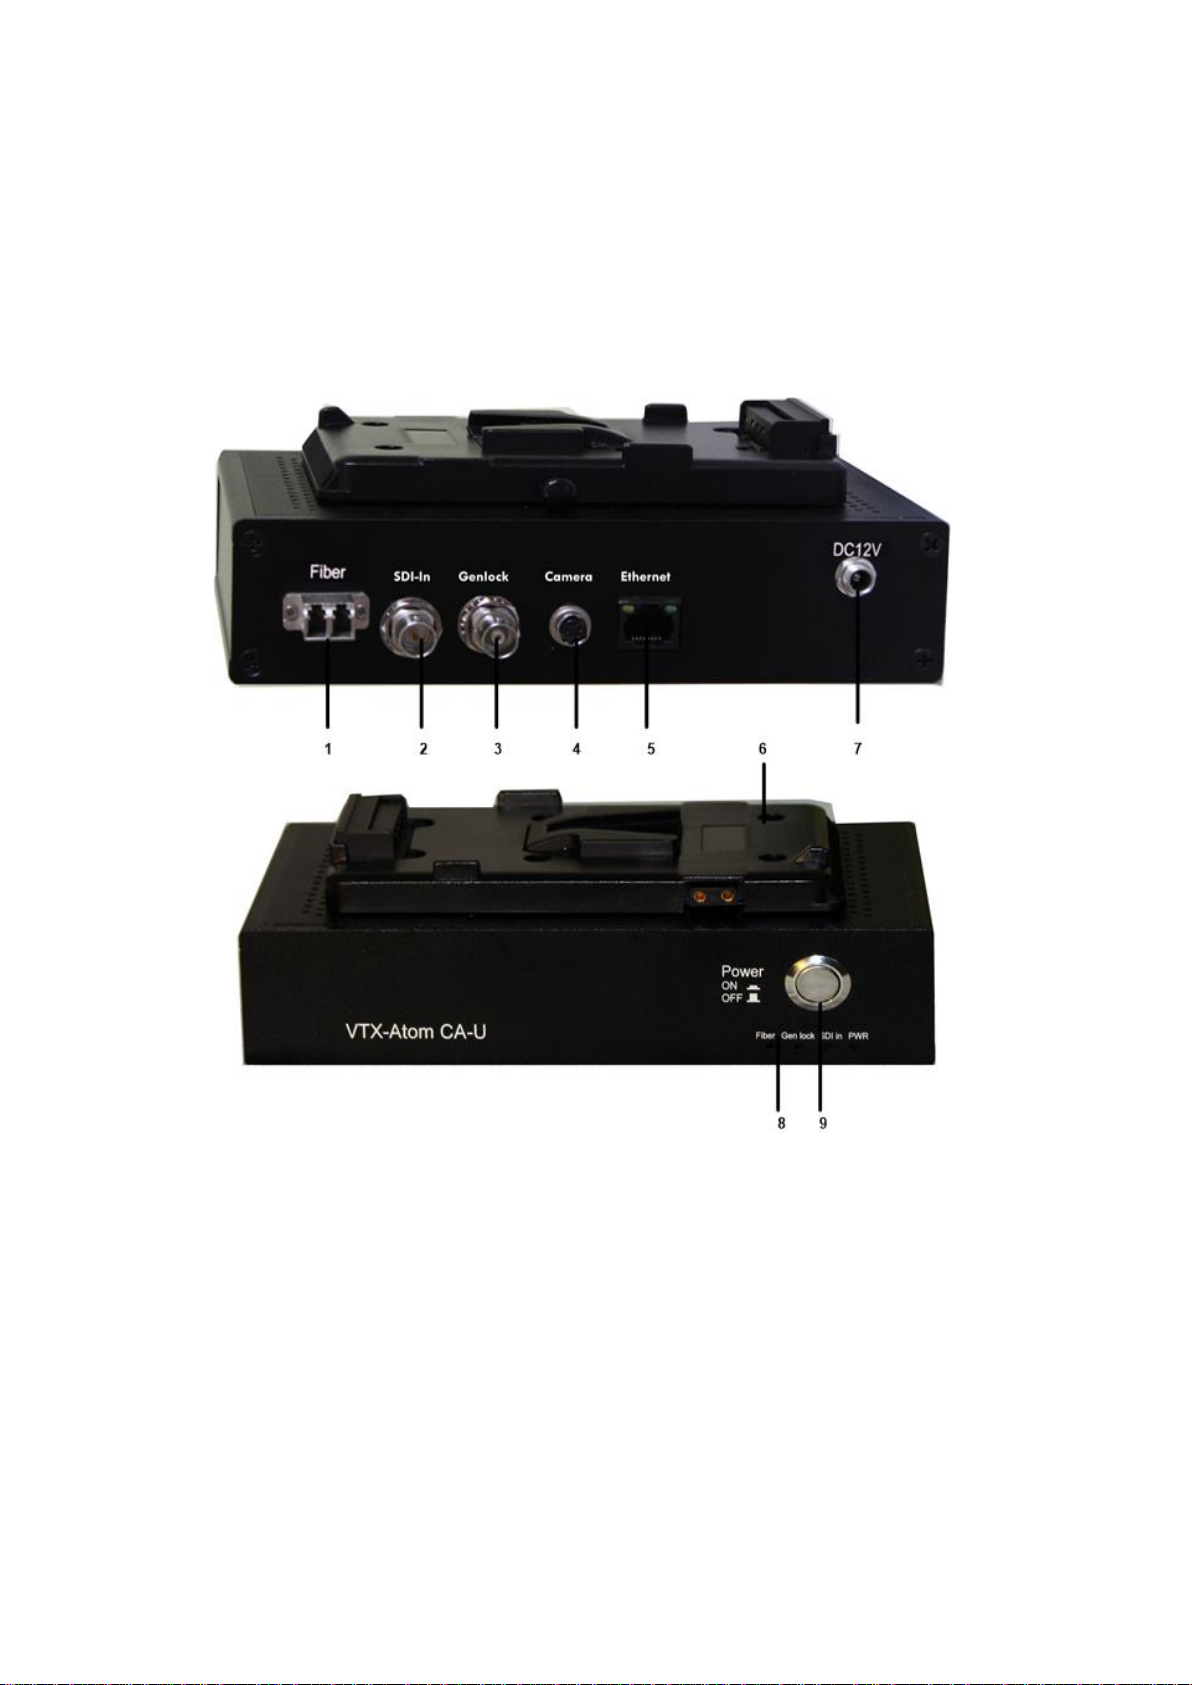
2- Base unit connectivity and interfaces :
1- Duplex Fiber connector: Single mode LC, max 20km
2- SDI-out: BNC-75 Ohm, SD/HD/3G/6G/12G
3- Genlock input: BNC 75 Ohm, can be used for CCVS, Black burst, Tri-Level-Sync
4- Sony RCP: Hirose 8 pin for Sony RCP, Built-in Wico PCB required
5- IP-RCP: RJ-45 for any IP-based RCP: Built-in PCB for Skaarhoj is default, PBC for
Cyanview required as option
6- Ethernet 10/100 kbps
7- USB for direct control from PC by Provideo Software
8- Blind panel for 2nd CCU-channel

2 VTX-Atom CCU-U - Manual
9- AC-Power inlet with 1,0A fuse and main switch
10- DC-Power switch
11- Blind panel for 2nd CCU channel
12- Control-input switch: Sony –IP based RCP –USB
13- LED’s: Power, Fiberlink, SDI-out, Genlock in
3- Camera Adapter
1- Duplex Fiber connector: Single mode LC, max 20km
2- SDI-in: BNC-75 Ohm, SD/HD/3G/6G/12G auto detect
3- Genlock output: BNC 75 Ohm, can be used for CCVS, Black burst, Tri-Level-Sync
4- Camera: Hirose 6 pin
5- Ethernet 10/100 kbps 6-
6- V-mount plate with D-Tap 12V-output
7- 12-15V DC input (max. 5A)
8- LED’s: Fiber link, Genlock-out, SDI-in, Power
9- Power switch

3 VTX-Atom CCU-U - Manual
4- Package content: Set incl.
1- 19” 1HU CCU + power cord
2- CA in compact, shock and water protected (IP62) metal box + 12V DC power supply
3- USB-USB cable
4- Manual + driver on SD-Chip
5- Initial Setting
1- Connect the CCU to the CA by fiber duplex single mode cable
2- Atom one SDI Output to CA SDI-in by ATB cable
3- Connect genlock (if any) by ATB-cable
4- Connect the Atom one camera to the CA by ATC cable
5- Connect the SDI out and Genlock in at the CCU-side by BNC cable
6- Install the USB-FTDI-driver to the laptop/PC
7- Connect the USB from PC to CCU by USB-cable

4 VTX-Atom CCU-U - Manual
8- Set front switch (12) to upper position “ USB”
9- Power on the CCU at 230V main switch (rear panel)
10- Switch on the DC power at front button of the CCU
11- Switch on the DC power at the CA side, after having connected to the DC-12V
adapter or attached the battery
12- All- LED’s light on
13- Start Provideo Software from PC. Normaly: Autodection find the camera.
14- If “Auto detection” failed, go to “Port”, select the right port (COM 6 instead
COM5 i.e). Set “Baudrate” to 115200“. Set ID = 1 or 2, according to the
camera. Go to “Connect”
15- After Provideo GUI opened: set the resolution HD,3G/6G ..12G
16- Set the camera ID = 1, Disable “Auto exposure configuration” and “Auto
White balance”for using 3rd RCP: Sony, Skaarhoj, Cyanview ect. Save the
setting to the internal memory! Finish!
6- Operation with Skaarhoj—RCP

5 VTX-Atom CCU-U - Manual
1- Skaarhoj RCP’s need a network switch to communicate to the Ethernet-
RS485 converter.
2- Both RCP and converter have to be configured in to the same IP-Range.
3- Log in to RCP by SkaarhoiUpdater
https://www.skaarhoj.com/support/firmware-updater/
4- Log-in to USR-TCP232-306: https//:192.168.07 (name= admin, PW=admin)
5- Connect the switch to CCU (RJ45) by CAT5 cable
6- If th switch is not PoE capable, power the RCP by his own DC-Adapter
7- Set the switch in the CCU-front to the middle position (IP-RCP)
8- After 3-5 sec. the RCP will log in the Camera

6 VTX-Atom CCU-U - Manual
Example for IP-Setting between Skaarhoj RCP and built-in converter
Setting Serial interface of the converter: TCP-Server mode, Port-No=5000

7 VTX-Atom CCU-U - Manual
7- Operation with Cyanview RCP
1- The Cyanview RCP Can communicate with the Atom cameras per two USB
ports (port 1 and 2)
2- Connect the CY-RCP to the CCU by USB-USB cable and power it by his own
12V DC adapter.
3- Change the Ethernet setting of the PC and go to RCP Menu by LAN (http://
10.192.18.26)
4- Set the Atom one camera and the USB-Port accordingly
8- Operation with SONY –RCP

8 VTX-Atom CCU-U - Manual
1- Sony’s RCP communicate with Atom one cameras through a RS-485 converter.
This PCB has to be built inside the CCU as an option (see price list)
2- After that, connect the RCP to CCU by a CCA-5 cable. The CCU feed 12V DC to
the CCU
3- Activate the RCP panel
9- Mechanical size
Mechanical size of CCU
Mechanical size of Camera Adapter

9 VTX-Atom CCU-U - Manual
10- Technical Specs.
VTX-Atom Camera Adaptor Universal VTX-CA-U
I/O Connectors
Fiber
Dual LC-Duplex singe mode
SDI-In: Autodetect
HD/3G/6G/12G
1 x BNC SMPTE ST-2082, ST-2081 424M, 344M, 292M, 259M, DVB-ASI,
Genlock Out
1 x BNC, SMPTE ST274, tri-level sync, 0.6 Vp-p, 75 Ω
SD: Black burst (NTSC: 0.286 Vp-p, 75 Ω/PAL: 0.3 Vp-p, 75 Ω) or NTSC 10F-
BB
Ethernet
1 x RJ-45 10/100 mbps
Camera Connector
1 x 6pin Hirose: RS-485 half duplex, 12V-DC,
Power
Lockable connector 12V-DC, Max. current depending on the PSU (1,5-5 A)
V-Mount
With D-Tap 14V-output from batterie
General
Body Size
188 mm x 114 mm x 45 mm LxWxD
Weight
0,5 kg
Power Consumption
Approx. 4W (without camera)
Operating temperature
0°C to 45°C (32°F to 112°F)
VTX-Atom Camera Control Unit Universal (VTX-CCU-U)
I/O Connectors
Fiber
Dual LC-Duplex singe mode
12G SDI-Out
1 x BNC SMPTE ST-2082, ST-2081 424M, 344M, 292M, 259M, DVB-ASI,
Genlock in
1 x BNC, SMPTE ST274, tri-level sync, 0.6 Vp-p, 75 Ω,SD: Black burst (NTSC:
0.286 Vp-p, 75 Ω/PAL: 0.3 Vp-p, 75 Ω) or NTSC 10F-BB
Ethernet
1 x RJ-45 10/100 mbps, auto cross
IP-RCP
RJ-45 connector for IP-Based RCP: Skaahoj or Cyanview
Sony-RCP
8 Pin Hirose for Sony RCP
USB
USB-in for Camera control from PC
General
Size
19" 1HU, 35mm deep
Weight
4 kg
Power Consumption
Approx. 4W without RCP, 8W with Sony RCP
Operating temperature
0°C to 45°C (32°F to 112°F)
System Optical Budget
TX-Output power
- 4 dBm
RX Sensitivity
- 18 dBm
Fiber Distance
20 km
© Vietex Media GmbH 2020