Viking Stage Lighting VK100 Abyss LED User manual

VK100 Abyss LED
Abyss LED 100w DMX
User
Manual M126
Please read the instruction carefully before use

1
B
Please note:
On applying the power this unit will take a few seconds for the
display to illuminate – after which it will Display ‘UAu’ on the display while it
prepares the unit for use. Please be patient.
There are NO user serv ceable parts ns de th s un t. It SHOULD NOT be
d sassembled by the user under any cond t on.
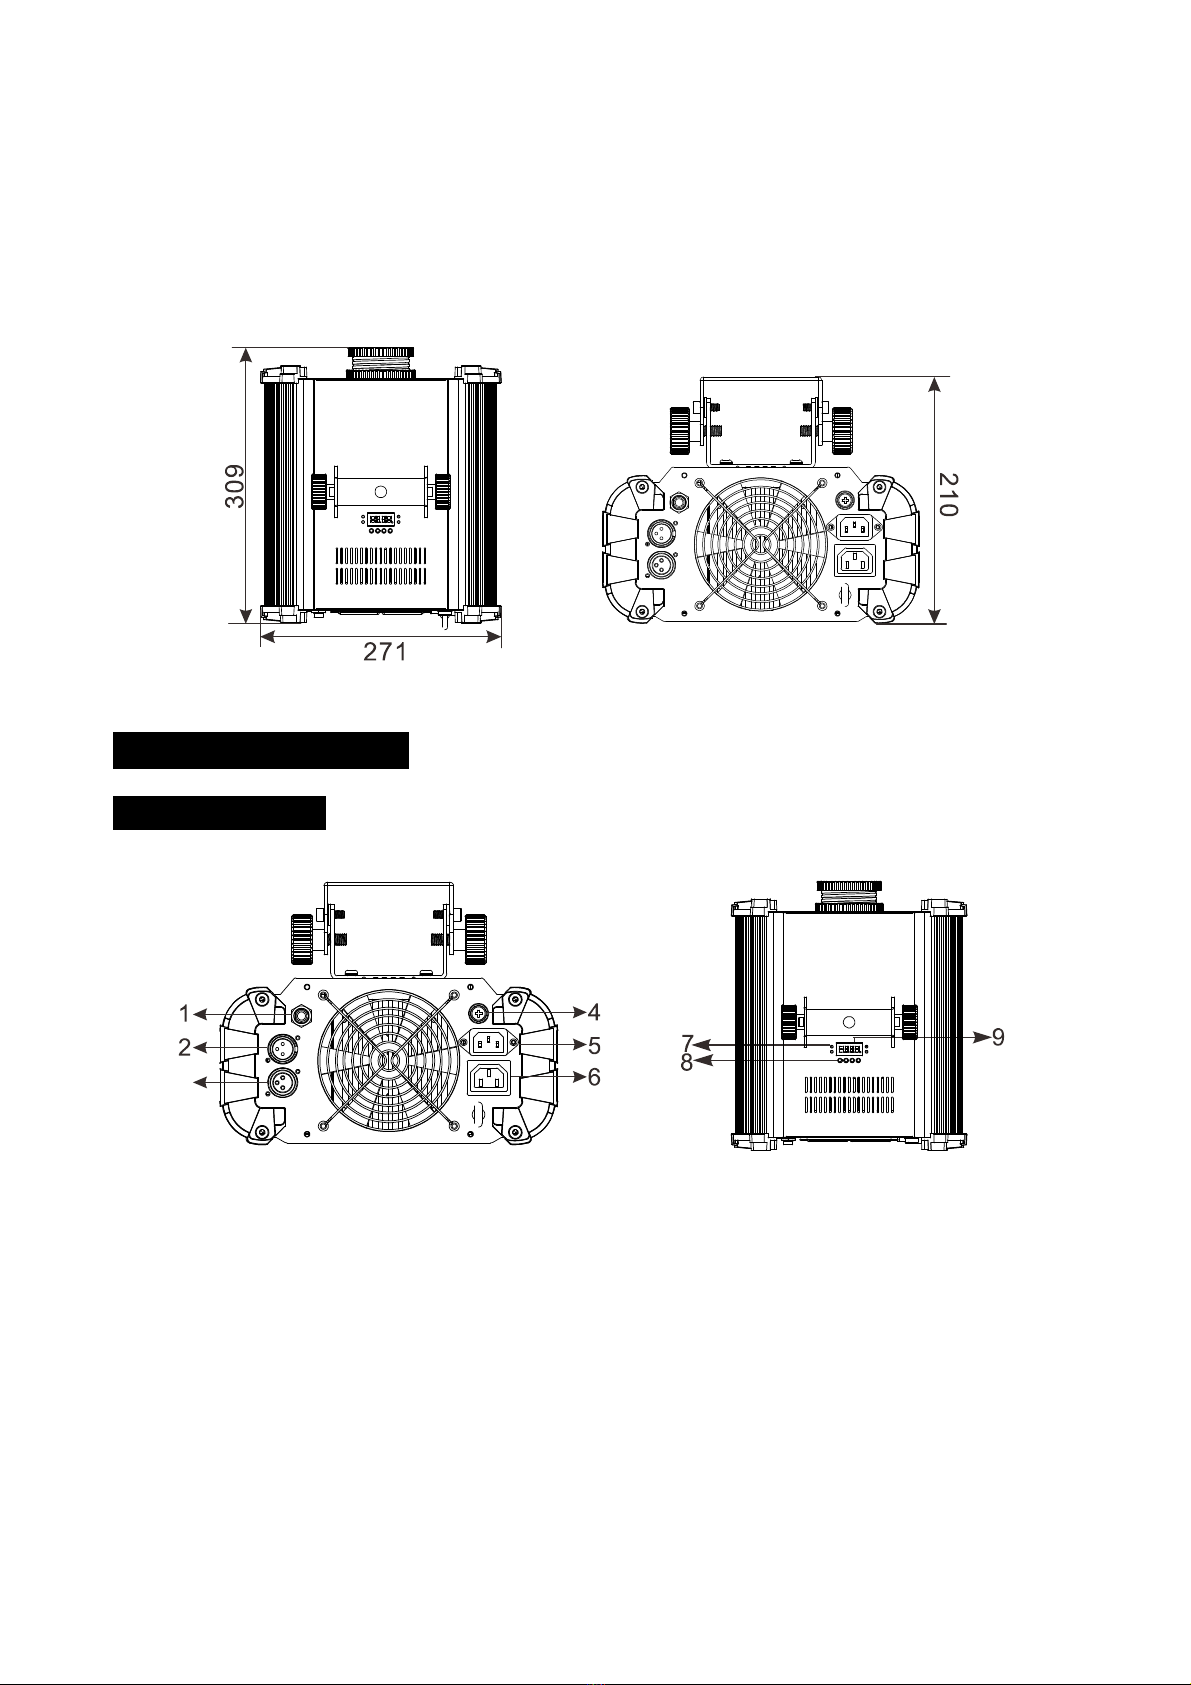
he unit should be mounted via its top mounted M10 bracket and standard hook clamp. Always
ensure that the unit is firmly fixed to avoid vibration and slipping while operating. Make sure
that the structure to which you are attaching the unit is secure and is able to support a weight of
10 times of the fixtures weight. Also always use a safety cable that can hold 12 times of the
weight of the unit when installing the fixture.
he equipment must be installed by professionals. It must be installed in a place where is out of
the reach of people and no one can pass by or under it.
2. Techn cal Spec f cat on
◇ he VK100 Abyss LED is a 100w LED Water wave effect, suitable for big clubs, stages, and
events
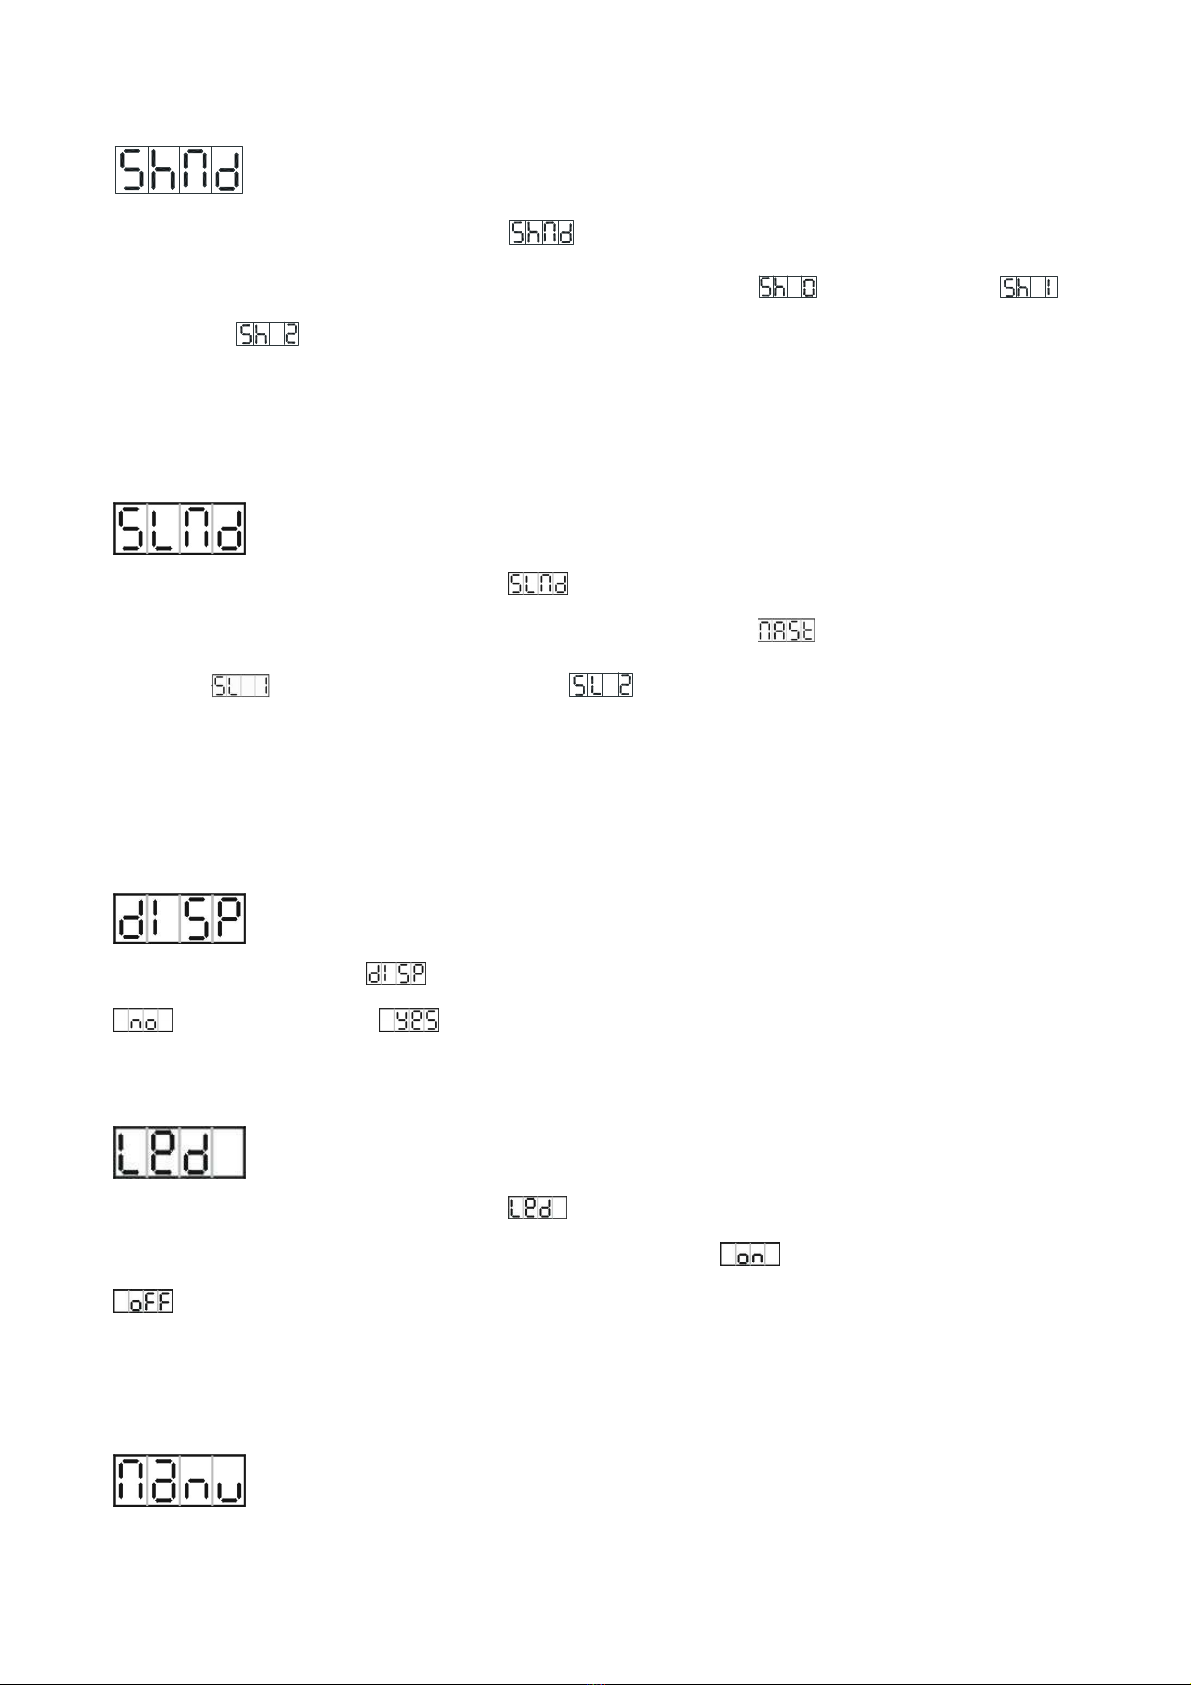
◇ Different working modes:
Standalone: no DMX-controller needed
Master/Slave: great synchronized shows, no DMX-controller required
DMX:3 channels (dimmer, speed, color)
◇ Color wheel with 5 colors plus open
◇ Beam Angle: 44°
◇ LED display for easy navigation
◇ Input Voltage: AC 100V~240V, 50/60Hz

2
B
◇ Power Consumpt on: 105W
◇ L ght Source: 1 x 100W cold white LED
◇ We ght: 6.2Kgs
◇ D mens on: 309 x 271 x 210 mm
3. How To Set The Un t
3.1 Control Panel
3
1. Only for remote control:
his is not supplied with the DMX version of this product.
2. DMX IN:
DMX512 link, use 3-pin XLR cable to link the unit and the DMX controller
3. DMX OUT:
DMX512 link, use 3-pin XLR cable to link the next unit and output DMX signal.
4. Fuse (T 3.15A):
Protects the unit from over-voltage or short circuit.

3
B
5. MAINS IN:
IEC Connection from main power supply;
th s un t MUST NOT be used on a d mmer c rcu t.
6. MAINS OUT:
IEC Connection for main power supply to the next unit.
7. LEDs:
DMX On DMX input present
MASTER On Master Mode
SLAVE On Slave Mode
SOUND Flashing Sound activation
8. Buttons:
MENU o select the programming functions
DOWN o go backward in the selected functions
UP o go forward in the selected functions
ENTER o confirm the selected functions
9. Funct on D splay:
o show the various menus and the selected functions;
3.3 Ma n Funct on
o select any of the given functions, press the MENU button up to when the required selection as
shown on the display. Select the function by the ENTER button and the display will blink. Use the
DOWN/UP button to change the mode. Once the required mode has been selected, press the
ENTER button to setup, to go back to the functions without any change press the MENU button
again. Press and hold the MENU button for about one second or wait for one minute to exit the
menu mode.
he main functions are shown below:

4
B
DMX 512 Address Setting
Press the MENU button up to when the is shown on the display. Pressing EN ER button
and the display will blink. Use DOWN and UP button to change the DMX 512 address. Once the
address has been selected, press EN ER button to setup or automatically exit menu mode without
any change after one minute. Back to the previous functions without any change press MENU
button.

5
B
Show Mode
Press the MENU button up to when the is showing on the display. Pressing EN ER button
and the display will blink. Use DOWN and UP button to select the (Random show),
(show 1) or (show 2). Once the mode has been selected, press the EN ER button to setup
or automatically return to the main functions without any change after one minute. o go back to
the functions without any change press the MENU button again.
Slave Mode
Press the MENU button up to when the is showing on the display. Pressing EN ER button
and the display will blink. Use DOWN and UP button to select the (set the fixture as
master) , (set the fixture as slave 1) or (set the fixture as slave 2). Once the mode
has been selected, press the EN ER button to setup or automatically return to the main functions
without any change after one minute. o go back to the functions without any change press the
MENU button again.
Display Inverse
Press MENU button until is blinking on the display. Use DOWN and UP button to select
(display normal) or (display inverse), press EN ER button to setup.
LED display
Press the MENU button up to when the is shown on the display. Pressing EN ER button
and the display will blink. Use DOWN and UP button to select (display always on) or
(display off 20 seconds after exit menu) mode. Once select, press EN ER button to setup or
exit menu mode without any change after one minute. Back to the functions without any change
press MENU button again.
Manual setting color

6
B
Press the MENU button up to when the is shown on the display. Pressing EN ER button,
and use DOWN and UP button to select (0-255) or
(000-2555,clockwise/counterclockwise) , or (000-255),press EN ER button to confirm and
use DOWN and UP button to adjust the value, once select press EN ER button to setup or
automatically exit menu mode without any change after one minute. o go back to the last
function without any change press the MENU button.
Self-test
Press the MENU button up to when the is shown on the display, Pressing EN ER button to
run the auto test. Back to the functions without any change press MENU button.
Back to the functions without any change press MENU button.
emperature est
Press the MENU button up to when the is blinking on the display. Pressing EN ER button
and the display will show the temperature of the unit. o go back to the functions press the MENU
button again.
Fixture Hours
Press the MENU button up to when the is blinking on the display. Pressing EN ER button
and the display will show the number of working hours of the unit. o go back to the functions
press the MENU button.
Software version
Press the MENU button up to when the is showing on the display. Pressing EN ER button
and the display will show the version of software of the unit. o go back to the functions press the
MENU button again.
Factory reset all channels
Press the MENU button up to when the is shown on the display, press EN ER button to

7
B
setup. Back to the functions without any change press MENU button.
4. How To Control The Un t
You can operate the unit in 3 ways:
1. By master/slave function
2. By Standalone using the Display and buttons on the unit
3. By DMX controller
No need to turn the unit off when you change the DMX address, as new DMX address setting will
be effected at once. Every time you turn the unit on, it will show “CP21” on the display and move
all the motors to their ‘home’ position. After that the unit will be ready to receive DMX signal or
run the built in programs.
4.1 Master/Slave Bu lt In Preprogrammed Funct on
he fixture will allow you to link 2 fixtures together and operate without a controller. In
Master/Slave mode, the first fixture whose DMX input jack has with nothing connect need to set
as master and the other unit need to set as slave 1 via menu, then the first unit will control the
other to give an automatic and synchronized light show. his function is good when you want an
instant show. Any fixture can act as a Master or as a Slave.
4.4 DMX 512 Conf gurat on
3 Channel Mode:
CHANNEL
VALUE FUNCTIONS
1
000 ~ 255
DIMMER
0 100%
2
000 ~ 009
010 ~ 120
121~ 134
135 ~ 245
246 ~ 255
D amond R pple Wheel
Stop
CW Rotation: fast slow
Stop
CCW Rotation: slow fast
Stop

8
B
3
000 ~ 010
011 ~ 021
022~ 032
033 ~ 043
044 ~ 054
055 ~ 065
066 ~ 076
077~ 087
088 ~ 098
099 ~ 109
110 ~ 120
121 ~ 127
128~ 187
188 ~ 196
197 ~ 255
Color Wheel
Open
Open Amber
Amber
Amber Green
Green
Green Blue
Blue
Blue Yellow
Yellow
Yellow Pink
Pink
Pink Open
Cont nuous Rotat on
CW Rotation: fast slow
Stop
CCW Rotation: slow fast
Table of contents
Other Viking Stage Lighting Lighting Equipment manuals
Popular Lighting Equipment manuals by other brands

MJ LED LIGHTNING
MJ LED LIGHTNING MJ-2042CR user manual

German Light Products
German Light Products Impression X4 Bar 20 instruction manual

VisionAid
VisionAid StandBright 2 instructions

Renkforce
Renkforce 1519480 operating instructions

Ecco
Ecco ED3789 Installation and operation instruction

Aervoe
Aervoe 1197 operating instructions