Vimco LUTRON Sivoya QED seeTouch SVQ-2WD User manual

Open
Close
LUTRON
SVQ-2W
SVQ-2WRL
SVQ-2WD
SVQ-3W-IR
SVQ-3WRL-IR
SVQ-4WRL-IR
❑
✓
❑
✓
SVQ-2W-IR
SVQ-2WRL-IR
SVQ-3W
SVQ-3WRL
SVQ-3WD
SVQ-5WRL
❑
✓
❑
✓
TM
Open
Preset 1
Preset 2
Close
LUTRON
Open
Preset
Close
Open
Preset
Close
LUTRON
Sivoia QED™seeTouch
Keypads
for use with Lutron Sivoia QED
Motorized Window Treatment System
❑
✓
❑
✓
❑
✓
❑
✓
❑
✓
❑
✓
❑
✓
❑
✓
040200a 6/2/03 9:42 AM Page 1

2
SVQ-2W, SVQ-2WRL,
SVQ-2W-IR, SVQ-2WRL-IR
Status
Indicator
LEDs
Open
Preset
Close
Open
Preset
Close
LUTRON
Open
Close
LUTRON
* Infrared Receiver available on SVQ-2W-IR, SVQ-2WRL-IR, SVQ-3W-IR, SVQ-3WRL-IR, and SVQ-4WRL-IR only.
** Raise and Lower buttons available on SVQ-2WRL, SVQ-2WRL-IR, SVQ-3WRL, SVQ-3WRL-IR, SVQ-4WRL-IR, and SVQ-5WRL only.
Open
LUTRON
Close
Open
Close
SVQ-2WD
Open
Preset
Close
LUTRON
SVQ-3W, SVQ-3WRL,
SVQ-3W-IR, SVQ-3WRL-IR
Open button
Preset button
Close button
Open
Preset 1
Preset 2
Close
LUTRON
Open button
Preset 1 button
Preset 2 button
Preset 3 button
Close button
Open
Preset 1
Preset 2
Close
Preset 3
LUTRON
Open button
Preset button
Close button
Open button
Close button
Infrared Receiver*
Raise/Lower**
Open button
Close button
Open button
Close button
SVQ-3WD
Open button
Preset button
Close button
Infrared Receiver*
Raise/Lower**
SVQ-4WRL-IR
SVQ-5WRL
Open button
Preset 1 button
Preset 2 button
Close button
Infrared Receiver
Raise/Lower
Raise/Lower
Installation Instructions Occupant Copy
CAUTION
!
■Lutron recommends that Keypads be installed by a qualified electrician.
■Do not connect high-voltage power to low-voltage terminals. Improper wiring can result in personal injury or damage
to the control or to other equipment.
■Keypads must be connected to the Sivoia QED Electronic Drive Unit (EDU) by using Class 2/PELV wiring methods per the
National Electrical Code®. Check with your local electrical inspector for the local code requirements and wiring practices allowed
in your area.
■Use only a cloth with warm water and mild soap to clean faceplates (no chemical cleaners).
Keypad Configurations
Non-insert version shown. Insert version also available.
040200a 6/2/03 9:42 AM Page 2

3Occupant Copy Installation Instructions
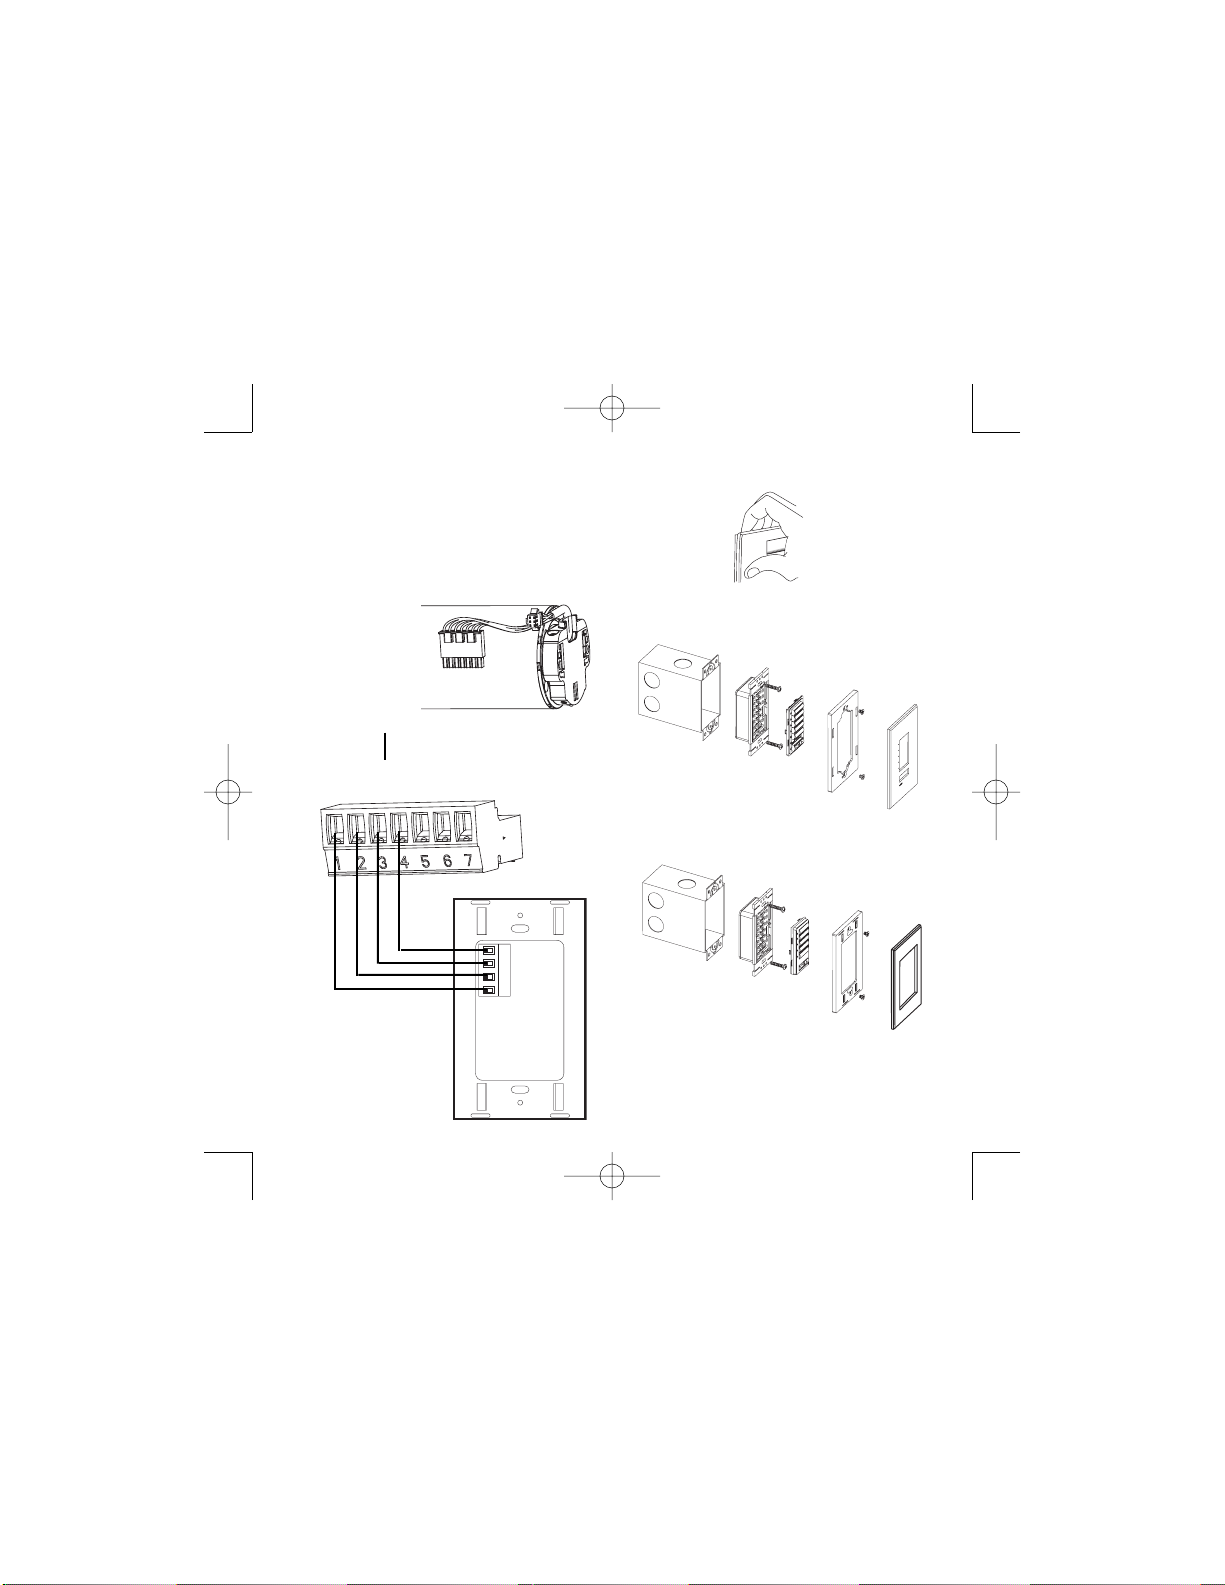
■Keypad Wiring
— Two #18 AWG (1.0 mm2) wires for power and two
shielded #18 AWG (1.0 mm2) stranded wires for
data (twisted pair). Lutron recommends and offers a
one-cable, non-plenum, low-voltage cable solution
(P/N SVQ-CBL-250).
— Power: wires 1 & 2, 12 - 15 VDC.
— Data: wires 3 & 4, twisted, shielded pair.
■Sivoia QED Link wiring layouts are shown on the next page.
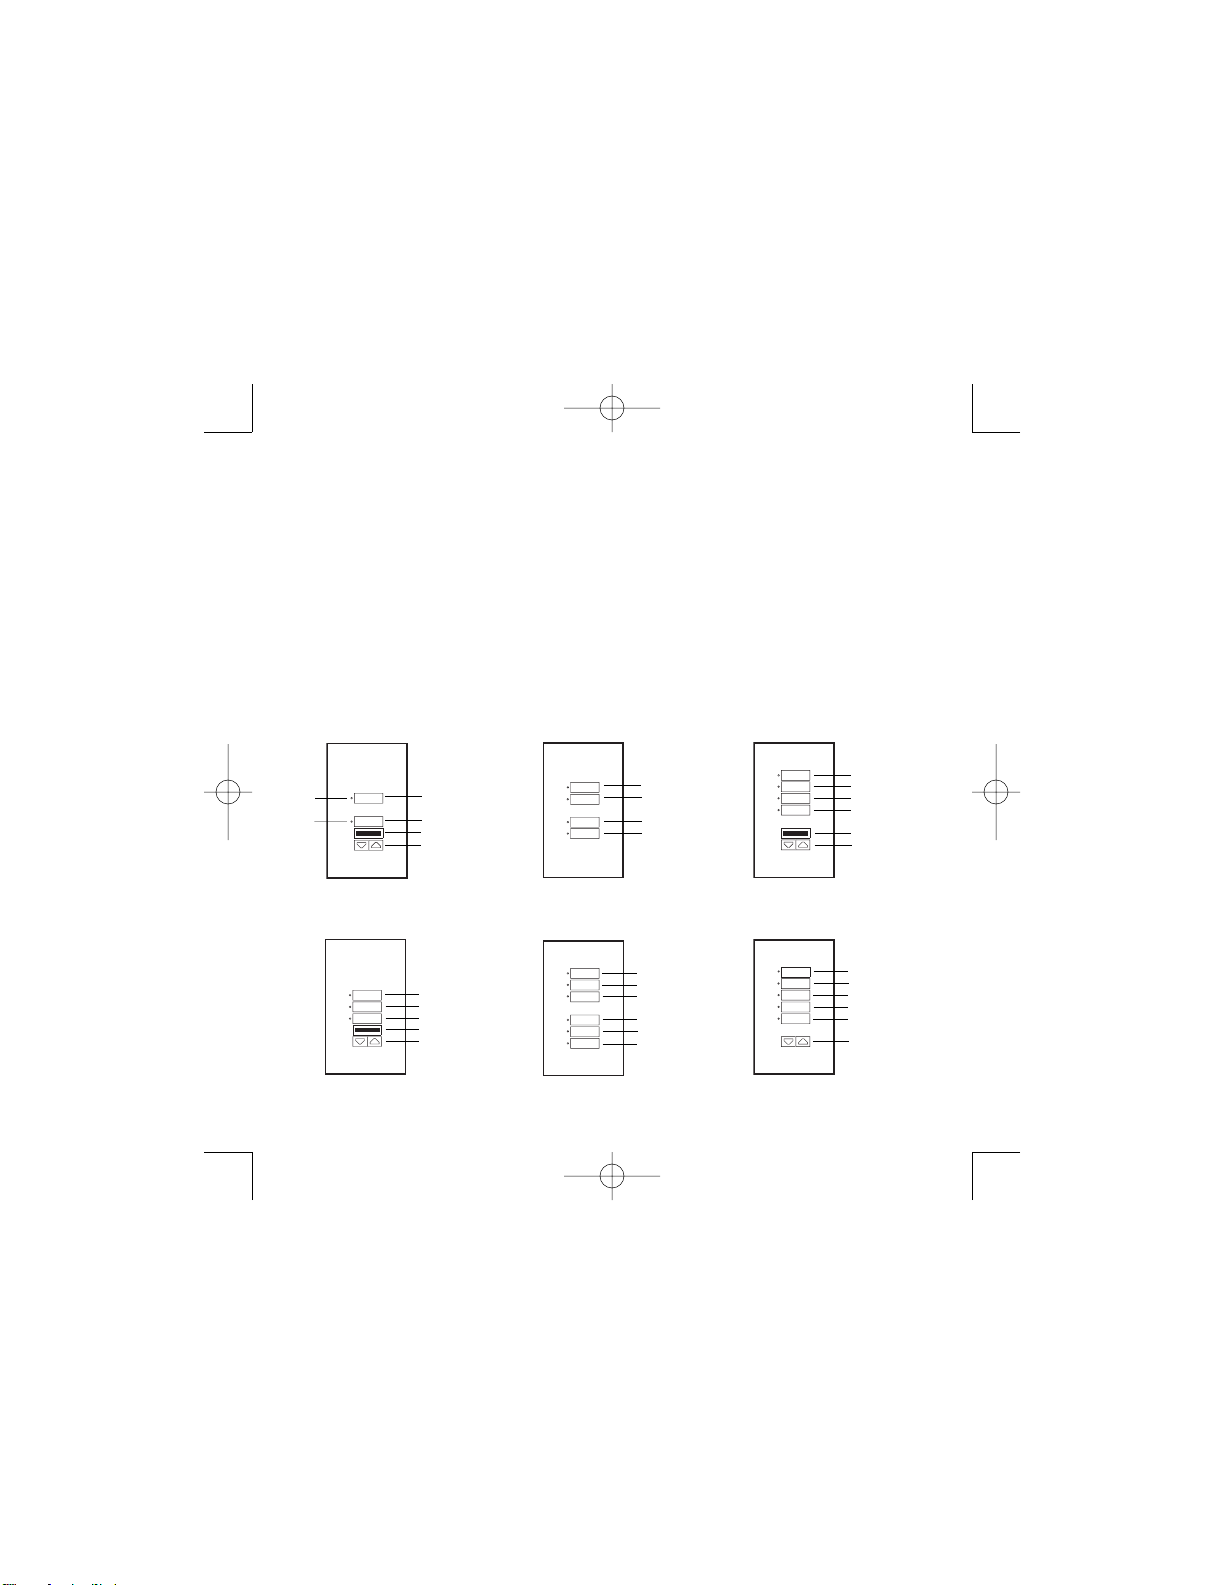
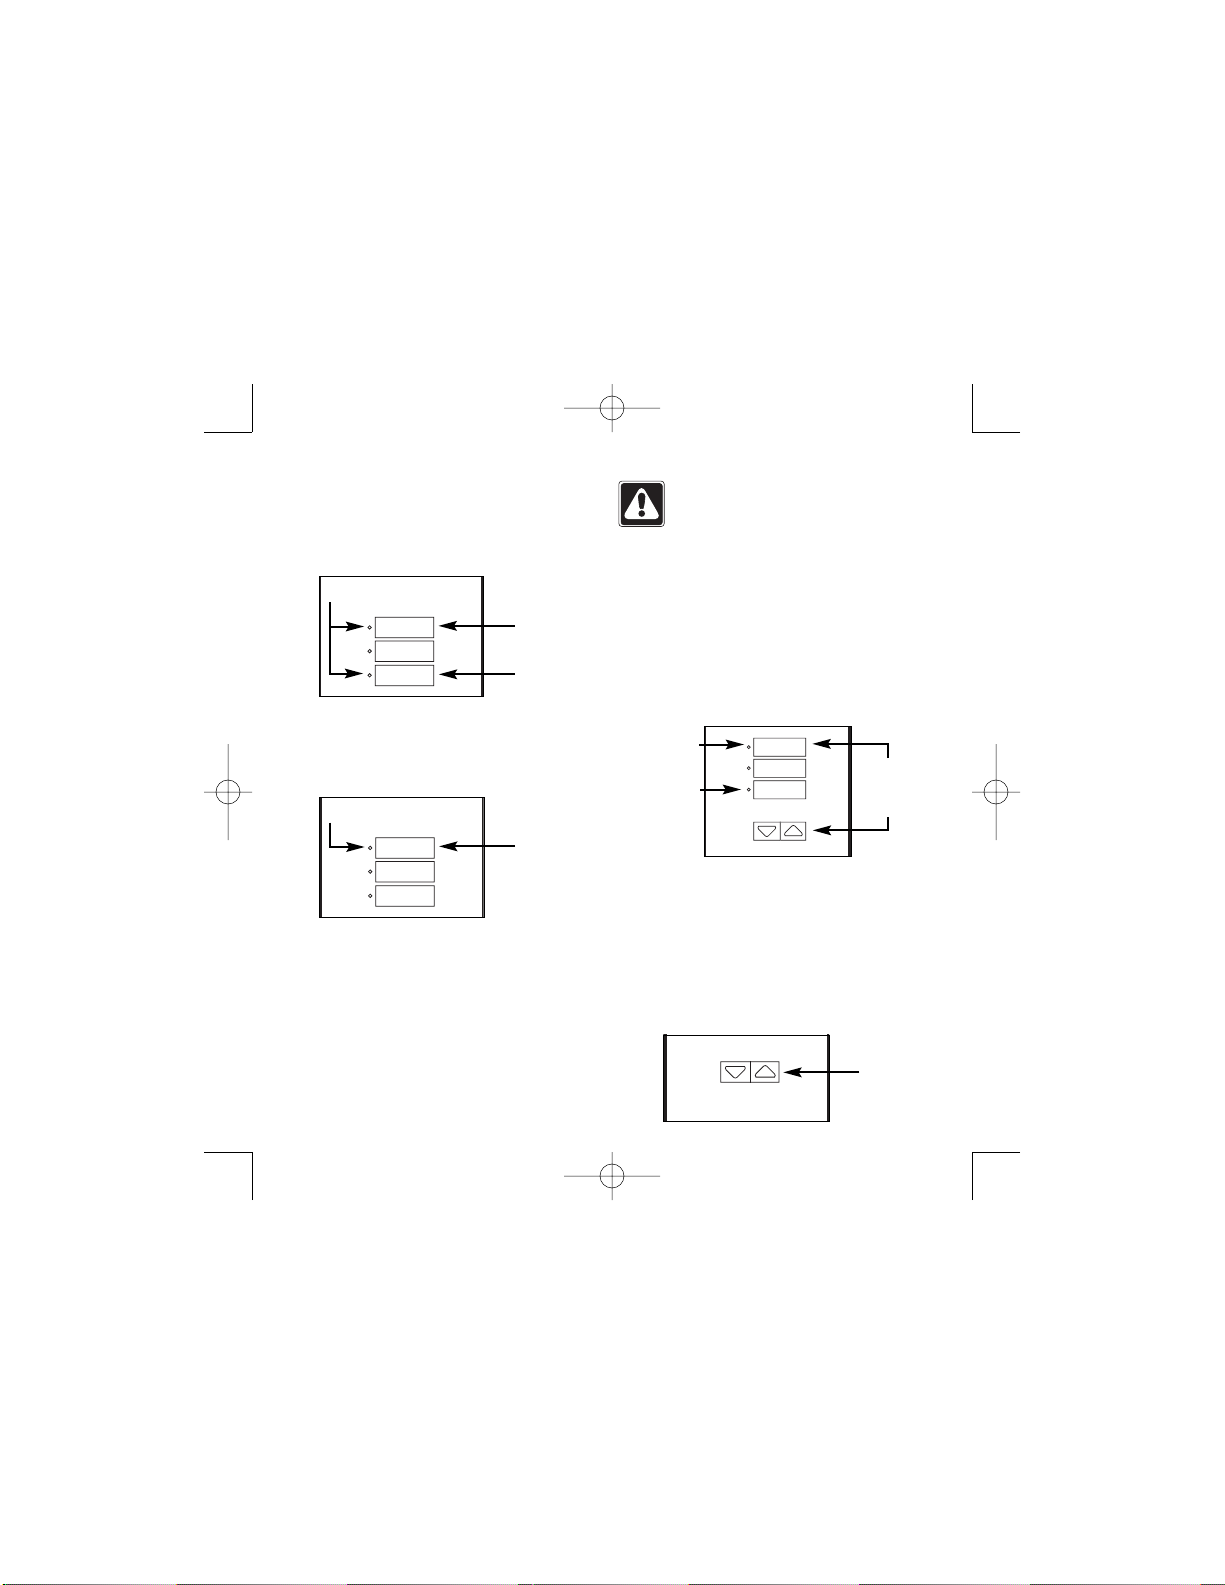
Button Functionality
Pressing the Open, Close, or Preset button will cause the window
treatments to move to the selected position. While pressing the
Raise or Lower button, the window treatments will raise or lower.
Open - Pressing the open button will cause the window
treatments to move to the fully-open position.
Preset - Pressing one of the preset buttons (Preset 1, Preset 2,
or Preset 3) will cause the window treaments to move to their
programmed preset level.
Close - Pressing the close button will cause the window
treaments to move to the fully-closed position.
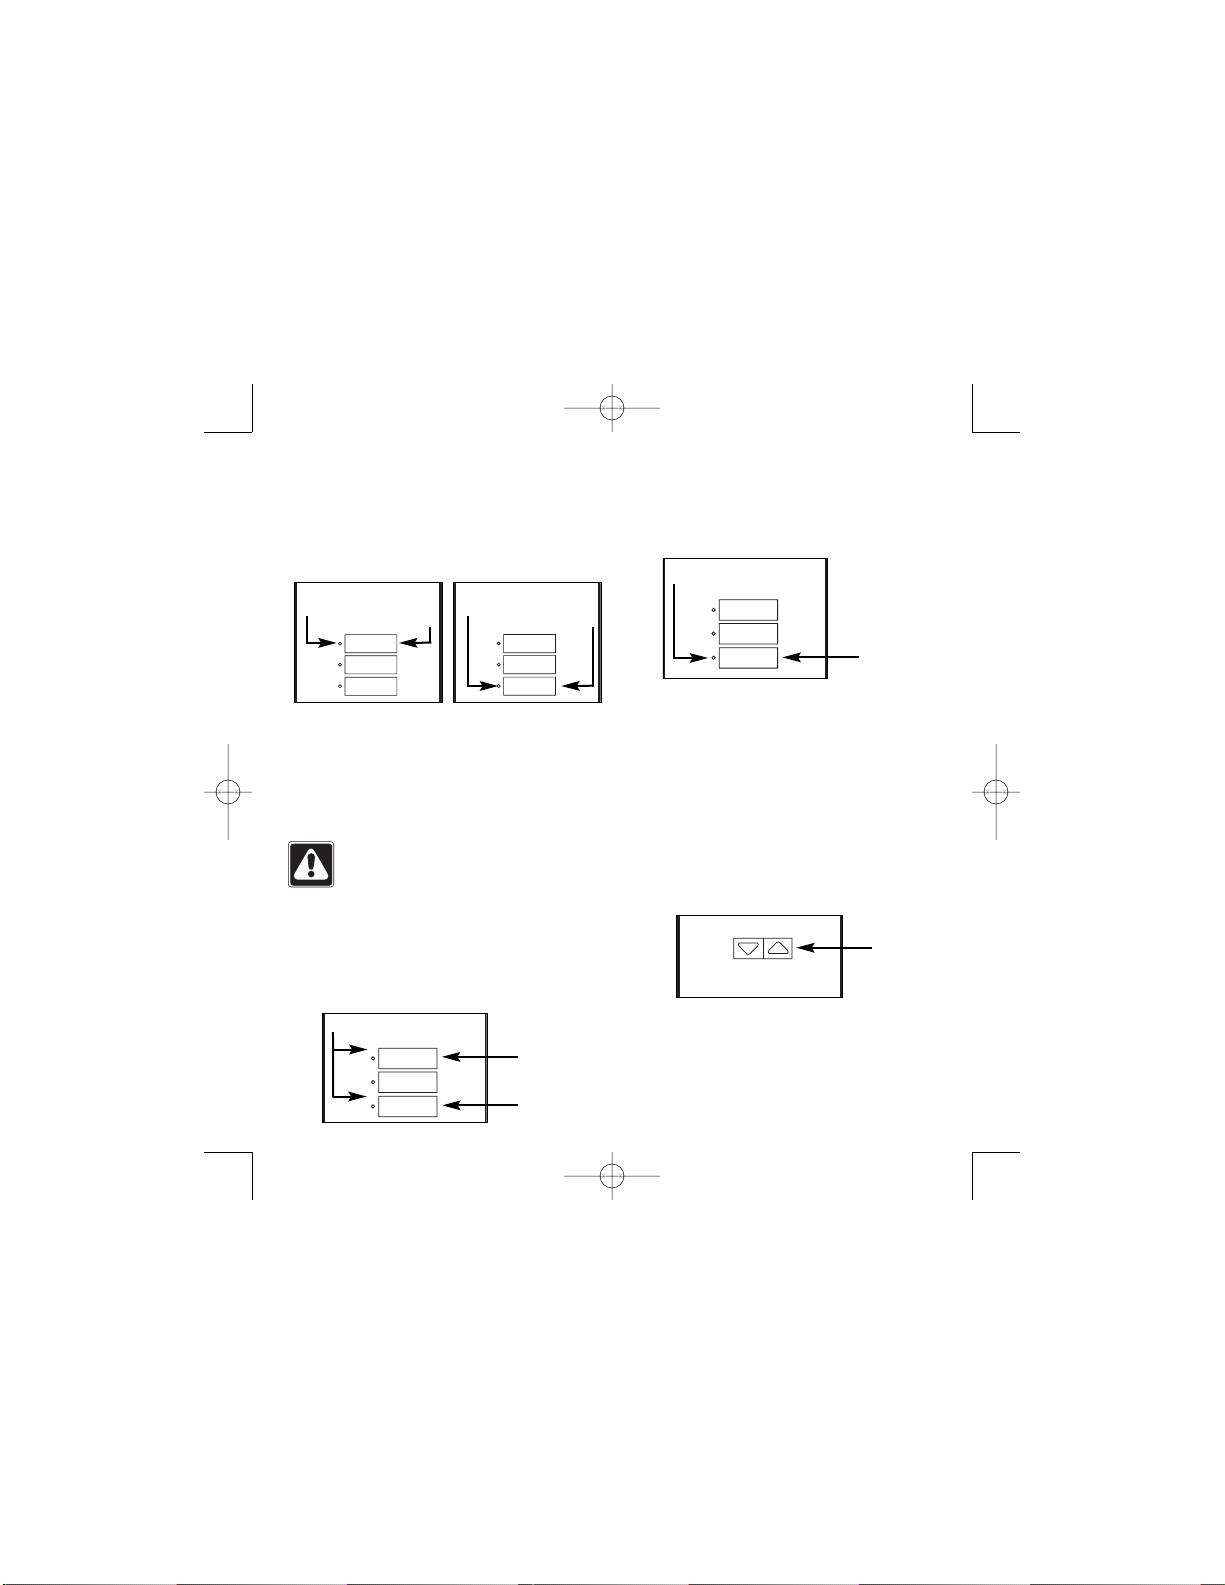
Raise - Holding the raise button will cause the window
treatments to move towards the open position. Releasing the
raise button will cause the window treatments to stop.
Lower - Holding the lower button will cause the window
treatments to move towards the closed position. Releasing the
close button will cause the window treatments to stop.
Wiring Notes
■System Maximums:
— Up to 64 Electronic Drive Units (EDUs) on one system.
One transformer per EDU.
— The Keypads wire to the Sivoia QED Communication
Link. The Link can support up to 32 Keypads and can
not exceed 4000 feet total.
— The Keypads are either powered by EDUs or Keypad
Power Supplies. Each EDU can provide power for one
Keypad.
The number of Keypads should not exceed
the number of EDUs unless connecting with a Keypad
Power Supply.
— The maximum distance between any two Sivoia QED
devices is 1000 feet unless specified otherwise.
— Operating environment should be between 0°C - 40°C
(32°F - 104°F).
Installation
Keypad circuits are classified as Class 2 circuits (U.S.A.) and
PELV circuits (IEC). Unless otherwise specified, the voltages do
not exceed 15 VDC. When installing and wiring to these
Keypads, follow all applicable national and/or local wiring
regulations.
Warning: Always turn Off the circuit breaker or
remove the main fuse from the power line before
doing any work. Failure to do so can result in
serious personal injury.
1. Turn power Off to all EDUs and power panels.
2. Mount standard U.S. 1-gang wallbox, 2.75 in. (70 mm)
deep (available from Lutron P/N 241-519).
ON
OFF
ON
OFF
ON
OFF
3/8 in. (10 mm)
3. Strip insulation from wires so that 3/8 in. (10 mm) of bare
wire is exposed for #18 AWG (1.0 mm2) wire.
040200a 6/2/03 9:42 AM Page 3

Open
Preset
Close
LUTRON
.75
.75
.75
.75
Open
Preset
Close
LUTRON
.75
.75
Wiring Key:
Communications Link: 4 Conductor #18 AWG (twisted and shielded)
Power Supply: 3 Conductor #16-20 AWG
SVQ-CBL-250 ( & combined): 7 Conductors. For more information, see the Sivoia QED Technical Reference Guide.
4Installation Instructions Occupant Copy4
AC
GRD
AC
Open
Preset
Close
LUTRON
.75
.75
.75
.75
.75
.75
Open
Preset
Close
LUTRON
AC
GRD
AC
AC
GRD
AC
.75
.75
AC
GRD
AC
Open
Preset
Close
LUTRON
.75
.75
.75
.75
AC
GRD
AC
AC
GRD
AC
Open
Preset
Close
LUTRON
Open
Preset
Close
LUTRON
Sivoia QED Link Wiring Using Power Panels
Sivoia QED Link Wiring Using Individual Transformers
For larger systems, distribute Keypads evenly on the link (maximum one Keypad between EDUs), as seen below.
For systems with up to four Keypads and 400 feet of wire, there is no requirement for even distribution of EDUs and Keypads.
A
B
A
B
A
B
CA B
.75
.75
.75
A
A
C
C
C
040200a 6/2/03 9:42 AM Page 4

5Occupant Copy Installation Instructions
Sivoia QED Link:
Class 2/PELV Wiring
connections to EDUs,
Power Panels, or
other Keypads.
Male EDU Connector
Sivoia QED seeTouch Keypad Wiring
4. Each Keypad terminal will accept up to two #18 AWG (1.0
mm2) wires.
Connect two #18 AWG (1.0 mm2) wires to terminals 1 and 2
of the Keypad’s terminal block.
Connect two #18 AWG (1.0 mm2) shielded, twisted pair wires
to terminals 3 and 4 of the Keypad’s terminal block.
4
3
2
1
Common
12V
DATA A/MUX
DATA B/MUX
AC
AC
EGND
Female EDU
Connector
Sivoia QED EDU
5. Remove the faceplate from the Keypad. To remove the
faceplate, pull outward at each corner, one corner at a time.
Non-insert Version Mounting Diagram
6. Mount Keypad as shown in the diagram below.
Insert Version Mounting Diagram
7. Attach faceplate by pressing in at each corner, one corner at
a time.
Wallbox
SVQ
Keypad Button
Assembly
Faceplate
Adapter Faceplate
Wallbox
SVQ
Keypad Button
Assembly
Faceplate
Adapter Faceplate
Back of Sivoia
QED seeTouch
Keypad
040200a 6/2/03 9:42 AM Page 5

6
Setting Limits
Note: Entering Limit Setup mode may cause the
window treatments to move approximately 8 inches
up or down. Be sure that each window
treatment is positioned such that the fabric can safely
move approximately 8 inches up or down before
entering Limit Setup mode.
Note: When using Keypads that do not have Raise and Lower
buttons, set the limits at the EDU. Refer to the Sivoia QED
Technical Reference Guide for more information.
1. Enter Limit Setup mode by pressing and holding the Open
and Raise buttons simultaneously. The LED next to the Open
button will flash once per second and the LED next to the
Close button will flash quickly (8 times per second).
Open
Preset
Close
LUTRON
2. Select the EDU to adjust using the Open button on the
Keypad. Each time the Open button is pressed and released,
an EDU will begin opening and closing the window treatment
over a range of approximately 8 inches. Repeat pressing the
Open button until the desired EDU is selected. The Close
button can also be used to select EDUs by moving through
the EDUs in the opposite order.
3. Adjust the currently selected EDU to the desired level, using
the Raise and Lower buttons on the Keypad.
Press the Open
and Raise buttons
simultaneously.
LED flashing once
per second
LED flashing 8
times per second
Installation Instructions Occupant Copy
Addressing the System
1. Enter programming mode on the Keypad by pressing and
holding the Open and Close buttons simultaneously for 5
seconds. The LEDs next to the Open and Close buttons will
flash once per second, indicating the Keypad is in
Programming mode.
Open
Preset
Close
2. Initiate system addressing by pressing the Open button. The
LED next to the Open button will flash quickly (8 times a
second) and the LED next to the Close button will turn off.
The system is now being automatically addressed.
Press the Open
and Close buttons
simultaneously
for 5 seconds.
Flashing once per second
Open
Preset
Close
Press the Open
button.
3. Wait for system addressing to be completed. This will take
approximately one minute. While addressing is in progress,
each Keypad will flash the Open LED quickly (8 times a
second). When addressing has successfully completed, the
Open and Close LEDs on each Keypad in the system will
flash slowly (once per second).
4. When system addressing is complete, exit Programming
mode by pressing and holding the Open and Close buttons
simultaneously for 5 seconds. The Open and Close LEDs
will stop flashing.
Flashing 8 times per second
LUTRO
N
Press the
Raise or
Lower button.
040200a 6/2/03 9:42 AM Page 6

7Occupant Copy Installation Instructions
4. Store the current position as the Open limit by pressing and
holding the Open button on the Keypad for 5 seconds. The
LED next to the Open button will turn on for two seconds.
OR
Store the current position as the Close limit by pressing and
holding the Close button on the Keypad for 5 seconds. The
LED next to the Close button will turn on for two seconds.
5. Use the Open or Close buttons to select other window
treatments and adjust the limits as in Steps 3 and 4.
6. Exit Limit Set mode by pressing and holding the Open and
Raise buttons simultaneously.
EDU Assignment
Note: Entering Assignment mode will cause the
window treatments to move between their Open and
Close limits. Be sure that the Open and Close
limits have been set appropriately.
1. Enter Programming mode on the Keypad by pressing and
holding the Open and Close buttons simultaneously for 5
seconds. The LEDs next to the Open and Close buttons will
flash once per second, indicating the Keypad is in
Programming mode.
2. Initiate Assignment mode by pressing the Close button. The
LED next to the Close button will continue to flash (once per
second) and the LED next to the Open button will turn off.
EDUs that are assigned to the Keypad in Assignment Mode
will move to their Close limit. EDUs that are not assigned to
the Keypad will move to their Open limit.
Open
Preset
Close
Press the
Close button.
3. Press any button on an EDU to toggle between assignment
or unassignment with the Keypad.
OR
Use the Open button to step through each EDU in the
system. Each time the Open button is pressed, a window
treatment will begin raising and lowering over approximately
8 inches. Repeat pressing the Open button until the desired
EDU is selected. The Close button can also be used to select
EDUs in the opposite order.
4. Assign or unassign the currently selected EDU using the
Raise and Lower buttons. Press the Raise button to unassign
the selected EDU. Press the Lower button to assign the
selected EDU.
LUTRO
N
5. Check assignment before exiting Assignment mode. EDUs
that are at the Close limit are assigned. EDUs that are at the
Open limit are unassigned.
6. Exit Assignment mode by pressing and holding the Open
and Close button simultaneously for 5 seconds. Each EDU
will return to the level it was at when Assignment mode was
entered. The Open and Close LEDs will stop flashing.
Press the
Raise or
Lower button.
Flashing once per second
Open
Preset
Close
Flashing once per second
Press the Open
and Close buttons
simultaneously
for 5 seconds.
Open
Preset
Close
LED on for
2 seconds
Open
Preset
Close
Press & hold
here to set
the Open limit
LED on for
2 seconds
Press & hold
here to set
the Close limit
040200a 6/2/03 9:42 AM Page 7

8
VIMCO
11520 Sun Shade Lane
Ashland, VA 23005
Made and printed in U.S.A.
P/N 040-200 Rev.A 6/03
Limited Warranty
VIMCO will, at its option, repair or replace any unit that is defective in materials or
manufacture within one year after purchase. For warranty service, return unit to place of
purchase or mail to VIMCO at 11520 Sun Shade Lane, Ashland, VA 23005, postage prepaid.
This warranty is in lieu of all other express warranties, and the implied
warranty of merchantability is limited to one year from purchase. This
warranty does not cover the cost of installation, removal, or reinstallation, or
damage resulting from misuse, abuse, or damage from improper wiring or
installation. This warranty does not cover incidental or consequential
damages. VIMCO’s liability on any claim for damages arising out of or in
connection with the manufacture, sale, installation, delivery, use, repair, or
replacement of the SHADING system shall never exceed the price paid for the
system.
This warranty gives you specific legal rights, and you may also have other rights which vary
from state to state. Some states do not allow the exclusion or limitation of incidental or
consequential damages or limitations on how long an implied warranty may last, so the
above limitation or exclusion may not apply to you.
These products may be covered under one or more of the following U.S. patents:
4,835,343; 4,924,349; D422,567; D436,930; D453,742; D456,783; D461,782; D465,460;
D465,770; D466,090; D466,091; D466,484; D475,024; D475,025; and corresponding
foreign patents. US and foreign patents pending.
Lutron, the Sunburst logo, and Sivoia are registered trademarks and Sivoia QED and
seeTouch are trademarks of Lutron Electronics Co., Inc. VIMCO and shading solutions by
VIMCO are trademarks of Virginia Iron & Metal Company, Inc.
National Electric Code is a registered trademarkds of the National Fire Protection
Association, Inc., Quincy, Massachusetts.
© 2003 Virginia Iron & Metal Company, Inc.
Open
Preset
Close
Press the
Preset button
for 5 seconds.
Flash and
then turn on
Note: The current position is stored as a preset only on the
EDUs that are assigned to that preset button. The preset
is only accessable from that particular Keypad.
Troubleshooting
For information on troubleshooting, please refer to the Sivoia
QED Technical Reference Guide.
Storing Presets
Sivoia QED EDUs have the ability to store positions as presets.
1. Set all EDUs controlled by the Keypad to the desired level
using the Raise and Lower buttons on the Keypad.
2. Store the EDUs’ current position as a preset by pressing and
holding the desired preset button for 5 seconds. The LED
next to the preset button on the Keypad will flash and then
turn on, indicating that the preset has been stored.
Technical Assistance
If you need assistance, call the toll free VIMCO Technical Support Center. Please
provide exact model number when calling.
(800) 466-1503 (U.S.A., Canada, and the Caribbean)
Other countries call (804) 752-3300
Fax (804) 752-3366
Email: [email protected]
Website: www.vimco.com
040200a 6/2/03 9:42 AM Page 8
This manual suits for next models
11
Table of contents
Other Vimco Keypad manuals