Vinsetto 923-045 User manual

INcka037_IT_EN
923-045
ASSEMBLY INSTRUCTION
IMPORTANT, RETAIN FOR FUTURE REFERENCE: READ CAREFULLY
13''-32'' 8KG
(17.6Ibs)
kg
75*75mm/100*100mm
VESA
(Chaque écran)

N4
M2
L1
E1
D2
C1
B1
A1
H1
G1
P1Q1
M-G
4
M-D
2
M-E
3
M-F
2
M-A
8
M-B
8
M-C
8
F1
6mm 5mm
M6x16
M4x12 M5x12 D5
M6x10
4mm
2

B
E
M-E
L
N
M-F C
L
·Suggerimento: lo spessore del tavolo è 10-58 mm, quindi usare i fori superiore e
centrale per installare la base.
Lo spessore del tavolo è di 50-85 mm, quindi usare i fori inferiore e centrale per
montare la base
· Svitare la vite con una
chiave a brugola ed estrarre
il bullone lungo.
H
3
02
03
01

E
P
Q
·Posizionare la staffa (E) sulla superficie di montaggio, fissare in posizione con la
piastra di supporto (Q) e il bullone lungo. Stringere il bullone con la manopola di
plastica. (si adatta allo spessore dello schermo 10~55mm)
F
A
M
4
05
06
04

G
A
M-A
M-B
M-C
D
H
M-D M-D1
M-D2
M-D3
5
08
09
07

G
H
H
H
M-D1
M-D2
M-D3
D
·Inserire M-D1 nel foro del pannello inclinabile.
·Installare il pannello VESA con il pannello inclinabile (far
passare M-D1 attraverso il foro di installazione di VESA).
·Installare M-D2 sul pannello VESA e fino a coprire M-D1.
·Utilizzare la vite M-D3 per fissare il tutto. Per livellare lo
schermo, ruotare la vite (M-D3) per alzarlo o abbassarlo.
·Stringere il bullone con la
chiave a brugola in dotazi-
one (L) per impostare
l'angolo di inclinazione.
6
10

M-G
G
11
Usare la chiave (G) per regolare l'altezza dello schermo
7

Leggere l'intero manuale delle istruzioni prima di iniziare l'installazione e il montaggio.
Se non si comprendono le istruzioni o si hanno dubbi, contattare un installatore locale
professionista o il distributore locale per ottenere assistenza.
Attenzione:
● Se non assemblato o installato correttamente, può portare a lesioni gravi, morte o
danni alla proprietà privata.
● Non assemblare o installare prodotti o accessori se sono danneggiati o mancanti. Se
è necessario sostituire parti o accessori, contattare il rivenditore locale o il fornitore di
servizi per ottenere assistenza.
● Il venditore non è responsabile per danni allo schermo dovuti al fissaggio a parete o
incidenti.
● Il produttore dichiara di non essere responsabile per eventuali danni o guasti causati
da qualsiasi modifica o installazione incorretta del prodotto, o installazione oltre la
capacità di peso specificata del prodotto, o uso incorretto del prodotto, o usura o danni
causati dall'uso del prodotto.
● Aprire con cautela la confezione, rimuovere il contenuto e stenderlo sul cartone o su
altra superficie protettiva per evitare che venga danneggiato.
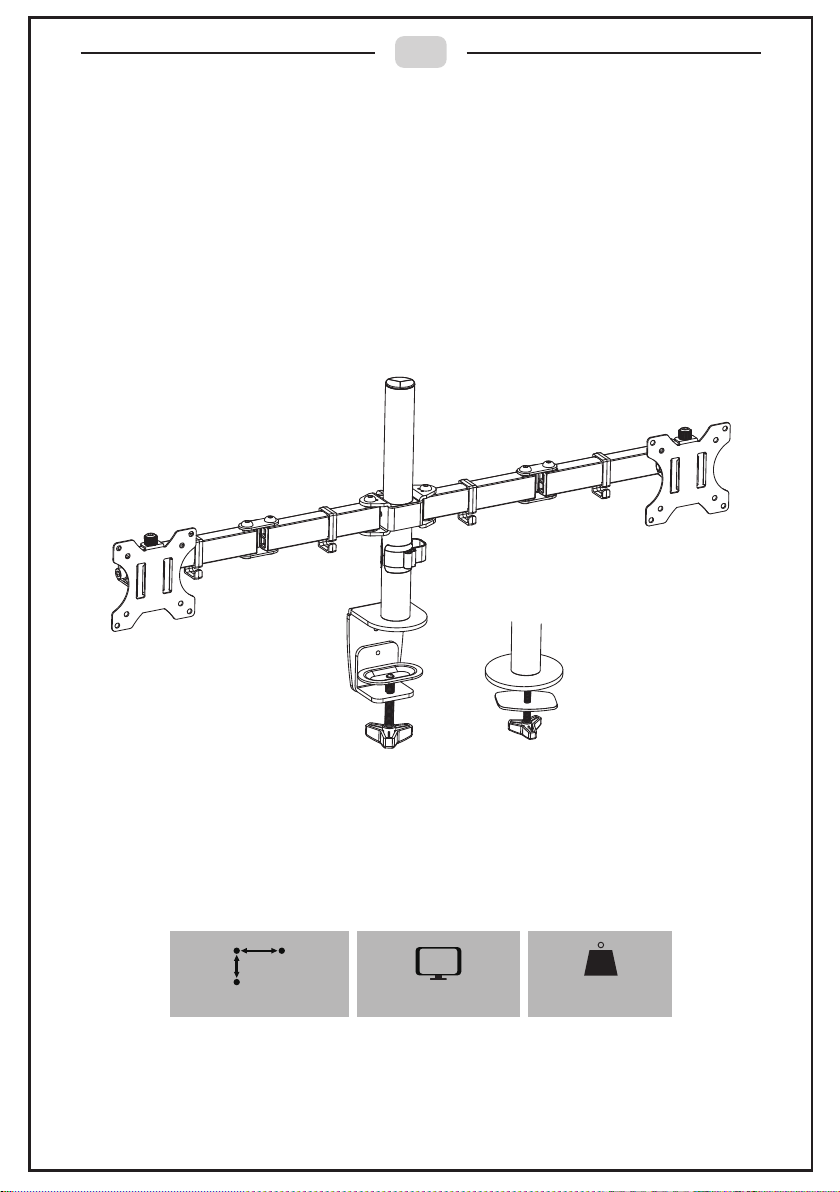
● Controllare il contenuto della confezione rispetto all'elenco delle parti presente nella
prima pagina per assicurarsi che tutti i componenti siano stati ricevuti integri. Non
utilizzare parti danneggiate o difettose.
● Leggere attentamente tutte le istruzioni prima di procedere all'installazione.
● Non utilizzare questo prodotto per qualsiasi scopo o in qualsiasi configurazione non
specificata esplicitamente in questo manuale delle istruzioni.
Con la presente decliniamo qualsiasi responsabilità per lesioni personali o danni
derivanti da un montaggio incorretto o un uso errato di questo prodotto.
8

EN
13''-32'' 8KG
(17.6Ibs)
kg
75*75mm/100*100mm
VESA
(each screen)
ASSEMBLY INSTRUCTION

N4
M2
L1
E1
D2
C1
B1
A1
H1
G1
P1Q1
M-G
4
M-D
2
M-E
3
M-F
2
M-A
8
M-B
8
M-C
8
F1
6mm 5mm
M6x16
M4x12 M5x12 D5
M6x10
4mm
2

B
E
M-E
L
N
M-F C
L
·Suggestion: table thickness is 10-58mm, use the upper and middle two holes to
install the base.
The table thickness is 50-85mm, use the lower and middle two holes to mount the
base
·Unscrew the screw with an
Allen key, and remove the
long bolt.
H
3
02
03
01

E
P
Q
·Position pole (E) on the mounting surface, secure using the support plate (Q) and
long bolt. Fasten bolt using plastic knob. (fits desktop thickness 10~55mm)
F
A
M
4
05
06
04

G
A
M-A
M-B
M-C
D
H
M-D M-D1
M-D2
M-D3
5
08
09
07

G
H
H
H
M-D1
M-D2
M-D3
D
·Put M-D1 in the hole of tilt panel.
· Install VESA panel with tilt panel(M-D1 should through the hole
of VESA install hole ).
·Install M-D2 on the VESA panel and it should cover M-D1.
·Use M-D3 screw to fix .To level the monitors, turn the screw
(M-D3)to raise or lower the monitor.
·Tighten the bolt with the
supplied Allen Key(L) to fix
the tilt angle.
6
10

M-G
G
Use wrench (G) to adjust the screen height
7
11

Read the entire instruction manual before you start installation and assembly.
If you do not understand the instructions or encounter any questions or problems,
please contact a qualified local installer or your local distributor for assistance.
Caution:
● This can result in serious injury, death or property damage if not assembled or
installed properly.
● Do not assemble or install products or accessories if they are damaged or missing. If
you need to replace parts or other parts, please contact your local dealer or service
provider for help.
● The vendor is not responsible for desktop damage due to load or accident.
● The manufacturer declares that it shall not be liable for any damage or damage
caused by any modification or improper installation of the product, or installation beyond
the specified weight bearing range of the product, or improper use of the product, or
wear or damage caused by use of the product.
● Carefully open the carton, remove contents and lay out on cardboard or other protec-
tive surface to avoid damage.
● Check package contents against the Supplied Parts List in the first page to assure
that all components were received undamaged. Do not use damaged or defective parts.
● Carefully read all instructions before attempting installation.
● Do not use this product for any purpose or in any configuration not explicitly specifie-
din
this instruction.
We hereby disclaim any and all liability for injury or damage arising from incorrect
assembly, incorrect mounting, or incorrect use of this product.
8
Other manuals for 923-045
1
Table of contents
Languages: