Virgin T6 WaterBar User manual

T6 WaterBar
Ownership
and care guide

STRAUSS_T6_USER GUIDE_AW.indd 2 08/03/2012 17:04

3
T6 – Better water, pure and simple
Why read this?
This guide isn’t particularly poetic or inspirational – it’s the quick way to get to know
the amazingly convenient features of your T6.
Your Virgin Strauss Water technician has showed you the basics so make a cuppa and settle
down for a few minutes of light reading. It will save you time in the long run. Promise.
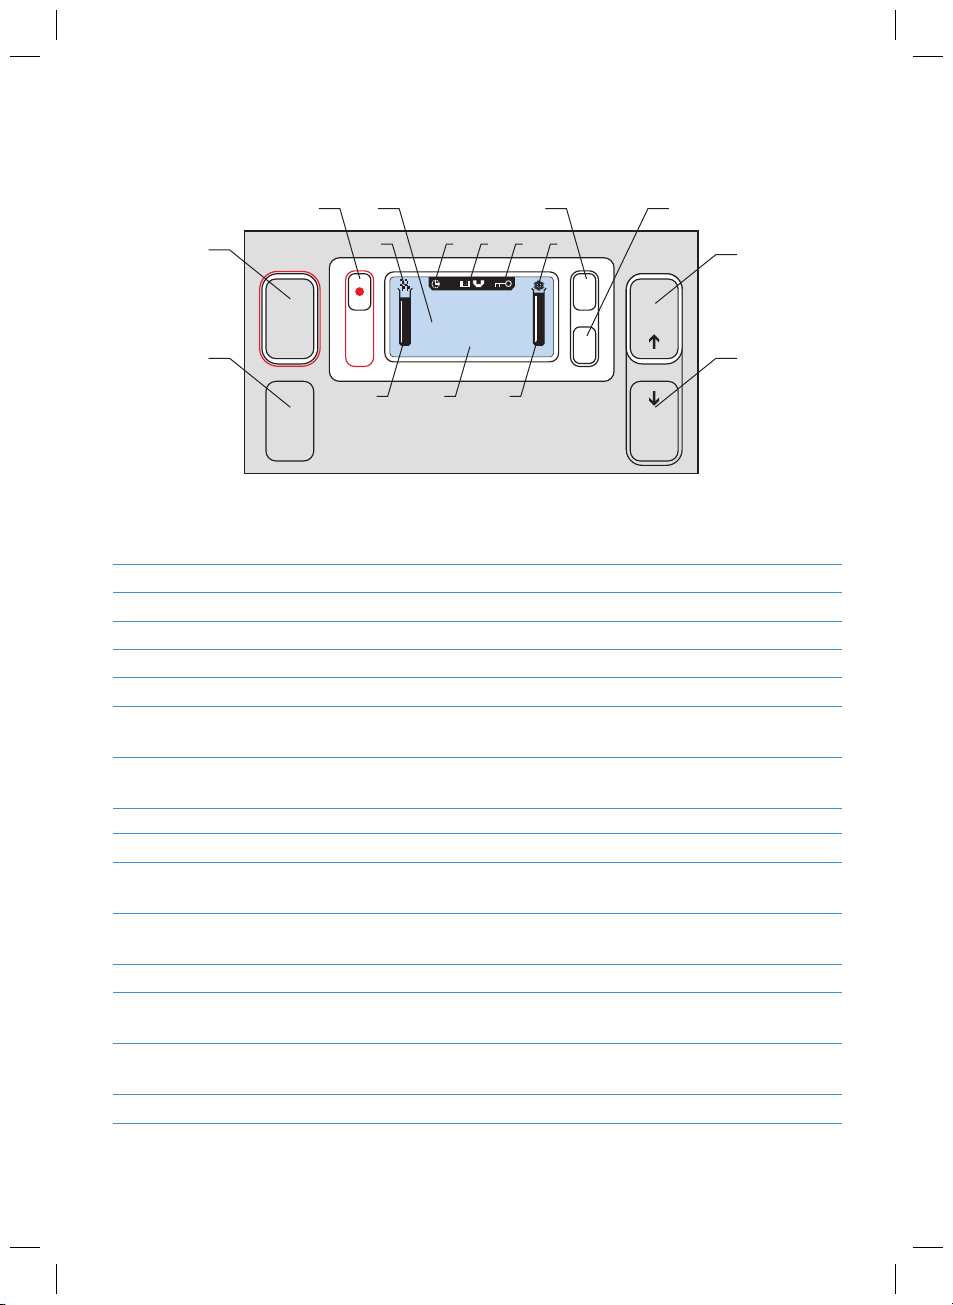
At the touch of a button
A few buttons actually, but beautifully simple to operate. The T6 gives you an endless supply
of chilled and boiling water – or any temperature in between. There are lots of brilliant ways to
customise the T6 so it works exactly the way you want. For instance, programming it for your
rst drink of the day, so you get a few more minutes in bed.
Child-friendly thinking
The T6 is innovative for your kitchen and safe for all the family. The ‘child safety’ lock
(see page 12) provides ingenious and indispensable protection for little ngers. The purifying
process removes the nasties and keeps all the essential minerals for healthy teeth and bones.
Plus, it will change the amount of water your family will drink!
Let’s get started
Tested and certied to the highest international standards and professionally installed,
you should enjoy years of trouble-free use.
If you can’t do what you’re trying to do, please
• try the trouble shooting guide on page 25
• visit the support section of www.virgin-pure.com
• call us on 0845 301 7700
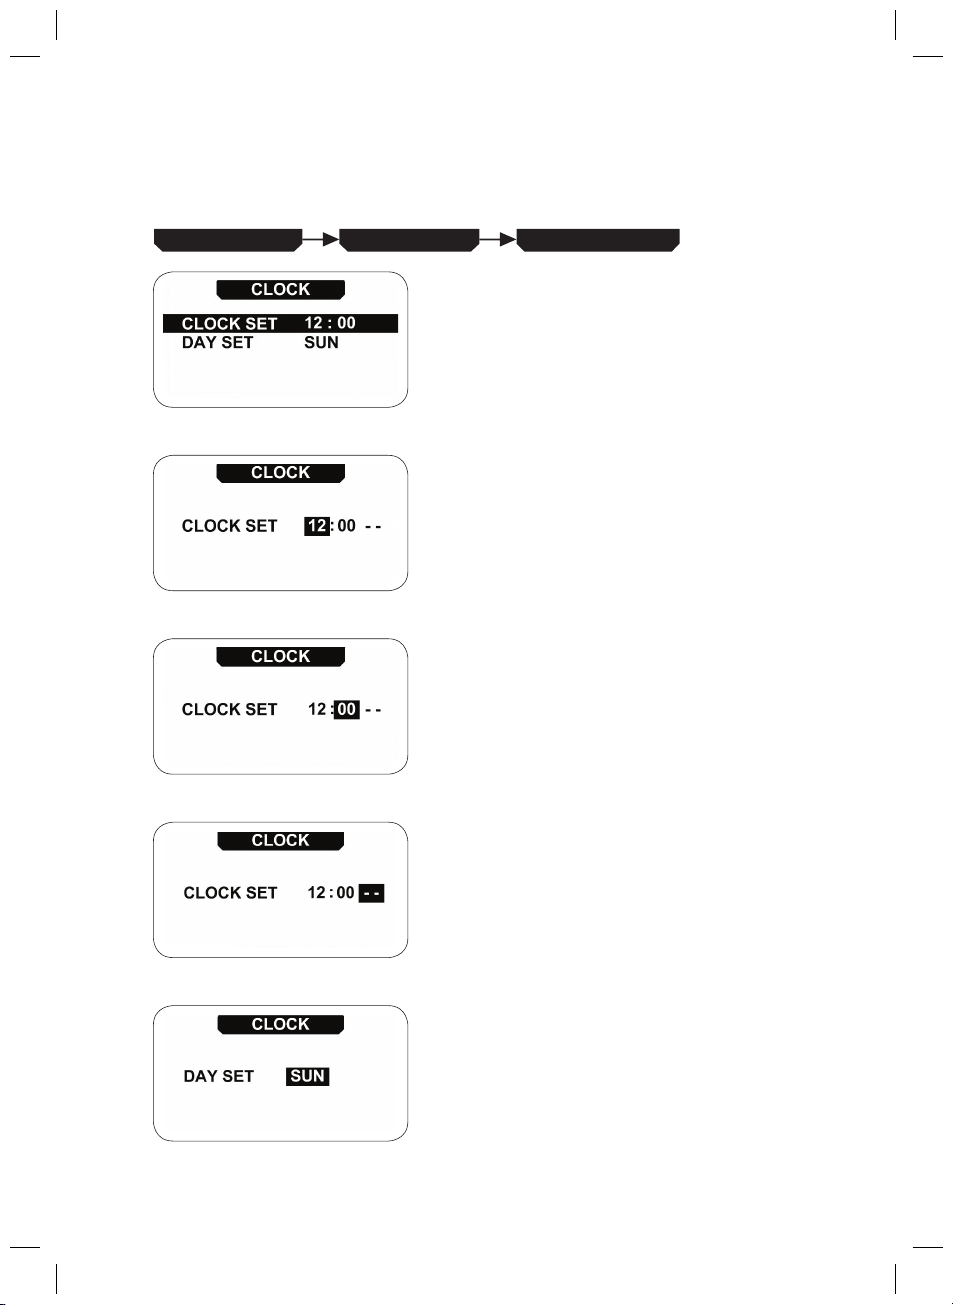
Tip: the T6 displays a series of menus. It’s simple to programme and even easier to use for
any age and level of technical ability. Even your Great Grandma can work it.
STRAUSS_T6_USER GUIDE_AW.indd 3 08/03/2012 17:04
0207 022 6472
www.virginpure.com

4
Where do I nd…
1The T6 appliance 5
2 What do all those buttons do? 6
3 Your water, how you want it
3.1 Dispensing water
3.2 System modes
3.3 Menu function
7
7
9
10
4 Keeping your T6 in tip top condition
4.1 Emptying the drip tray
4.2 Changing the lter and UV lamp
4.3 When to change the consumables
4.4 De-scaling
4.5 Automatic ushing
16
16
17
22
22
22
5 Keeping clean 22
6 Going on holiday? 23
7Safety fi rst 23
8 The technical bit 24
9Troubleshooting guide 25
STRAUSS_T6_USER GUIDE_AW.indd 4 08/03/2012 17:04

5
1. The T6 appliance
1. Top pad
2. Operation panel with digital display screen
3. Water spout
4. Folding tray
5. Drip tray
6. Tray grid
7. Condenser
8. Heating system switch
9. Power cable plug
10. Water inlet port
7
1
4
6
4
3
2
58
910
STRAUSS_T6_USER GUIDE_AW.indd 5 08/03/2012 17:04

6
2. What do all those buttons do?
COLD
CUP
HOT
MIX
EXTRA
HOT
MENU
OK
BACK
HOT COLD
12:00
1MIX Mixed water dispensing button
(preset quantity and temperature)
2HOT Hot water button
3 EXTRA HOT Extra hot button
4Graphic display screen
5MENU/OK Menu functions button
6BACK Back button (return to previous menu)
7COLD Cold water button
(Scroll up in menu functions)
8CUP Cold water button (preset quantity)
(Scroll down in menu functions)
9 Hot water temperature indicator
10 Indicates the heating system is operating
Lights up when heater is ON
11 Timer function indicator
Appears when energy saving mode is ON
12 UV system indicator
13 Child safety indicator
Appears when child lock is ON
14 Indicates that cooling system is operating
Lights up when compressor is ON
15 Cold water temperature indicator
16 Clock
1
2
3 4 5 6
7
8
1413121110
916 15
STRAUSS_T6_USER GUIDE_AW.indd 6 08/03/2012 17:04

7
3. Your water, how you want it
3.1 Dispensing water
Cold water
Press and hold the COLD button for continuous cold water.
The lling glass icon (shown) will appear while the water
is dispensing.
Preset cold water for your favourite glass
Press the CUP button once to dispense a preset amount of
cold water. The lling glass icon and quantity (shown) will
appear while the water is dispensing. Press any button to
stop at any time. See section 3.3.13 to nd out how to set
the water quantity.
Preset cold water for jugs
Press the COLD and CUP buttons simultaneously for a larger
amount of cold water. The jug icon and quantity (shown) will
appear while the water is dispensing. Press any button to
stop at any time. This quantity is set by us.
Hot water
Press and hold the HOT button for continuous hot water.
The lling cup icon (shown) will appear while the water
is dispensing.
Hot, hot, hot! Please take care when dispensing hot water!
Preset hot water for your favourite cup
Press the HOT button once for a preset quantity of
hot water. The hot cup icon (shown) will appear while the
water is dispensing. Press any button to stop at any time.
See section 3.3.16 to nd out how to set the water quantity.
This function is not available in child safety mode.
STRAUSS_T6_USER GUIDE_AW.indd 7 08/03/2012 17:04

8
Extra hot water
Press the EXTRA HOT button to heat water up to boiling
temperature, then press HOT button to dispense.
Hot water dispensing with child lock on
When the T6 is in child safety mode (see page 12), press
the HOT and COLD buttons simultaneously to dispense
hot water.
You will need to keep your nger on the HOT button to
keep the hot water owing.
Personalised water temperature set just for you
Press the MIX button to dispense water at your preset
water temperature. The lling glass icon and quantity
(shown) will appear while the water is dispensing.
Press any button to stop at any time. See page 15 to
nd out how to set the water quantity and temperature.
When child lock is on, the COLD button has to be
pressed simultaneously with the MIX button to
dispense water.
Warning: hot water.
STRAUSS_T6_USER GUIDE_AW.indd 8 08/03/2012 17:04

9
3.2 System modes
There are three main system modes designed to help you save energy:
1. Normal mode
In this mode, COLD, HOT, MIX, CUP and jug dispensing
is possible.
2. Energy saving mode
In energy saving mode you can dispense cold and mix
water, using the COLD, CUP and MIX buttons.
Hot water dispensing will begin when the water reaches
85ºC. If the EXTRA HOT button is pressed the water will
be heated to near boiling temperature.
The T6 will enter energy saving mode automatically half
an hour (or a period of time set by you) after it was used.
Page 11 explains how to set this.
3. Power down mode
In power down mode, the cooling and heating systems
switch themselves o .
The unit enters power down mode automatically after a
period of time, which can be set by you, or by selecting
the menu button and choosing OFF, and section 3.3.4
explains how to pre-set the period of time.
To exit power down mode, press any dispensing button.
The clock continues to function in power down mode.
POWER DOWN
POWER DOWN
SUN
STRAUSS_T6_USER GUIDE_AW.indd 9 08/03/2012 17:04

10
3.3 Menu function
3.3.1. Setting clock and day
To set the clock, enter the clock sub-menu:
The current time setting and day will
appear on the display.
Use the COLD and CUP buttons to scroll
and select the clock or the day.
Press OK to enter the set menu.
Setting the hour
Use the scroll buttons (COLD and CUP)
to change the hour.
Press OK to con rm.
Setting the minutes
Use the scroll buttons (COLD and CUP)
to change the minutes.
Press OK to con rm.
Setting the 24 hour - AM/PM clock mode
Use the scroll buttons (COLD and CUP)
to change the mode.
Press OK to con rm.
When the “- -“ symbol appears, the 24-Hour Clock
Mode has been activated.
Setting the day
Use the scroll buttons (COLD and CUP)
to change the day.
Press OK to con rm.
MAIN MENU TIME DATE CLOCK
STRAUSS_T6_USER GUIDE_AW.indd 10 08/03/2012 17:04

11
3.3.2. Wakey wakey!
There are two independent timers, which re-start the heating system from energy
saving mode. To set wake-up timer, enter the wake-up sub-menu:
3.3.3. Saving your energy
The energy saving mode timer automatically switches the heating system into energy
saving mode after a period of time set by you. To set the energy saving mode timer, enter
the energy saving sub-menu:
The current status of the wake-up timers
will appear on the display. Use the scroll buttons,
(COLD and CUP) to select the timer.
Press OK to enter the set menu.
The current setting will appear on the display.
Use the scroll buttons (COLD and CUP)
to change as required.
Press OK to con rm.
* Default setting: 60 minutes
Select ON to activate the timer, or OFF to deactivate.
Use the scroll buttons (COLD and CUP)
to change the hour and minutes.
Press OK to con rm.
MAIN MENU TIME DATE WAKEUP
MAIN MENU TIME DATE ENERGY SAVING
STRAUSS_T6_USER GUIDE_AW.indd 11 08/03/2012 17:04

12
3.3.4 Setting the automatic power down timer
The power down timer automatically switches the system o after a period of time set
by you. To set automatic power down mode timer, enter the power down sub menu:
3.3.5 Keeping the kids safe!
To activate the child lock, enter the child lock sub-menu:
3.3.6 Spout light option
To activate the spout light, enter the spout light sub-menu:
The current setting will appear on the display.
Use the scroll buttons (COLD and CUP)
to change the setting.
Press OK to con rm.
The current mode will appear on the display.
Use the scroll buttons (COLD and CUP)
to change the mode.
Press OK to con rm.
Child lock works on MIX and HOT buttons and
will beep if an attempt is made.
The current option will appear on the display.
Use the scroll buttons (COLD and CUP)
to change the option.
Press OK to con rm.
MAIN MENU SETTINGS DISPLAY SET SPOUT LIGHT
MAIN MENU TIME DATE POWER DOWN
MAIN MENU SETTINGS CHILD LOCK
STRAUSS_T6_USER GUIDE_AW.indd 12 08/03/2012 17:04

13
MAIN MENU TIME DATE POWER DOWN
3.3.7 Clock view option
To select the clock view, enter the clock view sub-menu:
3.3.8 Units of measurement
To change between metric or imperial units of measurement, enter the units sub-menu:
3.3.9 Beeping buttons
To change whether your buttons beep or not, enter the beep on key menu:
The current option will appear on the display.
Use the scroll buttons (COLD and CUP)
to change the option.
Press OK to con rm.
The current unit of measurement option will
appear on the display.
Use the scroll buttons (COLD and CUP)
to change the option.
Press OK to con rm.
The current option will appear on the display.
Use the scroll buttons (COLD and CUP)
to change the setting.
Press OK to con rm.
Beep remains in child lock option.
MAIN MENU SETTINGS DISPLAY SET CLOCK VIEW
MAIN MENU SETTINGS DISPLAY SET UNITS
MAIN MENU SETTINGS BEEP ON KEY
STRAUSS_T6_USER GUIDE_AW.indd 13 08/03/2012 17:04

14
3.3.10 Language
To change the language used, enter the language sub-menu:
3.3.11 Restoring factory settings
To restore factory (default) settings, enter the restore settings sub-menu:
3.3.12 Setting cold water temperature
To set the cold water to your preference, enter the cold water temp sub-menu:
The current selection will appear on the display.
Use the scroll buttons (COLD and CUP)
to change the language.
Press OK to con rm.
The current system status will appear on the display.
To change status, use the scroll buttons
(COLD and CUP). Press OK to con rm.
Default factory settings:
•Child safety mode - activated
•Automatic energy saving - 60 min
• Automatic power down - OFF
• Beep on key - OFF
• Spout light - ON
The temperature bar graphically indicates
the cold water setting.
Use the scroll buttons (COLD and CUP)
to change the setting.
Press OK to con rm.
MAIN MENU TEMP & QTY COLD WATER TEMP.
MAIN MENU SETTINGS LANGUAGE
MAIN MENU SETTINGS RESTORE SETTINGS
STRAUSS_T6_USER GUIDE_AW.indd 14 08/03/2012 17:04

15
3.3.13 Setting the cold water amount for your favourite glass*
To set the quantity of cold water to be dispensed (the CUP button), enter the cold water
quantity sub-menu:
3.3.14 Setting your personalised water temperature (MIX)
To set the mix temperature and quantity set by you, enter the mix water temp sub-menu:
3.3.15 Setting your personalised water quantity (MIX)*
To set the mix temperature and quantity set by you, enter the mix water quantity sub-menu:
The current quantity setting – between 60-300 cc
(2-10 oz) – will appear on the display.
Use the scroll buttons (COLD and CUP)
to change the quantity.
Press OK to con rm.
The temperature bar graphically indicates
the mix water temperature setting.
Use the scroll buttons (COLD and CUP)
to change the temperature.
Press OK to con rm.
The current quantity setting will appear on the display.
Quantity range: 60-300 cc (2-10 oz)
Use the scroll buttons (COLD and CUP)
to change the quantity.
Press OK to con rm.
MAIN MENU TEMP & QTY COLD WATER QTY.
MAIN MENU TEMP & QTY MIX WATER TEMP.
MAIN MENU TEMP & QTY MIX WATER QTY.
STRAUSS_T6_USER GUIDE_AW.indd 15 08/03/2012 17:04

16
3.3.16 Setting the hot water amount for your favourite cup*
To set hot water dispensing quantity, enter the hot water quantity sub-menu:
4.1 Emptying the drip tray
The current quantity setting – between 60-300 cc
(2-10 oz) – will appear on the display.
Use the scroll buttons (COLD and CUP)
to change the quantity.
Press OK to con rm.
Close the folding drip tray (1)
and wait a few seconds until all
the water has owed into the
drip tray.
Remove the drip tray (2) and
empty it.
MAIN MENU WATER TEMP & QTY HOT WATER QTY
4. Keeping your T6 in tip top condition
1 2
3.3.17 Reset programme
This option allows for a programme reset, however this is not something you should do
without help from us.
MAIN MENU SETTINGS RESET SETTINGS
*Due to possible uctuations in water supply pressure there is a possibility of an inaccuracy
in the pre-set water quantity. It’s important to check that the desired quantity was actually
delivered (this is especially important when pre-paring baby food, medications, etc).
If there is a discrepancy in quantity the volume can be reset.
STRAUSS_T6_USER GUIDE_AW.indd 16 08/03/2012 17:04

17
MAIN MENU WATER TEMP & QTY HOT WATER QTY
4.2 Changing the lter and UV lamp
To keep providing pure, crisp water, the lter should be replaced every six months
(about 2,000 litres/ 520 gallons of water), and the UV lamp every year.
The replacement procedures for both the lter and UV lamp are easy to perform
and clearly set out in the instructions that come with each pack.
We send everything you need to carry out these replacements
Every 6 months, your pack will contain:
A cleaning capsule – to run the de-scaling process
A replacement lter
At 12 months, your pack will contain:
A cleaning capsule – to run the de-scaling process
A replacement lter
A new UV lamp
So long as you run the de-scaling process and change the lter every 6 months, and
change the UV lamp every year, your T6 will keep pumping out beautiful, clean, crisp water.
It is important to read the instructions before changing the parts.
The REPLACE FILTER message will appear six
months after the last lter counter reset.
The REPLACE LAMP message will appear a
year after the last UV lamp counter reset.
STRAUSS_T6_USER GUIDE_AW.indd 17 08/03/2012 17:04

18
4.2.1 Every 6 months - the de-scaling process and inserting a new lter
The cleaning capsule which runs the de-scaling process contains citric salt for scale removal.
The T6 can’t be used during the scale removal process for approximately six hours, it’s best
performed overnight. Your T6 needs to be de-scaled before you change your lter.
Remove the rubber pad.
Insert the capsule into the
lter’s position (in either
direction), until it snaps
rmly into place.
Do not drink water from the
T6 from this point until the
process is complete.
After waiting for six hours, press
EXTRA HOT, and then wait until
the water boils. Dispense four
litres of water by pressing HOT.
Air may still be present in the
system so a light spluttering
may occur. Note: If there are
still scale particles in the water,
repeat this step.
Press PUSH and pull the lter
upward, using the ribbon
tab. Dispose of the lter in
accordance with your Local
Authority guidelines.
Press HOT and let the hot
water run for 1 minute.
Place a ve-litre container
under the spout.
Remove the cleaning capsule
from its package. Wet the
stems (legs) of the capsule
under a regular tap to
lubricate before inserting.
Press EXTRA HOT, and wait
for the water to boil.
Stick the enclosed warning
label on the front of the device
to ensure no one else uses it
whilst the process is running,
and wait for at least
six hours.
3
How to perform the descaling process
Needs to be performed every six months
Note : the unit cannot be used during the scale removal process for approximately
6 hours.
Therefore it is recommended to carry out the procedure at night
* The capsule contains citric salt for scale removal.
1. Remove the rubber pad. 2. Press the PUSH button and pull the filter
upwards, using the ribbon tab.
3. Remove the cleaning capsule from its
package.
4. Insert the capsule to the filter's position
(in any direction), until it snaps firmly into
place.
Attention
:
As of now and until the
process completes, do not drink
water from the device.
5. Place a 5 liter container under the spout. 6. Press the EH (EXTRA HOT) button, and wait
for the water to boil.
3
How to perform the descaling process
Needs to be performed every six months
Note : the unit cannot be used during the scale removal process for approximately
6 hours.
Therefore it is recommended to carry out the procedure at night
* The capsule contains citric salt for scale removal.
1. Remove the rubber pad. 2. Press the PUSH button and pull the filter
upwards, using the ribbon tab.
3. Remove the cleaning capsule from its
package.
4. Insert the capsule to the filter's position
(in any direction), until it snaps firmly into
place.
Attention:
As of now and until the
process completes, do not drink
water from the device.
5. Place a 5 liter container under the spout. 6. Press the EH (EXTRA HOT) button, and wait
for the water to boil.
4
7. Press the Hot Water button (HOT) and let
hot water run for 1 minute.
8. Place the included warning label on the
front of the device and wait for at
least 6 hours.
Attention!
Appliance is in descaling process
Do not use
Remove sticker when process ends &
follow attached instruction
9. After the wait, press the PUSH button,
remove the capsule, and discard it.
10.Place a 5 liter container under the spout.
Push the filter back to its position, until it
snaps firmly into place.
11.Press the EH (EXTRA HOT) button, and wait
for the water to boil.
Attention!
Appliance is in descaling process
Do not use
Remove sticker when process ends &
follow attached instruction
12.Press the Hot Water button (HOT) and let
hot water run for 3 minutes.
Note: If there are still scale particles in the
water, repeat Step 12.
13.The scale removal process is completed.
Remove the warning label and discard it.
The device is ready for use.
Note: For more information, please contact
Customer Service.
Attention!
Appliance is in descaling process
Do not use
Remove sticker when process ends &
follow attached instruction
1
4
7
2
5
8
3
6
9
STRAUSS_T6_USER GUIDE_AW.indd 18 08/03/2012 17:05

19
Insert the lter until you
hear a click.
Replace the rubber pad and
remove the warning label.
Press PUSH, remove the
capsule, and dispose of it in
accordance with your Local
Authority guidelines.
The scale removal process
is now complete.
Unwrap your new lter,
making sure the ribbon tab
stays in place.
10
13
11 12
Draining the air from your new lter
Place a jug under the spout and
press COLD for two minutes.
Wait for 10 minutes. Press COLD again, until
water starts running.
14 15 16
STRAUSS_T6_USER GUIDE_AW.indd 19 08/03/2012 17:05

20
Resetting the lter’s counter
Immediately after replacing the lter you need to reset the counter in order that the T6 will
display when your lter needs changing again.
Press MENU.
Scroll to FILTER.
Press OK.
Scroll to REPLACEMENT.
Press OK.
Press BACK until the main
screen appears.
Press OK.
Scroll to Yes.
1
4
7
2
5
8
3
6
STRAUSS_T6_USER GUIDE_AW.indd 20 08/03/2012 17:05
Table of contents
Popular Water Filtration System manuals by other brands

Rainfresh
Rainfresh CBF1 Installation & operation manual

KENT
KENT Prime Mineral RO Instruction handbook

Pentair
Pentair freshpoint F2000-B2B instruction manual

TOOLSTATION
TOOLSTATION 84582 quick start guide

HYDAC International
HYDAC International OFT20 Operating and maintenance instructions

Sartorius stedim
Sartorius stedim 16307 Directions for use

CKD
CKD AF2 Series instruction manual

Red Sea
Red Sea ReefMat 1200 user manual

Watts Premier
Watts Premier RO-TFM-4SV Installation, operation and maintenance manual

Aquafine
Aquafine RBE Series Installation, maintenance and operation manual

Oase
Oase FiltoClear 20000 operating instructions

Water Factory Systems
Water Factory Systems SQC3 Series owner's manual