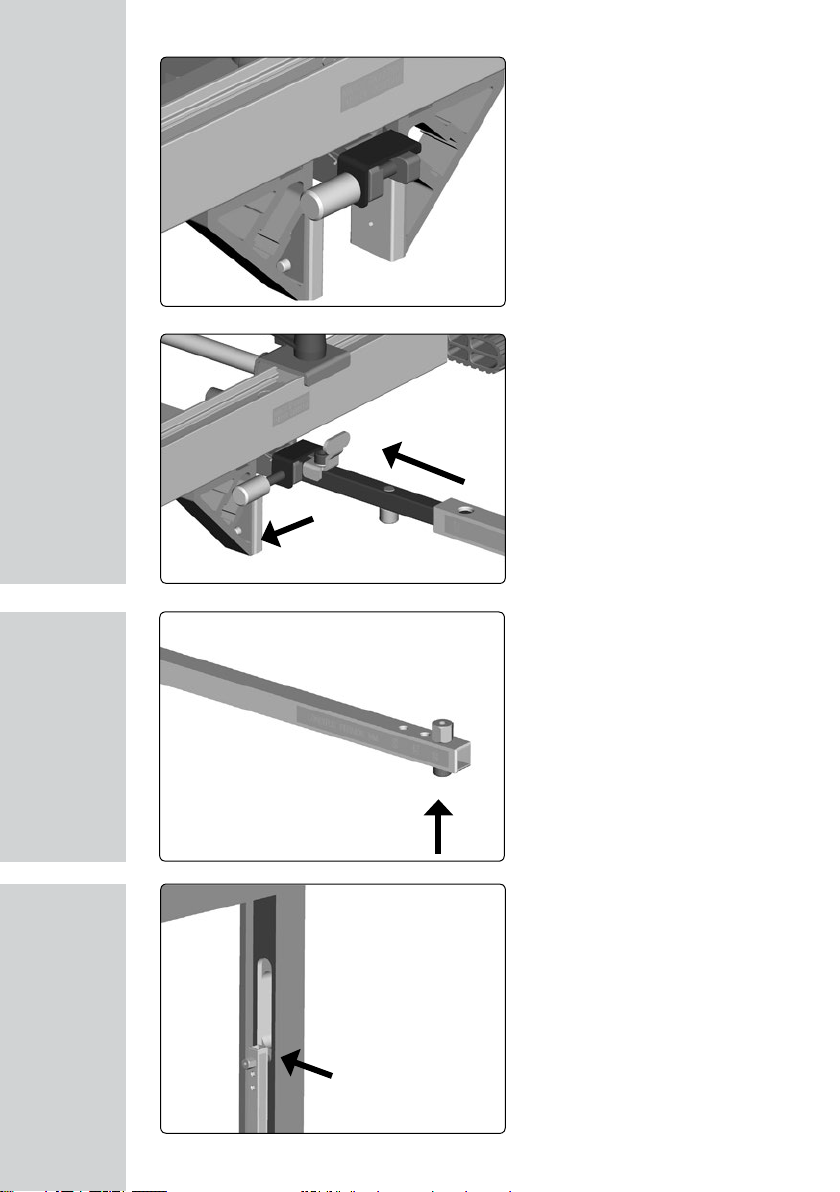
Virutex FR129 VB User manual

FR129 VB
GUIA RÁPIDA
QUICK GUIDE
GUIDE RAPIDE
GEBRAUCHSANWEISUNG
GUIDA RAPIDA
GUIA RÁPIDA
КРАТКОЕ РУКОВОДСТВО SKRÓCONA
INSTRUKCJA OBSŁUGI
Fresadora de herrajes
Router for fitting hinges
Fraiseuse paumelleuse
Beschlagfräse
Fresatrice per cerniere
Fresadora de ferragens
Frezarka do montowania zawiasów
Фрезер для петель

2
• Ensamblaje máquina.
• Assembling the machine.
• Assemblage machine.
• Zusammenbau der Maschine.
• Montaggio della macchina.
• Montagem de la máquina.
• Установите фрезер на каретку.
• Montaż urządzenia.
GUIA RÁPIDA
QUICK GUIDE
GUIDE RAPIDE
KURZBESCHREIBUNG
GUIDA RAPIDA
GUIA RÁPIDA
КРАТКОЕ РУКОВОДСТВО
SKRÓCONA INSTRUKCJA OBSŁUGI
2

3
• Montaje fresa, guía plantilla y plantilla.
• Mounting the bit, guide ring and template.
• Montage fraise, guide de copiage et
gabarit.
• Montage des Fräsers, Führungsringes und
Schablone.
• Montaggio della fresa, guida e sagoma.
• Montagem da fresa, guia e molde.
• Установите фрезу, копировальное
кольцо и шаблон.
• Mocowanie frezu, pierścienia
prowadzącego i wzornika.
• Montaje sobre el marco.
• Placing on the frame.
• Montage sur la huisserie.
• Befestigung am Rahmen
• Montaggio sul telaio.
• Montagem no quadro.
• Установите фрезер на дверную коробку.
• Montaż na ościeżnicy.

4
• Tope sobre el marco.
• Stopper on the frame.
• Butée sur la huisserie.
• Anschlag am Rahmen.
• Top sul telaio.
• Topo no quadro.
• Настройка на толщину петли.
• Ustawienie na ościeżnicy.
• Regulación grosor pernio.
• Adjusting the thickness of the hinge.
• Réglage épaisseur paumelle.
• Einstellen der Scharniertiefe.
• Regolamento spessore cerniera.
• Regulação espessura dobradiça.
• Ограничитель положения на коробке.
• Ustawienie głębokości frezowania.
4

5
• Montaje tope longitudes.
• Assembling the length stopper.
• Montage butée de longueur.
• Aufbau des Längsanschlages.
• Montaggio top lunghezze.
• Montagem da fresa, guia e molde.
• Установите ограничитель дины.
• Montaż pręta do lokalizacji zawiasów.
• Tope referencia pernios.
• Stoper hinges.
• Butée référence paumelle.
• Scharnieranschlag
• Top riferimento cerniere.
• Topo referência dobradiça.
• Упор для определения положения петли.
• Montaż stopera odniesienia.
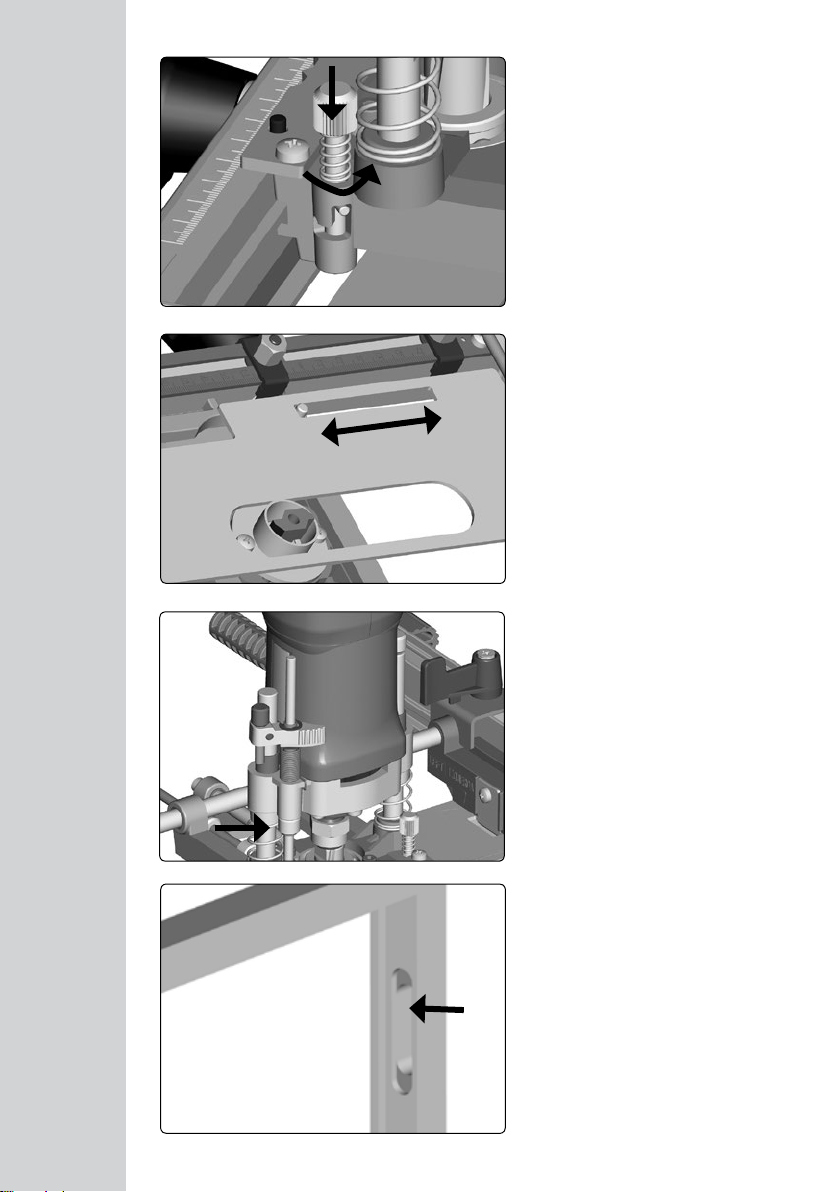
• Referencia sobre el marco.
• References on the frame.
• Référence sur la huisserie.
• Einstellen am Rahmen.
• Riferimento sul telaio.
• Referência no quadro.
• Позиционирование на дверной коробке.
• Ustawienie urządzenia we właściwej pozycji
na ościeżnicy.

6
• Topes referencia sobre puerta.
• Stoppers on the door.
• Butées de référence sur la porte.
• Anschlag auf der Tür.
• Top riferimento sulla porta.
• Topo referência na porta.
• Упоры для позиционирования на
полотне двери.
• Ustawienie urządzenia we właściwej pozycji
na drzwiach.
• Accesorio plantillas invisibles.
• Accessory for invisible templates.
• Accessoire gabarits invisibles.
• Zubehör für die Schablone.
• Accessorio sagome invisibile.
• Acessório moldes invisíveis.
• Комплект для врезки скрытых петель.
• Akcesorium do wzornika do zawiasów
wpuszczanych.
6

7
• Montaje accesorio.
• Assembling the accessory.
• Montage accessoire.
• Einbau des Zubehörs.
• Montaggio accessorio.
• Montagem accesório.
• Установка режущего инструмента.
• Montaż akcesoria.
• Referencia para montaje plantilla bisagra
invisible.
• Reference for assembling the template for
concealed hinges
• Référence pour le montage du gabarit des
paumelles invisibles
• Referenzieren der eingebauten Schablone.
• Riferimento montaggio sagoma cerniera
invisibile
• Referência para montagem molde dobra-
diça invisível
• Копирование и настройка глубины
фрезерования под переднюю планку
скрытой петли.
• Punk odniesienia do montażu wzornika do
zawiasów wpuszczanych.

8
• Copiado y ajuste profundidad solapa
bisagra invisible.
• Copying and adjusting the depth of the
front plate of concealed hinge.
• Copiage et réglage de la profondeur du
frontal de la paumelle invisible.
• Einstellen der Tiefe der Scharnierplatte.
• Copia e regolazione profundità frontale
cerniera invisibile.
• Copiagem e regulação profundidade frente
dobradiça invisível.
• Контрольная метка метка для установки
шаблона под скрытые петли.
• Wykonanie i ustawienia głębokości
kołnierza zawiasów wpuszczanych.
8

9
• Copiado y ajuste profundidad caja bisabra
invisible.
• Copying and adjusting the depth of the body
of concealed hinge.
• Copiage et réglage de la profondeur du
corps de la paumelle invisible.
• Einstellen der Tiefe des Scharnierkörpers.
• Copia e regolazione profundità corpo cer-
niera invisibile.
• Copiagem e regulação profundidade corpo
dobradiça invisível.
• Система упоров для работы без шаблона.
• Wykonanie i ustawienia głębokości kieszeni
zawiasów wpuszczanych.

10
• Ajuste fresado sin plantilla.
• Adjusting the trimming without template.
• Réglage pour fraisage sans gabarit.
• Einstellen der Fräsmaschine ohne
Schablone.
• Regolazione fresatura senza sagoma.
• Regulação fresagem sem molde.
• Копирование и настройка глубины
фрезерования под тело скрытой петли.
• Ustawienie do frezowania bez użycia
wzornika.
10
• Instrucciones fresado.
• Trimming instructions.
• Instructions de fraisage.
• Gebrauchsanweisung.
• Istruzioni de fresatura.
• Instruções de fresagem.
• Инструкция по эксплуатации.
• Instrukcja e frezowania.
ATENCIÓN • WARNING • ATTENTION

11

12
• Paso 1 - Proceder a la realización de los
encajes según el procedimiento normal.
• Step 1 - Proceed to make the recesses as
usually.
• Pas 1 - Copiage et réglage de la profondeur
du frontal de la paumelle invisible.
• Schritt 1 - Bereiten Sie die Durchführung/
Umsetzung der Falze nach gewohnter Metho-
de vor.
• Passo 1 - Procedere alla realizzazione degli
incavi seguendo il normale procedura.
• Passo 1 - Proceder à realização dos rasgos
segundo o procedimento normal.
• Шаг 1 - Приступите к выполнению пазов
в обычном порядке.
• Krok 1 - Rozpocznij proces frezowania gnia-
zda tak jak w standardowym przypadku.
EXCEPCIONES DE USO • EXCEPTIONS OF UTILIZATION • EXCEPTIONS
D’UTILIZATION • AUSNAHMEN • UTILIZZI SPECIALI • EXCEPÇÕES AO USO
ИСКЛЮЧЕНИЯ
Instrucciones para plantillas de más de 160 hasta 240 mm • Instructions for templa-
tes over 160 mm until 240 mm • Instructions pour des charnières de plus de 160 mm
jusqu’à 240 mm • Anleitung für Schablonen von 160 mm bis 240 mm • Istruzioni per
cerniere da oltre 160 mm no 240 mm • Instruções para moldes de mais de 160 e até
240 mm • Инструкция для шаблонов от 160 до 200 мм • Instrukcja użytkowania
szablonu w przypadku wymiarów od 160 mm do 240 mm
1. Realización de los encajes en marco • Making recesses on the frame • Réalisation des encas-
trements sur l’huisserie • Aussparungen am Gestell bilden • Realizzazione delle cave nel telaio
Realização dos rasgos no quadro da porta • Выполнение пазов на дверной коробке • Frezowa-
nie otworów pod zawias w ościeżnicy
12

13
• Paso 2 - Colocar la barra accesoria que se
suministra con la plantilla y haciendo tope
nuevamente en el marco proceder a repasar el
fresado del primer encaje.
• Step 2 - Place de supplementary rod delive-
red with the template and touching the upper
side of the frame proceed to enlarge the rst
recess.
• Pas 2 - Placer la tige supplémentaire livrée
avec le gabarit faissant butée avec la huisserie
et procéder à élargir le premier encastrement.
• Schritte 2 - Platzieren Sie die Zubehörstange
mit der mitgelieferten Schablone/Vorlage und
bringen Sie diese bis an den Rand vom Fensterrahmen, dann wiederholen Sie die Fräsarbeit der ersten Falz.
• Passo 2 - Collocare la barra accessoria che viene fornita con la dima e facendo nuovamente lo sul telaio
procedere a ripassare la fresatura del primo incavo.
• Passo 2 - Colocar a barra acessória fornecida com o molde, fazendo topo novamente no aro e refazer a
fresagem do primeiro rasgo.
• Шаг 2 - Установите дополнительный опорный стержень, поставляемый с шаблоном. Установите фрезер,
уперев стержень в верхний срез дверной коробки, и увеличьте первый паз, выполненный при шаге 1.
• Krok 2 - Załóż dodatkowy pręt dostarczany z szablonem i dotykając górnej powierzchni ościeżnicy rozpocznij
poszerzenia pierwszego gniazda.

14
• Paso 3 - Volver a colocar la barra estándar
y repasar el fresado de los siguientes encajes
normalmente.
• Step 3 - Place the standard rod again and
enlarge the other recesses as usually.
• Pas 3 - Placer la tige standard à nouveau
et èlargir les autres encastrements normale-
ment.
• Schritt 3 - Bringen Sie den Standard-Hebel
wieder an und wiederholen Sie das Fräsen
der nächsten Falze wie gewohnt.
• Passo 3 - Girare e sistemare la barra stan-
dard e ripassare normalmente la fresatura dei
successivi incavi.
• Passo 3 - Voltar a colocar a barra normal
e refazer a fresagem dos rasgos seguintes
normalmente.
• Шаг 3 - Установите стандартную штангу
и увеличьте остальные пазы.
• Krok 3 - Załóż ponownie standardowy pręt
i wykonaj standardowe poszerzenia gniazd.
1414

1515
• Paso 1 - Proceder a la realización de los
encajes según procedimiento normal.
• Step 1 - Make the recesses as usually.
• Pas 1 - Faire les encastrements normale-
ment.
• Schritt 1 - Gehen Sie zur Durchführung der
Falze nach dem üblichen Verfahren vor.
• Passo 1 - Procedere alla realizzazione degli
incavi seguendo procedura normale.
• Passo 1 - Proceder à realização dos rasgos
segundo o procedimento normal.
• Шаг 1 - Приступите к выполнению пазов
в обычном порядке.
• Krok 1 - Wykonaj standardowe frezowania
gniazd.
Realización de los encajes en puerta • Making the recesses on the door • Réalisation des en-
castrements sur la porte • Durchführung der Falze in der Tür • Realizzazione degli incavi nella
porta Realização dos rasgos na porta • Фрезерование пазов на двери • Frezowanie gniazd pod
zawiasy w skrzydle drzwiowym

16
• Paso 2 - Colocar la barra accesoria hacien-
do tope sobre la puerta y repasar el primer
fresado.
• Step 2 - Place the supplementary rod on
the upper side of the door and enlarge the
rst recess.
• Pas 2 - Placer la tige supplémentaire fais-
sant butée sur la partie supérieure de la porte
et élargir le premier encastrement.
• Schritt 2 - Legen Sie die Zubehörstange
an der Tür auf und wiederholen Sie das erste
Fräsen.
• Passo 2 - Collocare la barra accessoria a
lo sulla porta e ripassare la prima fresatura.
• Paso 3 - Volver a colocar la barra estándar y repasar los siguientes encajes tal y como se describe en el paso
3 del fresado del marco
• Step 3 - Place again the standard rod and enlarge all the other recesses as described in paragraph 3 making
recesses on the frame.
• Pas 3 - Placer à nouveau la tige standard et élargir les autres encastrements selon la procédure du point 3
encastrements sur la huisserie.
• Schritt 3 - Bringen Sie den Standard-Hebel wieder an und wiederholen Sie das Fräsen der Fensterrahmen
so, wie in Schritt 3 beschrieben.
• Passo 3 - Girare e collocare la barra standard e ripassare i successivi incavi come viene descritto nel passo
3 della fresatura sul telaio.
• Passo 3 - Voltar a colocar a barra normal e refazer a fresagem dos rasgos seguintes normalmente.
• Шаг 3 - Установите стандартную штангу и увеличьте остальные пазы, как указано в разделе 3
обработки дверной коробки.
• Krok 3 - Zamontuj ponownie standardowy pręt i poszerz pozostałe gniazda według opisu Kroku 3 dla frezowa-
nia gniazd w ościeżnicy.
Presionar
Press
Presser
Premere
Нажмите
Naciśnij
2. Instrucciones para galces superiores 13 mm hasta 20 mm • Instructions for rabbets over 13 mm
until 20 mm • Instructions pour des feuillures de plus de 13 mm jusqu’à 20 mm • Anleitung für
Falstiefe von 13 mm bis 20 mm • Istruzioni per battute superiori a 13 mm no a 20 mm • Instruções
para rebaixos superiores a 13 mm até 20 mm • Инструкции при глубине притвора от 13 до 20 мм
Instrukcja wykonywania felców od 13 mm do 20 mm
• Passo 2 - Colocar a barra acessória fazendo topo na porta e refazer o primeiro rasgo.
• Шаг 2 - Установите дополнительный опорный стержень, поставляемый с шаблоном. Установите
фрезер, уперев стержень в верхний срез дверного полотна, и увеличьте первый паз, выполненный при
шаге 1.
• Krok 2 - Zamontuj dodatkowy pręt na górnej krawędzi skrzydła drzwi i powiększ pierwsze gniazdo.
16

17
Sin calas: Galce max. (*)
Con calas: Galce max. (*)
13 mm
20 mm
(*) Without spacers: max. rabbet
Sans cales: feuillure max
Senza cuneo: battuta max.
Sem calços: Rebaixo max.
Без разделителя: макс. притвор
Bez przekładek: Max. głębokość felcu
(*) With spacers: max. rabbet
Avec cales: feuillure max.
Con cuneo: battuta max.
Com calços: Rebaixo max.
С разделителем: макс. притвор
Z przekładkami: Max. głębokość felcu

18
• Nota: Para bisagras de una profundidad superior a 40 mm, el exceso de profundidad deberá realizarse
de forma manual (taladro, tupí....)
• Note: For hinges with a depth over 40 mm, the excess of depth must be done manually (drill, router…).
• Note: Pour des charnières d’une profondeur supérieure à 40 mm, l’excès de la même doit être réalisée
manuellement (perceuse, défonceuse…).
• Hinweis: Bei Scharnieren mit einer Tiefe von mehr als 40 mm muss der Tiefenüberschuss manuell
erfolgen (Bohrer, Fräser…).
• Nota: per cerniere di una profondità superiore a 40 mm, l’eccesso della profondità dovrà essere realizzato
in modo manuale (trapano, fresatrice toupie..).
• Nota: Para dobradiças com profundidade superior a 40 mm, o excesso de profundidade deverá realizar-se
de forma manual (berbequim, fresadora tupia…).
• Обратите внимание: Для петель с глубиной посадки более 40 мм дополнительное заглубление
должно выполняться с помощью другого инструмента (дрель, универсальный фрезер …).
• Uwaga: W przypadku zawiasów o głębokości większej niż 40 mm, nadmiar materiału należy wybrać za
pomocą frezarki lub wiertarki.
40 mm
Acabado manual
Manual finishing
Finition manuelle
Manuelle Nachbearbeitung
Finitura manuale
Acabamento manual
Oтделка ручной
Ręczne wykończenie
18


Virutex, S.A.
Av. de la Llana, 57
08191 Rubí (Barcelona) Spain
www.virutex.com
2996801 042021
http://www.virutex.es/registre
Acceda a toda la información técnica.
Access to all technical information.
Accès à toute l’information technique.
Zugang zu allen technischen Daten.
Accedere a tutte le informazioni tecniche.
Aceso a todas as informações técnicas.
Dostęp do wszystkich informacji technicznych.
Доступ ко всей технической информации.
Other manuals for FR129 VB
2