VisionAid International ReadEasy Move 2 User manual

ReadEasy Move 2 Software v5.0.x
Standard User Manual
English, Revision B
Copyright (C) 2008-2015, VisionAid International Ltd, all rights reserved.

VisionAid International
Page 2
Table of Contents
Table of Contents................................................................................................. 2
Introduction......................................................................................................... 3
Improvement program ........................................................................................ 3
Ownership and intellectual property................................................................... 4
Box contents ........................................................................................................ 4
Unpacking............................................................................................................ 5
Carry Handle ........................................................................................................ 6
Positioning for use ............................................................................................... 6
Contrast / positioning mat................................................................................... 7
Plugging in ........................................................................................................... 8
Power adapter .................................................................................................. 8
Connecting the camera ..................................................................................... 8
Turning on / off.................................................................................................... 9
Lighting adjustment ............................................................................................11
Controls ..............................................................................................................12
Audio ..................................................................................................................16
Multi-Language...................................................................................................17
Reading documents with different languages..................................................17
Obtaining additional languages / feature packs...............................................17
Activating additional languages .......................................................................17
Supported languages .......................................................................................18
Upgrading software ............................................................................................21
FAQ and Troubleshooting ...................................................................................22
Appendix A: Safety..............................................................................................24
Appendix B: Technical Information.....................................................................25

VisionAid International
Page 3
Introduction
Congratulations on choosing the ReadEasy Move 2 digital capture reading system.
The ReadEasy Move 2 combines ease of use with the highest quality speech
output and the world’s fastest text recognition. It can capture and read any
printed material such as letters, bank statements, newspapers, food packaging
etc. and reads the text aloud using a natural sounding voice.
Improvement program
Users are the best people to help us improve and develop our products so if you
have any ideas or suggestions, no matter how small, please do contact us.
Suggestions contact information
Please use the following methods to contact us regarding your suggestions:
Email:
suggestions@visionaid.com
Post:
ReadEasy Move 2 Suggestions
VisionAid International Ltd.
Bridge Lodge, Spalding, Lincolnshire
PE11 3AU
United Kingdom
Phone:
+44 (0) 1775 711 977
Thank you and we wish you many hours of enjoyment with your new personal
reading assistant!

VisionAid International
Page 4
Ownership and intellectual property
The software installed on the ReadEasy Move 2 makes use of third party software
libraries that are redistributed under their own respective licenses.
LAME is distributed under the terms of the GNU Lesser General Public License
(LGPL), a copy of which can be found at http://www.gnu.org/licenses/lgpl.html
and is included in the software’s program directory.
OpenCV is distributed under the terms of the Berkeley Software Distribution
(BSD) license, a copy of which is included in the software’s program directory.
Copyright (C) 2000-2008, Intel Corporation, all rights reserved.
Copyright (C) 2009, Willow Garage Inc., all rights reserved.
Third party copyrights are property of their respective owners.
Box contents
Your ReadEasy Move 2 box contains the following items:
1. ReadEasy Move 2 carry case
2. ReadEasy Move 2 digital capture reading system
3. ReadEasy Move 2 camera
4. Power supply and power cord
5. White contrast / positioning mat
6. Laminated quick reference guides (version dependent)
7. Standard paper user manual and optional paper Feature Pack manual
8. Audio CD user manual
9. Over ear headphones with in-line volume control
10. Optional keypad (if Keypad or Low Vision Touch Feature Pack
purchased)
11. Optional trackball (if Low Vision Touch Feature Pack purchased).
If any of these items are missing from your package, please contact your local
distributor.

VisionAid International
Page 5
Unpacking
Lift ReadEasy Move 2’s carry bag out of its
shipping box and lay it down onto a flat surface
with the shoulder straps touching the table, and
the handle (which is normally located on the top
of the bag when upright) facing towards you.
The bag has two main compartments, both with
double zips as well as a small single zip pocket
(located right on the top) and two small zipped
side pockets.
Firstly, remove the main ReadEasy Move 2 unit
from the padded Velcro sealed bag in the lower
compartment. ReadEasy Move 2’s handle will be facing upwards ready to grasp
hold of to help you easily remove it.
Then, remove the white contrast / positioning mat (and large print
documentation if required), located above the padded Velcro bag, held in place
by a divider.
Then remove the camera, power adapter, power cable and headphones (if
required) which are located in the higher double zip compartment.
Connect the power cable to the power supply ‘brick’.
If you have purchased the optional feature pack, the keypad and trackball will
also be located in the same compartment. Remove these if present and
required.
5) Keypad (optional)

VisionAid International
Page 6
Carry Handle
ReadEasy Move 2 features an integrated foldable carrying handle making it easy
and safe to move from room-to-room.
The carry handle lays flat against the back of the unit when not in use. By lifting
the handle into its upright position it is then easy to grasp and move the unit.
When packing ReadEasy Move 2 back into its carry bag, you can lower the unit
into the Velcro sealed padded section with the handle up and leave it facing
upwards making it easy to grasp when removing the unit.
Positioning for use
When placing ReadEasy Move 2 on a surface to use, ensure that the surface is flat
and is large enough for you to position the items you wish to capture under the
camera. Also ensure that the unit is not directly underneath any bright lighting,
as this can affect its accuracy when reading glossy documents.
2)
1)
3)

VisionAid International
Page 7
Contrast / positioning mat
ReadEasy Move 2 also includes a contrast / positioning mat. This can be used if
the surface where the ReadEasy Move 2 is located is very dark or textured and
the item wishing to be read is small (e.g. a postage receipt or small packet of
food).
To position the mat, ensure ReadEasy Move 2 is located on a flat surface where
you wish to use it. Then, make sure the contrast mat is folded flat (the top
section is folded over for transport). There is a “finger” at the top of the mat
that can be slid around the back of the ReadEasy Move 2, from left to right.
Ensure the “finger” is held flat with the index finger on your left hand as you
slide the mat from right to left until it fits snugly up against the left side.
When in position,
the mat also doubles
as a positioning
guide, as its size
roughly represents
the capture area.

VisionAid International
Page 8
Plugging in
Power adapter
1. Plug the power cable into the power adapter.
2. Plug the power tip from the power brick into ReadEasy Move 2’s power
socket, located on the back side, in the very bottom right corner.
3. Insert the mains plug into a wall socket and ensure it is switched on.

VisionAid International
Page 9
Connecting the camera
ReadEasy Move 2 features a unique, magnetised, easy release camera system.
The slot for the camera (coloured blue) is located on the top edge of the main
unit, on the left hand side.
With the rectangular section of the camera facing downwards (also coloured
blue) and the main length of the camera arm facing towards you, slowly lower
the blue rectangular section over the blue camera slot. As you do so you will feel
it magnetise firmly into position.
The camera will only go into its slot one way round and does not require much
force at all.
To disconnect the camera, grasp it firmly at the back (above the camera slot) and
simply pull it directly upwards.
2)
1)
3)

VisionAid International
Page 10
Turning on / off
To turn on ReadEasy Move 2, ensure it is plugged in, mains power is switched on
and that the camera is connected. Then, press the on / off button, located on the
right side of the machine, 1 inch, (2.5 cm), from the top and 0.5 inch, (1.3cm),
from the back.
After pressing, the on / off button will immediately illuminate with a blue ring.
You will not hear anything from the device until it announces that is ready,
approximately 13 seconds after being switched on.
To turn ReadEasy Move 2 off, simply press the on / off button again.
IMPORTANT:
It takes approximately 10 seconds for ReadEasy Move 2 to power off when
the on / off button has been pressed, so if you wish to unplug the unit, please
do not do so until this time has passed.
On / off button
VisionAid International
Page 11
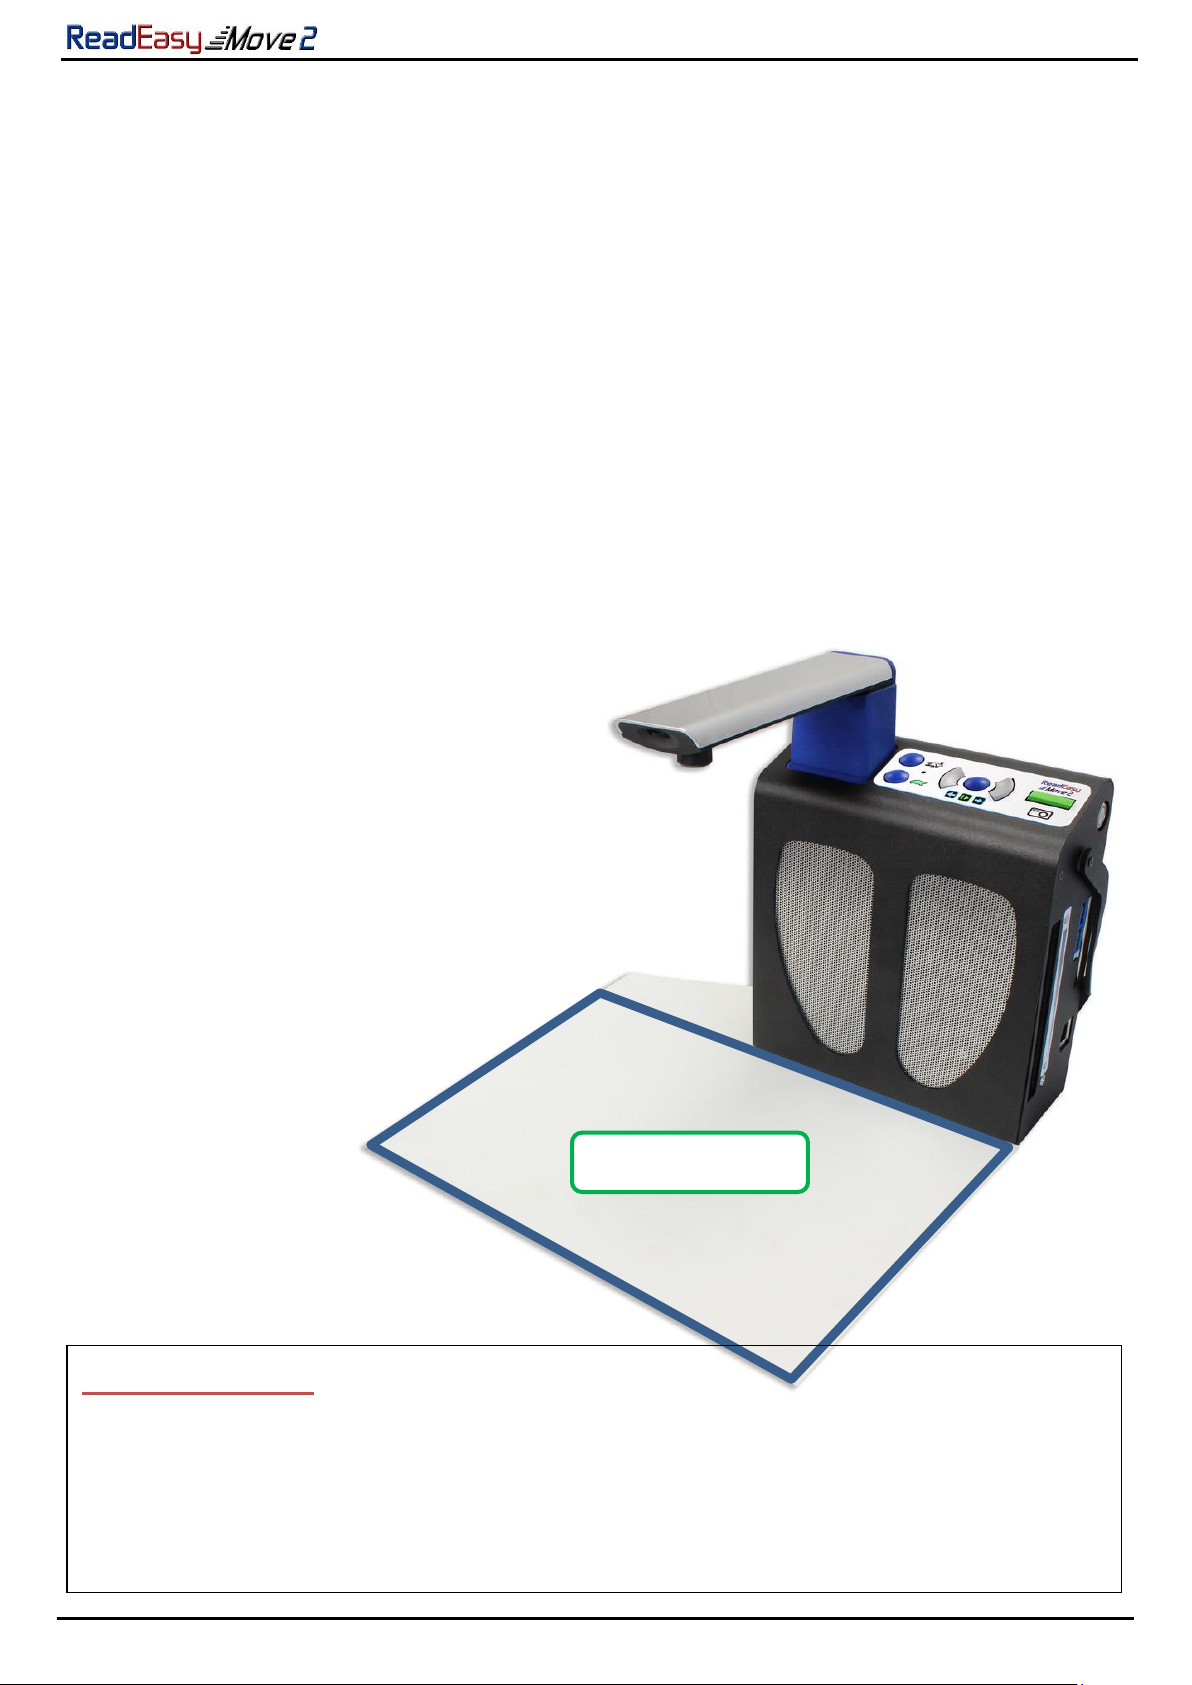
Positioning documents for capture
ReadEasy Move 2 captures an area slightly larger than an A4 or Letter sized page.
Documents must be in a landscape orientation with the long edge of the
document going left to right.
To align your document, simply place it up against the front of the ReadEasy Move
2 and slide it so that the right edge of your document is in line with the right edge
of ReadEasy Move 2.
The orientation of the document will not influence the recognition of the text.
When capturing extremely thick objects, due to the reduced distance to the
camera, ReadEasy will capture a smaller area. It may therefore be necessary to
raise ReadEasy Move 2 up, (by placing a thick book underneath it for example),
to ensure it captures enough of the desired object.
Capture Area
POSITIONING TIP:
ReadEasy Move 2 has powerful document straightening and rotation abilities
but for the highest accuracy and speed, try to position your document as
squarely as possible and ensure pages are relatively flat.

VisionAid International
Page 12
Lighting adjustment
ReadEasy Move 2 features integrated, LED lighting. By default, (and for most
scenarios), the lighting should be turned off. Turning the lighting on can help if
there is very little ambient light in the room but may cause reflections on glossy
documents.
The lighting control switch is located on the front the camera head.
To turn the lighting on, move the switch to the left. To turn the lighting off, move
the switch to the right.
Turn Light Off
Turn Light On
Lighting Control Switch
VisionAid International
Page 13
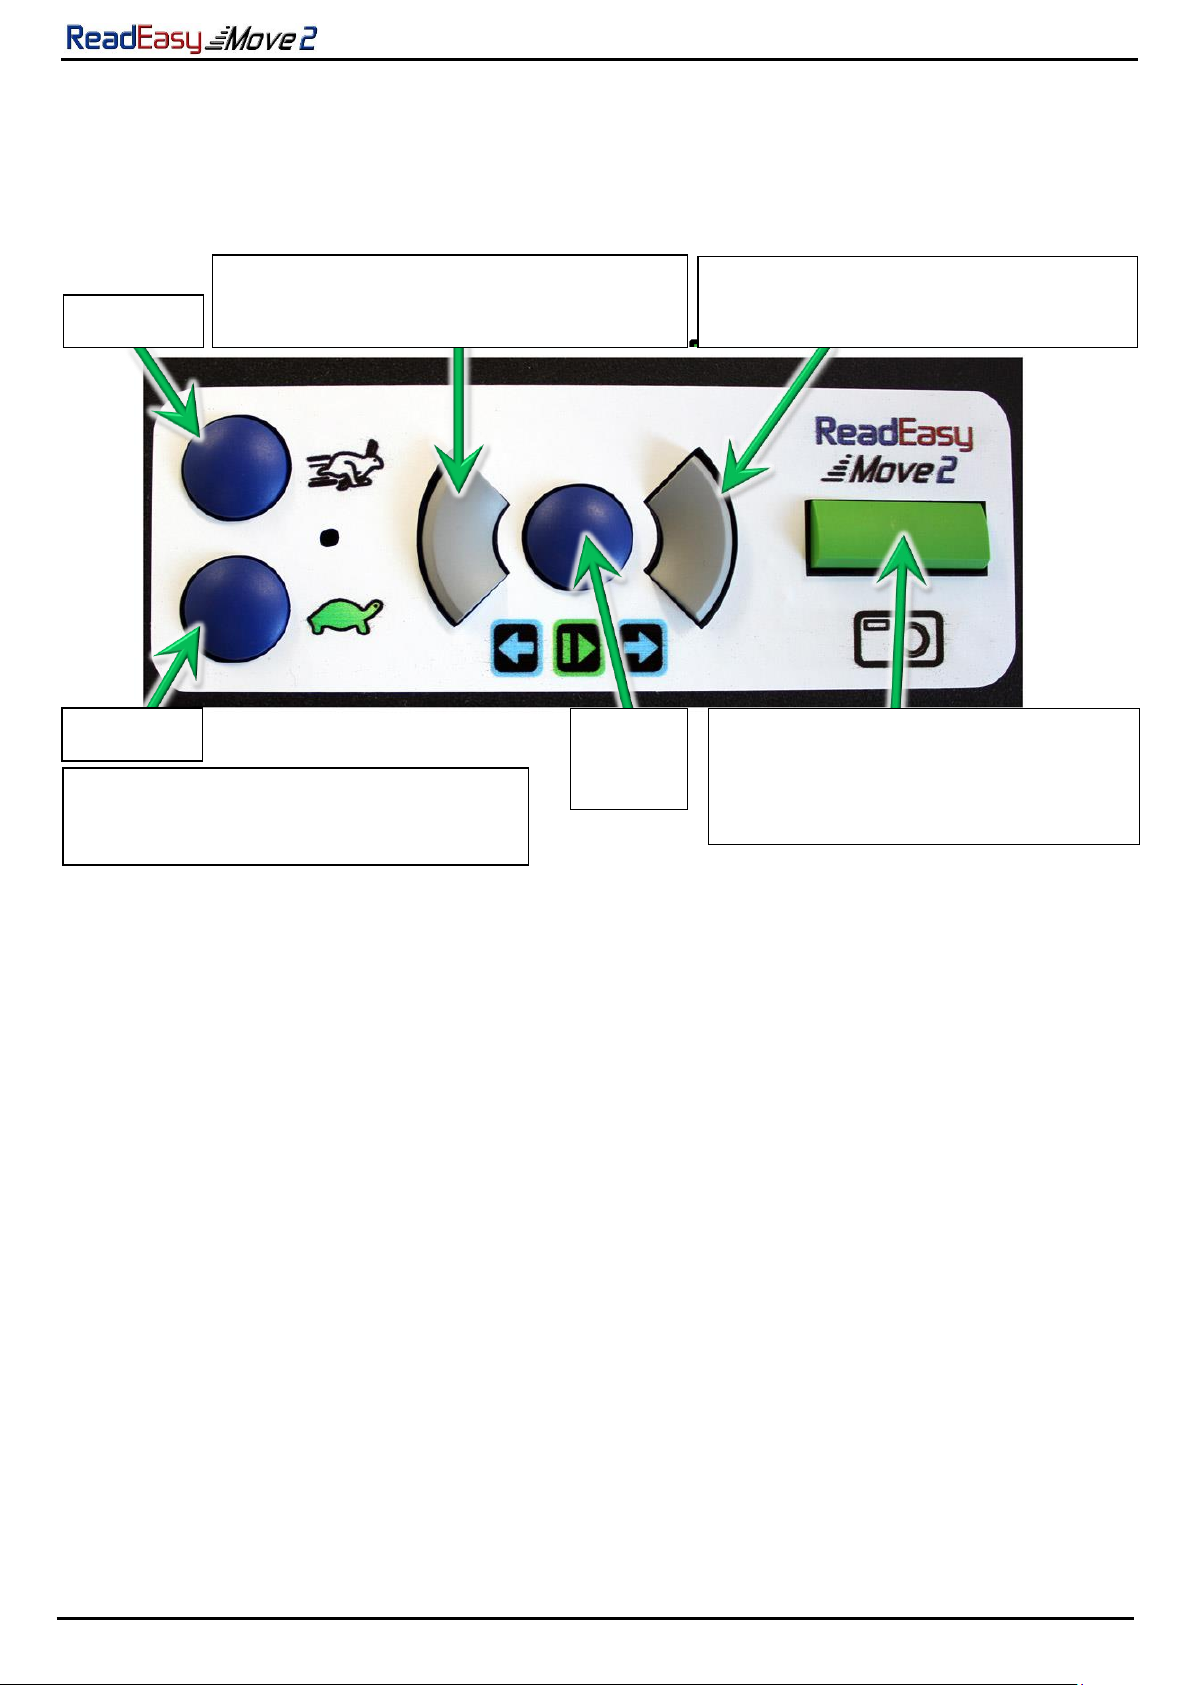
Controls
The main controls are all located on the top of the unit. There are a total of 6
tactile buttons.
Standard capture (quick press)
To capture a document and have it read aloud, ensure you have a document
under the camera and then press the green rectangular button. This is the
farthest button to the right, on the top of the unit.
ReadEasy Move 2 features an intelligent motion detection system that won’t
allow your document to be captured if it is moving. This allows you time to press
capture and position your document underneath ReadEasy Move 2 with both
hands, (e.g. for a book). Your document will be captured two seconds after the
last movement was detected.
An audible “beep” will be emitted as movement is detected.
To override this function and force ReadEasy Move 2 to capture your document,
simply press Capture again.
Your document will start being read aloud a few seconds later.
Quick press: Previous Sentence
Press & Hold: Previous Paragraph
Quick press: Next Sentence
Press & Hold: Next Paragraph
Faster & Slower simultaneously:
Change Voice
Faster
Play /
Pause
Slower
Quick press: Capture
Press & Hold: Single column
(for bank statements)

VisionAid International
Page 14
Single column capture (press and hold)
To capture documents with tabular information, (like bank
statements), simply press and hold the capture button until “capturing single
column” is announced. This is the farthest button to the right, on the top of the
unit. This forces ReadEasy Move 2 to read across columns of information.
Play / pause
To start and stop the reading of your document, press the play / pause
button. This is the blue circular button, located between the two grey
quarter-circles. It is the third button from the right.
Next sentence (quick press)
To navigate forwards one sentence, press and release the right grey
quarter circle button, which is the second button from the right.
Next paragraph (press and hold)
To navigate forwards one paragraph, press and hold the right grey quarter circle
button, which is the second button from the right.
Previous sentence (quick press)
To navigate backwards one sentence, press and release the left grey
quarter circle button, which is the fourth button from the right.
Previous paragraph (press and hold)
To navigate backwards one paragraph, press and hold the left grey quarter circle
button, which is the fourth button from the right.
Faster and slower
To increase or decrease the speed of the reading voice, press the faster
or slower buttons. These are the two vertically in-line, blue, circular buttons
located just to the right of the camera on the top of the unit.
Change Voice
To change the reading voice, press the faster and slower buttons simultaneously.
These are the two vertically in-line, blue, circular buttons located just to the right
of the camera on the top of the unit.

VisionAid International
Page 15
Force full restart
To force ReadEasy Move 2 to fully restart, simply press and hold Capture and
Faster buttons together. This should only be used for troubleshooting purposes.
This is different to turning the unit on and off using the power button as the
software and hardware on ReadEasy is fully re-initialised using restart.

VisionAid International
Page 16
Audio
Volume adjustment
To increase or decrease the volume, simply raise
or lower the volume slider. This is located on the
right hand edge of the machine, near the front.
Please note, it is not possible to completely shut
off the volume using just the slider.
Headphones
ReadEasy Move 2 includes a pair of over ear
headphones with in-line volume control. They
have a standard 3.5 mm audio jack connector.
To use the included headphones, (or any other
that you may already own), simply plug them into the headphone
socket, located on the right hand edge of the machine, 1.20
inches, (3 cm), from the front and 1.40 inches, (3.5 cm), up from the bottom.
Volume from the loud speakers will automatically be muted as soon as the
headphones are plugged in.
To alter the headphone volume, we recommend using the in-line volume wheel,
located on the headphone wire. It is also possible to adjust the volume of the
headphones using the main volume slider.
In-line volume control
Headphone
socket
Volume
VisionAid International
Page 17
Multi-Language
Reading documents with different languages
ReadEasy Move 2 offers automatic language detection. This means that whatever
the language of the document is that you place under ReadEasy Move 2, it will
automatically change its reading voice to the voice of the document. This is
subject to the languages that are available and installed.
This happens on a per-sentence basis so even single pages with multiple
languages will read in the correct voice.
Obtaining additional languages / feature packs
If you wish to purchase an additional voice pack or feature pack, please contact
your local distributor.
Activating additional languages
Once you have contacted your distributor and purchased an additional language,
they will provide you with a coded piece of paper. Capturing this document will
automatically unlock and enable the new language.
IMPORTANT:
For multi-language to be available, you must have the Keypad Feature Pack,
together with the additional languages you require.

VisionAid International
Page 18
Supported languages
ReadEasy supports over 30 languages. Please note, some languages do not
support automatic switching (they cannot be automatically detected and must be
set manually).
We provide two sets of voices. The first is the Nuance Vocalizer range of voices.
The second is the Ivona set of voices. Depending on your country, you will most
likely have a preference for one or the other once you have heard them.
Vocalizer Voices
Language
Auto
Switch
Voices
Arabic
No
Voice only –No OCR: Maged (Male)
Catalan
Yes
Nurian (Female)
Chinese
No
Basic Support: Sin-Ji (Female) Hong-Kong Cantonese,
Ting-Ting (Female) Chinese Mandarin, Ya-Ling (Female)
Taiwanese Mandarin
Czech
Yes
Zuzana (Female)
Danish
Yes
Ida (Female)
Dutch
Yes
Claire (Female - Netherlands) Xander (Male -
Netherlands)
Ellen (Female –Belgian)
English
Yes
Daniel (Male - British) Serena (Female - British)
Sangeeta (Female –British Indian), Jill (Female -
American) Samantha (Female - American)
Tom (Male - American), Karen (Female - Australian) Lee
(Male - Australian), Tessa (Female –South African)
Finnish
Yes
Mikko (Male)
French
Yes
Felix (Male - Canadian) Julie (Female - Canadian)
Thomas (Male - French) Virginie (Female - French)
Hindi
No
Voice only –No OCR: Lekha (Female)
Gaelic
No
OCR only –no voices
German
Yes
Anna (Female) Steffi (Female) Yannick (Male)
Greek
Yes
Alexandros (Male)
Hungarian
Yes
Eszter (Female)
VisionAid International
Page 19
Italian
Yes
Paolo (Male) Silvia (Female)
Japanese
No
Voice only –No OCR: Kyoko (Female)
Korean
No
Narae (Female)
Norwegian
Yes
Stine (Female)
Polish
Yes
Agata (Female)
Portuguese
Yes
Joana (Female - Portuguese)
Raquel (Female - Brazilian)
Romanian
No
Simona (Female)
Russian
Yes
Milena (Female)
Slovak
No
Laura (Female)
Spanish
Yes
Diego (Male - Spanish) Monica (Female - Spanish)
Javier (Male - Mexican) Paulina (Female - Mexican)
Swedish
Yes
Alva (Female) Oskar (Male)
Thai
No
Voice only –No OCR: Narisa (Female)
Turkish
Yes
Aylin (Female)
VisionAid International
Page 20
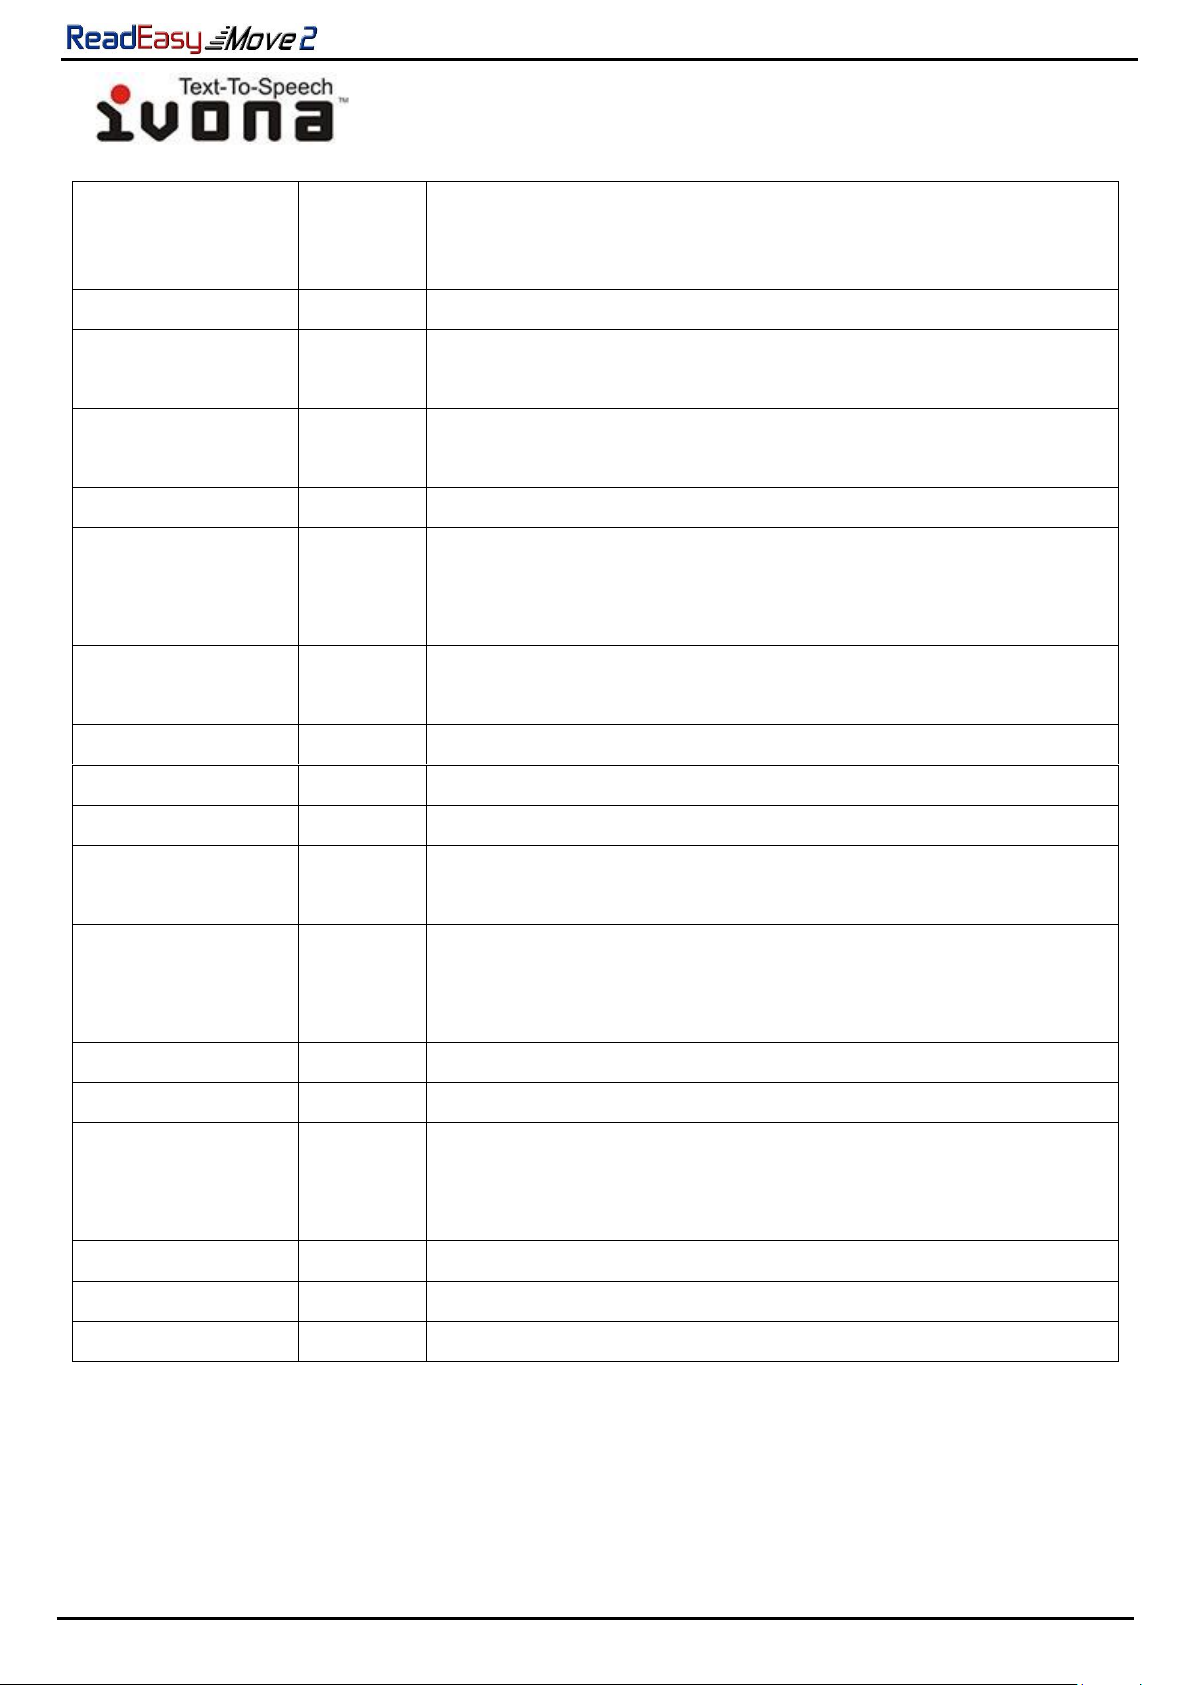
Ivona Voices
Language
Auto
Switch
Voices
Danish
Yes
Mads (Male), Naja (Female)
Dutch
Yes
Lotte (Female - Netherlands), Ruben (Male -
Netherlands)
English -
American
Yes
Eric (Male), Ivy (Female), Jennifer (Female), Joey
(Male), Kendra (Female), Kimberly (Female)
English - British
Yes
Amy (Female), Brian (Male), Emma (Female)
English –
Australian and
Welsh
Yes
Nicole (Female –Australian), Russel (Male –
Australian), Geraint(Male –Welsh), Gwyneth
(Female –Welsh)
French
Yes
Chantal (Female –Canadian), Celine (Female –
French), Mathieu (Male –French)
German
Yes
Hans (Male), Marlene (Female)
Icelandic
No
Dora (Female), Karl (Male)
Italian
Yes
Carla (Female), Giorgio (Male)
Polish
Yes
Agnieszka (Female), Ewa (Female), Jacek (Male),
Jan (Female), Maja (Female
Portuguese
Yes
Crisitano (Male –Portuguese), Ricardo (Male -
Brazilian Portuguese), Vitoria (Female - Brazilian
Portuguese)
Romanian
No
Carmen (Female)
Russian
Yes
Tatyana (Female)
Spanish
Yes
Conchita (Female - Castilian), Enrique (Male –
Castilian), Miguel (Male –American), Penelope
(Female –American)
Swedish
Yes
Astrid (Female)
Welsh
No
Geraint (Male), Gwyneth (Female)
Turkish
Yes
Filiz (Female)
Table of contents


