Vitea Care Spring User manual

Instructions for Use
Spring
Multifunctional rehabilitative device
Edition MG 05.2016
1

Contents
1. Introduction..................................................................................................................................... 3
2. Description of the product............................................................................................................... 3
3. Purpose............................................................................................................................................ 5
4. Contraindications............................................................................................................................. 5
5. Use................................................................................................................................................... 5
6. Safety of use.................................................................................................................................... 6
7. Service and maintenance................................................................................................................. 9
7.1. Change of position................................................................................................................... 9
7.2. Transporting and moving the device.................................................................................... 13
7.3. Maintenance and control of the technical condition.............................................................. 14
8. Technical parameters:.................................................................................................................... 16
9. Symbols......................................................................................................................................... 16
10. Contact details........................................................................................................................... 17
2

1. Introduction
Thank you very much for choosing our product. We strongly believe that this device will meet your
expectations. We strongly recommend reading this document prior to the first use of the device. This
user manual is submitted in order to present the essential information related with the safe use of this
product. Following these recommendations shall considerably prolong the durability and aesthetics of
the product. We would also like to emphasize that we are doing our best to constantly improve the
quality of our products, which may result in slight changes, which are not always included in the user
manual.
2. Description of the product
Wooden multifunctional rehabilitative device which can be also used as a seat facilitates the everyday
care and rehabilitation of children with disabilities.
Figure 1.
1. Profiled headrest, stabilizing the head, with height regulation.
2. Neck rest pillow with height regulation.
3. Backrest (smooth and electric pilot controlled adjustment of the backrest inclination angle,
from the sitting position - 90° to lying position - 0°.
2
1
8
13
9
10
12
16
11
3
5
15
6
4
14
7
3
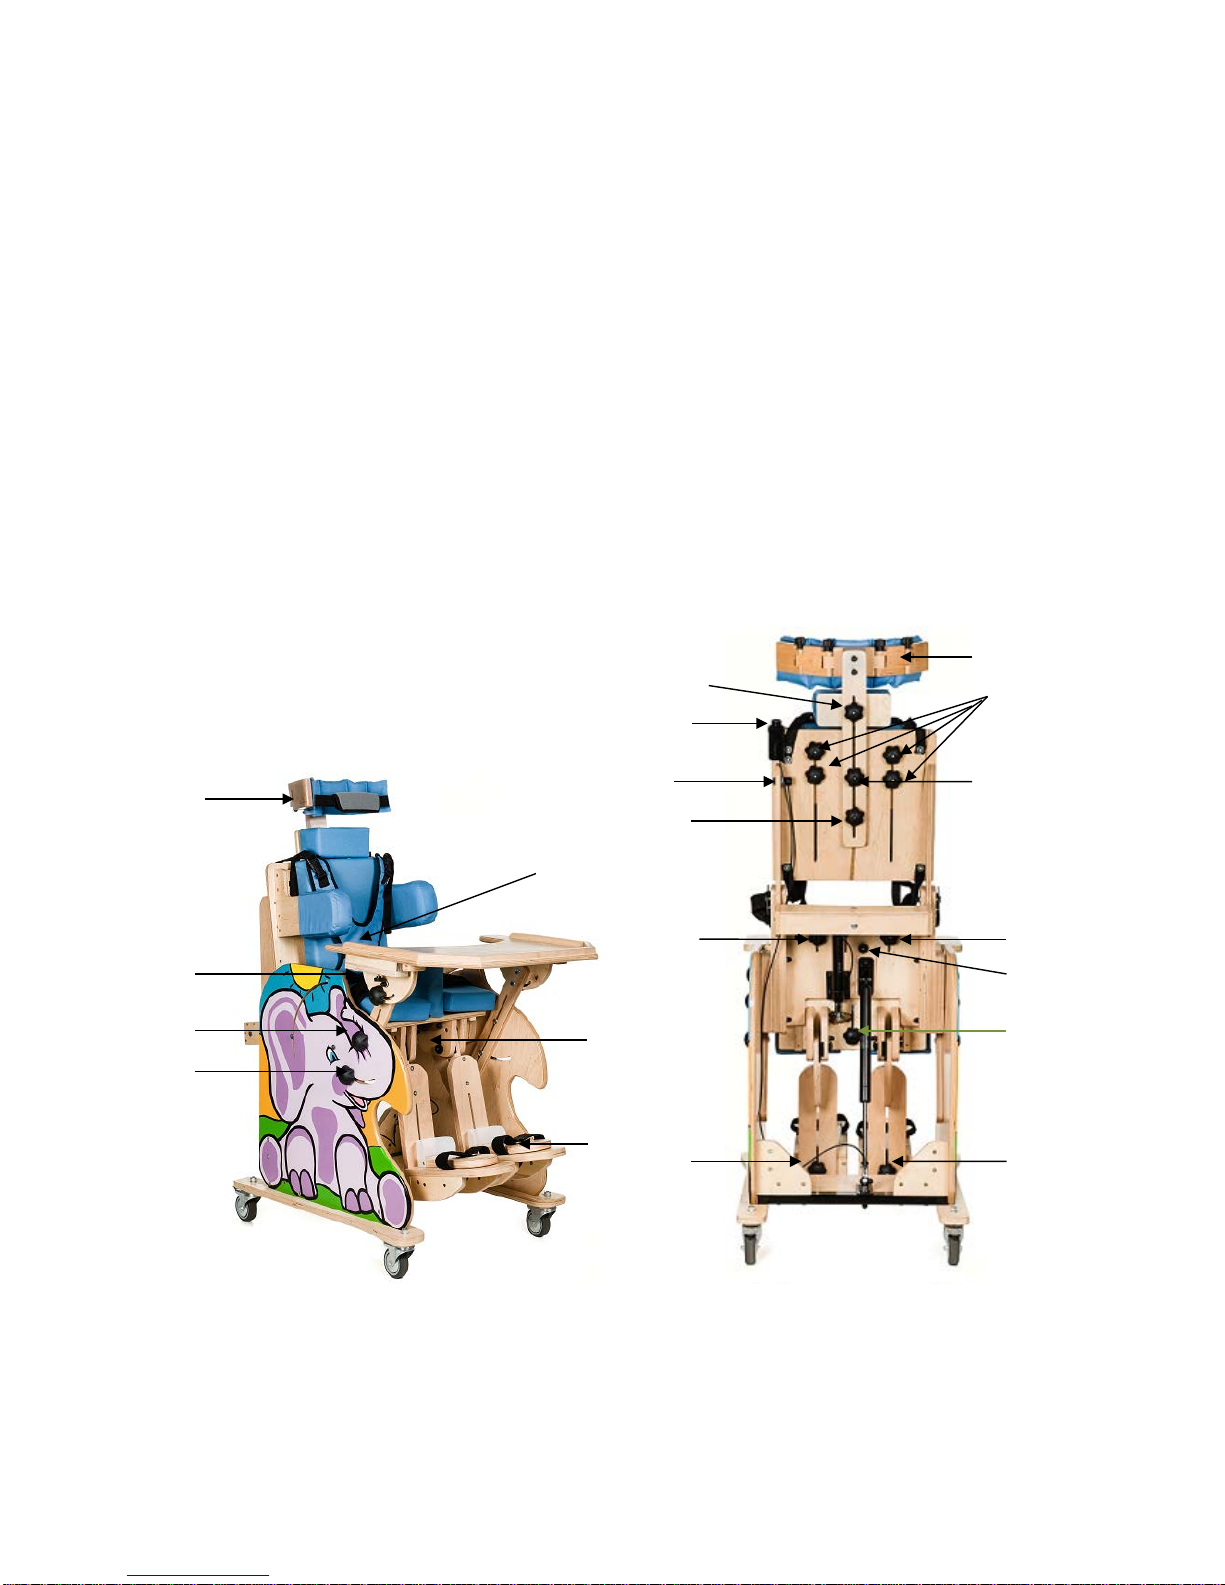
4. Seat (smooth and electric pilot controlled adjustment of the inclination angle from -15° to
+90°, manual movement to the front and to the back).
5. Footrest with smooth height regulation, adjustment of the footrest inclination angle from 0°
(default horizontal position) to 90° (default vertical position - the position of the device
immediately after removing from the package).
6. Foot support - adjustment within three planes (movement front/back, right/left. inclination).
7. Abductor wedge (separator), regulated, covered with upholstery, ensuring proper position of
hip joints.
8. Regulated lateral trunk stabilizers.
9. Armrests (regulated height and inclination angle).
10. Profiled top for manual exercises and play with adjustment of movement and inclination
angle.
11. Wheels, equipped with independent parking locks.
12. Waistcoat harness supporting the trunk.
13. Belts stabilizing the pelvis.
14. Belts stabilizing knees / thighs.
15. Belts stabilizing feet.
16. Belt stabilizing the head.
Figure 2. Figure 3.
A – regulation of the table /armrest inclination angle
B,C – regulation of table/armrest up and down movement
D – regulation of headrest circumference
E – regulation of table front and back movement
D
D
J
L
K
M
N
I
A
B
K
C
I
H
F
E
P
O
M
G
4

F – footrest angle regulation (from 0° to 90°, gradual regulation, seven steps with 15° each) lock
G – regulation of the abductor wedge
H – regulation of foot support
I – regulation of footrest's height
J – regulation of neck supporting pillow height
K – regulation of headrest height
L – regulation of trunk stabilizer
M – regulation of front and back movement of the seat
N – seat movement lock
O – button regulating the seat inclination angle
P – button regulating the backrest inclination angle
3. Purpose
This product has been created mainly for children suffering from: cerebral palsy, myelomeningocele,
muscular dystrophies, as well as CNS defects of various aetiology. Construction of the device enables
to change the position of the child, as well as to verticalize the child. Multi-functionality and modular
structure of the device makes it possible to adjust the device to individual dimensions and functional
possibilities of the patient, as well the patient's specific therapeutic needs. Contraindications
concerning verticalization also stand as contraindications relating the use of verticalization feature of
the device. Stable structure with wheels equipped with parking locks, enables full mobility, while
maintaining proper safety.
The construction of the product - made of plywood, is secured with a non-toxic clear varnish.
Upholstery - made of PU foam, covered with polyester.
4. Contraindications
Do not use the upright function in cases where the patient's condition does not allow it. Never leave a
child alone in the device without adult supervision. Qualified medical personnel should attend first
verticalization.
Additionally, it is essential to familiarize oneself with user manual attached to the purchased
verticalizing device.
5. Use
Safe utilisation of the product requires training of the caretaker by trained medical personnel
(physiotherapist), as medical professionals will help adjusting and regulating the device to meet the
requirements and functional condition of the patient, as well as provide crucial guidelines concerning
the course of the verticalization process.
A. Take the device carefully out of the package and check whether the device has no visible
damages.
B. Block the wheels (11) by pressing blockades.
C. Make sure that all screwed connectors are not loose.
D. Disassemble the table top (two small knobs (E) at the lower part of the table), as well as loose
the abductor wedge (knob under the seat (G)).
E. Seat adjustment should be performed when the device is in its initial seating position. In order
to adjust the seat, it is essential to loosen two clamps (M), set the blockade (N) in the open
position (pull and turn) and move the seat carefully (to the front or to the back), release the
blockade (N), move the seat (to the front or to the back), until you hear a characteristic click,
5

then tighten properly the two screw clamps (M) to lock the movement of the seat and ensure
its proper position.
F. Adjust the dimension of the device to meet the individual need of the child. In order to do so:
a. make sure that the waistcoat, as well as belts supporting the pelvis, thighs and feet are
unlocked,
b. seat the child in the seat of the device,
c. loosen the knobs (L), set the right and the left trunk stabilizer to stabilize the trunk of
the patient in proper physiological position, and screw the knobs (L) to lock the
stabilizers,
d. adjust and lock the Abductor wedge with a knob (G), ensuring that the wedge
stabilizes the thighs and does not press the perineum of the patient,
e. loose the knobs (H, I) and then adjust the height of footrests to the patient, making
sure that patient's feet rest freely on footrests, screw (tighten) the knobs (H, I) and
fasten the feet supporting belts attached to the footrests,
f. in order to readjust the angle of footrests - pull out and hold the blockade in an open
position (F), and then readjust the footrest until you reach the desired angle (from the
initial position of 90° towards the position of 0° - horizontal position), and finally
activate the blockade (F) and move the footrest delicately until you hear a
characteristic click,
g. loosen the knobs (J, K) and adjust the height of the headrest to the height of the
patient, and then lock (tighten) the knobs (J, K),
h. loosen four knobs (D) and adjust the circumference of the headrest to the
circumference of the patient's head, and then lock (tighten) the knobs (D),
i. fasten all four locks on the waistcoat and pull the straps, making sure that the
waistcoat efficiently stabilizes the trunk and is located at the centre of the patient's
chest. Ensure that the straps attached to the waistcoat do not collide with any slots,
holes and any other elements of the device, especially when you change the position
of the device. Lower straps should always be close to the patient's body, ensuring that
they do not collide with the stabilizers fixating the trunk (8),
j. fasten the belts stabilizing knees/ thighs,
k. when the patient is sitting in the seat, the pelvis belt should be left unlocked and it
should be located on both sides of the seat cushion,
l. use the knobs (A, B, C) located on both sides of the device to adjust the height of
armrests. Lock the knobs (A, B, C),
m. Install the table top when necessary. In order to install the table top, it is essential to
slide it horizontally into the armrests (both armrests need to be at the same height),
tighten the knobs (E), and then check, by grabbing the table top and moving it (back
and forth) whether the table top is properly locked. Inclination angle and the height of
the table top, along with armrests, can be additionally adjusted with the use of knobs
(A, B, C).
6. Safety of use
CAUTION!
1) Non-compliance with the regulations detailed in this user manual may result in damaging
the device.
2) Neglecting to apply safety regulations included in this user manual may lead to an injury.
3) In order to increase the comfort, as well as the safety of the person using the device,
always follow the instructions stated in the user manual.
4) Before adjusting the desired position, it is crucial to make sure that limbs of the patient
6

are safely placed on the device, and all belts stabilizing the body are properly placed,
fastened and secured.
5) Do not leave the child unattended. Caretakers are held responsible for child's safety.
6) Leaving the child without fastened belts may pose a threat to child's health and life.
7) The system of the seat and the belts cannot replace a proper supervision of a caretaker.
8) Do not allow the child to play with this product.
9) Do not transfer the stabilizer when the child is sitting in it.
10) In order to avoid accidental runaway of the device, it is crucial to always apply the
brakes.
11) During transportation, it is important to disconnect the charging wire from the battery, to
protect the durability of batteries.
12) Take full precautions when disassembling, assembling or adjusting the device, since
slots, holes and mobile elements may pose a risk of trapping or jamming your fingers.
13) Do not attempt to modify the device without consulting the manufacturer and without
manufacturer's consent. Any modification may lead to damaging the product or to injury.
14) The device has small parts - risk of ingestion.
15) There are no contraindications related with simultaneous use of the device and other
individual orthopaedic equipment, including: orthopaedic footwear, cervical collars, back
braces and orthoses. In each and every case, the decision concerning the use of particular
devices shall be made by the physician.
16) In case of excessive skin sweating and in case of sensitive skin, in order to prevent skin
abrasions, it is not recommended to use the device without covering the body with
underwear.
17) The device is anticipated to be used indoors in temperature ranging from +10°C to
+40°C.
18) Getting on and getting off the device requires applying brakes on all wheels (11).
19) Getting on and getting off the device requires support from the caretaker, it is forbidden
to leave the child in the device unattended, without the supervision of the caretaker.
20) The device is anticipated to be used indoors and ONLY on even surfaces.
21) Using the device on a surface that does not ensure a safe support, namely on an uneven,
wet, icy, greasy, significantly sandy surface is unacceptable due to the possibility of fall.
22) The device is anticipated for children whose height ranges from 96cm to 130cm and
whose weight does not exceed 35kg.
23) Supports can only be used to support child's legs (sitting position, lying position or
standing position), it is forbidden to stand on foot support or to load (overweight) them.
24) The device should be stored away from sources of ignition and high temperature.
25) It is absolutely CRUCIAL to perform an inspection of all construction elements of the
device, at least on monthly basis. The inspection should cover the following:
-check the operation of mechanisms used to adjust settings and their locks,
-check the functioning of wheels,
-perform thorough visual inspection of electric connections,
-thoroughly check the stability, the look and the condition of the supporting
structure.
26) Do not use the device in case of stating any visible or palpable defects (such as fractured
structure), as this may pose a risk of an accident.
27) All repairs should be performed by a qualified personnel of the manufacturer. It is
forbidden to turn over or toss the device, as well as to exceed the maximum permissible
load of the device stated in the user manual.
7

28) Protect against direct contact with sources of open fire.
29) The estimated useful life of the device is 5 years. After this period of time, the device can
be used only after obtaining a positive evaluation of control performed by the
manufacturer.
30) Before initiating the rehabilitation process with the use of the device, it is essential to
contact the physician, who is in charge of the patient. After conducting the appropriate
qualification procedure, after obtaining the complete awareness of the patient concerning
the possibility of certain dysfunctions of the organism, as well as after providing proper
guidelines on conduct in the event of such dysfunctions, it is crucial to outline an
individual, preliminary therapeutic programme relating the gradual adaptation of the body
to the device. Failing to comply with the above-mentioned recommendations may lead to
regrettable responses of the patient's organism to change in the position of most internal
organs, as well as the need to adapt in the light of entirely new conditions.
31) User's body parts or guardian's body parts may become trapped or jammed in slots or in
spaces between various elements of the device, when folding and adjusting the its
mechanisms. Therefore, it is crucial to perform any operations of this kind with extreme
caution. When the adjustment has been finished, remember to stabilise the position of the
given element by properly tightening the nuts.
32) When using and operating the device, it crucial to remember the distance between fixed
parts of the device in places where the adjustment of parameters may cause the risk
associated with dimensions of particular slots and holes.
Safety principles during verticalization:
1) The verticalization process should be performed gradually.
2) If the child is verticalized for the first time, the verticalization process should be performed
under the supervision of qualified medical personnel.
3) It is crucial to pay special attention to child's reactions during the verticalization process -
pale skin, perspiration, nausea. If any symptoms occur, immediately stop the verticalization
process and go back to lying position.
4) STANDING IN THE DEVICE. The device makes it possible for the handicapped person to
assume a standing position, which is entirely safe and comfortable. Even in case of fainting,
the position remains verticalized due to a stable basis.
5) When the vertical position is in standing position, IT IS FORBIDDEN to operate the
backrest with the help of buttons (4 and 5), as this may possibly lead to moving the backrest
to an undesired position (inclination of the backrest to the front).
Safety principles concerning gas springs
1) The scope of spring functioning within the following temperature range: between -30ºC and +
80º C,
2) Protect the gas spring against soiling in order to ensure that it retain its functional properties,
3) Prevent contact between gas spring and any kind of fluids.
User safety stands as the most important aspect when using the device. That is why it is essential to
thoroughly read the whole user manual before using the device. The device can be operated only by a
person, WHO HAS BEEN PROPERLY TRAINED. Tracing and comprehending the principles
detailed in this user manual will significantly improve the comfort and easiness of the device service,
as well as it will enable to avoid dangerous situations as far as the user, as well as the person operating
the device is concerned.
8

The manufacturer shall not be held responsible for damages of property and injuries of people, which
result from improper usage of the device (usage noncompliant with safety principles).
The manufacturer shall not be held responsible for property damage / personal injuries resulting from
using the device against guidelines, recommendations included in this user manual or in other
documents related with the device.
This user manual contains the specification of the product, as well as all the information essential to
safely and comfortably use the product. All the information shall be changed and updated along with
noteworthy changes in the product. However, there may appear slight differences between descriptions
and figures between the user manual and the product that you obtained, which result from the ongoing
perfection of the product. These slight variations do not pose any significant influence on the manner of
using the product.
Verify and read the warranty card. Make sure that it has been properly completed and stamped. Keep
the warranty card to protect your rights in case of any damage.
The user manual constitutes an integral part of the product. If you ever decide to sell your device,
remember to provide the user manual to the subsequent user of the device (this is required by the law).
Carry the user manual with you, so that you can refer to it in case of any problems or difficulties with
using the device. Nonetheless, in case when you will not be able to solve the problem with the help of
the user manual and all guidelines it contains, or you will be afraid of further using the product,
immediately contact the manufacturer, who will provide you with all the essential help.
7. Service and maintenance
7.1.Change of position
The device enables assuming five basic positions. Before using the device, it is crucial to familiarize
oneself with the user manual and follow the instructions detailed in the user manual.
SITTING POSITION
Figure 4
9

The sitting position (seat on the level 0°, backrest and footrests vertically 90°) is an initial position,
and the device should be in this particular position after being taken out from the package.
In order to prepare the device for changing the position, it is essential to:
•Disassemble the table top with the use of knobs (E).
•Move armrests up and to the front, to a maximum possible level (knobs: A, B, C),
•Move foot supports as low as possible (6).
LYING POSITION
Figure 5.
In order to set the lying position
•Loosen all four knobs (L) responsible for adjusting the lateral trunk stabilizers and
move the stabilizers (Fig. 1 item 8) to the lowest possible position.
•Loosen the waistcoat stabilizing the trunk (Fig. 1 item 12) - in order to do so, pull all 4
fasteners of the waistcoat, as this will shorten all stripes attached to the waistcoat.
•Loosen the knee/thigh stabilizing belts.
•Make sure that all limbs of the patient are in secure positions.
•Press and hold the button (5) on the remote control, which is responsible for lowering
the backrest. When lowering the backrest, it is important to gradually lift footrests -
unlock the blockade of footrests (F) by pulling them out and gradually readjust the
footrests with a complete scope until they reach level 0° and hence they provide
horizontal support for lower limbs, release the blockades (F) until you hear a
characteristic click.
•Place the patient on the device, ensuring that the head rests on the headrest, whereas
feet rest of footrests. Due to structure of the device, it is essential to slide the patient
upwards, in order to obtain a stable and comfortable lying position, which can then
constitute the initial position for verticalization.
•Adjust the lateral stabilisers, tighten the knobs (L).
•Fasten and adjust the waistcoat, fasten and adjust the soft stabilizing belt / Fasten and
adjust the waistcoat, fasten and adjust the soft belt stabilizing the pelvis, as well as
belts stabilizing the knees. Make sure that they adhere to the patient's body and
stabilise it properly.
10
Lying (horizontal) positions is an initial position to assume the following positions:
•
STANDING POSITION,
•
TRENDELENBURG POSITION.
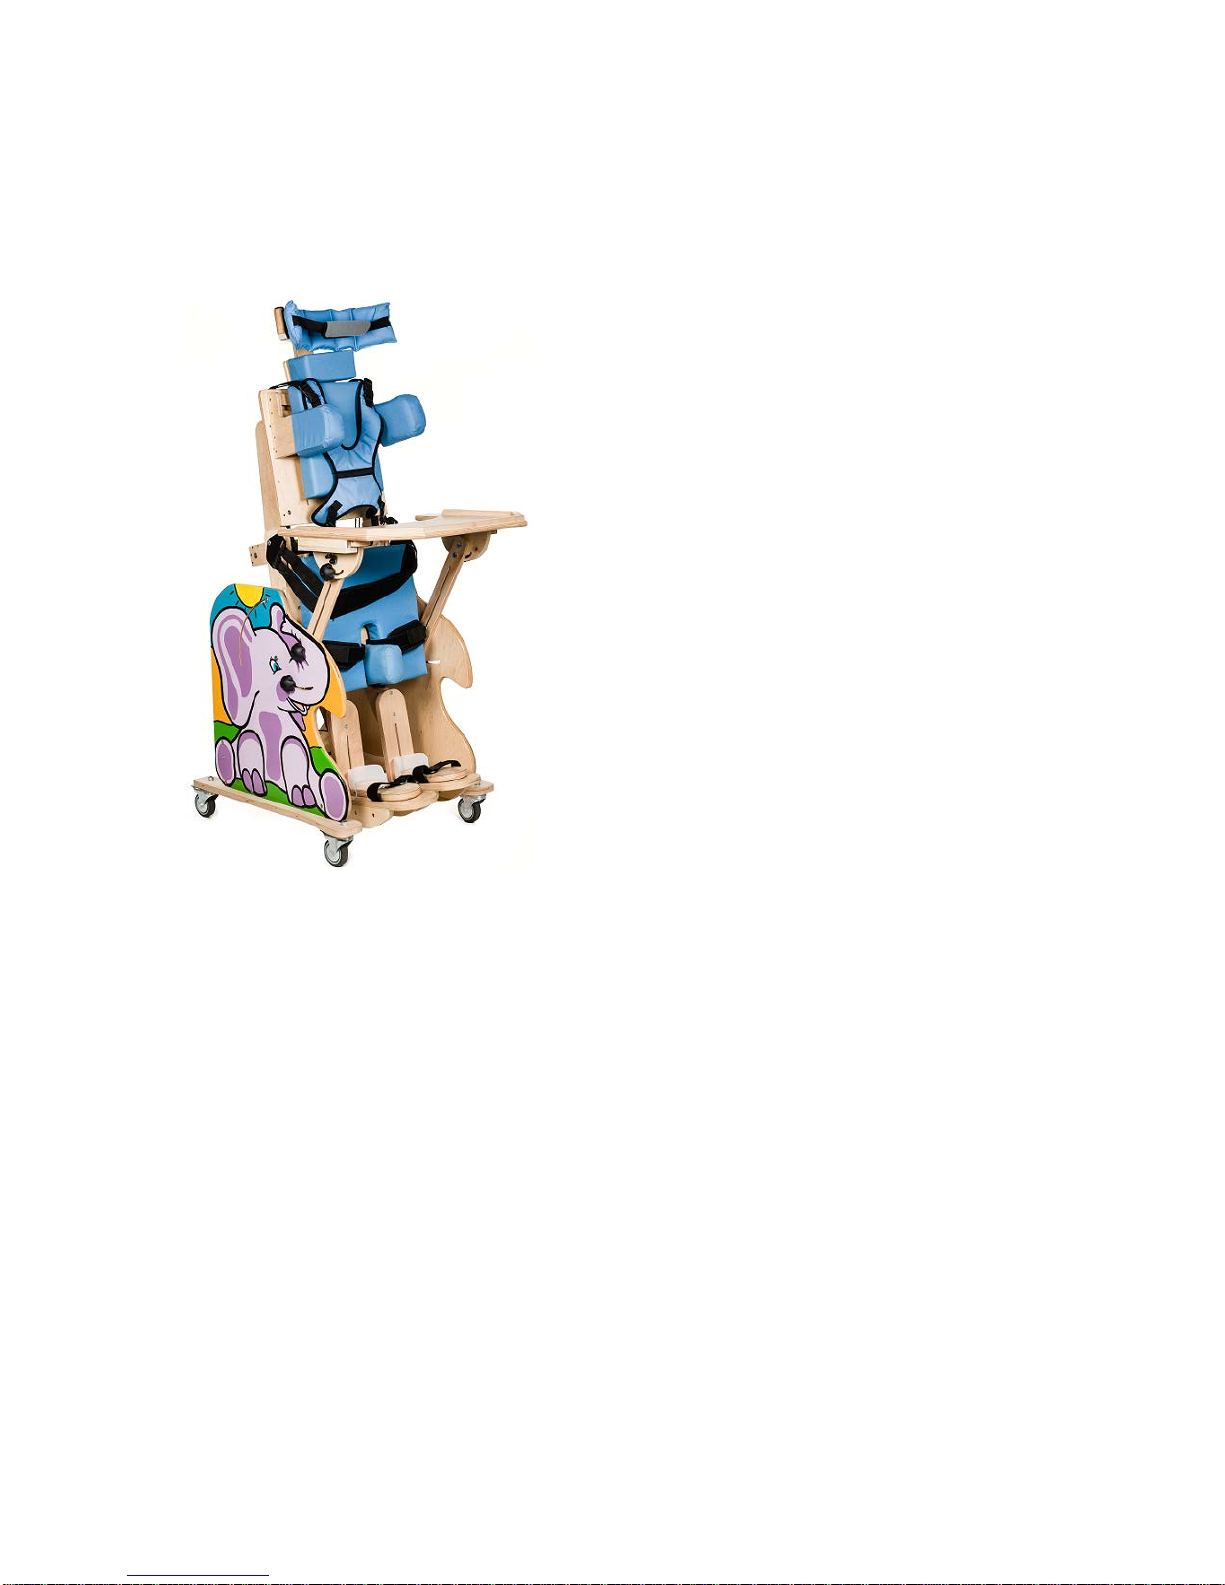
STANDING POSITION
Figure 6.
Before verticalization, it is crucial to make sure that all extremities of the patient (upper limbs in
particular) are safely placed, whereas all the belts stabilizing the body are properly set, fastened and
secured.
Apart from compliance with the above-mentioned guidelines, the following has to be done to
VERTICALIZE the patient:
•Press and hold the button responsible for adjusting the position of the seat, until you reach the
desired VERTICAL POSITION (80°), observing the belts stabilising the patient and checking
whether they did not shorten during the stabilization of the patient, whether they did not get
jammed or shortened by the mobile elements of the device.
•Check whether the stabilizing belts properly stabilize the patient (if they are properly
tightened).
In order to move back to lying position, it is essential to put the button (O) responsible for adjusting
the position of the seat and at the same time apply a little bit of force to move the seat downwards,
until you reach the horizontal position.
11

TRENDELENBURG POSITION
Figure 7.
In order to set the Trendelenburg position:
•Make sure that the device is in lying position (horizontal - Fig. 5), Make sure
that all extremities of the patient are safely placed.
•Then press and hold the button (P) responsible for adjusting the position of the seat, and at
the same time apply a little bit of force to move the seat downwards (-15° from the 0° level),
as it can be seen in Figure 5. Always observe the belts stabilizing the patient's body and
check whether they were not trapped or jammed by mobile elements of the device.
•Check whether the stabilizing belts properly stabilize the patient.
Trendelenburg position stands as the initial position to set the "ZERO GRAVITY" POSITION.
"ZERO GRAVITY" POSITION
Figure 8.
12

In order to set the "ZERO GRAVITY" positions, please make sure that the device is in the
Trendelenburg position (-15° - Figure 7), and then press and hold the button (P) responsible for
adjusting the backrest, until you reach the desired position (+15° from 0° horizontal position). Then
unlock the footrest blockade (F), readjust the footrests until they reach the desired angle +15° (down
to level 0°) until you hear characteristic clicks in each of the footrest. The device can also be safely
moved to the ZERO GRAVITY position from the Lying Position.
When the device is in Standing position or in Zero Gravity position, the following has to be done to
move back to sitting position:
•
Make sure that all extremities of the patient are in secure position.
•At first move the device back to lying position.
•Loosen the belts in the waistcoat by pulling all 4 fasteners.
•UNLOCK THE BELT SUPPORTING THE PELVIS AND SECURELY PLACE ITS
PARTS (LEFT AND RIGHT) VERTICALLY ALONG THE SEAT.
•Unlock the knee stabilizing belts.
•Readjust the trunk stabilizer, moving it to the maximum possible upper position, by
unscrewing the knobs (L).
•Press and hold the button responsible for lifting the backrest, until you reach the desired
vertical position 90°, and at the same time move footrests from horizontal position 0° to 90°
position (vertical) with the help of blockades (F).
•Adjust (pull) the waistcoat, until it is placed directly on the chest of the patient.
•Adjust belts of the lateral stabilizer by tightening all knobs (L).
•In case when necessary, adjust the abductor wedge with the help of the knob (G).
7.2.Transporting and moving the device
When transporting the device, it is crucial to focus on the following aspects:
•the device has to be transported without the user sitting in it - this device has not been anticipated
as an additional seat in the transportation vehicle;
•stabilizing belts need to be attached to strong points of the device; fix the device only with the
help of construction elements;
•after fastening belts, the device should not move in any direction;
•when transporting, apply the brakes on every wheel.
When moving the device, it is crucial to focus on the following aspects:
•the device can be moved only when the user is not sitting in it;
•the device has to be in its sitting position, which enables to grab all 4 points indicated in the
figure below, on both sides of the device, by selecting the emphasized variant:
13
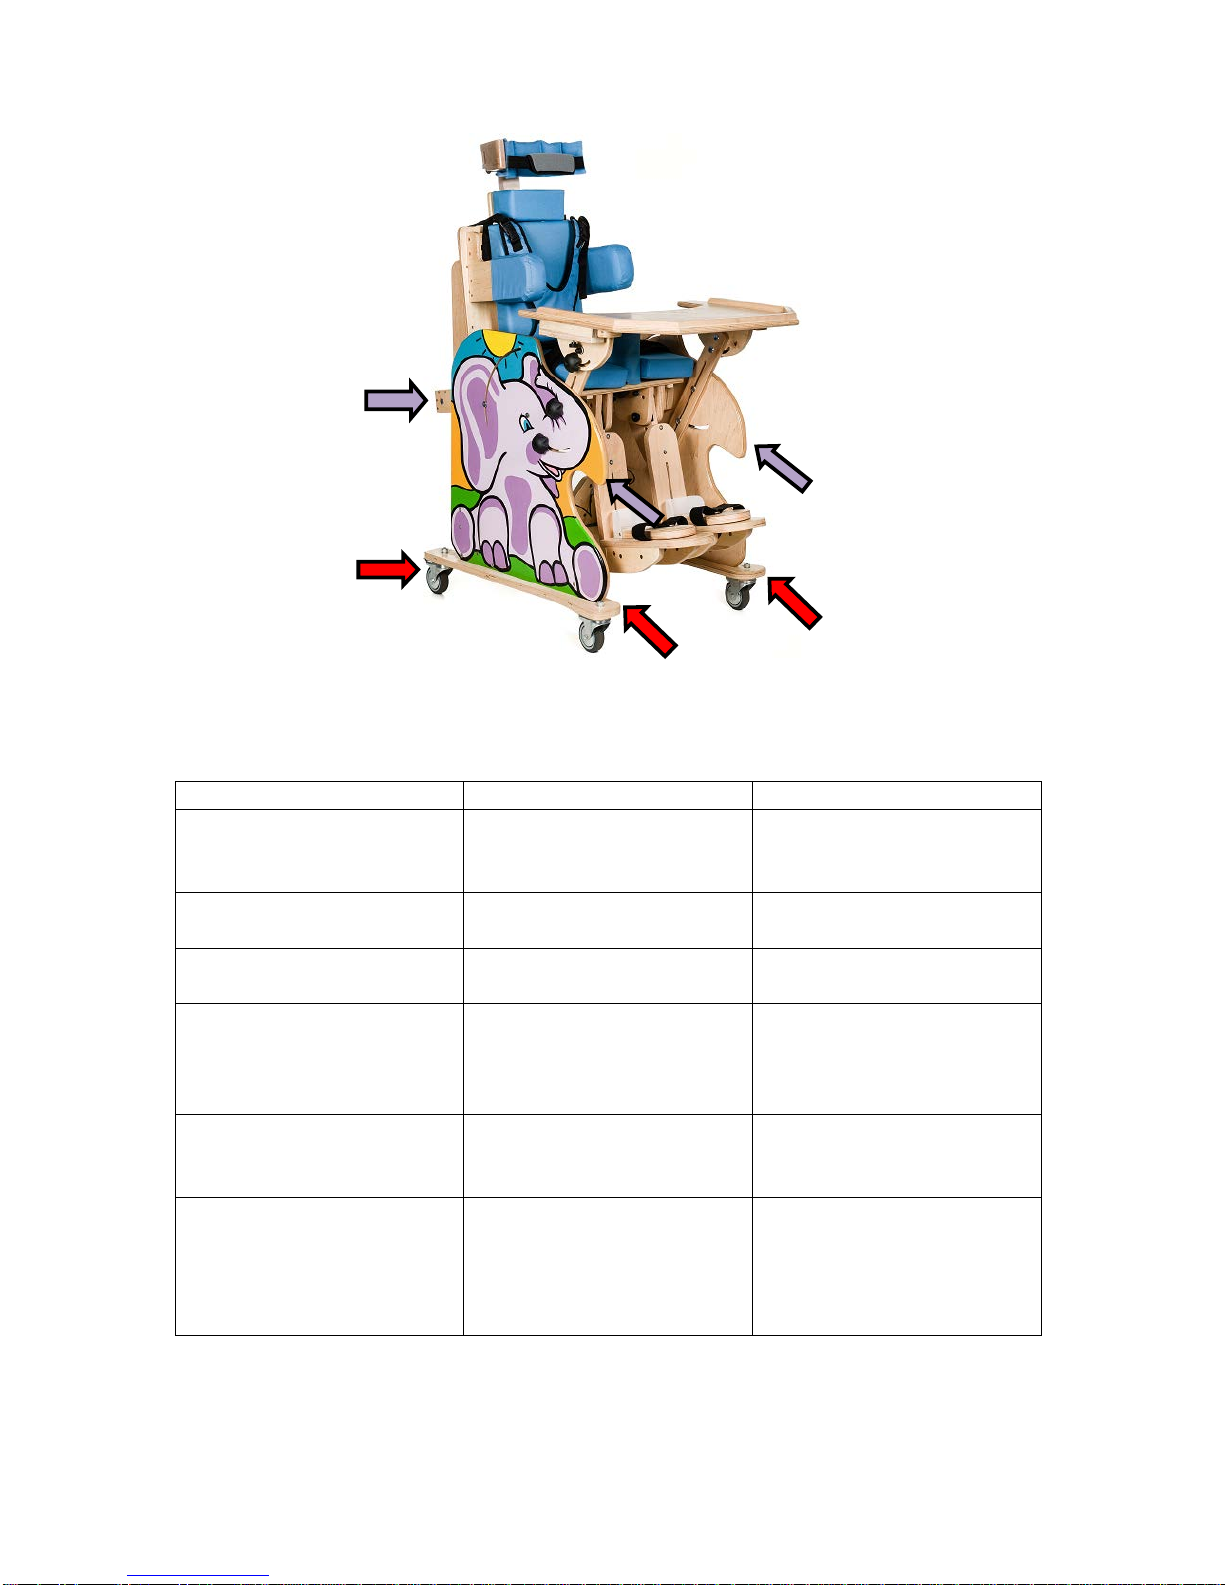
Figure 9.
7.3.Maintenance and control of the technical condition
Frequency
Control area
Remarks
Before first use
Control of the technical
condition of all elements in the
package.
Check whether all elements of
the device
have no visible
mechanical damage.
Before every use
Checking of parking locks
Make sure that all blockades are
functioning properly.
Every two weeks
Tightening of screws, nuts, as
well as their proper placement.
Make sure that all screws and
nuts are properly tightened.
Every two months
Purity, general condition.
In case of any mechanical
damages, it is cruc
ial to
immediately contact the
manufacturer.
Once a week
Wheels
Control the condition of wheels,
and remove any dust and sand
from wheels.
Once a month
Wheel axes
Wheel axes should be
lubricated by dropping several
drops of maintenance and
lubrication
agent between the
axis and the hub.
14

Maintenance
•The construction of the device has to be wipe with a damp cloth without any detergents or
other similar agents.
•Remove dirt or debris from mobile elements of the device (wheels, screws, clamp locks) on
daily basis.
•Upholstery stains should be removed as quickly as possible with the help of a damp cloth with
a mild detergent and lukewarm water. Repeat the whole process until the stain is completely
removed. Dry the upholstery with an absorbing cloth or tissue, do not rub. Do not use a cloth
that is excessively wet, as this may make the stain bigger, and in extreme cases it may damage
the upholstery or the foam. Do not iron.
•To maintain performance parameters of the device, it is crucial to keep all of its elements
clean.
•Storing the device in areas characterised by significant humidity (baths, laundries, etc.) or
outdoors, along with lack of proper care and hygiene, will lead to rapid loss of aesthetic and
functional parameters.
•Do not expose the additional seat of the device to extreme weather conditions (rain, snow,
strong sunlight), since this may lead to discoloration of certain elements.
It is forbidden to use:
•solving agents,
•toilet cleansing agents,
•agents containing chlorine,
•sharp brushes and sharp objects,
•corrosive cleaning agents.
•Do not clean the device with the use of pressure pr vapour aggregates!
Repair
•In case when it is necessary to repair the device, please turn to the manufacturer.
Customer service
•If you have any further questions or you need help, please contact the manufacturer.
15
8. Technical parameters:
Permitted user weight
35kg
Life of the product
5 years from the date of production
Height of the seat (including the headrest) (cm) 38-52
Depth of the seat (cm)
30 - 37
Height of footrests (length of the lower leg) (cm)
23 - 39
Height between the base and the armrest (cm) 71 - 92
Width of the seat (hip width) (cm) 40
Width of the backrest (width of the chest) (cm)
15 - 27
Width of the device (cm) 60
Length of the device (cm)
75 - 150
Weight of a fully equipped device (kg) 36
Stated on the product
Except for the upholstery, this device is made of plywood, steel and is 95% recyclable.
Materials: wood, steel. plastic, polyester material, PU foam.
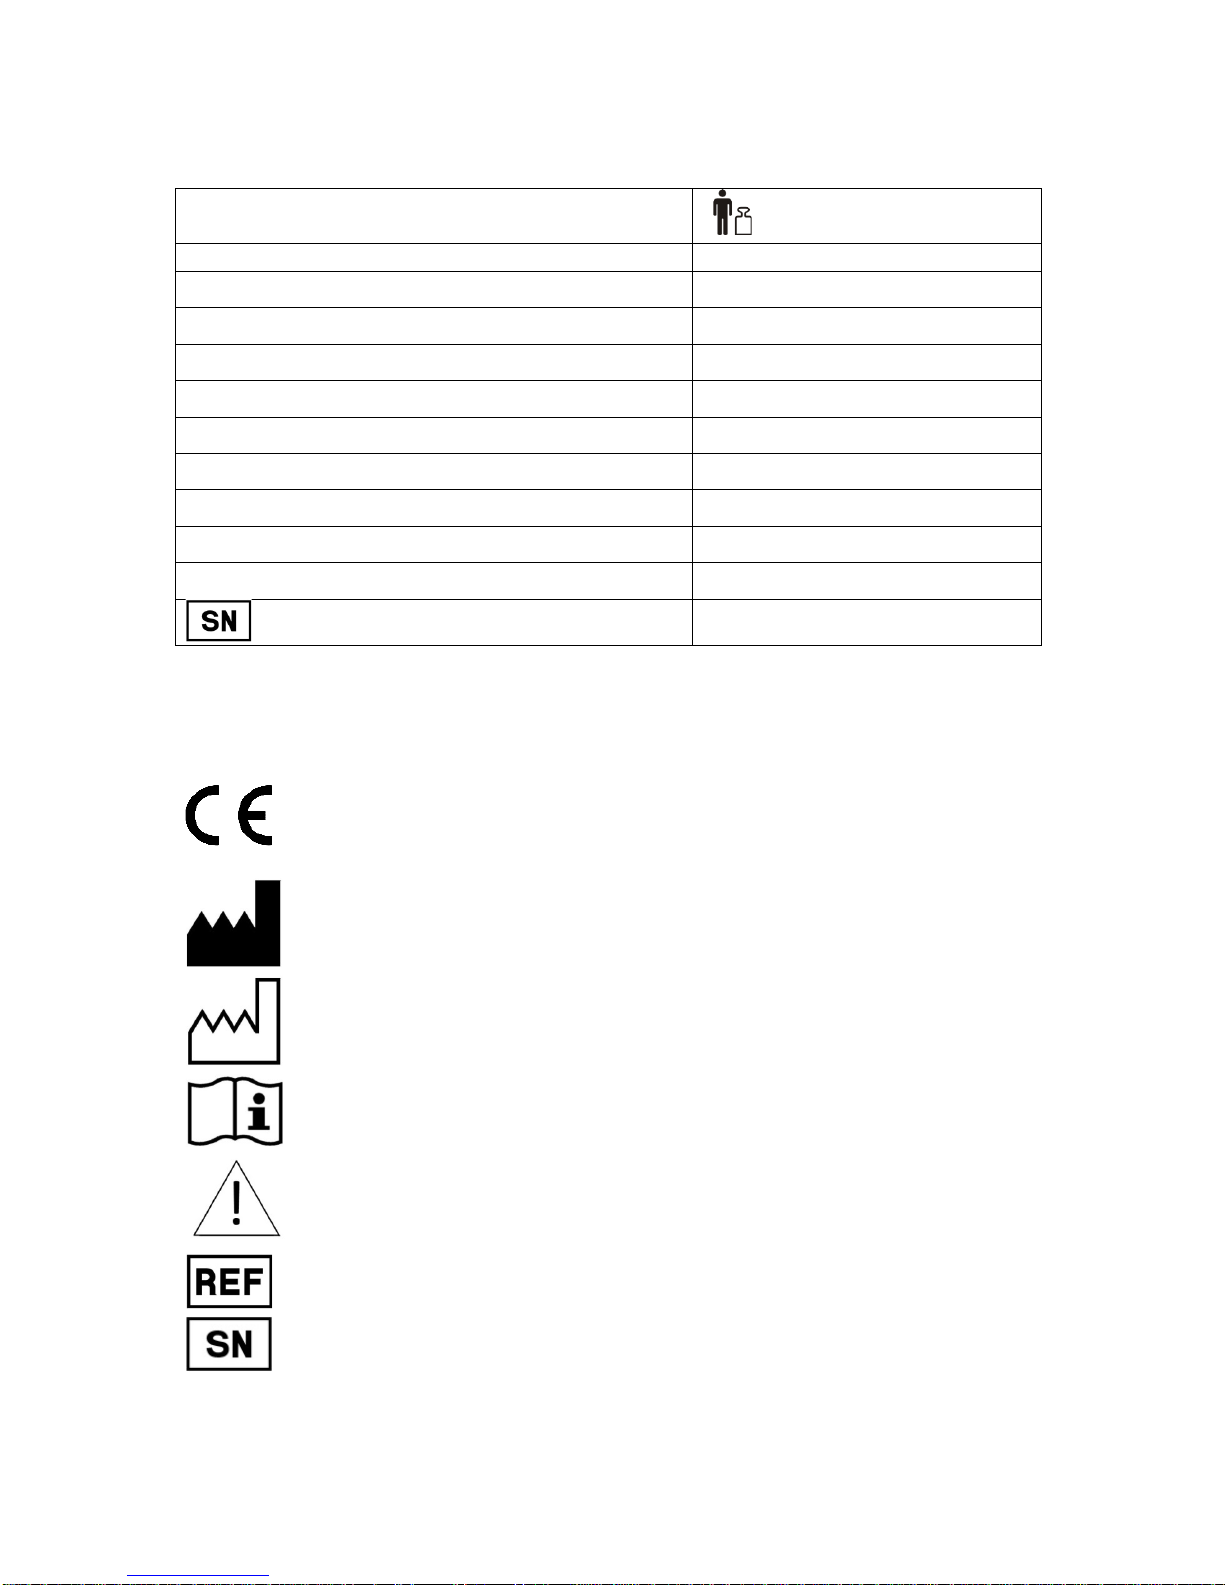
9. Symbols
Confirmation of EU/EC Declaration of conformity
Manufacturer
Production date
Read the operator manual
Warning
Reference number
Serial number
16

Protect from moisture
Protect from sunlight
Maximum permitted user weight
Interior use
The maximum safe angle of the incline
Risk of trapping fingers
Product intended for vehicle transport.
Product is not intended to be used as a seat during transportation by means of
a motor vehicle.
Product intended for carriage by air
10. Contact details:
mdh sp. z o.o.
ul. ks. W. Tymienieckiego 22/24 90-349 Łódź, Poland
tel. +48 42 674 83 84
fax. +48 42 636 52 21
www.mdh.pl www.viteacare.com
17
Table of contents
Other Vitea Care Medical Equipment manuals


Popular Medical Equipment manuals by other brands

Saadat
Saadat Dena 650 user manual

Sage Products
Sage Products Prevalon AirTAP 7211 Operator's manual

Abilia
Abilia VocaFlex Colour user manual

Integra LifeSciences
Integra LifeSciences MAYFIELD Infinity XR2 A2079 instruction manual

Arjo
Arjo Enterprise 9600X Instructions for use

Blatchford
Blatchford 932285 Instructions for use


