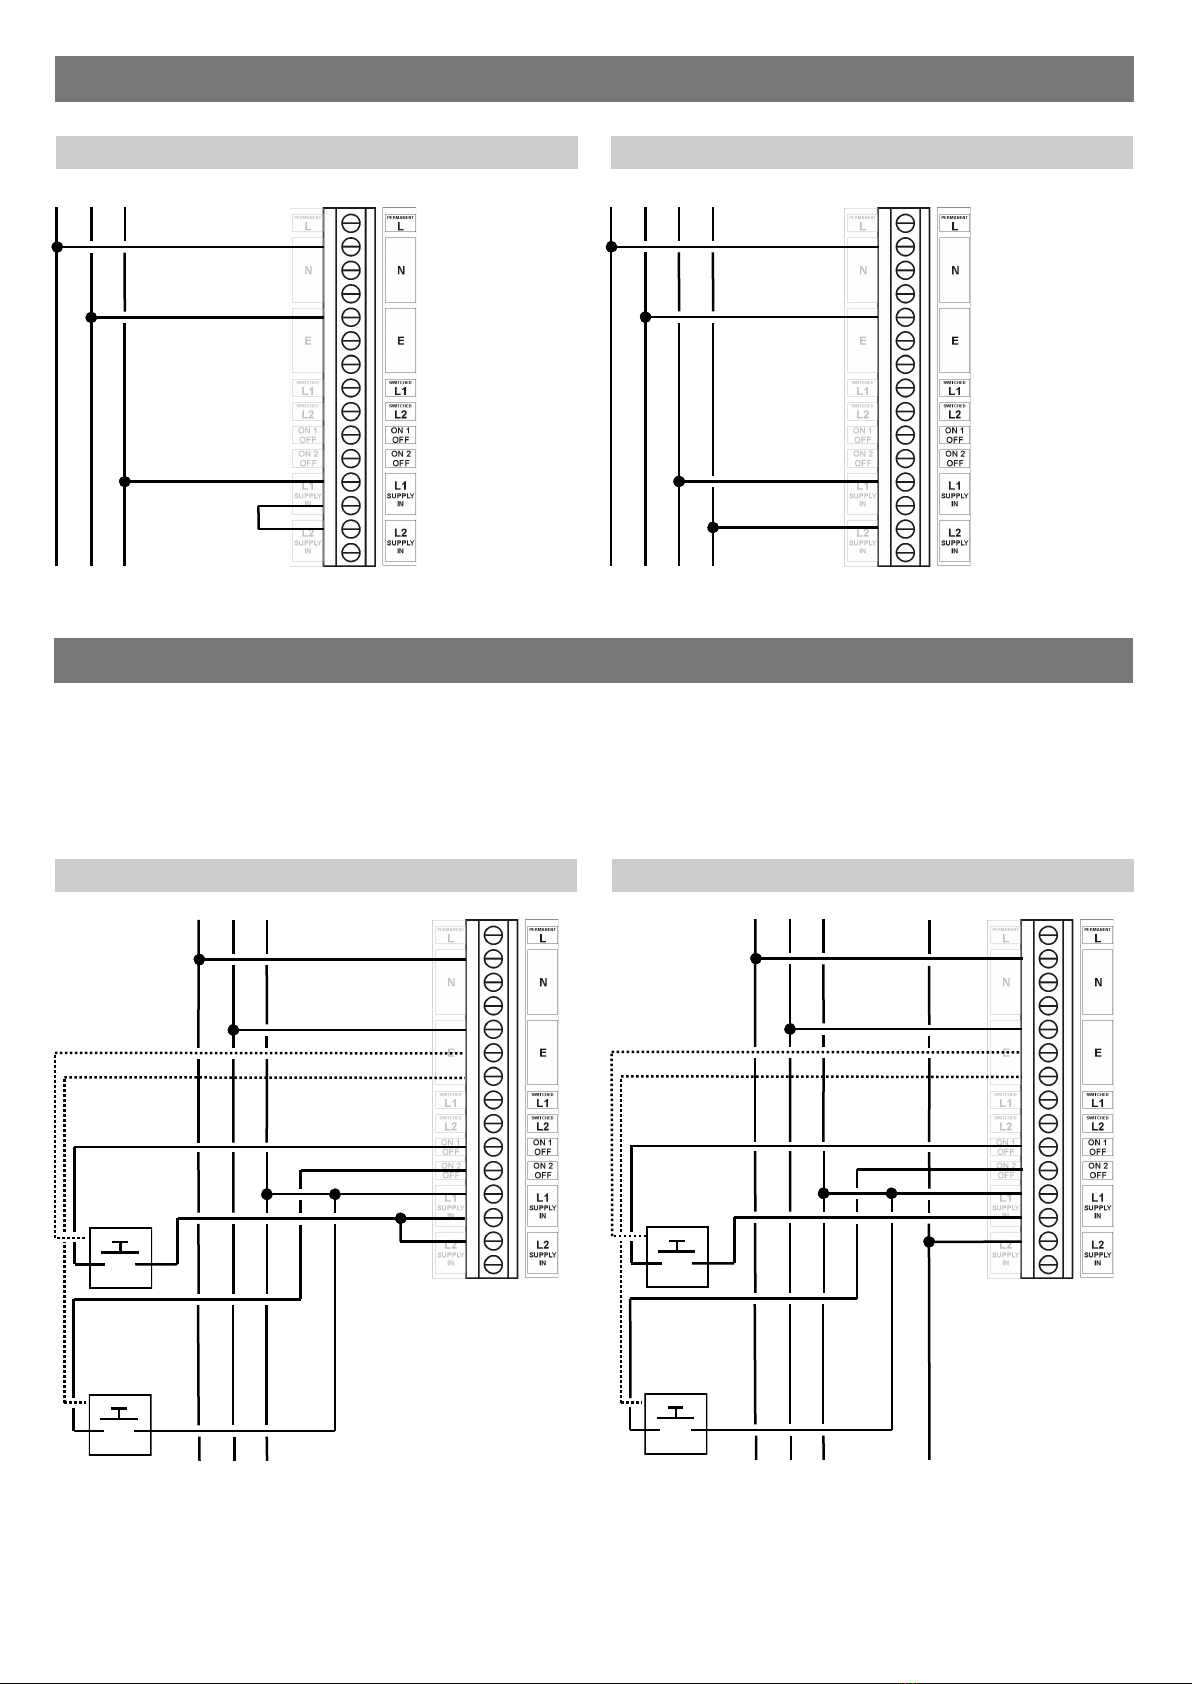
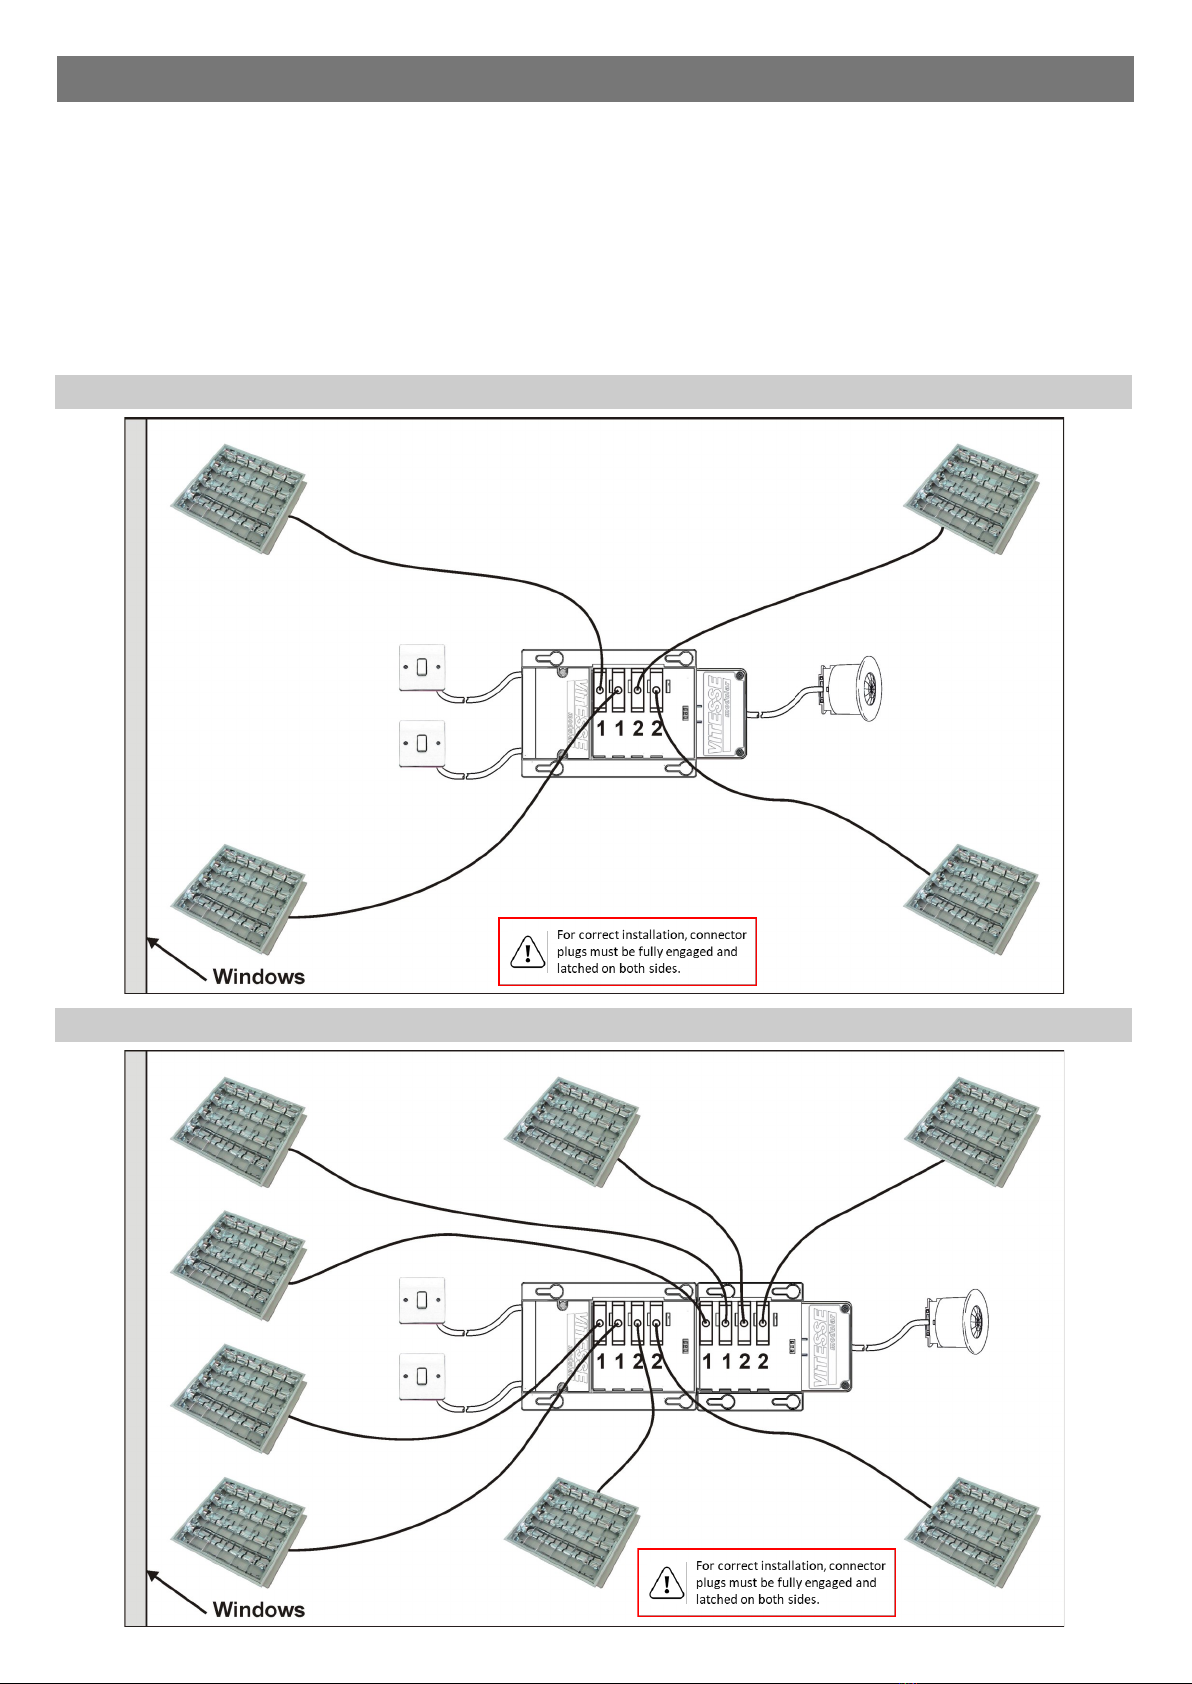
Vitesse VITM4-2CH User manual

• The Vitesse modular system is a cost effective method of providing power and control for lighting installations in in-
dustrial, commercial and retail buildings. The system is designed for ease of installation: mains input is connected
using the spacious wiring compartment; control inputs and outputs are pluggable using industry standard connectors.
The modular approach allows for between 4 and 16 luminaires to be connected.
• The VITM4-2CH is a two channel, non-dimming distribution box for use in applications that require two independently
switched lighting circuits, or lighting and ventilation circuits. For example this product is ideal for connection to a 2
channel presence detector for separate window row switching. It has two live inputs, a common neutral and two
switch inputs.
VITM4-S-2CH
Vitesse modular starter for non-dimming systems
VITM4-E-2CH
Vitesse modular extender for non-dimming systems
Channel for channel nuts (zebs)
Removable gland plate with
3 x Ø20mm knockouts
3 x Ø20mm knockouts for rear
cable entry
4 x key slots to accept M6 (1/4”)
fixings
BESA box fixings
202mm
150mm
146mm
127mm
122mm
75mm
Fixing points
M6 (1/4”)
Warning. This device works at mains voltage. Be sure to take care when working with electricity.
• The box should be fixed on a smooth, flat surface or using drop rod fixings attached to channel nuts.
• Ensure that there is easy access to the wiring compartment and all connectors once the box is in-situ.
Height - allow 150mm for total height of unit (including connectors and cable)
9 pole interface
connector and lead
supplied with
detectors
Channel 1 Channel 2 Channel 1 Channel 2
Overview
Vitesse Modular 4 - 2 Channel Switching Modules
Product Guide
System Components
Installation
VITM4-2CH
Install this way up
The unit MUST be
installed this way up
to ensure good lock
of cable plug to
socket.

2
• All wiring should be mains rated.
• Remove wiring compartment cover. Wire the box using the diagrams
below
On/off 1 and On/Off 2 connect switches through to detectors
Switched live turns the lights on and off
• Use the cable clamps to secure the wiring or use cable glands (not
supplied). The clamps can be split, and flipped over to clamp
different cable diameters.
• Replace wiring compartment cover.
• Plug in the luminaires ensuring that the connector latches to the box.
• The unit MUST be installed orientated as per the arrow to ensure
good lock of cable plug to socket!
Small
cables
Large
cables
Cable clamps
Permanent Live
Neutral-Supply in
Earth
Live 1-Switched
Live 2-Switched
On / Off 1
On / Off 2
Live 1-Supply in
Live 2-Supply in
Local lighting switch and local emergency test switch
NEL
Local emergency
test switch
Local lighting
switch 1
Emergency test using central switch
NELMultiple boxes
DO NOT WIRE ACROSS
PHASES
Central
emergency test
switch
A local lighting switch may still be used when there
is a central emergency test switch or when a circuit
breaker is used to interrupt the power.
Wire link
NEL
Wire link
Wire link
Channel 1 Channel 2
Local lighting
switch 2
Emergency test using power interruption
Wiring
Wiring using single supply
Luminaire connections / Lead colours
Permanent Live Black (4 core only)
Neutral Blue
Earth Green / Yellow
Switched Live Brown
Install this way up

3
Local lighting switch and local emergency test switch
NEL1
Emergency test using central switch
NEMultiple boxes
Emergency test using power interruption
DO NOT WIRE ACROSS
PHASES
A local lighting switch may still be used when there
is a central emergency test switch or when a circuit
breaker is used to interrupt the power.
NE
Wire link
Sensor
Detector lead needs to be ordered separately
from the detector. Order code VITM4-L3-2CH.
Where two detectors connect to a single box a
dual lead is available VITM4-LD3-2CH.
CH1 and CH2 plugs are coded.
Ensure that the plugs are
inserted correctly and do not
apply excessive force
L2
L1 L2
L2L1
Central
emergency test
switch
Local emergency
test switch
Local lighting
switch 1
Local lighting
switch 2
Wiring using dual supply
Connecting a detector

4
NEL
Single live supply Dual live supply
NEL1 L2
NEL
Single live supply Dual live supply
L2
Wire link
Wire link
NEL1
• Diagrams show separate switches for each channel. One switch can be used for both channels. For 2 switches set
switch mode on detector to “1 position switch separate” otherwise it can be left as default for 1 switch operation set
to “1 position switch together.”
• In 2 switches mode as shown, short push turns ON, Long held push turns OFF (>1 sec)
(Allow a few minutes initial power-on setup to take place before operation the switches!)
• See detector programming manual further information.
Presence detector connections - Automatic on, automatic off
Absence detector connections - Manual on, automatic off
Switch Noise Filtering
Due to the noise filtering process, there is a small delay of ~0.3 seconds. Therefore, kindly apply an assured push action
to these momentary switches, as fast clicks on the switches will be ignored as they are treated as noise on the line.
Ch1
Ch2
Ch1
Ch2

5
Window / room switching
Window / room switching + Extender
2 Channel detectors
The flexibility of using two channels detectors allows the following scenario:
• Channel 1 - occupancy and lux
Channel 1 of the detector can be used to switch the Channel 1 luminaires at a preset lux level. These luminaires
are typically situated nearest the windows. The luminaires will also switch with occupancy.
• Channel 2 - occupancy only
The inner luminaires, ie those furthest from the windows, are switched with occupancy only.
Switch inputs
• One or two manual switches, ie for luminaires on channels 1 and 2, can be used to manually override the lights on
or off, or in the case of absence detection activate the luminaires on entry.
The diagrams below illustrate a typical application.
Applications

6
This page intentionally left blank

7
This page intentionally left blank

8
Due to our policy of continual product improvement CP Electronics reserves the right to alter the specification of this product without prior notice.
Modules
VITM4-S-2CH 4 pole starter box, 2 channel
VITM4-E-2CH 4 pole extender box, 2 channel
Presence / Absence Detectors
Connectors
Detector Leads (LSF)
VITM4-L3-2CH 3m 2 channel sensor lead
VITM4-LD3-2CH 3m 2 channel dual detector sensor lead
VITM4-LPW 4 pole luminaire plug white
Luminaire Leads (LSF)
VITM4L303100W 3 core 3m 1.0mm2 White plug
VITM4L305100W 3 core 5m 1.0mm2 White plug
VITM4L403100R 4 core 3m 1.0mm2 Red plug
VITM4L405100R 4 core 5m 1.0mm2 Red plug
Other leads available to order.
Part numbers
C.P. Electronics Ltd
Brent Crescent
London
NW10 7XR
United Kingdom
Tel: + 44 (0) 333 900 0671
Fax: + 44 (0) 333 900 0674
www.cpelectronics.co.uk
Ratings
Voltage 230VAC +/- 10%
Frequency 50Hz
Terminal capacity 4mm2 in wiring compartment
Temperature 0ºC to 35ºC
Power Rating of system 16A. Rating of each output 10A (but limited on
the detector output rating, check datasheet of detector!
Compliance LVD-2014/35/EU
For further compliance information visit
www.cpelectronics.co.uk/compliance
For lighting purposes only with suitable circuit protection. For fixed wiring
only
Ref: #WD325 Issue 8
IMPORTANT NOTICE!
This device should be installed by a
qualified electrician in accordance with
the latest edition of the IEE wiring
regulations.
UK Patent no. GB2463063
EU patent pending
EU registered design no.
001587544-0001, 001587544-0002
EBDSPIR-PRM-2CH PIR 2-Channel presence detector
EBDSPIR-PRM-2CH-NC PIR 2-Channel presence detector, normally closed fail safe contacts
MWS3A-PRM-2CH Microwave 2-Channel presence detector
MWS3A-PRM-2CH-NC Microwave 2-Channel presence detector, normally closed fail safe contacts
MWS6-PRM-2CH Microwave 2-Channel presence detector
MWS6-PRM-2CH-NC Microwave 2-Channel presence detector, normally closed fail safe contacts
This manual suits for next models
2
Table of contents
Popular Control Unit manuals by other brands

Metal Work
Metal Work HDM series user manual

Rockwell Automation
Rockwell Automation ControlLogix 1756 Series Selection guide

Alcolizer
Alcolizer HH3 Work Instruction

Emerson
Emerson AVENTICS AV03 Assembly instructions

SMC Networks
SMC Networks VZ400 Series quick start guide

Accton Technology
Accton Technology CAP2315A installation guide

Conductix-Wampfler
Conductix-Wampfler 0815 Series installation instructions

Rasmussen
Rasmussen RPK1-N Assembly, installation and operation instructions

Siemens
Siemens SINAMICS G130 List manual

Xtreme Power Systems
Xtreme Power Systems XtremeLink Installation and usage manual

SMA
SMA NET Piggy-Back Technical description

tousek
tousek ST 51 Connection and installation manual