Vivant alternate User manual

USER MANUAL
Read carefully before using the device and save these instructions.
Redefining Tradition

USER MANUAL
1
Table of Contents.....................................................Page
1. An Introduction to Your New Alternate.......................................2
2. Packaging List of Components...................................................4
3. Getting Started.......................................................................5
4.Cleaning Your Alternate..........................................................11
5. Tips for the User....................................................................14
6. Safety Information................................................................18
7. Warranty.............................................................................20
8. Company Contact Information................................................21

An Introduction to Your New Alternate Device
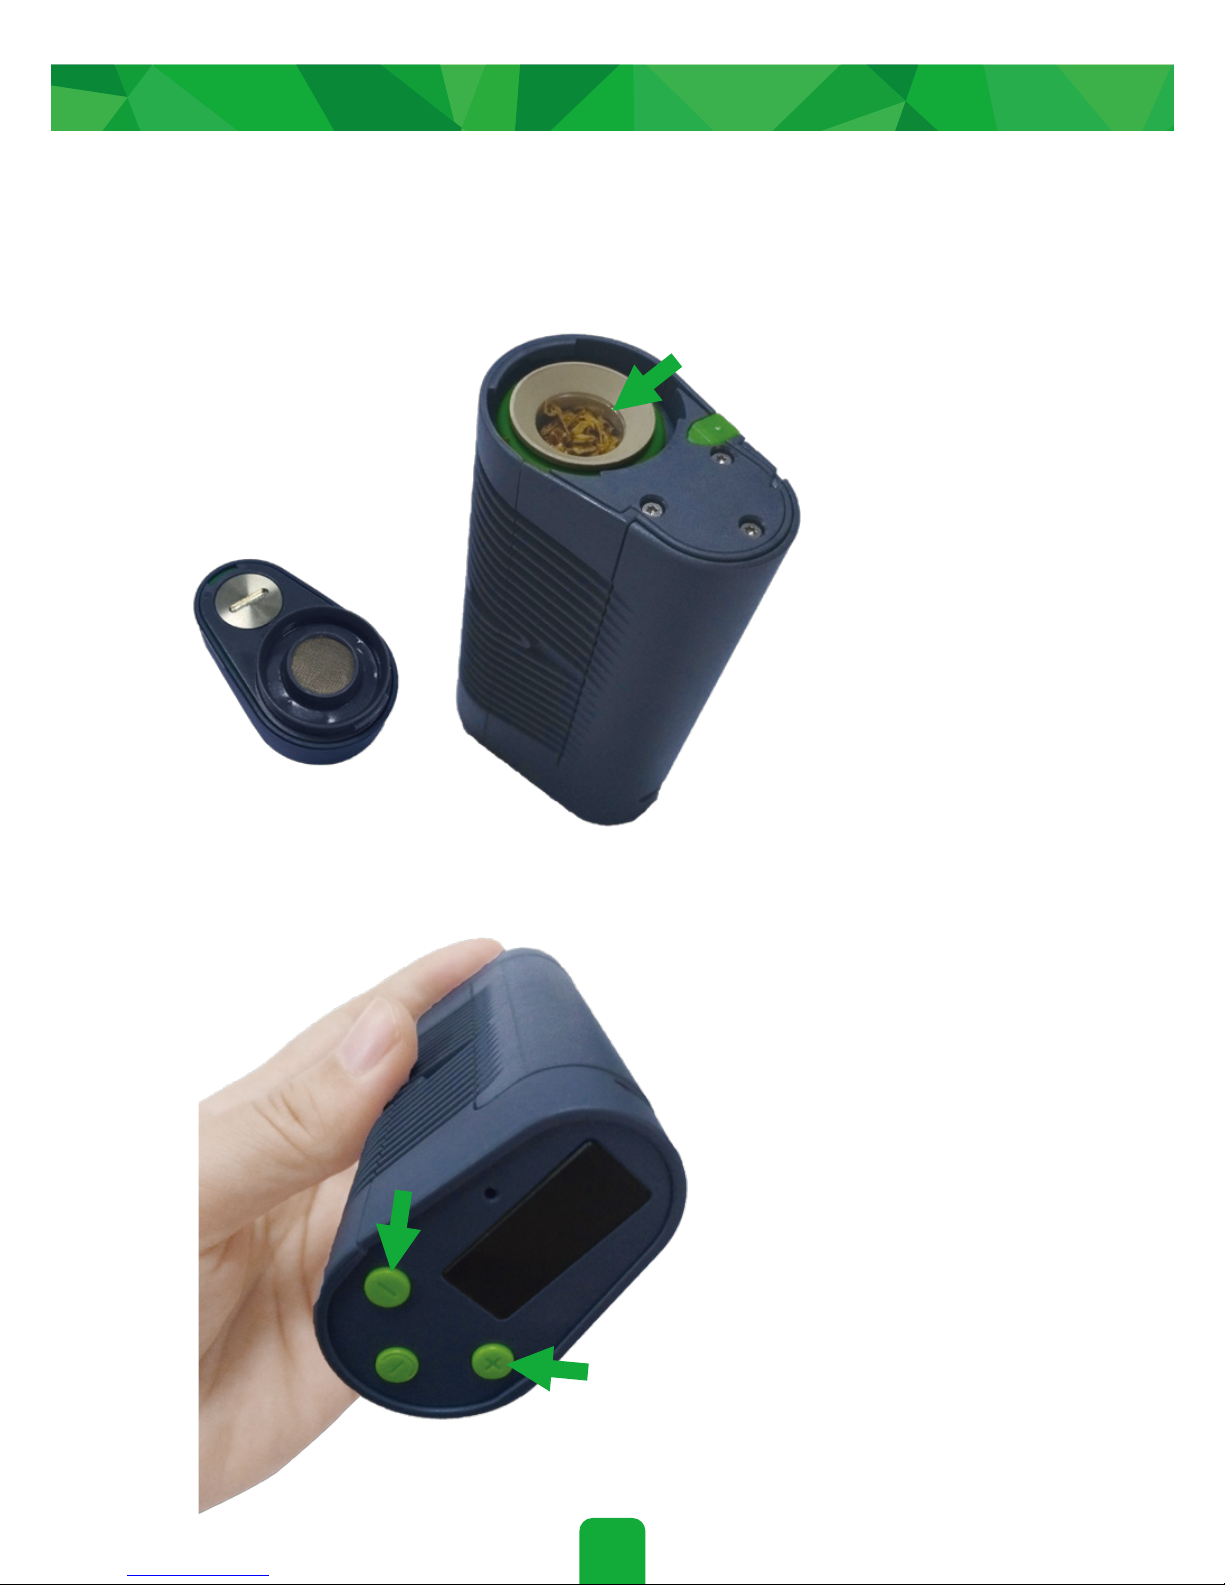
The Alternate is a portable compact convection device with the perfect
hand-feel. It uses an onboard temperature control system powered by
a chargeable Li-ion 18650 Battery (included). Powering on the device
can be done with a single button click, displaying the current tempera-
ture and remaining battery life. Selecting the desired temperature can
be achieved by using the two intuitive up/down buttons, heating will
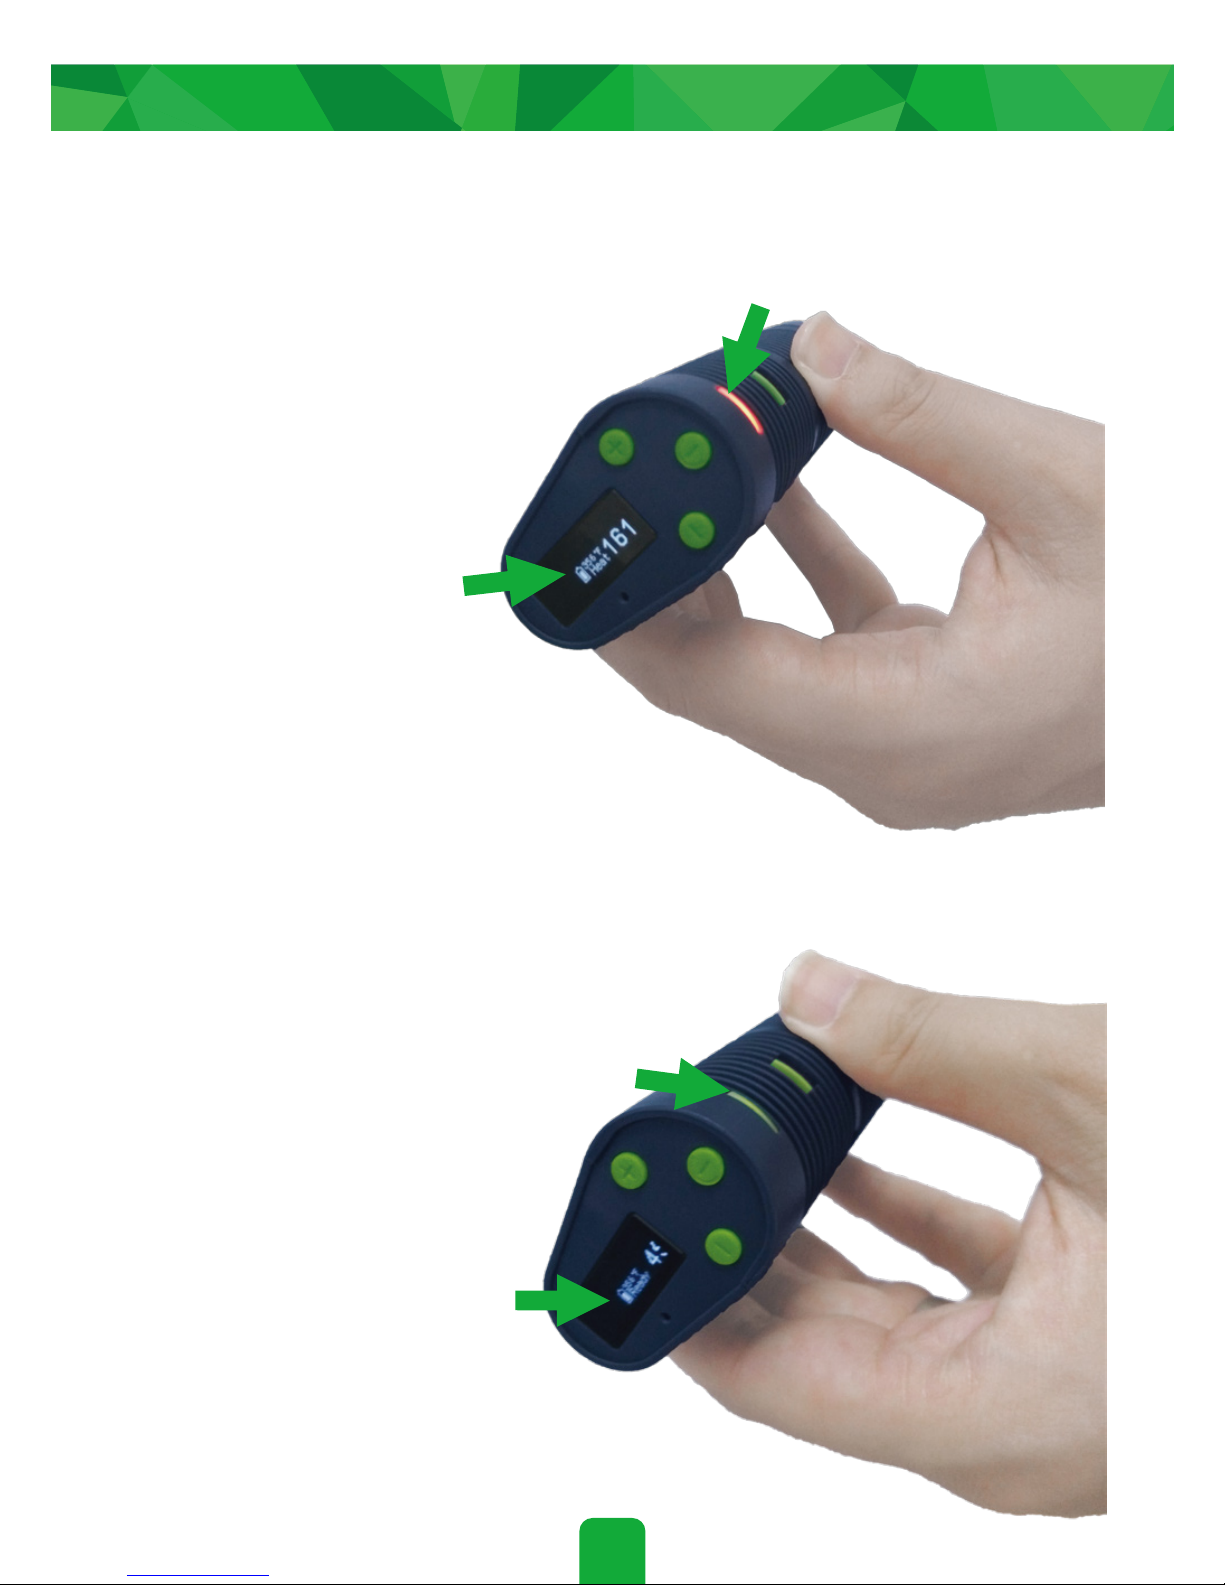
begin automatically until it reaches that temperature. Once the
indication LED turns green the device is ready and will hold the desired
temp steady for one minute. When the LED turns red please wait as the
device is re-heating and will be ready again soon. The Alternate also
features an industry first airflow control to customize your vaping
experience. We recommend 356°F(180°C) for the best results,
however Alternate can be set to a max of 428°F (220°C).
• Full Convection Hot Air System
• High Efficiency Heat Exchanger
• Removable and Rechargeable 18650 Battery
• Super Precise Temperature Control
• Automatic off Feature
• Airflow Control with Reverse Flow Protection
• OLED Display
2

3
An Introduction to Your New Alternate Device
Top Cap Mouthpiece
Airflow Adjuster
LED Light
ON/OFF Button OLED Screen
USB
Regulatory Buttons
Battery Cover

4
Packaging List of Components
Things included in the box are following:
1* Alternate 1*Brush
1* Quick
Start Guide
1* Seal Ring
(Top Cap)
1* USB Cable
1*Grinder Tool
1*Stainless Steel
Concentrate Pad

Install battery in proper position. Be
mindful of the positive and negative
side. The device will not work if
battery is installed incorrectly.
1.
Charge the device with a 1 amp
charger via micro USB port on the
unit.
2.
5
Getting Started

Grind herbs using provided tool.
3.
Open chamber by twisting top
cap counter clockwise.
4.
6
Getting Started

Getting Started
5.
7
Screw on the filling device. Remove the packing tool. Push
ground material into the hole into the center of the unit. Push
down into bowl with the packing tool.
Getting Started

8
Fill chamber being mindful not to over pack.
This will cause a reduction in airflow.
6.
Once you have replaced the
top, press the power button
5 times consecutively to turn
on the device. Choose your
desired temperature by
using the up and down
buttons on the bottom of the
unit.
7.
Getting Started

9
Press and hold the on/off
button for 2 seconds until the
unit beeps and the screen
reads heat.
8.
The red light on the unit will
turn green and the screen
will read ready when the unit
has reached desired temp.
the unit will also beep 3
times.
9.
Getting Started
Red LED
Green LED
Heat
Ready

10
11.
Breath in through the
mouthpiece with a slow and
steady draw.
10.
Unit will auto shutoff after
60 seconds of non use.
Press the on/off button 5
times rapidly. This powers
off the unit and makes it
safe for storage.
Getting Started
Press this button 5 times

11
Remove airflow assembly.
Using a coin unscrew the
airflow director allowing the
assembly to be taken apart.
2.
1.
Ensure unit is powered off and battery is removed.
Cleaning Your Alternate

12
Pull the lower portion of the
assembly with a small tool to
expose the internal portion
of the airflow unit.
3.
4.
Remove the airflow valve.
Cleaning Your Alternate

13
Use a solution of 1 part water 1 part *isopropyl alcohol*
and the provided brush . Rinse and clean all pieces until all
residue is removed. Allow parts to sit out and dry complete-
ly before reassembling the unit.
5.
*Isopropyl alcohol is flam-
mable. Allow all alcohol to
completely evaporate before
reassembling unit*
6.
Cleaning Your Alternate

14
Buzzer adjustment: In power-off state, long press the on/off
button and up button to enter buzzer adjustment interface.
Press two regulatory buttons to adjust buzzer volume from 1
to 5. You may press the on/off button to confirm after
adjustment. You may switch to silent mode by pressing the
down button when the volume is 1.
2.
1.
Airflow adjustment:Raise or push the airflow adjuster to
control the amount of air taken into the device.
Tips for User

15
Stealth function: When the device is on, press the
fire button and down button simultaneously to
switch between stealth on and off.
3.
4.
Key lock function: Long press the two regulatory buttons
for 2 seconds to switch between “Lock” and “Unlock”.
When the device is locked, press the regulatory buttons
and the screen will display “Locked”
Tips for User

16
USB port function:The USB port can be used for charging
and updating firmware. During charging, the battery icon is
blinking. When the device is charged in power-on state, the
screen turns blank after 30 seconds and displays charging
icon; when charged in power-off state, the charging icon is
displayed in the center of the screen.
5.
Switch the display mode:In power-off state, long press the
two regulatory buttons and the screen display will rotate 180
degrees. You can view the screen from two different angles.
6.
Tips for User
Charging in
power-on state
Charging in
power-off state

17
Countdown reset: During the 60 seconds countdown period
after heating, you can press the two regulatory buttons
simultaneously to restart the countdown process.
8.
7.
Shift between ℃and ℉: If you raise the temperature to 220℃
and continue to press the up button, the temperature reading
will turn to the lowest Fahrenheit (158℉). Equally, if the
temperature decreases below 70℃, the temperature reading
will turn to 428℉automatically.
Tips for User

18
Malfunction Indication:
1.Trouble Code 1 Indication: When there is a disconnection in the
heat bar, the screen will display “Trouble Code 1”.
2.Trouble Code 2 Indication: When there is a short circuit in the
heat bar, the screen will display “Trouble Code 2”
3.Trouble Code 3 Indication: When the resistance value of heating bar
is below the normal range, the screen will display “Trouble Code 3”.
Safety Information

19
4.Trouble Code 4 Indication: When there is a disconnection in the
TC sensor, the screen will display “Trouble Code 4”.
5.Trouble Code 5 Indication: Whenthere is a shortcircuit in the TC
sensor, the screen will display “Trouble Code 5”.
1.Only have your product repaired by VIVANT. Do not attempt to
repair the product by yourself as damage or personal injury may
occur.
2.Do not leave the product at high temperature or damp environment,
for this may damage the product. The appropriate operation
temperature is from 0℃(32℉) to 45℃(113℉) while charging and
-10℃(14℉) to 60℃ (140℉) while in use.
3.Keep away from water.
Contra-indication:
Safety Information
Table of contents
Other Vivant Vaporizer manuals