Vivat D-26 User manual

Vivat Turn Table D-26
User manual

2
Content
1. Introduction .............................................................................................................................................................. 3
1.1. Sphere of application ........................................................................................................................................ 3
1.2. Requiring skills .................................................................................................................................................. 3
1.3. Features ............................................................................................................................................................ 3
1.3.1. Photo mode settings ................................................................................................................................. 3
1.3.2. Video mode settings ................................................................................................................................. 4
1.3.3. Manual mode settings .............................................................................................................................. 4
1.4. Vivat Turn Table features.................................................................................................................................. 4
2. Package contents ...................................................................................................................................................... 4
3. Specifications ............................................................................................................................................................ 4
4. Preparation for work................................................................................................................................................. 5
5. Operation of the Vivat Turn Table ............................................................................................................................ 5
5.1. The controls ...................................................................................................................................................... 5
5.2. Working with a remote control ........................................................................................................................ 6
5.3. The preparation of the camera......................................................................................................................... 6
5.4. Vivat Turn Table modes .................................................................................................................................... 7
5.5. Menu operations............................................................................................................................................... 7
5.5.1. Photo mode............................................................................................................................................... 7
5.5.2. Video mode............................................................................................................................................... 9
5.5.3. Manual mode.......................................................................................................................................... 10
5.5.4. Device settings (SETTINGS) .....................................................................................................................11
Appendix .........................................................................................................................................................................13

3
1. Introduction
Nowadays, when online shopping is gaining in popularity, clients make 90% of decisions
about purchasing of a good basing only on the image of the product. The decision to "buy" or
"not" directly depends on how well the object is presented on the website. The best option
of visualization of the product is "Photo 360°" - the opportunity to examine it from all sides.
This is achieved by serial photographing of the object that rotates. The usage of this technology
will increase the number of orders, and therefore the profits of the online store. To create a
"Photo 360°" we have developed rotary table Vivat Turn Table.
1.1.Sphere of application
Vivat Turn Table is designed for:
-automatic creation of “Photo 360°” - photo series of the object from different angles
(catalogs for online stores, electronic catalogs of products, antiques auctions etc.);
-making video of rotating objects (stock video commercials of products, reviews on
YouTube etc.).
-
1.2.Requiring skills
The table is designed to be easily used both by non-professional users, who do not have
any specific photography skills, and by professional photographers.
The built-in LCD screen and buttons eliminate the need for a PC or other control devices.
1.3.Features
Vivat Turn Table has three modes of operation:
-photo mode;
-video mode;
-manual mode.
1.3.1. Photo mode settings
-platform movement direction;
-number of frames per full platform rotation;
-user angles of object photos;
-pause before and after shutter release, manual shooting, continuous shooting;
-smooth start and stop of the movement;
-platform rotation speed.

4
1.3.2. Video mode settings
-platform movement direction;
-number of cycles;
-smooth start and stop of the movement;
-platform rotation speed.
1.3.3. Manual mode settings
-platform rotation speed.
1.4. Vivat Turn Table features
-fully automatic operation - table itself manages the camera requiring no other control
and timing devices;
-the use of industrial stepper motor enables highly accurate shooting of objects
weighing up to 20 kg.;
-remote control allows you to operate the Vivat Turn Table at a distance of up to 5
meters. This saves time and improves the working process. Managing of the work by
remote control eliminates vibration caused bypressing buttons on the bodyof the table;
-popular shooting programs are recorded in the unit's memory. They can be started in
"one click". Also, remote control allows to make a test photo.
2. Package contents
-Vivat Turn Table;
-power cord 220/110 V;
-camera control cable and shutter release adapter;
-IR remote control;
-transportation and storage bag;
-Vivat Photo 360 full version software link.
3. Specifications
Maximum object’s weight __________________________________ 20 kg
Platform diameter _________________________________________26 cm
Voltage support __________________________________________ ~110V÷220V, ±12V
Unit weight _____________________________________________ 2.1 kg
Dimensions _____________________________________________ 26 cm х26 cm х8.5 cm
5
4. Preparation for work
Set the device on a hard flat surface.
On the back of the Vivat Turn Table there are connectors for camera –“Camera”, power –
“220/110V”, battery “12V”, service USB port “Service” and power switch –“On/Off”.
Connect the power cord connector “220/110V”, or battery cable to “12V” and sync cable from
camera to connector “Camera”. The connecting of the camera to Vivat Turn Table must be
performed when the power is off. The plug of the sync cable should be fixed into the housing
unit.
5. Operation of the Vivat Turn Table
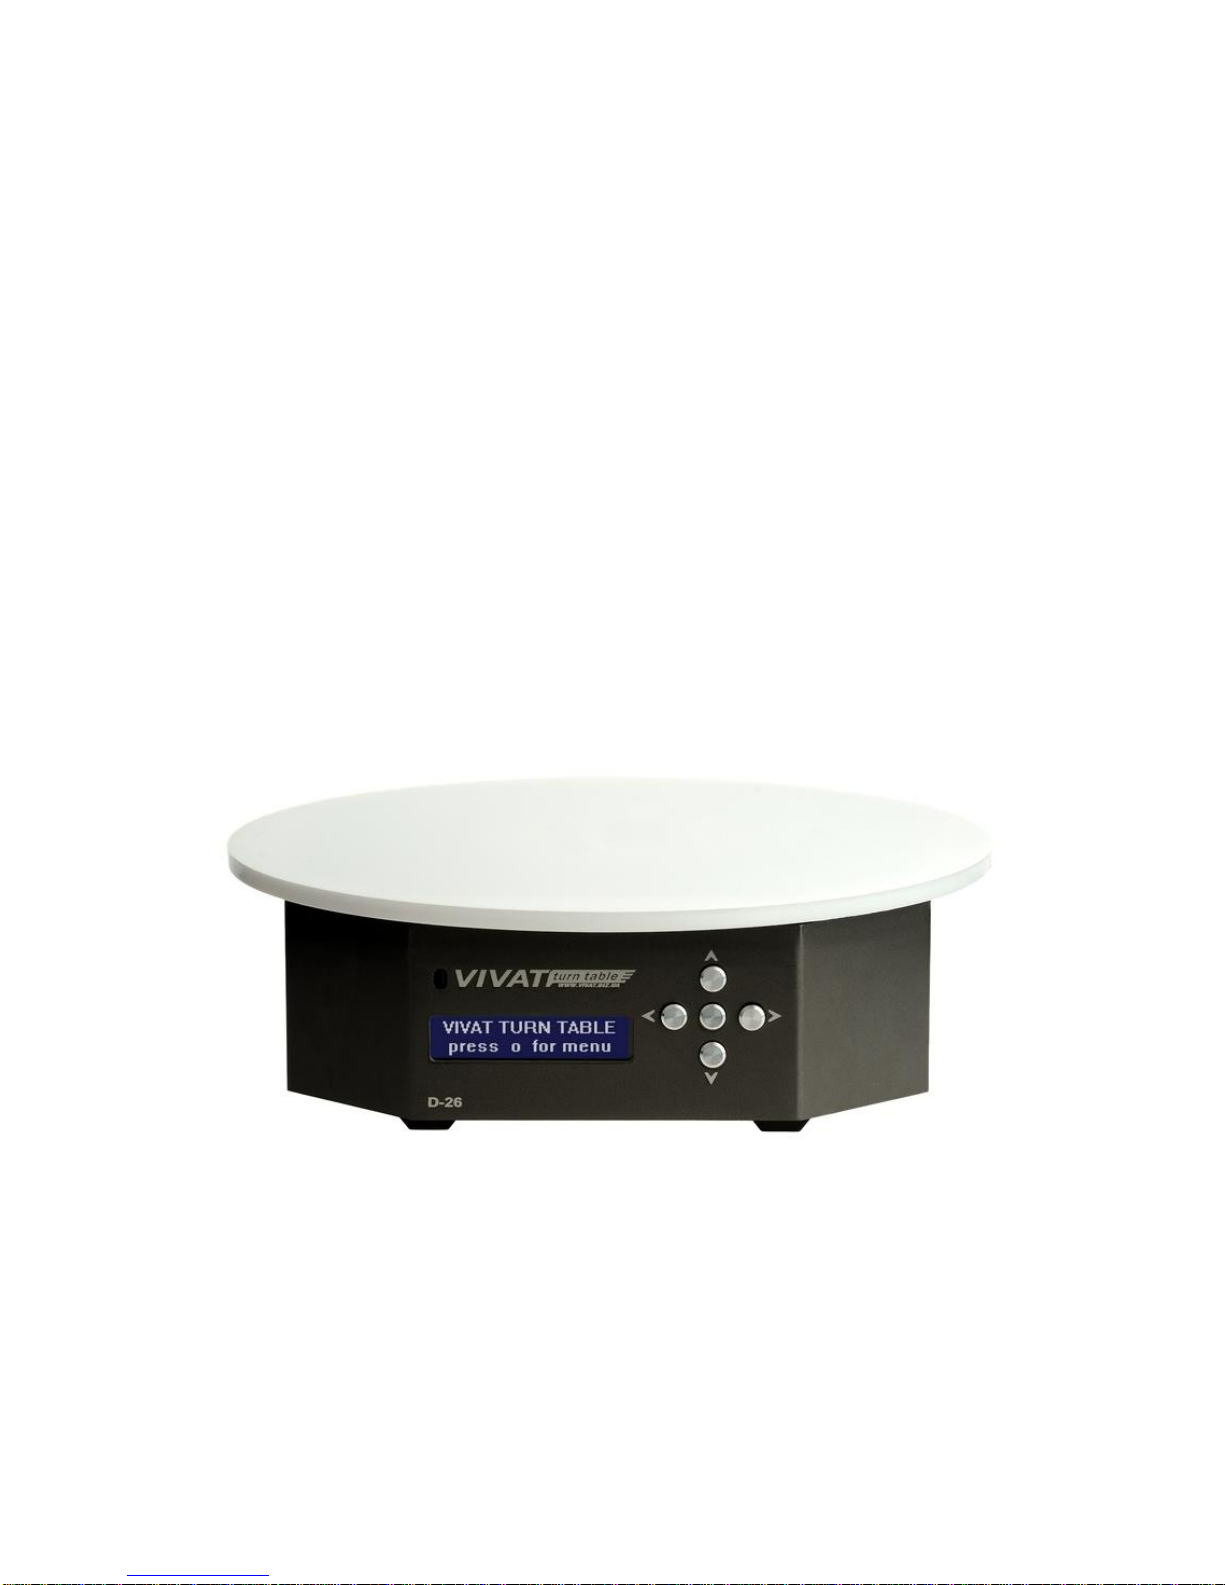
5.1. The controls
On the front panel of the Vivat Turn Table there are: LCD screen, control buttons and IR
remote receiver.
The LCD screen displays information about the operating mode, settings and status of the
program.
"Left" and "right" buttons are used for the menu navigation, "up" and "down" change the
settings, "center”button uses to confirm.
6
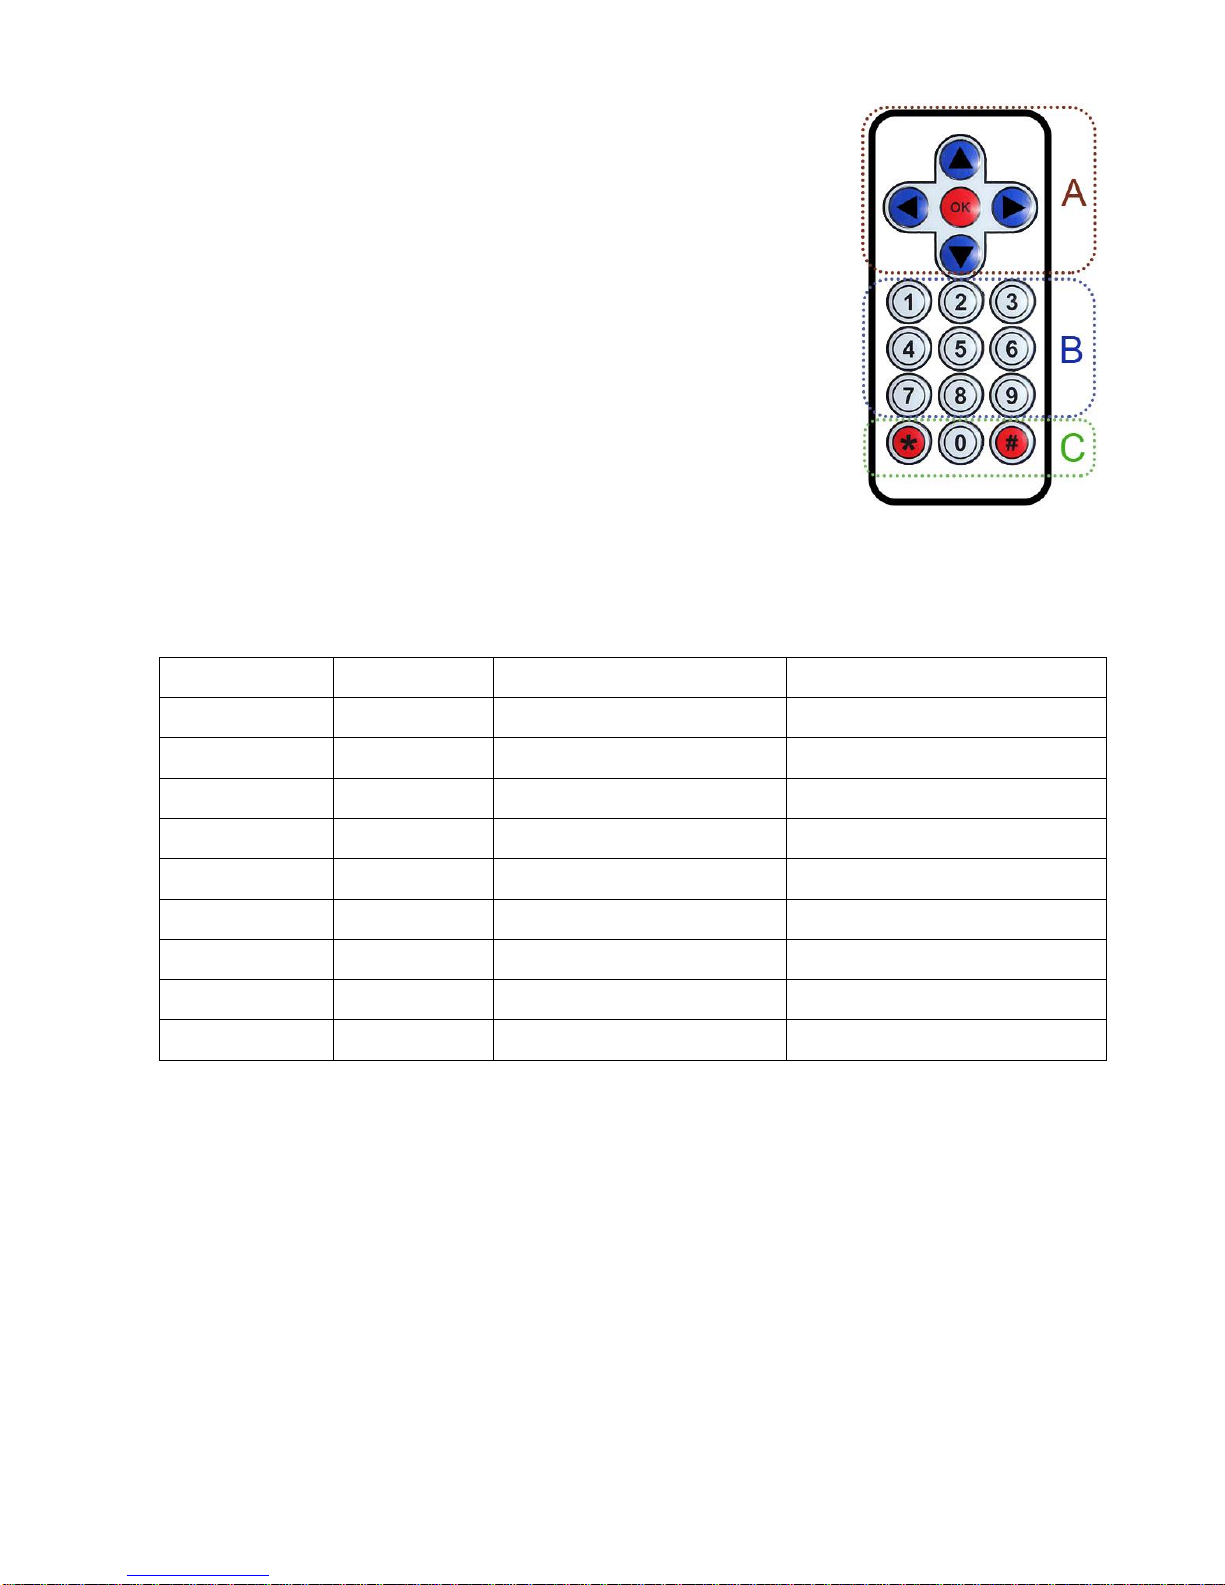
5.2. Working with a remote control
Vivat Turn Table comes with an infrared remote control (IR).
Five buttons (section “A”, pic. 5) duplicate buttons on the front
panel of the Vivat Turn Table.
Numeric buttons from "1" to "9" (excl. “8”) (section “B”, pic. 1)
launch preset programs. The modes of each program are
presented in Table. 1. Button “8” starts manual mode.
"0" button allows you to make a test photo to check the settings
of illumination, button "*" starts photo mode and "#" starts video
mode with current settings (section “C”, pic. 1).
IR remote design may vary, but all functions will be preserved.
IR button
Mode
Frames/Cycles
Rotation speed
1
photo
24
manually set before
2
photo
40
manually set before
3
photo
60
manually set before
4
video
manually set before
2%
5
video
manually set before
10%
6
video
manually set before
20%
7
photo
user frames
manually set before
8
manual
---
manually set before
9
video
manually set before
100%
Table 1. Presets
5.3. The preparation of the camera
Before starting the work with Vivat Turn Table it is important to adjust the camera:
-disable the autofocus on the lens or the camera body (depending on a model);
-select the manual mode and adjusts the exposure according to the shooting conditions;
-when shooting "Photo 360°” disable camera "auto turn-off" and " image review"
functions, also sometimes remote control option should be turned on (when shooting
video, it is not necessary).
In different cameras, same settings can have different names.
Pic. 1

7
5.4. Vivat Turn Table modes
There are two main modes of Vivat Turn Table –“PHOTO MODE”and “VIDEO
MODE”. Also device has an additional manual control mode –“MANUAL MODE”.
In “PHOTO MODE”platform rotates at a certain angle with a certain speed, then it signals
camera to release the shutter. This process occurs as manytimes as many frames have been
set until the object makes a full rotation (360°).
“VIDEO MODE”is mainly used for shooting objects in continuous motion. This is the
perfect mode for shooting objects for stock videos and items presentation.
“MANUAL MODE”is additional. It is used to put the object in the correct position in the
frame.
5.5. Menu operations
After turning on the inscription “press o for menu”appears on the LCD screen. This means
that the device is ready to use.
Press the center button on the table body (or the “ok” button on the remote control) and go
to menu selection mode.
The menu navigation is performed by the buttons "left" and "right". To confirm - use the
center button. To change settings modes use the buttons "up" and "down". In order to
confirm setting changes (save value) - press the center button.
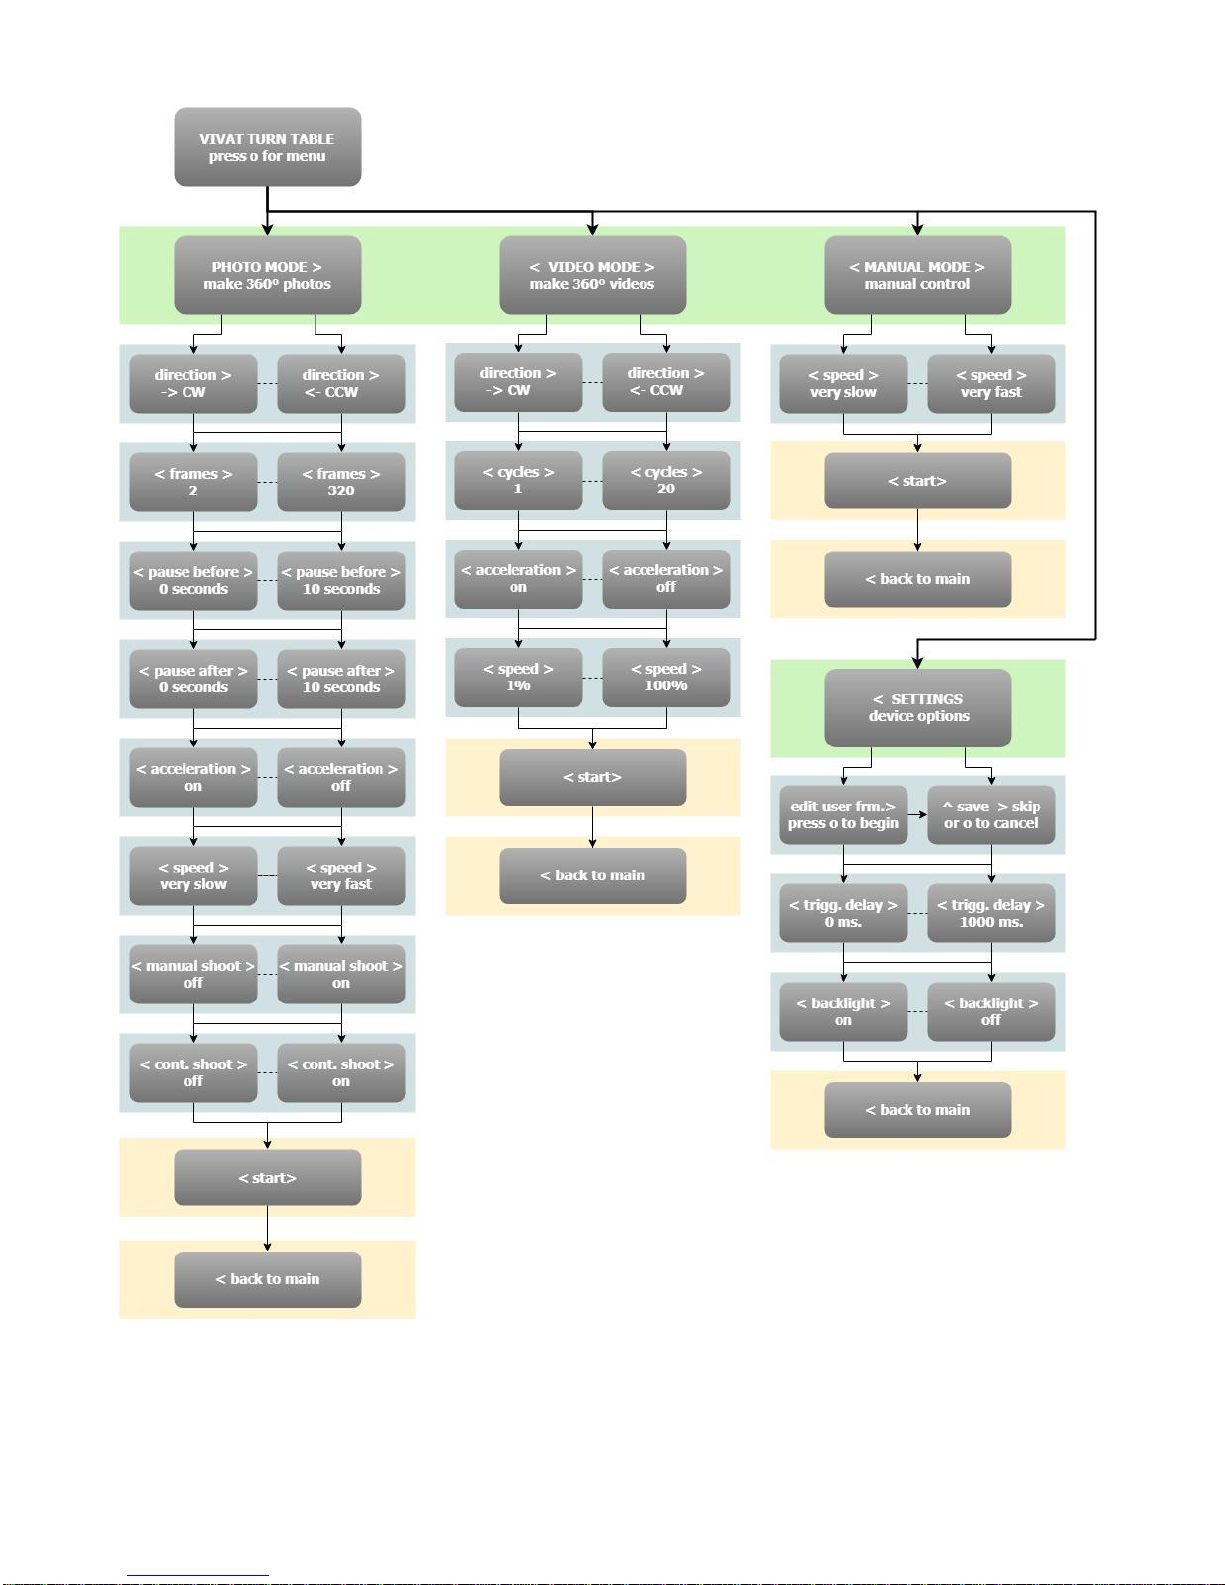
Appendix 1. (Ap. 1) shows the complete menu structure.
5.5.1. Photo mode
The photo mode (Photo 360 °) is the first in the list proposed to user. It is commonly
used with this equipment.
The first option of the photo mode is “direction”- the direction of the platform motion:
clockwise “-> CW”or counterclockwise “<- CCW”.
The number of frames per full rotation (from 2 to 320) is set by parameter “frames”.
Smooth movement of "Photo 360°” depends directly on this value.
VIVAT TURN TABLE
press o for menu
PHOTO MODE >
make 360° photos

8
Last value of “frames” property is “user frames”. When this value is chosen, device
make photos according previously saved user frames. They can be set in “SETTINGS”
menu.
You can specify the pause in seconds between the stop of the platform and camera
shutter release (“pause before”). This is necessary while shooting flexible objects for
damping vibration transmitted from the platform to the object.
It is also possible to set the pause after the shutter ("pause after"). This pause is required
for shooting at slow shutter speeds.
Option “acceleration”activates motion platform with acceleration and deceleration.
This prevents the displacement of the object through its own inertia.
One of the main options is “speed”- the rotation speed of the platform. Choose from 5
options - from slowest to fastest.
“Manual shoot” will turn on/off manual control option. Device will wait until user
presses buttons “left” or “right”. This option can be useful for animations creation.
“Cont. shoot” (continuous shoot) – will turn on/off continuous shoot in photo mode.
Parameters “pause before”, “pause after” and “manual shoot” are ignored in this case
and platform rotates without pauses and makes photos. Very important is to choose
optimal rotation speed and frame quantity to avoid skipped frames.
“Start”launches the program. The progress will be shown on the LCD- screen:
“Back to main”returns to the main menu.
running...
frame: 7/60
- program can be interrupted
by pressing on the center button

9
5.5.2. Video mode
Next after "Photo mode" is "Video mode"
This mode has 4 options.
The first option “direction”, as in the photo mode , sets the direction of the platform
movement.
You can also specify the number of full turns –“cycles”(1 to 20).
“Acceleration”is for a smooth start and stop of the platform.
The option “Speed”allows you to change speed from 1% to 100%. You can change the
speed during program progress by pressing “up” and “down” buttons.
“Start”launches the program. The progress will be shown on the LCD- screen:
“Back to main”returns to the main menu.
< VIDEO MODE >
make 360° videos
running...
cycle: 2/3
- program can be interrupted
by pressing on the center button
PHOTO MODE >
make 360° photos
direction >
< pause before >
< pause after >
< acceleration >
< speed >
< manual shoot >
< start >
< back to main
< cont. shoot >
- pause after shutter release
- motion with smooth start and
stop
- platform rotation speed
- pause before shutter release
- platform motion direction
- manual shoot option
- launch the program
- return to main menu
- continuous shooting

10
5.5.3. Manual mode
The manual mode allows the user to control the turntable himself by pressing the "left"
and "right" buttons.
It is possible to select the appropriate speed of the platform with option “speed”.
“Start”launches the manual mode.
Buttons "left" and "right" rotates the platform clockwise and counterclockwise. The
central button is for exit from manual mode.
“Back to main”returns to the main menu.
Manual mode can be launched from IR remote using “8” button. It is useful for
positioning object before shooting. In this mode some IR buttons have another
assignment:
< VIDEO MODE >
make 360° videos
direction >
< cycles >
< acceleration >
< speed >
< start >
< back to main
- motion with smooth start and stop
- platform rotation speed
- launch the program
- return to main menu
- number of full turns
- platform motion direction
< MANUAL MODE
manual control
< speed >
< start >
- manual mode start
- platform rotation speed
< back to main
- return to main menu
press <> to move
or o to exit
11
IR button
Value
1
rotate platform to 22,5°counterclockwise (1/16)
2
---
3
rotate platform to 22,5°clockwise (1/16)
4
rotate platform to 45°counterclockwise (1/8)
5
---
6
rotate platform to 45°clockwise (1/8)
7
rotate platform to 90°counterclockwise (1/4)
8
back to zero (start) position
9
rotate platform to 90°clockwise (1/4)
Table 2. Values of digital buttons in manual mode.
Exit from the manual mode is carried by central button on the remote control or on the
table body.
5.5.4. Device settings (SETTINGS)
In this menu user can change basic device settings.
“Edit user frm.” (edit user frames) allows users to set up to 10 frames with different
shooting angles. Choose this menu item, LCD will show “^ save > skip or o to cancel”.
After pressing “up” button, device will save start position as first user frame and starts
rotation clockwise. Every next pressing “up” button will save current position as user
frame (from 1 to 10). If you don’t need start position to be saved as user frame, press
“left” button instead of “up” button on start. Device will make full circle rotation and
save all user frames to memory.
“Trigg. delay” (trigger delay) sets delay of shutter trigger (some cameras need more
time to react to device signal).
< SETTINGS
device options
edit user frm. >
< trigg. delay >
< backlight >
< back to main
- shutter trigger delay
- user frames setup
- back to main menu
- backlight during program running

12
“Backlight” - will turn on/off LCD backlight during running the program. It can be
useful when shooting reflective objects.
“Back to main”returns to the main menu.
13
Appendix
Appendix. 1 Device menu structure.
Table of contents
Other Vivat Turntable manuals


