VIVAX home FC-31501 WH User manual

Upute za uporabu
Korisničko uputstvo
Servisna mjesta
Jamstveni list
HR
Servisna mjesta
Garantni list
BiH
User Manual
Servisna mjesta
Garantni list
CG
Servisna mesta
Garantni list
SR FC-31501 WH
FC-22501 WH
FC-04501 WH
Udhëzime për shfrytëzim
Упатствo за употреба
Список на сервиси
Гарантен лист
МК
RoHS
2002 / 95 / EC
NNO-1/09

User
manual
Free
Standıng
Ovens
ENG
FC-31501 WH
FC-22501 WH
FC-04501 WH
RoHS
2002 / 95 / EC
NNO-1/09

FC-31501 WH FC-22501 WH FC-04501 WH
Congratulations on your purchase of this appliance provided by high technical element and
produced in a modern factory. Please read this manual carefully and keep it on hand for future
reference.
IMPORTANT: This new appliance is easy to use, however, to obtain the results, it is important to
read this booklet and to follow all the instructions before using it for first time.
The booklet contains the necessary information regarding installation, use and
maintenance, as well as giving useful advice.
CE This appliance complies with the following E.E.C. Directives.
•73/23 – 90/683 (Low Voltage Directive)
•90/336 (Gas Appliance Directive)
•93/68 (General Directives)
and subsequent modifications
ıt is very ımportant that this instruction book should be kept safety for future cosultation.ıf the
appliance should be sold or given to another person, please ensure that the booklet goes together
with it so that the new owner can know of the functions of the machine and also be aware of the
warning.
This warning has been given for for the safety of you and others.We therefore, ask you
to carefully read the procedures of the installing and using this cooker.
•This appliance has been designed for use by adults, take care, therefore the children
do not attempt to play with it.
•This product is intended for cooking of food and must not be used for other purposes
•Placing distances of appliance;
•The work of installation must be carried out by competent and qualified installers
according to the regulations in force.
•modifications to the domestic electrical mains, which may be necessary for the
installation of the appliance should be carried out only by competent personel.
It is dangerous to modify, or attemp to modify, characteristics of
this appliance.
•Unstable or deformed pans, should not be placed on the burners or plates in order to
avoid accidents caused by upsetting or boiling over.
•Particular care should be taken when cooking with oil or fat.
•The appliance remains hot for a long time after being swiched off.

FC-31501 WH FC-22501 WH FC-04501 WH
•Supervise children at all times, paying attention that they do not touch surfaces or
remain in the vicinity of the appliance when in use or when not completely cooled.
•If the appliance is fitted with a cover. İts function is to protect the surface from dust
when closed and to accumulate splashes of grease when open.
•Do not use for other purposes.
•Always clean the cover before closing it.
•Leave the burners and / or plates to cool before closing the cover
•All covers, glass or metal, are removable to facilitate cleaning.
•Always ensure that the knobs are in the ‘’0’’ (STOP) position when the appliance is
not in use.
•Always insert the dripping pan when using the grill or when cooking meat on the
grid.Pour a little water in to dripping pan to avoid grease burning and the creating
unpleasant smells.
•Always use oven gloves to remove dripping pan from the oven.
•The accessories (grid and dripping pan) should be washed before using for the first
time.
•Take care when using cleaning products in spray form, never direct the spray onto
the resistance.
•If when placing food in the oven or when removing it, a large quantity of oil, juice, etc.
spills onto the bottom of the oven re-clean before starting to cook to avoid unpleasant
smoke and also the possibility of these substances catching fire.
•Ensure that air can circulate around the gas appliance, poor ventilation can producea
lack of oxygen.
WARNING: The use of a gas cooking appliance produces the heat and humudity in
the room in which it is installed.Ensure good ventilation of the room keeping natural
ventilation openengs clear or installing an extractor hood with a discharge tube.
•For reasons of hygiene and safety this must be always kept clean. A build up of
grease or other food can cause fires.
•Avoid installation of the cooker near inflammable material (e.g. curtains, tea towels,
etc.)
•Do not shut lid when burner alight.
Fig 2
•Supply the appliance with the type of gas stamped on the relevant adhesive label
situated in the immediate vicinity of the gas connection tube.
•The gas oven becomes hot with the movement of air.
•The appliance heavy, move it carefully.
•Before maintenance and cleaning disconnect the appliance and allow to cool.
•To facilitate ignition, light the burners before placing pans on the grid. After having lit,
check that the flame is regular.
Always lower the flame or turn it off before removing the pan.
Ensure that the oven grids are inserted correctly.
If there are self-cleaning panels they should only be cleaned with soap and water.

FC-31501 WH FC-22501 WH FC-04501 WH
Only heat-resistant plates may be placed in the drawer / dishwarmer compartment
sıtuated under the oven. Do not combusitible materials there.
•In case of repairs, do not attempt to do it by yourself, repairs carried out by unqualified
persons can cause damage. Contact an authorized assistance center and insist an
original spare parts.
•Never place empty pan as oven or hob burner running.
USAGE
Fig 3.
FC-31501 WH FC-22501 WH FC-04501 WH
IGNITION OF HOB BURNERS
To ignite a burner, before positioning the saucepan, use the appropriate switch marked by a
small spark, push the corresponding knob in completely and turn in an anticlockwise direction to
the maxımum position, push ignition, by having a flame, regulate the flame as required.
FIG. 4 IGNITION
If after a few attempts the burner does not ignite, check that the baffle and its cap are correctly
positioned .
To interrupt the supply of gas, turn the knob in a clockwise direction to the position ‘’0’’
During cooking, when using fats or oils, take particular care as they can, when over-heated, self
ignite.
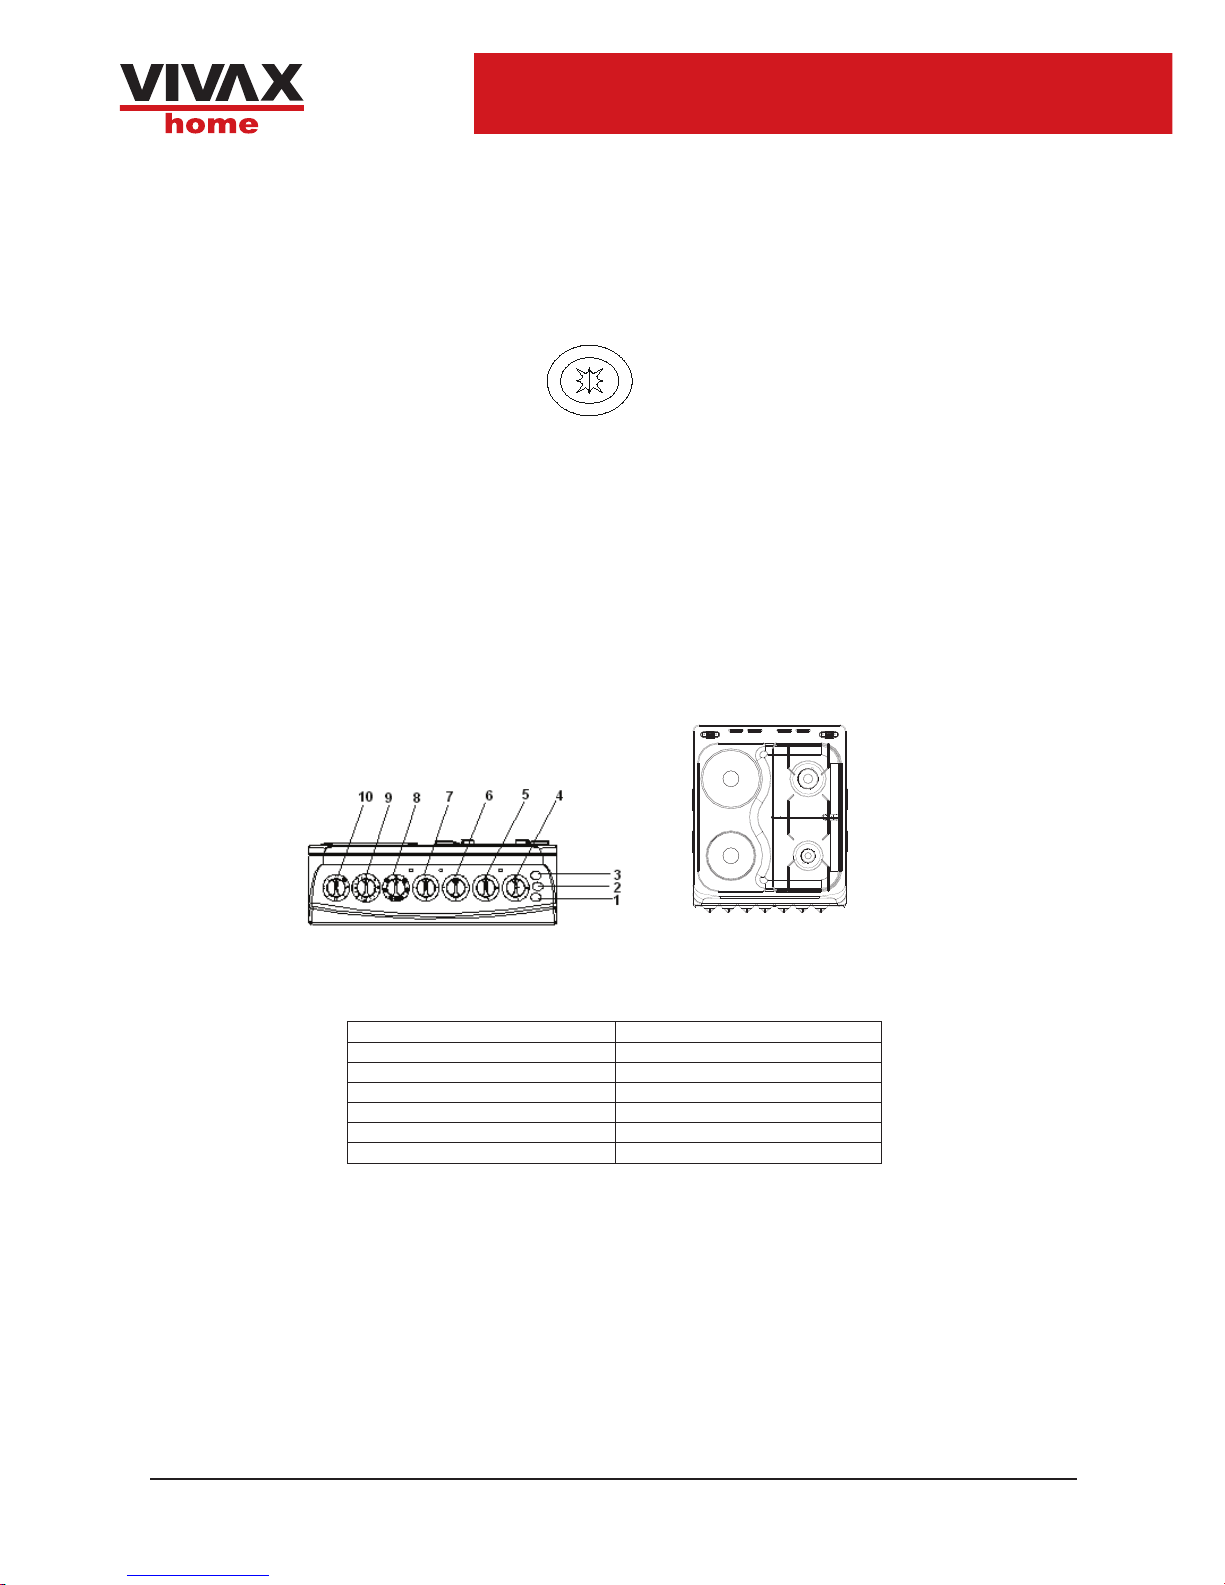
CONTROL KNOBS ON THE COOKER
The knobs for using the gas cooker are found on the control panel .
Fig. 5a Fig. 5b
Table 1.
1-LAMP
7-LEFT FRONT 1000W HOT PLATE
2-IGNITION
8-OVEN KNOB
3-CHICKEN ROTISSERIE
9-THERMOSTAT
4-RIGHT FRONT SMALL BURNER
10-TIMER
5-RIGHT BACK MIDIUM BURNER
6-LEFT BACK 1500W HOT PLATE
The regulation knobs should be turned in anticlockwise.
USING BURNER:
Each gas burner is equipped with a gas valve which has “push and turn “ safety
system in order to ignite gasburner ;
*push and turn on left softly the button of gas burner you want to ignitie

FC-31501 WH FC-22501 WH FC-04501 WH
*ignite the burner by lighter or by pressing “button on the control panel(if your
appliance has this feature)”
*you can adjust power of flame by turning the button.
.No gas supply
Maxımum gas supply
Minimum gas supply
USING ELECTRIC HOT PLATE : (MIXED HOBS)
Turn corresponding knob for hot plate clockwise, the signal lamp will
light showing that hot plate is working. When cooking is finished, turn off by turning the
knob to ‘’0’’ position. Hot plate cooker has heat grades shown in (table 1).
Table 2.
__________________________________________________
Knob position 0 1 (250 W) 2 (750 W) 3 (1000 W)
___________________________________________________
Function Off low heating, cooking fast cooking
Cooking & boiling boiling&grill
Level level level
___________________________________________________
3
2
1
0
FIG. 7 HOT PLATE KNOB
WHEN USING ELECTRIC HOT PLATE, NOTE THE FOLLOWINGS
•At first use, switch on the hot plate at three position for 5 minutes, so upper surface
protection material will be stable.
•Use flat pan with diameter same as hot plate.
•Do not put anything between hot plate and pan.
•After using the hot plate, when it cool, clean the surface with wet fabric, do not use
strong or rigid material for cleaning.
FIG. 8 LAMP
When you push the buton , oven lamp runs.
Fig.6
FC-31501 WH FC-22501 WH FC-04501 WH
USING MECHANIC TIMER:
Mechanic timer use by set the time max 90 minutes. You can set the time turning the switch clockwise.
When Time’s up the timer alerts. If you want to cancel the countdown before the time you set,turn the
switch to “0” position.
0
30
60
90
FIG. 9 Mechanic Timer
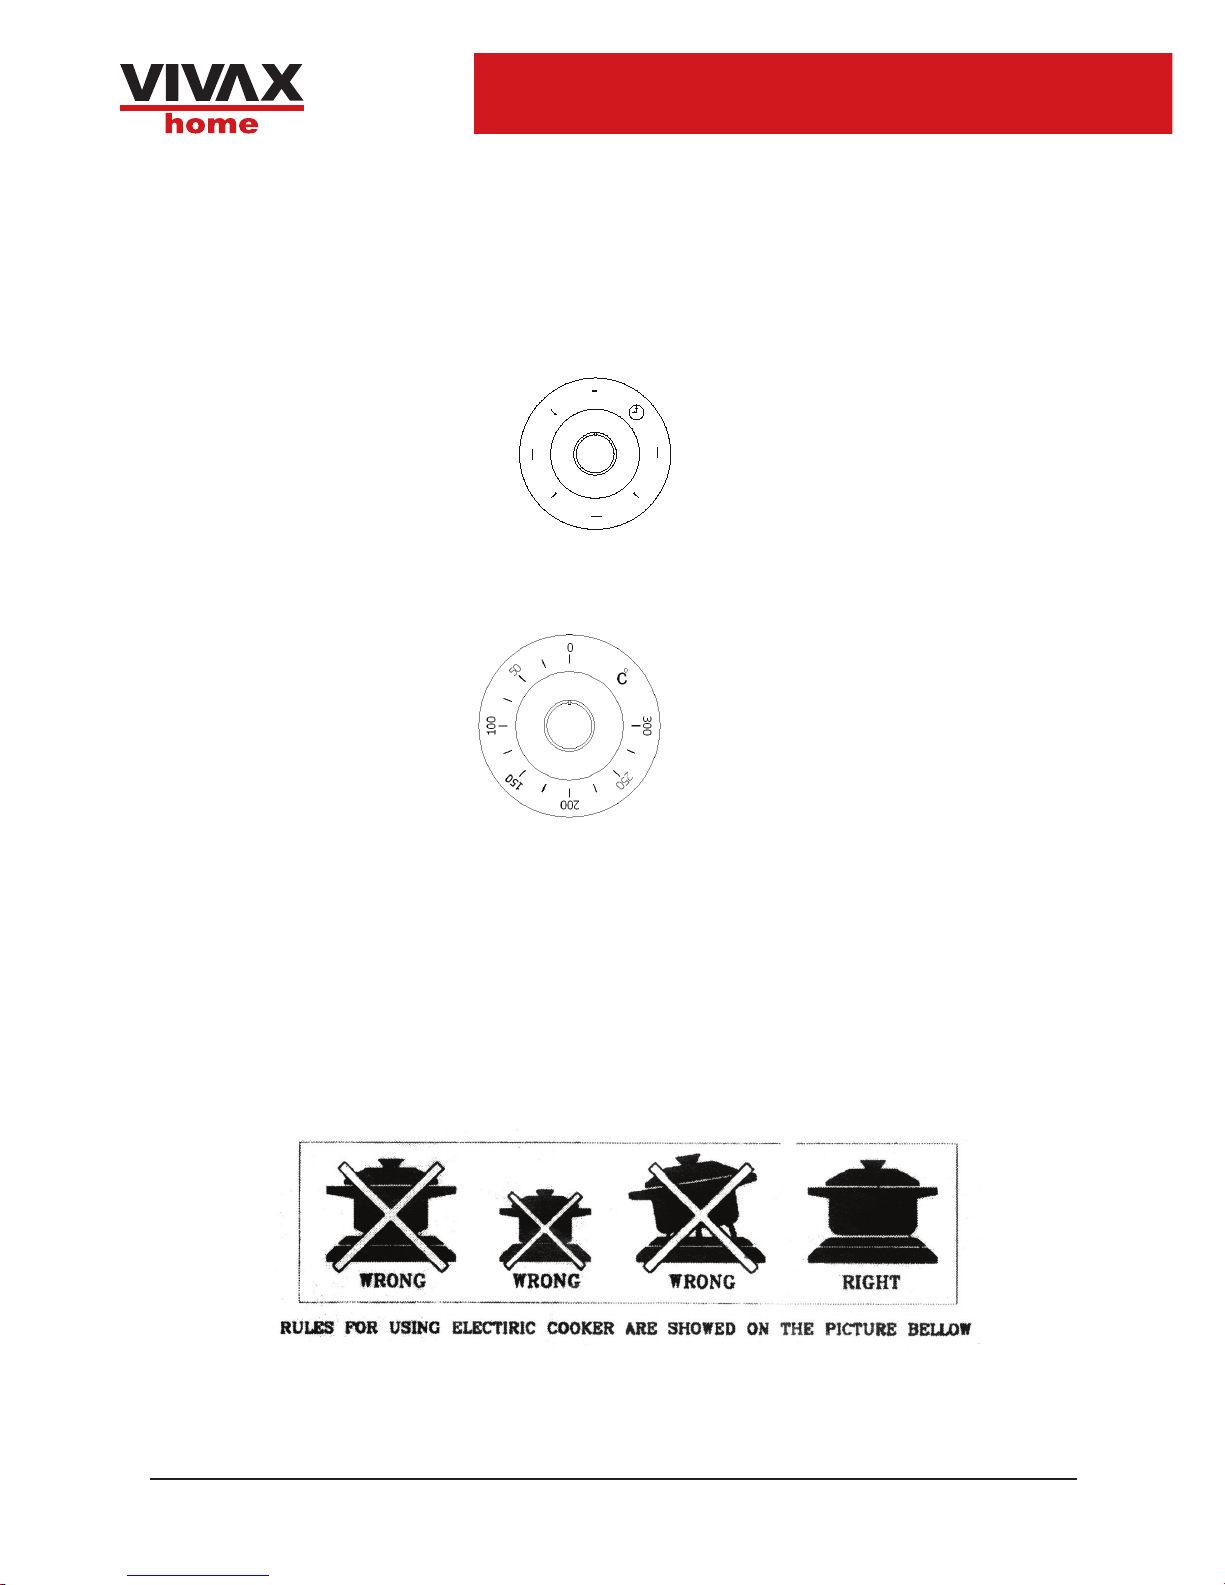
TERMOSTAT:
This feature is for electric oven only. You can turn the knob to clockwise and brign desired position
to adjust temperature.
Fig. 10 Thermostat
Remember that a wide-bottomed pan allows a fastercooking that a narrow one
Always use pots which properly fit what you have to clock.
Particulary make sure that the pans are not too small for liquids, since these could easily
overflow.
Moreover, the pans should not be too large for a faster cooking. In fact, grease and juices
may spread on the bottom and burn easily.
It is beter to use non-openable moulds for baking cakes. In fact, an openable mould lets
wuices and sugar leak through, falling on the bottom of the oven and consequently
burning on the bottom of the baking tray, makin cleaning difficult.
Avoid putting plastic-handled pans in the oven as they are not heat-proof.
You should use pans with the right diameter to fit the burner, in order to make he most out
of it, thus reducing gas consumption.
Fig.11
FC-31501 WH FC-22501 WH FC-04501 WH
Fig. 12
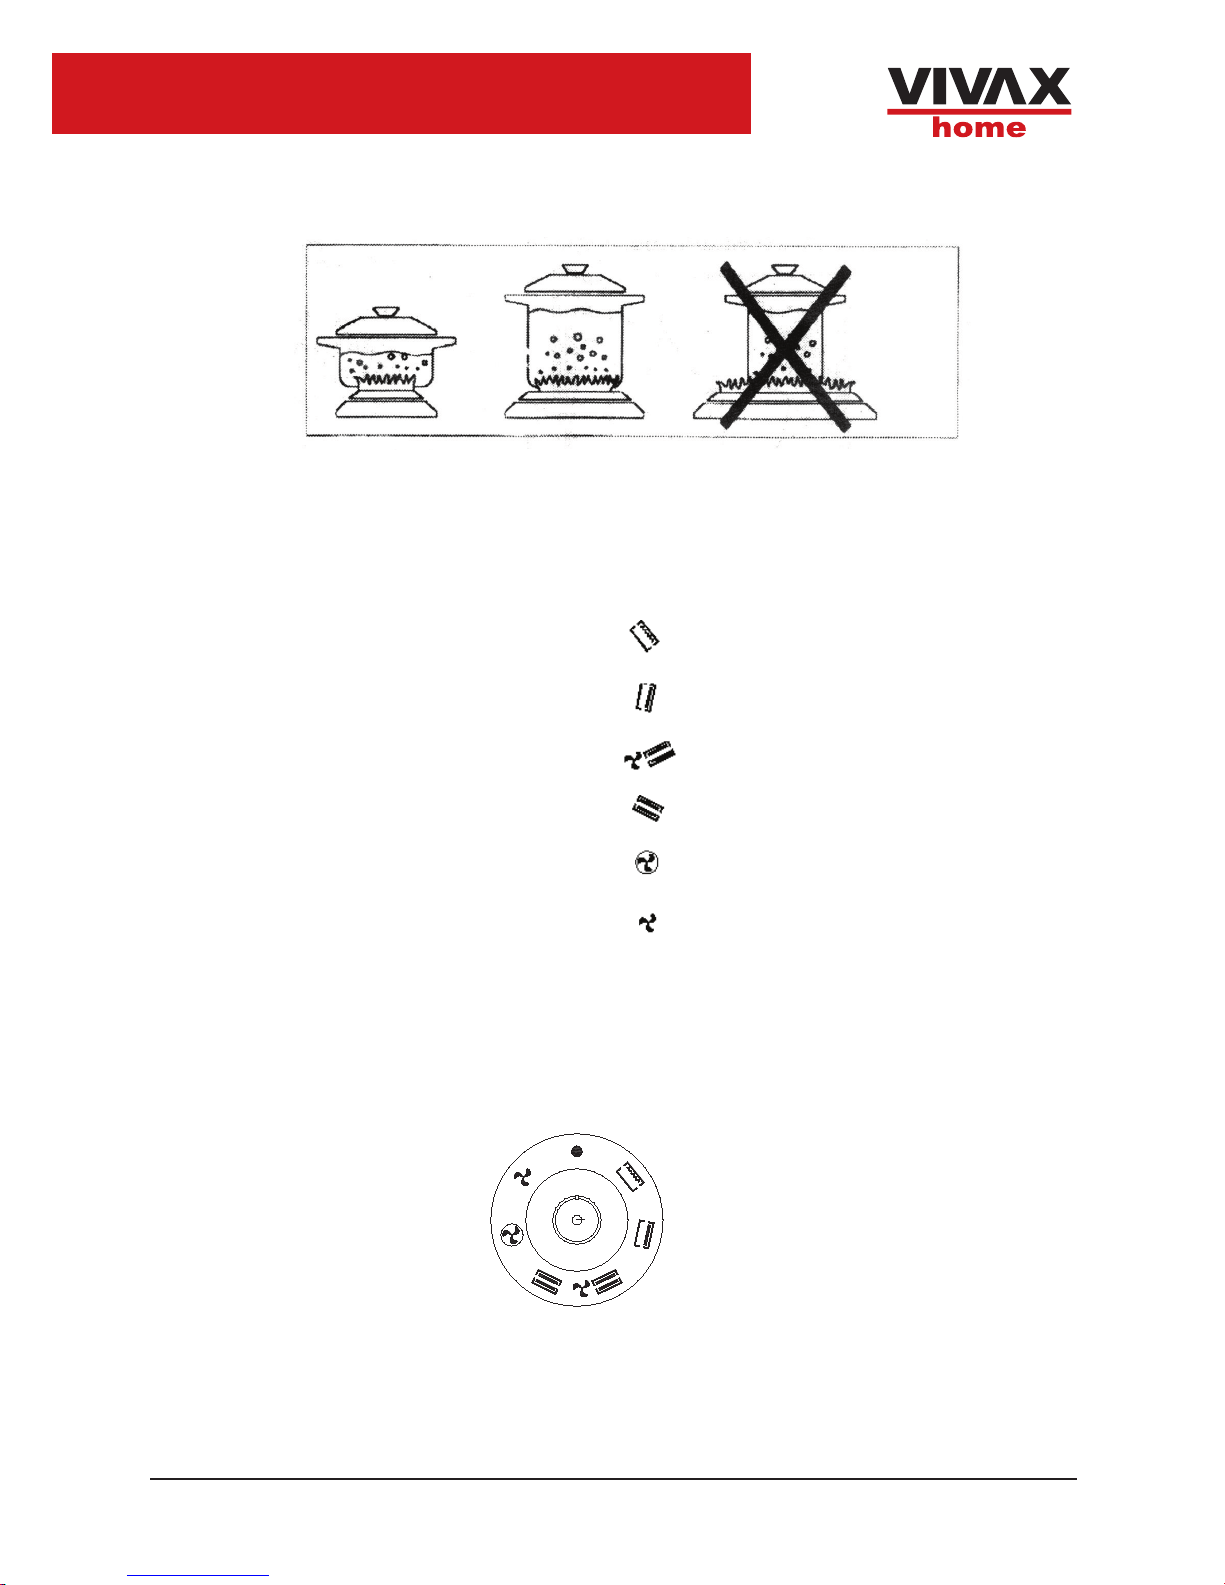
İt is also advisable to cover any boiling liquids and. As soon as the liquid starts boiling,
lover the flame enough to keep the boiling point.
USING THE ELECTRIC OVEN ;
Electric oven has top heating element with grill heating element, bottom heating element,
turbo fan and turbo fan with heating element(multifuntion turbo fan). In order to bring the
knob desired position;
Gril heating element:……………………….
Top heating element:…………………………
Turbo fan+top and bottom heating element:
Top and bottom heating element…………….
Turbo fan wit heating element:………………
Turbo fan :………………………………………
FIG 13 Oven Knob

FC-31501 WH FC-22501 WH FC-04501 WH
The Oven Controller commands oven burner and gril burner. In These models, the
security System turns off the gas supply in the case the flame is exinguish.
If you want to use the oven down burner, you turn the switch counter –unticlockwise and
push the ignite button until it burns. Push and hold 10-15 seconds for security system
runs.To adjust the flame height, you can get the controller knob to the big flame sign or
small flame sign.
If you want to use the gril burner, you turn the switch clocklwise and push he ignition until
it burns.
The device shall not be operated for more than 15s. If after 15s the burner has not lit, stop
operating device and openthe compartment door and /or wait at least 1 min. Before
attempting a further ignition of the burner.
Manuel Ignıtıon Of Gas Oven:
Press and put the flame to the burner you want to ignite.
Turn the related knob anticlock wise to the max position.
Keep pressing for 15 seconds and leave the knob.
If burner goes of repeat the operation.
PREHEATING:
After turn-on the oven, leave the door open for a few minutes, then close it and turn the
regulator knob to the temperature required. Preheat the oven for about 15 minutes before
inserting the food to be cooked.
TURNING ON THE TURNSPIT:
Pres the corresponding grill knob to operate the grill. The grill burner can only be turned
on when the oven burner off. ( a safety switch prevents the use of the two different heat
sources simultaneously)
USING THE ROTISSERIE (TURNSPIT):
Impale the food for cooking on the rotisserie spit, taken care that it is secured between the
two forks, balance the weight to avoid forcing the motor unnecessarily .
FIG.14 ROTISSERIE
When you push the rotisserie button, chicken rotisserie runs.
INSTALLATION INSTRUCTIONS:
This appliance is not provided with a combustion product discharge device. It is
recommended that it be installed in sufficiently aried places, in terms of the laws in force.
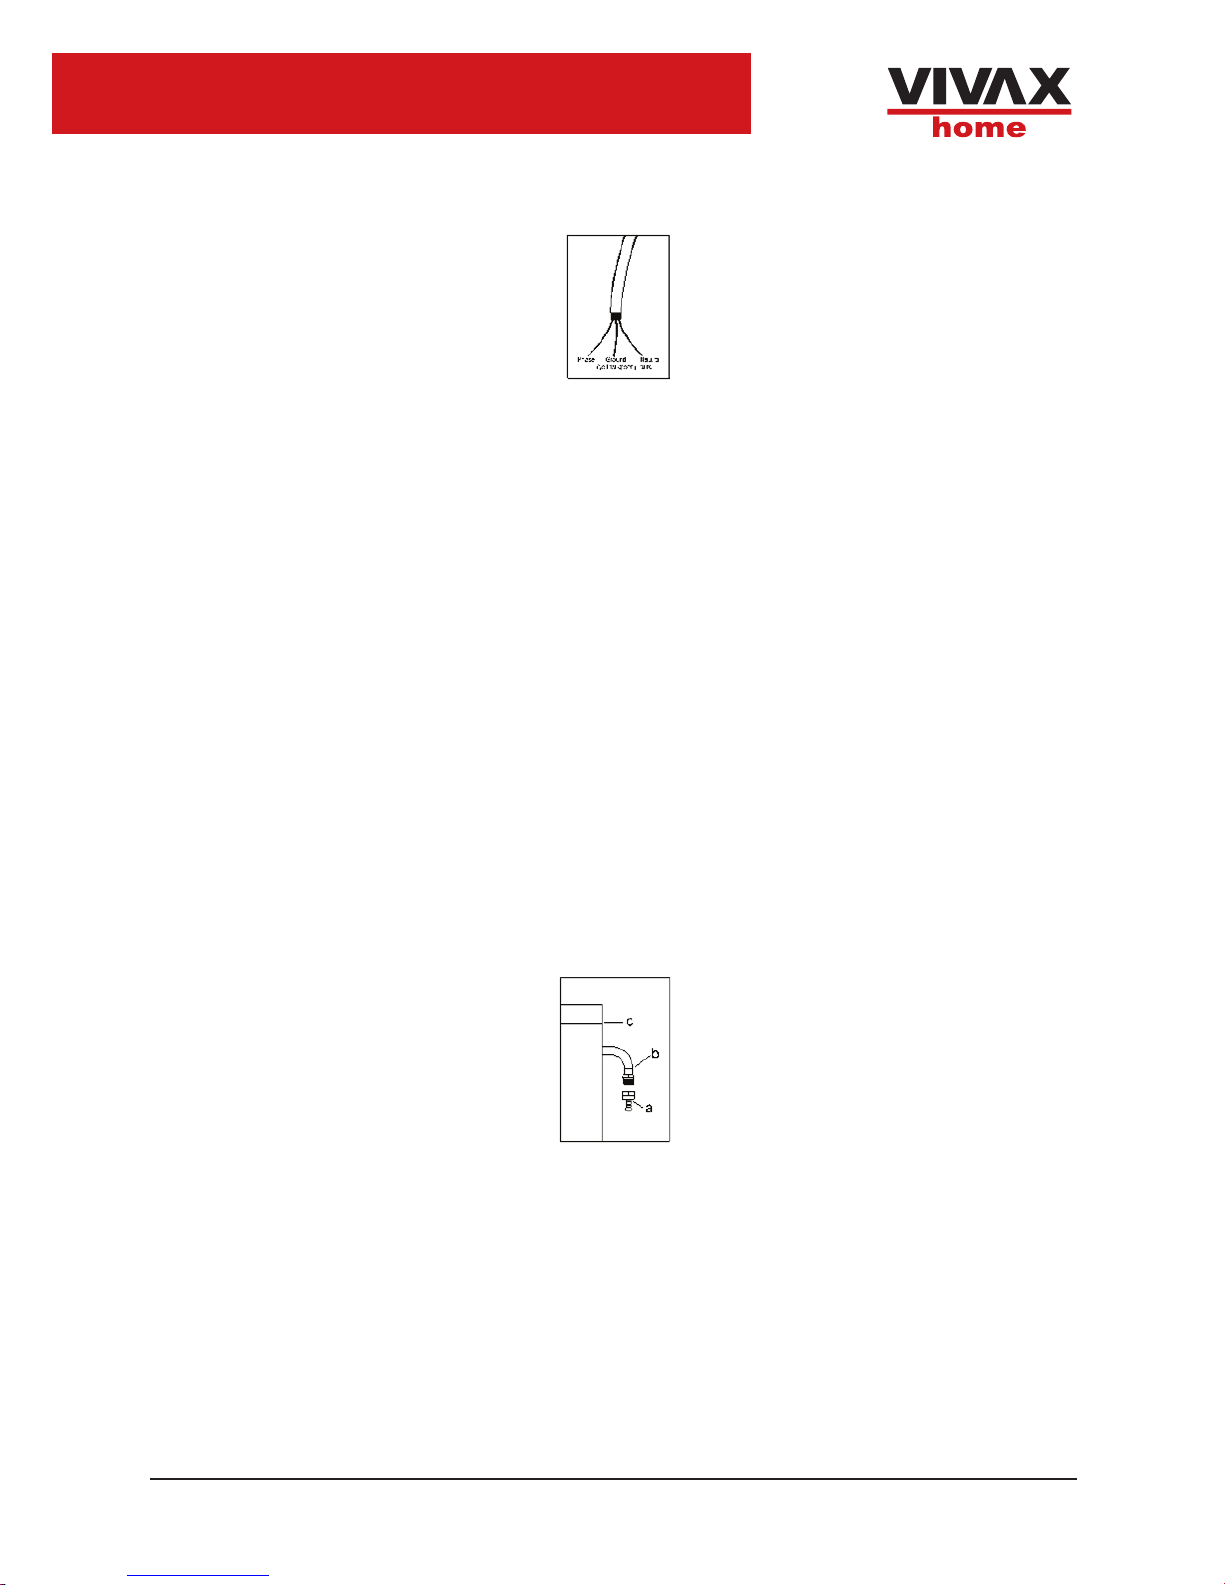
ELECTRICAL CONNECTION:
The unit is preset to work with voltage of single phase 230 V.
Before making the connection make sure that;
•The energy power available in teh user’s house is sufficient for the normal supply
of this appliance (see reating plate)
FC-31501 WH FC-22501 WH FC-04501 WH
Fig. 15
•The unit is correctly connected to earth through a suitable plug and according to
installed appliance.
The appliance is supplied without plug: Consequently, you have to install a plug fit for
the eload shown in the serial number plate. The plug has to be connected to an
adequate socket. If you wish to directly connect to the manis, tou have to interpose an
omni polar mains, complying with the existing regulations. The brown live wire (
originating from the clamp of the cooker junction box) must always be connected to
the phase of the manis supply. In any case. The supply cord must be positioned in
such a way as it dosen’t reach in any point a temperature higher by 50ºC than the
room temperature.
THE MANUFACTURER REFUSES ANY RESPONSIBILITY IN CASESWHERE
NORMAL SAFETY MEASURES ARE NOT AVAILABLE.
WARNING: This appliance must be earthed.
GAS CONNECTION:
Gas connection must be carried out according to the rules in force. The manufacturing
company release the unit tested adjusted for the kind of gas stated on the rating plate
located for the back of the range, next to connection pipe. Be sure that you are going
to connect the unit to the same kind of gas written on the plate.
USING A RIGID PIPE OF FLEXIBLE METAL PIPE FOR CONNECTION:
To ensure higher safety, it is recommended to carry out the connection to the gas
system using rigid pipes (ex. Copper) or using flexible stainless stell pipe to avoid any
stretch of the unit (
Fig. 16
Gas feeding pipe fitting is G ½
For this type of installation, connection on the gas supply should be carried out using
only and exclusively flexible metallic tubes in conformity with rules in force.
USING FLEXIBLE, NON METAL PIPES FOR CONNECTION:
When the connection (can be easily inspected) in its full extent, there is teh chace to
while using flexible pipe use according to the rules in force.
The flexible pipe must be tightly using clambs according to the rules in force, (fig /)

FC-31501 WH FC-22501 WH FC-04501 WH
The flexible pipe should include following conditions:
•No where it can reach over tempature, other than room tempature higher than 30ºC
in between range
Fıg 17.
•It is no longer than 1500 mm
•It is shows no throttlex.
•It is not subject to traction or force.
•It can be easily inspected in order to check it’s condition
Fig.18
The control of preservation of the flexible pipe consist in checking that;
•It doesn’t show crack’s cuts, marks, of burning both on the end parts and on its full
extent
•The material is not hardened, but shows its normla elasticity,
•The fastening clamps are not rusted.
•Expiry term is not over.
If one more anormalities are seen, do not repair the pipe, replace it.
IMPORTANT
Once installation is complete, check the perfect seal of every pipe fitting, using a
soapy solution, never a flame.

FC-31501 WH FC-22501 WH FC-04501 WH
ADAPTATION TO DIFFERENT KINDS OF GAS
To adapt the appliance to a different kind of gas from the one the appliance has been
set for, follow the instruction below in their order.
GAS CONNECTION
LPG : Use the rubber pipe holder.
Natural Gas : Use the pipe fitting ‘Always insert the gasket.
Then proceed with the gas connection, as
indicated in the relevant paragraphs.
Fig. 19
HOB BURNER NOZZLES REPLACEMENT
•Remove the pan supports.
•Extract the caps and the wall baffles of the burners.
•Using a socket spanner 7 unscrew and remove the nozzles replacing them with the
ones required.
For the kind of gas in use
Reassemble the parts following the same procedure backwards.
These burners do to not need any primary air regulation.
HOB BURNERS ADJUSTMENT OF MINIMUM LEVEL
To adjust the minumum level;
1- Turn the knob to position of minimum flame;
2- Remove the knob
Fig. 20
3- a) In case of conversion from naturel gas to LPG, tightly screw the by-pass screw,
of the cooks;
b) when converting from LPG to naturel gas unscrew about one-fourth turn by-pass
screw, until a regular small flame is reached.

FC-31501 WH FC-22501 WH FC-04501 WH
Reassemble the turning quickly the knob from the maxımum postion to the minumum
one,the flame does not go out.
SUGGESTIONS FOR COOKING:
Start your cooking with a big flame as necessary. The outside of the flame is much
hotter than its inside (nucleus). Accordingly, the top of the flame mean a waste of gas.
In contras gas burners do not require flat-bottomed pans; the flames lick the bottom
and spread the heat all over the surface.
No special pans are required for gas burners. However, thin walled pans transmit the
heat to the food more quickly than thick-walled ones.
A thick pan bottom prevents partial overheating as it allos sufficient thermal
compensation.
Avoid very small pans. Wide and shallow pans are more suitable than narrow and
deep ones as they allow a faster heating. Cooking is not quickened by placing narrow
pans or wide burners. The result is just a waste of gas. For a proper usage, place
small pans on small burners and large pans on large burners.
Remember to cover pans to reduce gas consumption.
SUGGESTIONS FOR OPERATING OF OVEN
Traditional cooking:
Heat derives from the top and the bottom. Therefore preferable to use the central
guides. If cooking requires more heat from the bottom or the top, use the upper or
lower guides.
ADVISE FOR USE OF THE TRADITIONAL OVEN
For the cooking of cakes
Pre-heat the oven, unless indicated differently, for at least 10 minutes before use. Do
not open the oven door when cooking dishes which must raise (e.g raised parstries
and souffles); the jet of cold air would block the raising process. To check if cakes are
cooked, insert a toth stick into the mixture; if it comes out clean the cake is ready. Wait
until at leas 3/4 of the cooking time has passed before doing this check. As a general
rule remember that;
A dish which is well-cooked on the outside but not sufficiently cooked inside would
have required a lower temperature and longer cooking time. On the contrary a ‘’dry’’
texture would have required a shorter time and higher cooking temperature.
For the cooking of meat
If you want roasts with a good color, use very little oil. If the pieceis lean, use oil or
butter or a little of both. Butter o oil are on the other hand unnecessary it the piece has
a strip of fat. If the place has a strip of fat. If the place has a strip o fat on one side
only, put in the oven with. This side upwards; when melting the fat will grease the
lower side sufficiently. Red meat should be removed from the fridge one hour before
cooking otherwise the sudden change of temperature could couse it to become tought.
A roast especially if of red meat, must not be salted at the beginning of cooking as salt
causes juices and blood to seep put of the meat thus preventing the formation of a
well-browned crust. It is advisable to salt the outside of the meat after just over half the
cooking time. Pleace the roast in the oven in a dish having a low rim; a deep dish
shields heat. Meat can be placed on an ovenproof dish or directly on the grill under
which the dripping pan will be inserted to collect juice ingredients for gravy should only
be put in the dish immediately if cooking time is brief, otherwise they should be added
during the last half hour.
Beging cooking rare meat at a high temperature reducing the temperature to finish
cooking the inside. The cooking temperature for white meat can be moderate
throughouf. The degree of cooking cen be checked by pressing the meat with a fork, if

FC-31501 WH FC-22501 WH FC-04501 WH
it does not give the mea cooked. At the end cooking it is advisable to wait at least 15
minutes before cutting the meat in order that the wices are not lost.
Before serving plates can be kept warm in the oven at minimum temperature.
For the cooking of finish:
Cook small fish from start to finish at a high temperature. Cook medium-sized fish
initially at a high temperature and then gradually lower the temperature from start to
finish.
Check that baked fish is cooked by gently witing one side of the gut; the meat must be
white and opaque through, except in the case of salmon, trout or similar.
Grilling
The following types of meat are suitable for grilling. Mostly meat cut in slices or pieces
of various sizes, but not usually very thick, poultry cut in half and flattened, fish, some
vegetables (e.g. corrugates, aurbergines, tomatoes, etc.), of meat or fish and seafood.
Meat and fish to be grilled should be lightly brushed with oil and always placed on the
grill; meat should be salted upon completion of cooking; whereas fish should be salted
on the inside before cooking. The grill should be positioned in the guides nearest or
furthest from the grill element according to the thickness of the meat, in order to avoid
burning the surface and cooking the inside insufficiently.
The formation of smoke caused by drops of juise and fat can be avoided by pouring 1
or 2 glasses of water the dripping pan.
The grill can also be used to brown, toast bread and grill certain types of fruit, such as
bananas, halved grapefruit, slices of pineapples, etc. Fruit should not be placed too
near the source of heat.
Cooking times
Cooking times cab vary according to the type of food, its consistency and its volume. It
is advisable to watch when cooking for the first time and check results since
conditions, similar results are obtained.
The ‘TABLE OF COOKING TIMES’ relating to cooking in the oven and by grill is
provided as a guid.
Experience will show possible variations to the values set out in the table.
Nevertheles carefully follow the indications given in the receipt you intend to fallow.
ATTENTION: do not place any urensils such as dripping pan, cake tins, casseroles,
Pyrex dishes, aluminium foil or other on the base of the oven when the oven in use. A
stagnation of heat would result which would compromise the results of cooking and
could damage the oven enamel.
Table 3.
Food Temperature C Slide position Gas
Oven
Cooking Time
Minutes
Pastry
Bottom of cake to be gasnishod 200 3 15-20
Butter-milk curd cake 200 2 35-40
Jam cake 200 2 35-40
Leavening dough cakes in moulds
Brioche 200 2 35-40
Beaten mixture cakes in moulds
Black and white flour cake 175 2 60-70
Royal flat bread-cake 175 3 60-70
Margharita cake 175 3 35-40
Small cakes
Pastry 170 3 15-20
Cream puff 200 3 30-40
Lasagne 225 2 40-50
FC-31501 WH FC-22501 WH FC-04501 WH
Pizza 240 2 20-25
Poultry
Duck 1 - 1/2 - 2 kg 200 2 120-180
Goose 3 kg 200 2 150-210
Roast chicken 200 2 60-90
Turkey 5 kg 175 2 230-250
Game
Hare 200 2 60-90
Roe-deer rib 200 2 90-160
Deer haunch 175 2 90-160
Meat (cooking time for every cm of thickness
Long cooking roast meat 175 2 12,-15
Short cooking roast meat 200 2 10,-12
Meat loaf 200 2 30-40
Vegetables
Bolled vegetables flab 200 2 40-45
Fish
Frey muilets 200 2 40-50
Grill
Chops 3 15-20
Sausages 3 20-25
Grilled chicken 3 60-70
Roast veal on the spit 0,6 kg 70-80
Chicken on the spit 60-90
MAINTENANCE
Before each operation discornect the unit.
Cleaning the cooker
Drops of sauce,fruit juice etc., should be remoced as soonas possible with a soft cloth
soaked in warm detergent water. Do not use steelwool or knives to take of layers of
crust. Remove stubborn marks with a well wetted soap impregnated pad, but care
must be taken not to scratch the enamel. Wash the enameled grids with water and
detergent; these can also be washed a dishwasher.
Take off the burner covers and the grids and wash them carefully with warm water and
detergent. Dry them well before putting them back in position.
Moreover make sure that theseare properly re-placed. The burner can be rubbed with
steel wool or a slightly abrasive cloth.
Clean the oven door and crystal cover, in models equipped with these items, only with
warm water, and avoid the use of rough or abrasive substances; in cooker with an
automatic ignition the sparling bulp should be cleaned periodically and accurately to
avoid difficulties in lighting; furthermore check that the burner holes are not obsructed.
Cleaning oven
Clean carefully the oven cavity after use when it is stil warm. In fact at this moment it
is easy to take of deposits of fa tor other subtances such as fruit juice, sugar particles
or fat. You can warm detergent water or one of the appropriate spray oven cleaners.
Do not direct the spray at the mat steel parts as this could damage them and always
follow the manufacturer’s instructions. Clean the oven accessories (grate, grid, plate,
etc.) with warm water and detergent.
Remove possible incrustations with a slightly abrasive powder.
Never line say part of the oven with aliminium foil. It would result in an accumulation of
heat which might damage the cooking resultsand also damage the enamel.

FC-31501 WH FC-22501 WH FC-04501 WH
Periodical control
Periodically check the condition of the flexible pipe of gas connection and make it
replaced by skilled technicians as soon as it show abnormalities. Annual replacement
is recommended.
Have the cooks periodically lubricated by skilled technicians ın case of unusual
working have the range chacked by skilled technicians.
In ranges with cylinder holder, do not use this space to leave a non-connected or an
empty cylinder.
Lid cleaning
All the cooker lids can be disassembled as shown in fig. As regards lids, follow
instruction in (fig 20a, 20b)
Fig 21 a Metal lid Fig 21b Glass lid
After proper cleaning carefully reposition the lid into its hinges.
Cleaning the oven door
For a more complate cleaning of the oven door, it is advisable to disassemble to
disassemble it in the following way .
Fig. 22
Open the door fully, turn the two caps stiuated on the arm of the hinge to 180º,
partially close the door to an angle of 30º, lift the door and extract from the front.
Re-mount the door be reversing the operation described above.

FC-31501 WH FC-22501 WH FC-04501 WH
If the appliance doesn’t work properly check tje following points before asking for service:
The follow of gas seems abnormal
Make sure that:
-The flame speeder holes are not obstructed;
-The pressure regulator is working;
-The bottle valve is completely open.
Gas smell in the room
Make sure that;
-The gas valve is not open
-The gas supply tube is well positioned and good condition; remember to replace
it at last once a year.
Never look for an escape of gas with a match; use instead soapy water.
The oven doesn’t heat
- Make sure that the oven knobs are in the correct working positions.
Cooking time is too long
- Check that the temperature is correct for the type of food to be cooked.
The cooker produces smoke
-We advise tou to clean to oven after use. Splashes of fat can occur during the cooking of meat and, if
the oven isn’t cleaned properly, these produce smoke and bad smell. (see paragraph concerning
cleaning).
If after following all the above check the appliance stil doesn’t work, call your. Nearest service center
given them all the necessary information, such as model and serial number of the appliance.
INSTRUCTIONS FOR THE INSTALLER
The following instructions are meant for a qualified installer, in order that the operations of installing,
regulations and service executed according to the existing regulations.
Whenever changes are mode involving the disconnect of the machine it is necessary to proceed with
maximum caution.
THE MANUFACTURER COMPANY DECLINES ANY RESPONSABILITY FOR POSSIBLE DAMAGES
RESULTING FROM AN INSTALLATION WHICH DOESN’T COMPLY WITH THE RULES IN FORCE
INSTALLATION ENVIRONMENT
Warning-this unit can be installed and can work only in constantly ventilared rooms, according to rules
in force .
In order to make the gas unit work properly, it is necessary that air sufficient to gas combustion can
naturally flow in the (the installer must follow the rulesin force).
The air flow into the room must come directly through openings of external walls. These openings (or
opening) should be realized in such a way not to be obstacle.
Both from inside and outside.
Installation and maintenance must be carried out by qualified technician, in compliancewith rules in
force.
The electric connection must be carried out in compliance with rules EN 60335.our responsibility will
not be involved in case of accidents caused by a defectiveornon existent earthconnection.

FC-31501 WH FC-22501 WH FC-04501 WH
Gas cooking units must discharge combustion products through hoods directly connected to flues or
outside.
LEVELING
The appliance is provided with adjustable small feet placed in the back and frond corners of the base.
By adjusting the small fett .
Fig. 23
it is possible to change the hight of the appliance so as to ensure a beter leveling with other surfaces
and a uniform distribution of the liquids contained in pans or pots.
TABLE 4 .
50*60
50*60
50*60
FC-31501WH
FC-22501WH
FC-04501WH
small burner 0,9kw 0,9kw ,-
0,028 lt/h
0,028 lt/h
,-
middle burner
1,5kw
1,5kw
,-
0,046 lt/h
0,046 lt/h
,-
big burner
1,95kw
,-
,-
0,060 lt/h ,- ,-
lamp
15w
15w
15w
down resistance
1000w
1000w
1000w
up resistance
800w
800w
800w
plate
1000w
1000w
1000w x 2
plate 1500w 1500w x 2

Upute za
uporabu
Samostojeći
štednjaci
HR
BiH
CG
FC-31501 WH
FC-22501 WH
FC-04501 WH
RoHS
2002 / 95 / EC
NNO-1/09
This manual suits for next models
2
Table of contents
Languages:
Popular Cooker manuals by other brands


Hotpoint
Hotpoint CH60EKK Use and Installation Instructions

NEFF
NEFF B4472N0GB instruction manual

Hotpoint
Hotpoint EG1000EX operating instructions

New World
New World NW92TDF3BL instruction manual

Range Master
Range Master Arleston 90 DF User's guide & installation instructions

BigBlue
BigBlue RANGECOOKERS Select 100df Installation instructions and user guide

Favor.it
Favor.it EC 540 SFT user manual

Crock-Pot
Crock-Pot CR026 instruction manual

Range Master
Range Master Nexus 110 Induction User's guide & installation instructions

V-ZUG
V-ZUG EasyCook Combair-Steam SL manual

Range Master
Range Master Classic 90 Gas Installation & user guide

Porter&Charles
Porter&Charles Cooker user manual