Vivax Metrotech VM-880 User manual

Checkout Procedure
1. Hold the unit in a vertical position well away from any
metallic objects. Switch on the unit and check that the
battery is good by looking at the battery icon. Replace the
battery if necessary.
(See Battery Replacement section below)
2. Now momentarily press the auto sensitivity pushbutton.
The sensitivity setting indicator should show maximum. (if
not, find another test site) The display should read less
than one half and the numeric value should be less than 50.
3. Now lower the VM-880 down towards the PK nail.Stop
when the numeric valie increases by approximately 10 and
the speaker pitch increases.The distance from the nail
should be greater than 2" (50mm). This will vary greatly
due to site condition and PK nail tolerance.
4. If the unit fails this test, it should be returned to the factory
or approved service centre as there are no fieldserviceable
parts.
Controls and Indicators
2
1
2
3
4
5
6
9
8
7
10
11
1
2
3
4
5
6
7
8
9
10
11
Power signal warning. Could be a live cable.
Battery level indicator (Flashes when replacement is required)
Indicates polarity of field (+ or - )
Decrease sensitivity
Speaker volume setting
Numeric signal level indicator
Bar graph indicating signal strength
Sensitivity setting indicator
Press to switch on, then short press to change speaker
volume. Long press to switch off.
Increases sensitivity.
Short press auto sensitivity set. Sets sensitivity to 60% meter
deflection
Long press to invert screen when pinpointing
Operation
The VM-880 Ferrous Metal Detector locates only those ferrous
metalsthat attractthe earth’s magnetic fields, such as iron,
nickel, cobalt and their alloys, as well as magnets, such as
magnetic markers.
Utility objects that contain these metals would include PK nails,
marker stakes, valve boxes, cast iron pipe, manhole covers and
large iron tanks. It also locates objects that generate their own
magnetic field, such as magnets. This discriminating feature of
the VM-880 simplifies theoperator’ s search for a specific
magnetic target. The size, shape, depth and orientation of the
target object will define the “profile” or “signature” indicated on
the VM-880 meter.
3
Greater than 2” (50mm)
3. There will also be a “+” or “-” icon on the screen. This indicates
the polarity of the magnetic field which will be explained later.
4. Sweep the area holding the unit such that it is pointing towards
the ground at an angle of about 45 degrees. Walk forward
slowly sweeping left to right and keeping the tip an even and
close distance from the ground.
5. When a ferrous object is approached the bar graph will expand
and the pitch from the speaker will increase. (Set the speaker
volume with a momentary press of the ON/OFF pushbutton)
6. Hold the unit exactly vertical to pinpoint the highest pitch and
largest bar graph deflection. If preferred, invert the screen by a
prolonged press of the auto sensitivity pushbutton. The numeric
value can be used to aid the pinpointing process. Refer to
below picture. Pinpoint in two directions to ensure the exact
location is found.
7. If the signal over ranges, use the
“ + ” and “ - ” keys to bring the signal
back into the range of the bar
graph.
8. Alternatively pressing the auto
sensitivity pushbutton will alter the
gain automatically so that the bar
graph is setto approximately 50%.
4
To Operate the VM-880:
1. To turn on the unit, press the ON/OFF/Speaker pushbutton.
2. The sensitivity of the instrument will automatically set itself
to the last setting.
“Signatures” of Different Targets
The following figures illustrate typical VM-880 responses to
common targets. With a little experimentation you will become
familiar with the “profile” or “signature” of each object you are
trying to locate.

Technical Specifications
Item Parameter
Batteries
Battery Life
Control
Display
Speaker
Weight
Dimensions
Temperature
Construction
Sensitivity
2 x AA (LR6)
Typically 28 hours
4 pushbutton keypad (gain up, gain down,
On/Off/speaker, auto gain/screen invert)
Indicates signal level, battery condition, gain
setting, magnetic field polarity, speaker
volume and power signal proximity
Frequency increases or decreases with
gradient field intensity
1.54lbs (0.7kg)
43” x 2.5” x 2.6” (1090mm x 88mm x 67mm)
Operating:
14º F to +122º F (-10º C to +50º C)
Storage:
-40º F to +140º F (-40º C to +60º C)
Carbon fiber reinforced antenna tube and high
impact thermoplastic injection molded housing
Typically detects small PK Nail to a depth of
6"(15cm)
1
All magnetic fields have a positive or negative polarity. A long bar
for instance will be positive one end and negative the other.
Knowing the polarity of the magnetic field helps identify the shape
and length of the object and helps distinguish it from other objects
in the ground.
The polarity is indicated by the “+” or “-” icon. The polarity of the
field depends on a number of factors. Magnets are polarized
North and South. The polarization of the VM-880 detects depends
on the way the magnet was inserted in the ground. Others are
polarized by the earth’s magnetic field.
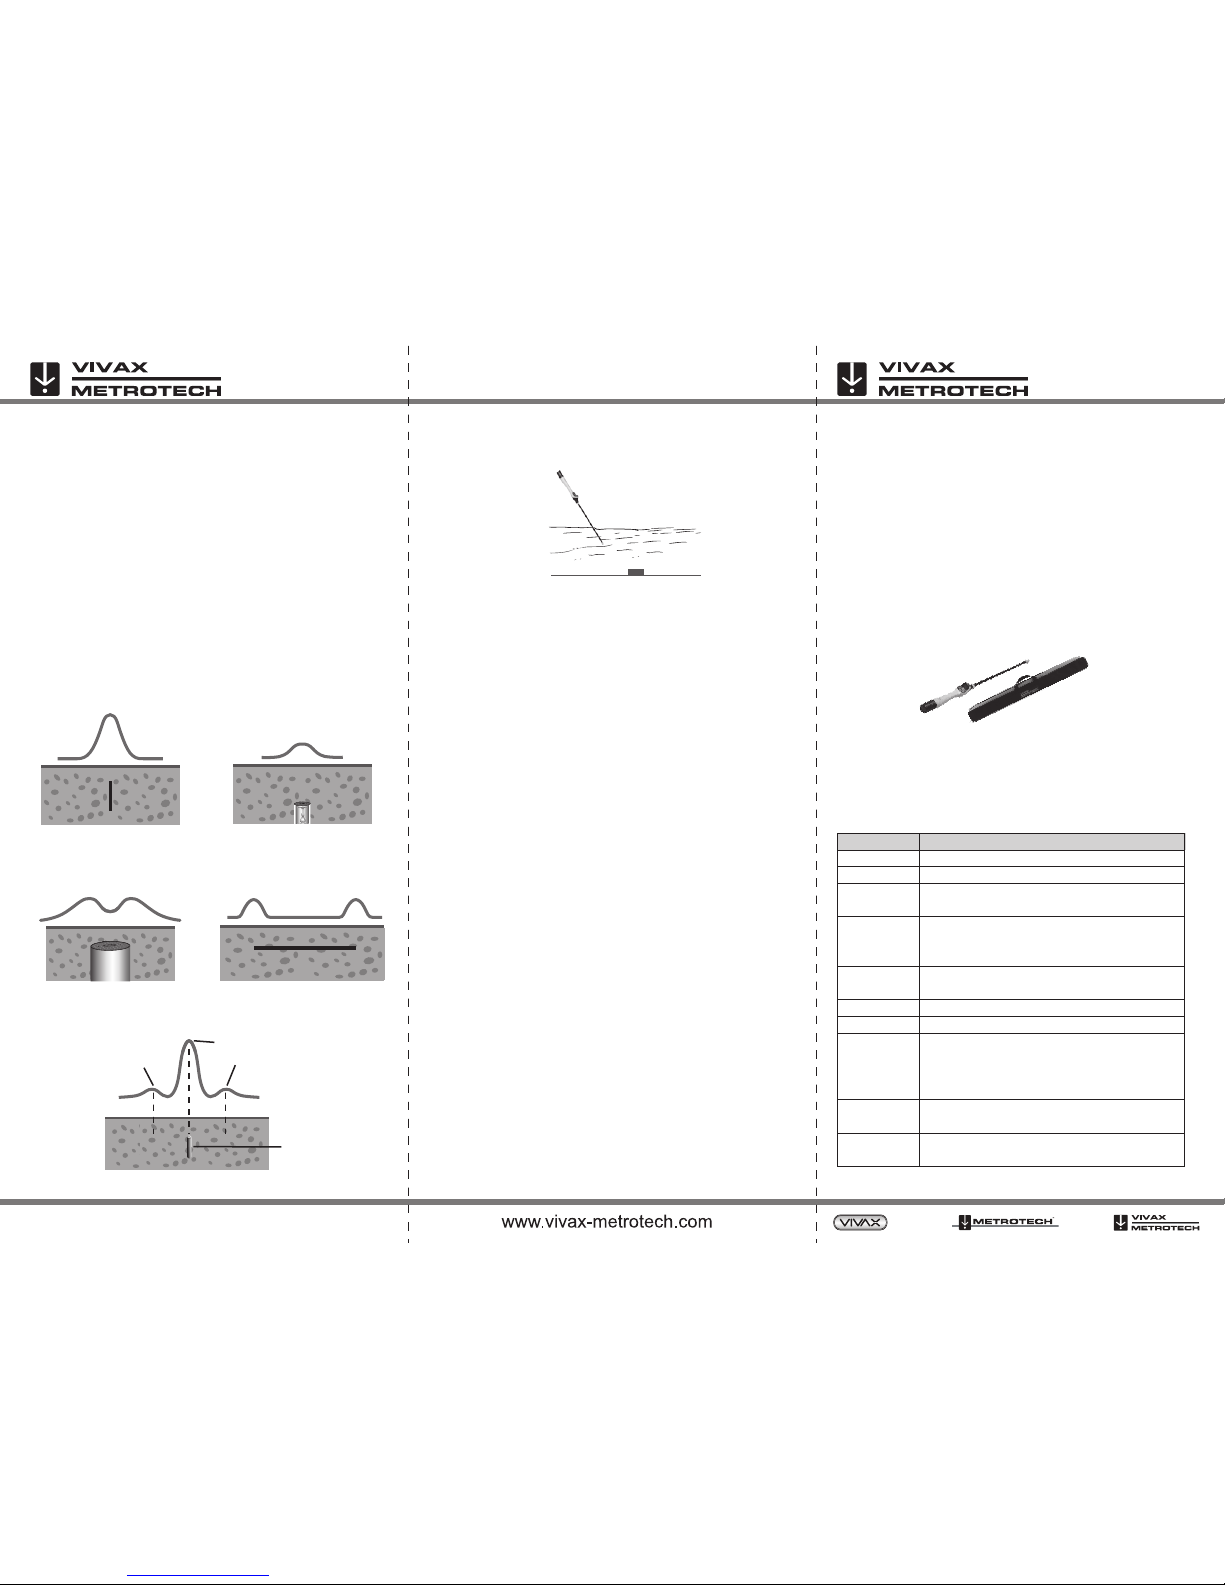
The shape of response depends how big and how deep the object,
larger objects will display a peak at the extremities of the object.
These peaks will be opposite polarity. Smaller or deeper objects will
have just one peak and may have a + or – polarity.
5
Peg
+ (or -) Valve Cover
+ (or -)
Manhole Cover
+ (-) - (+)
Large Manhole or Long Bar
+ (-) - (+)
Very strong magnetic fields may have ghost signals either side of the
main peak signal. Buried magnets, for instance may exhibit this
effect.
6
Ghost Peak
Main Peak
Ghost Peak
Strongly
Magnetized
Locating in Water
The VM-880 has a fully sealed antenna shaft. Therefore it is
suitable for locating in water up to the end of this shaft.
Maintenance
The VM-880 is designed for rugged, outdoor use, but rough
handling should be avoided.Keep the equipment dry, clean and free
of grit. Store the VM-880 in its carrying case and in a cool, dry
place. DO NOT expose to excessive temperatures.
Battery Replacement
The only maintenance requirement for Model VM-880 is to monitor
the condition of the battery and replace the battery when necessary.
To replace the battery follow the steps below:
1. Have ready two 1.5V Alkaline AA (LR6) batteries.
2. Unscrew the end cap on the handle end of the VM-880.
3. Remove and replace both batteries.
4. Slidethe battery holder back into the handle noting the
correct polarity.
5. Replace end cap.
Service Center Information
If the equipment does not function properly, replace the batteries as
described above. If the equipment still have malfunctions, contact one
of the Vivax-Metrotech Customer Service departments, or call the
factory for the nearest authorized Vivax-Metrotech repair station.
Disclaimer: Product and accessory specification and availability information is
subject to change without prior notice.
VM-880 User Guide V1.5
Vivax-Metrotech Corp. (Headquarter)
3251 Olcott Street, Santa Clara, CA 95054, USA
T/Free: +1-800-446-3392
Tel: +1-408-734-1400
Fax: +1-408-734-1415
Email: [email protected]
Website: www.vivax-metrotech.com
Please visit www.vxmt.com for other locations.
P/N: 4.04.000018
VM-880 Introduction
The Vivax-Metrotech Model VM-880 locator is the latest in the
generation of 880 series of highly sensitive and discriminating
instruments designed to locate only buried magnetic (iron and
steel) objects. It rejects those objects that are not magnetic, i.e.
aluminum cans, bottle caps, etc. The “finely tuned” sensitivity of
the VM-880 makes it possible to locate magnetic objects at
greater depths.
The VM-880 is rugged, lightweight, water resistant and compact.
VM-880 Standard Equipment
Standard equipment is listed below and pictured as above.
• VM-880 Ferrous Metal Detector
• Carrying Case
• User Guide
Other manuals for VM-880
1
Other Vivax Metrotech Metal Detector manuals
Popular Metal Detector manuals by other brands

BallistiGlass
BallistiGlass BallistiScan quick start guide

Tesoro
Tesoro Toltec 100 Operator's instruction manual

Bounty Hunter
Bounty Hunter Treasure detector owner's manual

Garrett
Garrett Metal Detector GTI 1500 owner's manual

Zircon
Zircon MetalliScanner m40 user manual

Bosch
Bosch PMD 10 Original instructions