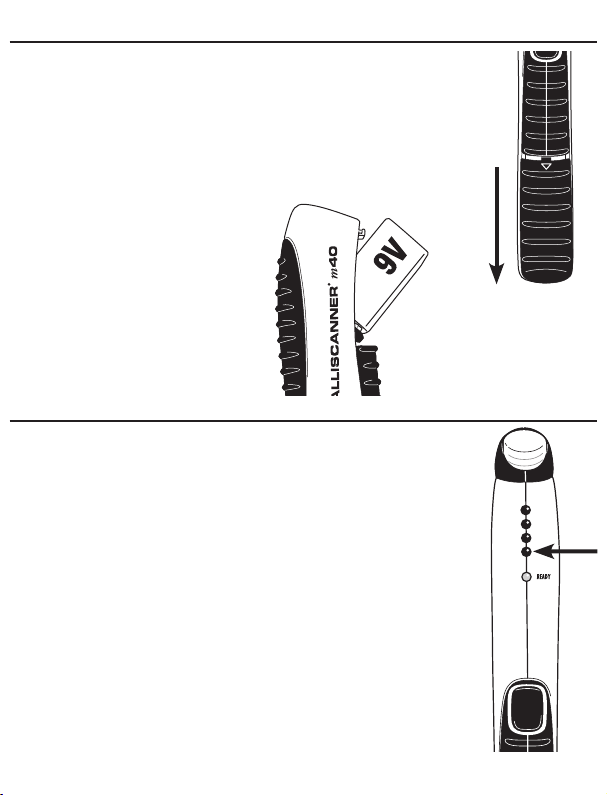
1. INSTALLING THE BATTERY
1. Remove the battery cover located below the power button by pressing in on the arrow
and sliding the cover towards the bottom of the tool.
2. Holding the tool upside down, tilt the battery
out of the cavity.
2. OPERATING TIPS
For optimum scanning results:
1. If the unit indicates metal over a large area, you can refine the scanning area to
more accurately locate the metal target. After scanning the area as indicated above,
mark the edges of the area where you get the strongest metal signal. Starting over
one of the marks, press and hold the power button; this will recalibrate the tool
and decrease the sensitivity. While holding the power button, scan the area again.
The area indicated should become smaller so you can more precisely identify the
metal location. This procedure can be repeated to narrow the field even further.
2. Because the unit uses signal strength to determine position, large, deep objects,
and small, shallow objects will give similar indications.
3. The unit should be turned on in the same orientation that will be used when
scanning. If the tool is twisted or rotated during use, you may get a temporary
indication of metal where none is present. Wait until ONLY the READY light is
on before scanning.
4. MetalliScanner®m40 finds ferrous (magnetic) metal such as 1⁄2 in. (12 mm)
rebar to 4 in. (102 mm) deep and non-ferrous (non-magnetic) metal such as
1⁄2in. (12 mm) copper pipe up to 2 in. (51 mm) deep. Targets found at the
maximum depth may only be indicated by the first red LED on the display.
5. When scanning concrete, the tool will indicate the presence of the metal mesh
that is usually found in driveways and slab foundations, but due to the size
variety of metal mesh, the tool may not indicate the exact location of the wires.
6. Magnetized materials may cause false, unstable indications.
The MetalliScanner®m40 electronic metal detector locates metal through concrete and most nonmetallic materials.
The wide and pinpoint scanning positions allow you to quickly and easily find plumbing, ductwork, rebar, nails,
and screws in your walls, floors, and ceilings. Find studs in lath and plaster walls by locating the row of nails
attaching the wood lath to the studs. MetalliScanner®m40 is also great for scanning reclaimed or recycled lumber
to find hidden metal before sawing and planing.
MetalliScanner®m40
Electronic Metal Detector
MetalliScanner®m40
Electronic Metal Detector
3. WIDE AREA SCANNING
1. Grasp the tool with your thumb over the power button.
2. Hold the tool in the air with the blue sensor parallel
to the scanning surface away from any known metal.
3. Press and hold power button. The READY light
indicates that calibration is complete and you are
ready to search for metal.
4. Move the unit near the surface and scan while
continuing to hold the power button. Do not rotate
the tool, see Tip #3.
5. As you approach a metal object the red LEDs will light progressively
from the bottom up. The closer the illuminated lights get to the top,
the closer you are to a metal object. The illuminated blue sensor and
audio tone indicate a strong target. Small targets or targets deep within
the surface may only illuminate some of the red LEDs and not the blue
sensor or audio tone. In this case, use the highest LED indication to
determine the metal position.
6. Mark the point where you get the highest LED indication, continue scanning,
and mark the point where the LED indication decreases. Halfway between
these points is the logical center of the metal field. To further refine this
position, see Tip #1.
2. PINPOINT SCANNING
1. Grasp the tool with your index finger over power button.
2. Hold the tool in the air with the blue sensor perpendicular to
the scanning surface away from any known metal.
3. Press and hold power button. The READY light indicates that
calibration is complete and you are ready to search for metal.
4. Move the unit near the surface and scan while
continuing to hold the power button. Do not rotate
the tool, see Tip #3.
5. As you approach a metal object the red LEDs will
light progressively from the bottom up. The closer the
illuminated lights get to the top, the closer you are to
a metal object. The illuminated blue sensor and audio
tone indicate a strong target. Small targets or targets
deep within the surface may only illuminate some of
the red LEDs and not the blue sensor or audio tone.
In this case, use the highest LED indication to determine
the metal position.
6. Mark the point where you get the highest LED indication;
continue scanning and mark the point where the LED
indication decreases. Halfway between these points is
the logical center of the metal field. To further refine this
position, see Tip #1.
7. Scan the surface both vertically and horizontally to
pinpoint the metal target location.
3. LOCATING STUDS IN LATH & PLASTER
1. Scan across the wall using the Wide Area Scanning procedure outlined
previously to locate the nails that attach the wood lath to the studs.
2. To help confirm you have found a stud and not a pipe or other metal
object, scan the target area located in Step #1 again, this time using
Pinpoint Scanning, and scan the area vertically. The LEDs may move up
and down on the display, indicating the nail pattern of the small nails
attaching the wood lath to the stud. (In contrast, a pipe or other solid
metal will typically be indicated by a consistent signal.)
3. To help verify your findings, scan your work area thoroughly and
mark the location of every object indicated by the tool. Do not assume
everything is a stud.
• Studs are normally spaced 16 in. (40 cm) or 24 in. (60 cm) apart,
not odd intervals.
• Studs normally run from floor to ceiling, except above and below
windows, and above doors.
• Pipes and other large metal objects will give a consistent, strong
signal in either scanning mode. The nails in a stud will likely show
some variance in the strength of the signal.
• Be aware of walls that are likely to contain plumbing. For example,
a living room wall may be common to a bathroom and contain
plumbing for the sink, shower, or toilet.
Visit www.zircon.com for the most current instructions.
MetalliScanner and Zircon are registered trademarks or trademarks of Zircon Corporation.
Tip #4
Tip #4
READY Light
READY Light
EN
EN
Battery Cover
Battery Cover
Power Button
Power Button
LED Display (both sides)
LED Display (both sides)
Blue Sensor (Wide Area)
Blue Sensor (Wide Area)
Blue Sensor
(Pinpoint)
Blue Sensor
(Pinpoint)
ZirconCorporation ZirconTV
ZirconTools
|
ZirconToolPro ZirconTools
Model: m40
9 Vcc 33 mA
Requires
One 9 Vcc Battery (Included)
Manufacturer: ZIRCON DE MÉXICO, S.A. DE C.V.
AV. ITURBIDE # 424, COL. OBRERA, C.P. 22830, ENSENADA, BAJA CALIFORNIA
Tel.: 01 (800) 788-0233
Please read and follow these instructions prior to using the tool.
© 2017 Zircon Corporation • P/N 68717 • Rev B 04/17
Visit www.zircon.com for the most current instructions.
MetalliScanner and Zircon are registered trademarks or trademarks of Zircon Corporation.
ZirconCorporation ZirconTV
ZirconTools
|
ZirconToolPro ZirconTools
Model: m40
9 Vcc 33 mA
Requires
One 9 Vcc Battery (Included)
Manufacturer: ZIRCON DE MÉXICO, S.A. DE C.V.
AV. ITURBIDE # 424, COL. OBRERA, C.P. 22830, ENSENADA, BAJA CALIFORNIA
Tel.: 01 (800) 788-0233
Please read and follow these instructions prior to using the tool.
© 2017 Zircon Corporation • P/N 68717 • Rev B 04/17