Vivitar 500MR F/6.3 User manual

V-500MR
INSTRUCTION MANUAL
500mm Mirror Lens


Limited Five Year Warranty
-1-
Vivitar warrants this quality product to be free of defects in material and workmanship for a
period of five yearsfrom the date of purchase. During the period,Vivitar will repair or replace the
product at no charge for parts or labor.
TIME PERIOD OF THIS WARRANTY
The time period of this warranty starts from the date of the original purchase and expires on the
fifth anniversary date of purchase.
WHAT IS NOT COVERED BY THIS WARRANTY
No express or implied warranty is made for any defects in this product which result from
accident, abuse, misuse, failure to operate the product in accordance with relevant instructions,
neglect, immersion in or exposure to chemicals or liquids, extremes of climate, fungus, excessive
wear and tear/cosmetic damage and defects resulting from other extraneous causes such as
unauthorised disassembly, repair or modification.
This warranty shall not extend to any incidental or consequential damages arising from the
purchase, use or inability to use this product even if Vivitar has been advised of such damages.
The laws of some countries and some States thereof do not allow the limitation of incidental or
consequential damages, so the above limitation or exclusion may apply to you.

WHAT TO DO WHEN SERVICE IS NEEDED
-2-
TECHNICAL SUPPORT
support team members will answer your questions. For phone support in the US please call 1-800-592-9541, in the
UK call 0800 917 4831. If you would like to call from anywhere else, please visit www.vivitar.com for your local toll
free number.
STEP 1. Package the product and relevant accessories carefully, using ample padding materials and a sturdy
mailing container to prevent damage in transit.
STEP 2. Include in package:
a) Evidence of date and place of original purchase (for example, a copy of your sales receipt).
b) Detailed description of your problem.
c) When possible, a sample evidencing the problem.
STEP 3. Return item (insured) to: (in the U.S.):
Vivitar
Attn: Technical Support
195 Carter Drive
Edison NJ 08817
When service is complete, the product will be returned to you shipping prepaid. In the event the product is
deemed to be not faulty or the defect is a result in wear and tear, Vivitar may levy a handling charge for the
from country and State to State thereof. For more information visit our website www.vivitar.com
(in the U.K.)
Sakar UK
2D Siskin Parkway East
CV3 4PE, UK

-3-
500mm Mirror Lens
1
1
2
3
4
2
3
4
Focus Ring
Distance Scale
Index for Distance
Macro Ratio

-4-
Specications
Filter Size
Minimum Focus Distance
Magnication
Zoom/Focus Control
Angle of View
Groups/Elements
Lens Coating
Length
Maximum Diameter
Weight
Rear-mounted screw-in 30.5mm
5.6' (1.7 m)
1:3
Not Applicable
5 Degrees
6/6
Multicoated
3.4" (8.6 cm)
3.0" (7.6 cm)
0.79 lb (360 g)
:
:
:
:
:
:
:
:
:
:

-5-
Your new Catadioptric or Reex mirror lens is a highly developed, computer designed product which uses
the merits of both reex optics and refraction optics. This gives you very sharp picture quality with less color
aberration, which is considered the most harmful factor in the eld of telephoto photography.
1. Required T-Mount
A proper T-Mount adapter should be threaded onto the back of your lens in order to attach your lens to your
camera.
2. Mounting Your Lens to Your Camera
The T-Mount is similar in design to the mount of standard lenses designed for your camera, and is coupled
and removed in the same manner.
3. Focusing the Lens
Focusing is accomplished while viewing the subject through the viewnder of your camera and rotating the
focusing ring. Since the aperture is preset, you will nd under certain light conditions a shadow appearance
on the split-image section of your focusing screen. In this case, simply focus on the edges of your subject
with the outer center of your prism.

-6-
NOTE: In order to compensate focusing when normal positioning may be altered due to extreme
temperature change, the focusing ring has been designed to allow rotation beyond the xed
marks of the distance scale. To avoid mistakes, always focus while looking through the viewnder.
NOTE: No adjustments in focusing are necessary when taking infrared photography as required
with normal lenses.
4. Light and Contrast Control
Since the reex lens is not equipped with a diaphragm system, the use of lters plays an important factor in
the control of light and contrast.
5. Filters
Normal (IA Skylight): This lter should be used when no other lters are necessary.
ND 2X & ND 4X (Neutral Density): These lters control the passage of light since no diaphragm
is provided in the lens. Exposure factor is 4X with a ND4X, so that the light intake through the
lens is decreased as if a similar lens were stopped-down by 2 stops. Note that ND lters reduce
light passage only, while the depth of eld is not changed.

-7-
Y52 (Yellow): This lter is used when taking black and white pictures. It also makes a blue
background darker. It is quite eective when taking shots of clouds on a blue horizon.
056 (Orange): This lter makes blue or green color lines darker and yellow or red color lines
lighter than they seem to the human eye. It is most eective when stronger contrasts are desired.
R60 (Red): This lter is used to make daytime scenery appear as night time scenery, or to
emphasize and strengthen contrast. It is also necessary when taking infrared black and white
exposures.
NOTE: If the subject being photographed shows too much light or seems overexposed when
measured by a meter or as indicated by an LED warning signal of the camera, then adjustment
of the light intake can be controlled by using one of the ND lters. When using an R60 lter
with an aperture preferred camera, an aperture adjustment of +0.5 to +1.0 is required.

-8-
6. Exposure or Aperture Adjustments with TTL Cameras
Since the aperture of the reex lens cannot be changed, the exposure is controlled entirely by the
shutter speed being used. The speed dial is set according to your TTL reading. Cameras with
automatic aperture and shutter priority will automatically set the right speed with their auto
exposure mechanisms, with the exception of a few models which require manual function.
With aperture priority or manual operation of your camera, the apropriate shutter speed must be
adjusted using three neutral density lters in case of over exposure readings or if the camera’s
LED warning light is activated. If your camera has a manual TTL system, then simply follow the exposure
indicator in the viewnder by compensating with the shutter speed. If there is excessive light beyond the
shutter speed capability, then attach a Neutral Density lter to reduce the overall passage of light.
7. Exposure or Aperture Adjustments on Cameras Without a TTL System
When using a camera with no TTL system and only a normal lter, the exposure must be stopped
down as indicated by the table on the following page to the shutter speed adusted as indicated
by an exposure meter reading. So, for example, with a 300mm f5.6 reex lens, the setting would
be f5.6. If a Y52 lter is used in daylight, the stop down would be 1. Also, if the appropriate
shutter speed is metered as 1/1000 seconds using a single exposure meter with an f stop of 5.6,
then the shutter speed setting would be 1/500 seconds.

-9-
Filter UItilization Chart (Exposure Adjustment)
Kind of Filter Color Exposure Shutter Stop Down Exposure Shutter Stop Down
Normal Clear 1 No Adjustment 1 No Adjustment
Y52 Yellow 2 1 1.5 1/2
056 Orange 2 1 1.5 1/2
R60 Red 6 2 4 2
ND2X Gray 2 1 2 1
ND4X Gray 4 2 4 2
ND6X Gray 8 3 8 3
Under Daylight Under Tungsten Light

-10-
NOTE: Generally, if a 1/2 shutter speed adjustment is indicated to negative lm, a full stop should be taken.
When a reversal lm is being used, disregard the half-stop setting and use a normal shutter speed.
8. Depth of Field
The area in acceptable sharpness in front of, and behind the subject in focus is called the depth of eld. The
aperture selected and the distance of the subject as well as the focal length of a lens determines the depth of
eld. Because of the long focal length of your lens, the depth of eld is narrow. For example, with a 500mm f
6.3 lens, at a distance of 6 feet, the depth of eld is only 1/2 inch wide. It is recommended that you practice
focusing with your lens before taking any serious pictures, especially in close up photography. Also, we
recommend using a focus magnier to help determine the depth of eld sharpness under extreme
conditions.

-11-
9. Cleaning and Maintenance Tips
A. The lens should always be capped when not in use. Only wipe with cleaning papers or
cloth specically made for optics.
B. Accumulated dust should be blown o with a syringe or blower brush specically designed
for this purpose. To remove ngerprints or smears, shred the end of a lens tissue and roll it to
make a swab: dampen it with a lens cleanerspecially made for photographic optics and gently
wipe the surface without applying too much pressure. If necessary, repeat using a new swab.
To clean, start at the center of the lens using a circular motion and working to the edge of the
lens for best results.
C. When the lens is not in use, it should be stored in a cool dry place, or if not possible, then in
a leather case with a silica gel packet, or aluminum case with polyfoam liner.
YOUR LENS IS A HIGHLY COMPLEX PRECISION OPTICAL INSTRUMENT. IT IS INDIVIDUALLY ASSEMBLED
BY SKILLED CRAFTSMEN. WITH PROPER CARE AND MAINTENANCE IT SHOULD GIVE YOU YEARS OF
SATISFYING AND ENJOYABLE PHOTOGRAPHIC RESULTS.


This manual suits for next models
2
Table of contents
Other Vivitar Lens manuals

Vivitar
Vivitar Automatic Fixed Mount Lens 55mm f2.8 Macro User manual

Vivitar
Vivitar 650-1300mm Telephoto Zoom Lens User manual

Vivitar
Vivitar 500mm Preset User manual

Vivitar
Vivitar 7MM-C User manual

Vivitar
Vivitar 7MM-P User manual

Vivitar
Vivitar 37W-72W User manual

Vivitar
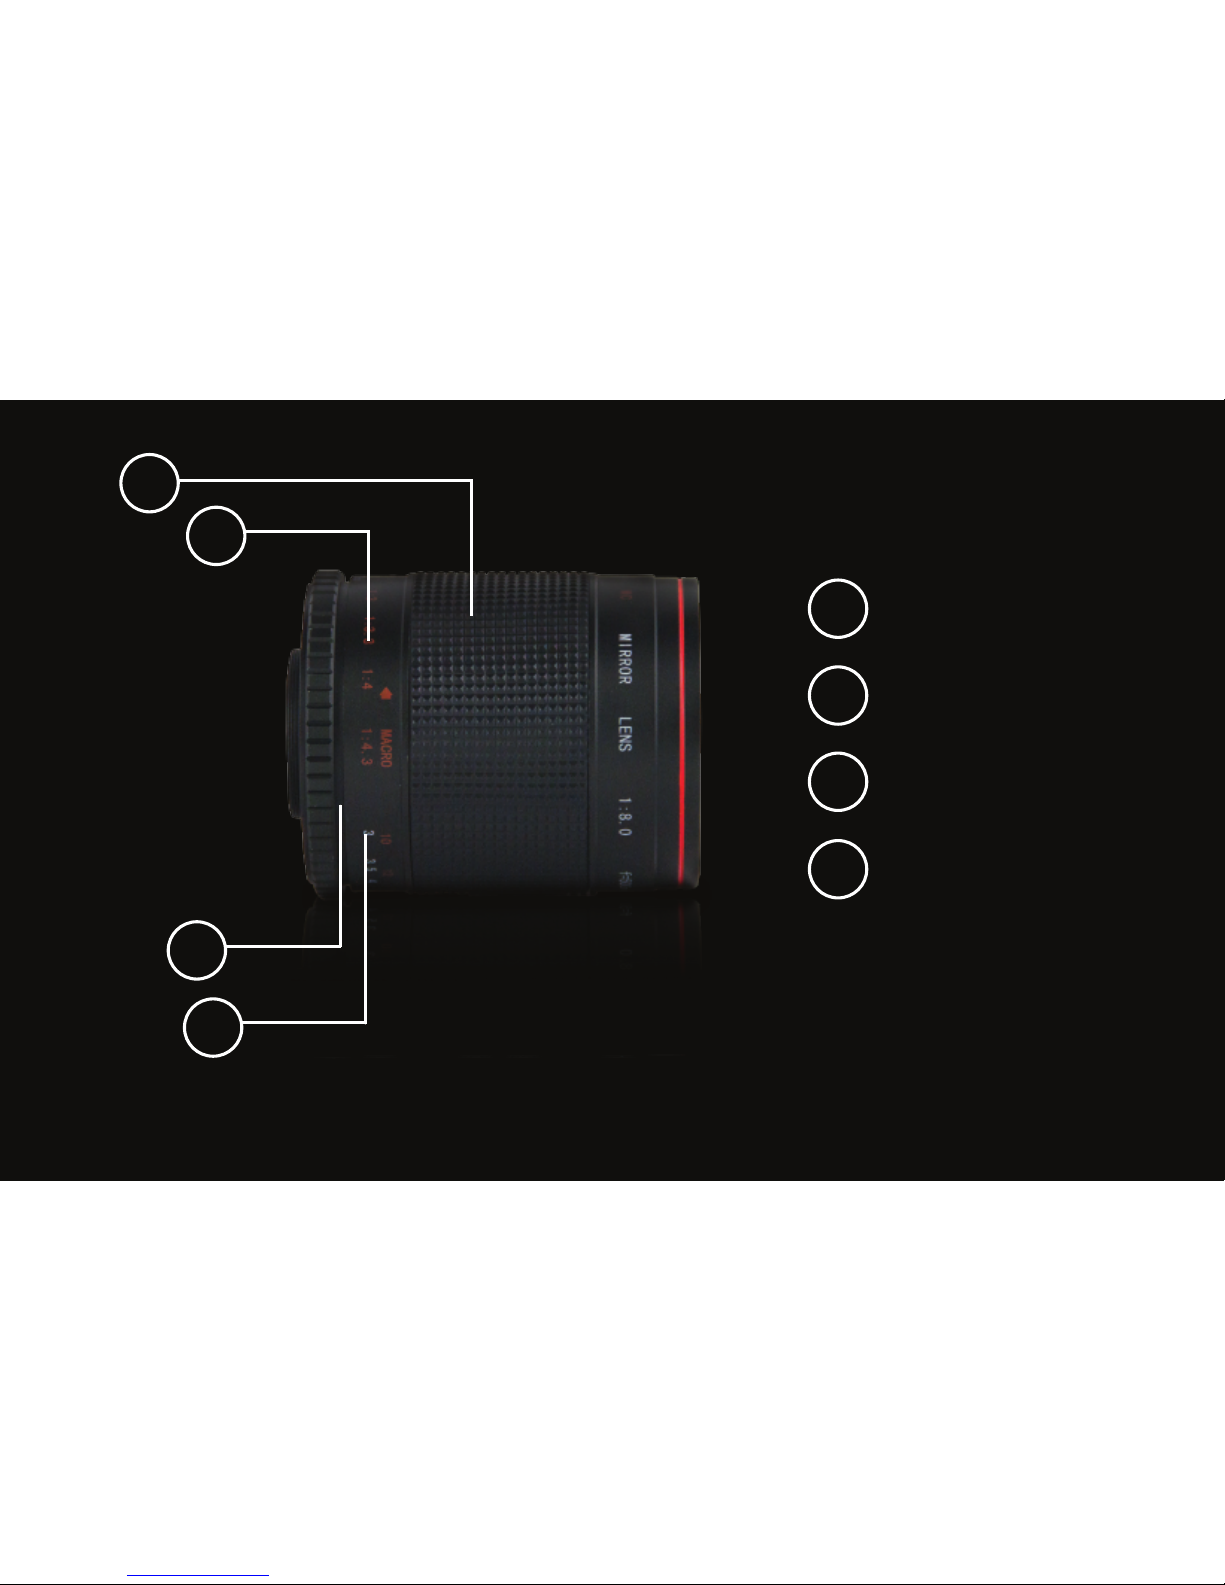
Vivitar 800MR F/8 User manual

Vivitar
Vivitar 7MM-N User manual