Vivitek NovoDS DS310 User manual
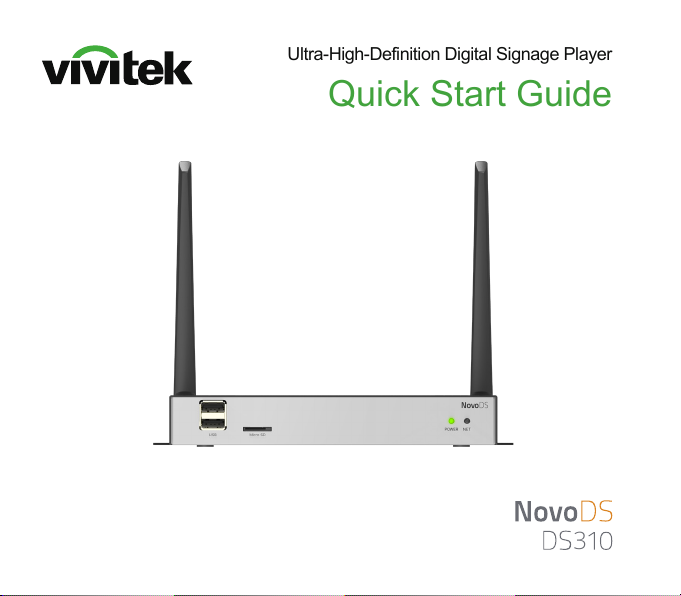
Ultra-High-Definition Digital Signage Player
Quick Start Guide
3

EN-1
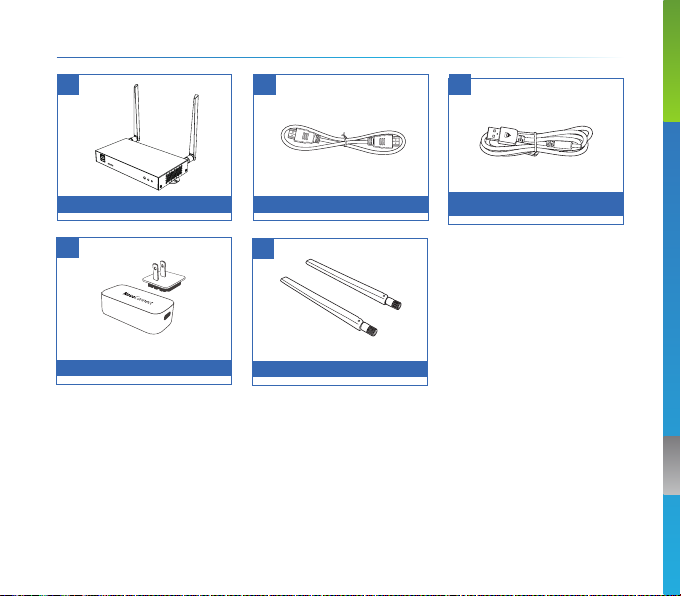
NovoDS310
Antenna
HDMI-to-HDMI Cable
USB Power Adapter
1
5
2
4
PACKAGE CONTENTS
USB-to-DC-in Power Cable
3

EN-2
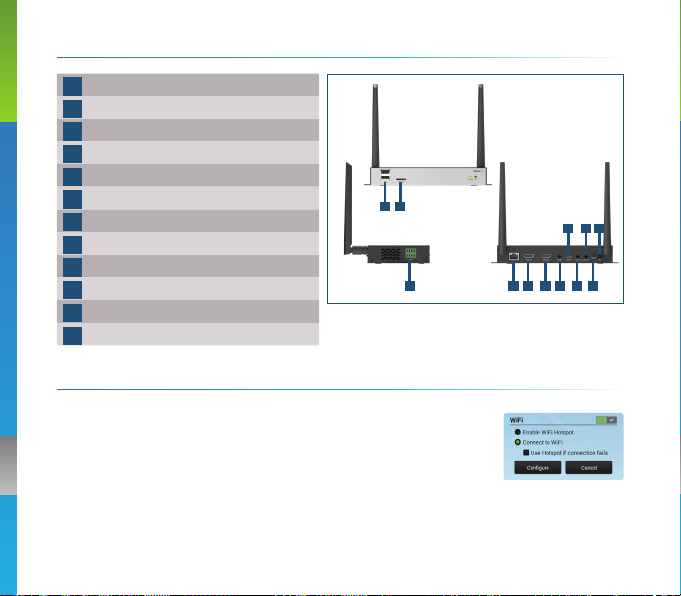
NovoDS310 OVERVIEW
1Port USB-A
2Micro SD Card Slot
3RJ45 (Ethernet)
4HDMI IN
5HDMI OUT
6RS232
7Port Type-C
8AUDIO IN
9AUDIO OUT
10 RESET
11 DC Jack
12 GPIO
1 2
7119
312 45 6 8 10
NETWORK CONNECTION
• Wi-Fi
Click button Network in home-screen’s menu, and select
Connect to Wi-Fi
• Ethernet
Plug in an Ethernet cable to the RJ45 port
Note: If Ethernet is connected, WiFi connection will be disabled automatically.

EN-3
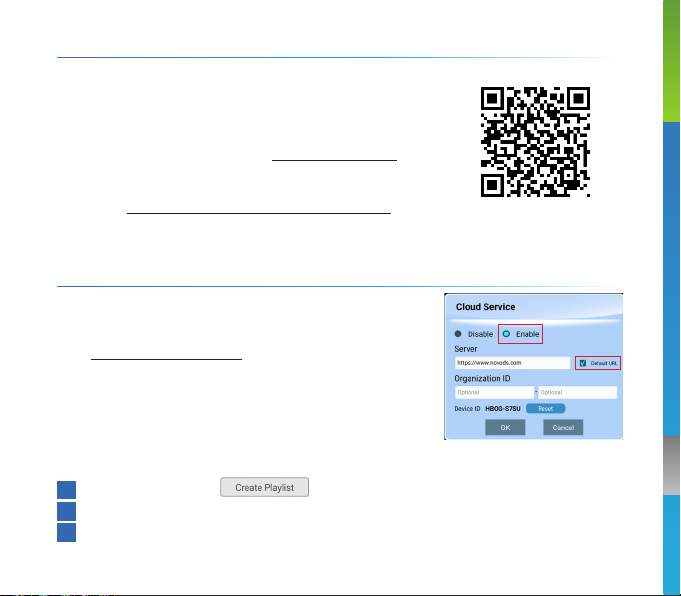
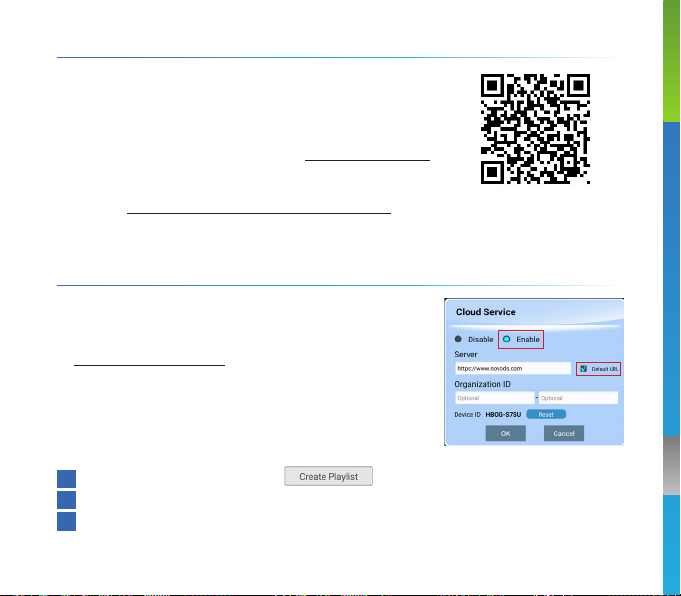
(1) Enable cloud service on DS310
(2) Sign up/Sign in
• https://www.novods.com
(3) Register devices on the Cloud
• Click Register Devices in menu Quick Actions
(4) Create and Publish Playlists
1Click button
2Add widgets
3Click Save and Publish
Two ways to create and play signage
content
• NovoDS Cloud
¾Free to sign up - www.novods.com
• NovoDS Studio (Windows/MacOS)
¾www.novods.com/resources/software
Cloud Service and Studio Software
NovoDS Cloud
Scan the QR code for
more information
EN-4
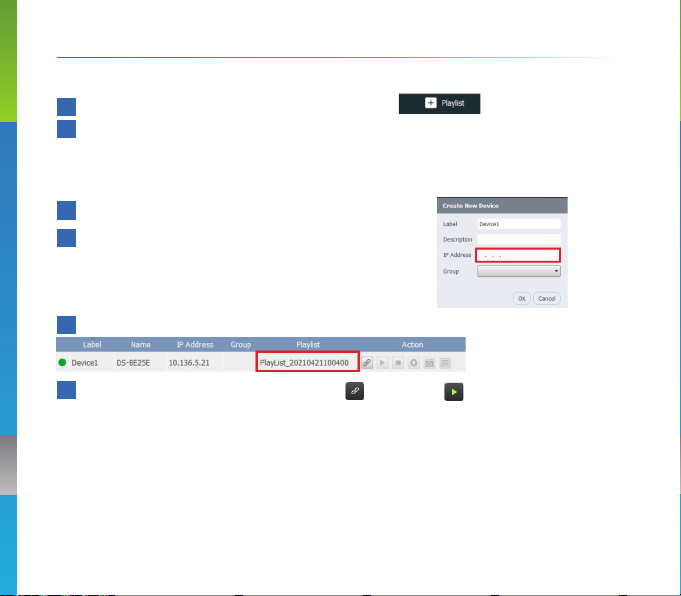
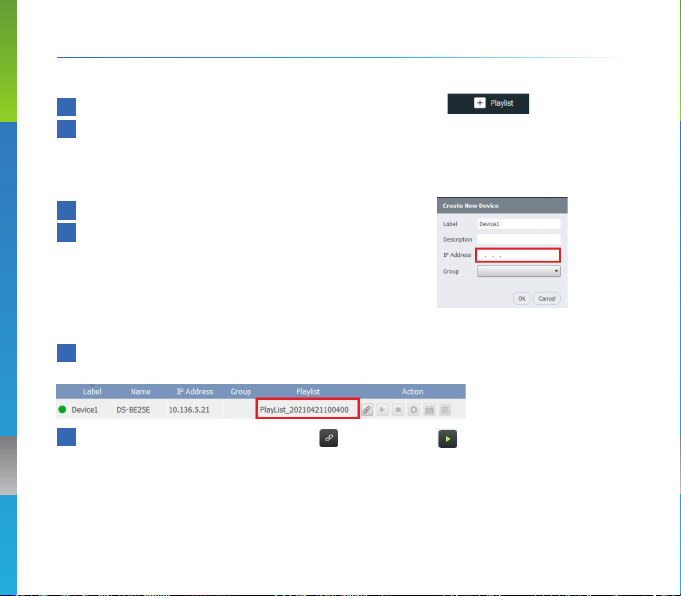
(1) Create Playlists
1Click button + Playlist
2Add widgets and populate appropriate information
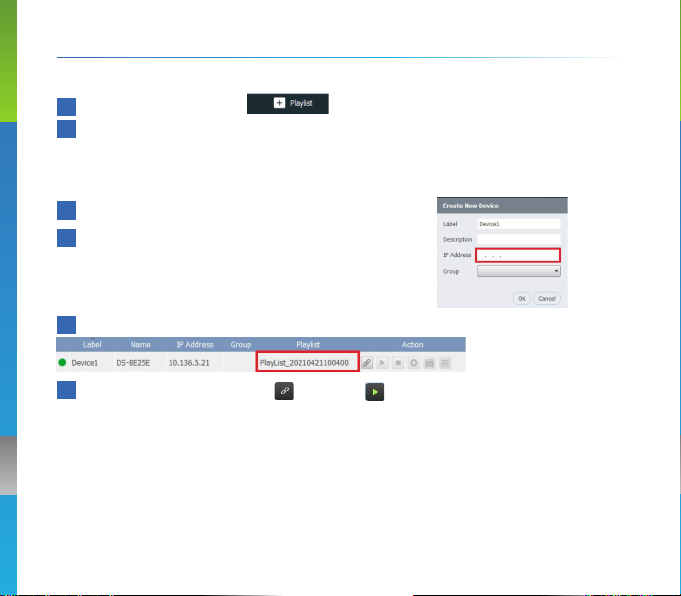
(2) Add Devices
1Click button + Device
2Enter the IP address shown on the display
(3) Publish Playlists
1Select the desired playlist from the device’s drop-down menu
2Click the “Connect” button and Play
NovoDS Studio
Note:
1. Make sure your computer is in the same network as your NovoDS devices.
2. Cloud Service on your device must be disabled.
FR-1
CONTENU DE L'EMBALLAGE
NovoDS310
Antenne
Câble HDMI vers HDMI
Adaptateur secteur USB
1
5
2
4
Câble d'alimentation USB vers
entrée CC
3

FR-2
PRÉSENTATION de NovoDS310
1 2
7119
312 45 6 8 10
1Port USB-A
2Logement pour carte microSD
3RJ45 (Ethernet)
4ENTRÉE HDMI
5SORTIE HDMI
6RS232
7Port Type-C
8ENTRÉE AUDIO
9SORTIE AUDIO
10 RÉINITIALISATION
11 Prise CC
12 GPIO
CONNEXION RÉSEAU
• Wi-Fi
Cliquez sur le bouton Network (Réseau) dans le menu
de l’écran d’accueil et sélectionnez Connect to Wi-Fi (Se
connecter au Wi-Fi)
• Ethernet
Branchez un câble Ethernet sur le port RJ45
Remarque : Si Ethernet est connecté, la connexion Wi-Fi sera automatiquement
désactivée.
FR-3
(1) Activer le service cloud sur DS310
(2) S’inscrire/Se connecter
• https://www.novods.com
(3) Enregistrer les appareils sur le Cloud
• Cliquez sur Register Devices (Enregistrer les
appareils) dans le menu Quick Actions (Actions
rapides)
(4) Créer et publier des Playlists
1Cliquez sur le bouton
2Ajouter des widgets
3Cliquez sur Save (Enregistrer) et Publish (Publier)
Deux façons de créer et de lire du
contenu de signalisation
• NovoDS Cloud
¾Inscription gratuite - www.novods.com
• NovoDS Studio (Windows/MacOS)
¾www.novods.com/resources/software
Service Cloud et logiciel Studio
NovoDS Cloud
Scannez le code QR
pour plus d’informations
FR-4
(1) Créer des Playlists
1Cliquez sur le bouton + Playlist (+ Playlist)
2Ajoutez des widgets et renseignez les informations appropriées
(2) Ajouter des appareils
1Cliquez sur le bouton + Device (+ Appareil)
2Entrez l’adresse IP affichée à l’écran
(3) Publier des Playlists
1Sélectionnez la playlist souhaitée dans le menu déroulant de l’appareil
2Cliquez sur le bouton « Connecter » et Lecture
NovoDS Studio
Remarque :
1. Assurez-vous que votre ordinateur se trouve dans le même réseau que vos appareils
NovoDS.
2. Le Cloud Service (Service Cloud) doit être désactivé sur votre appareil.

DE-1
LIEFERUMFANG
NovoDS310
Antenne
HDMI-auf-HDMI Kabel
USB-Netzadapter
1
5
2
4
USB-auf-DC-in Stromkabel
3

DE-2
NovoDS310 ÜBERSICHT
1Anschluss USB-A
2MicroSD Karteneinschub
3RJ45 (Ethernet)
4HDMI EINGANG
5HDMI AUSGANG
6RS232
7Anschluss Typ-C
8AUDIO EINGANG
9AUDIO AUSGANG
10 RESET
11 DC Buchse
12 GPIO
1 2
7119
312 45 6 8 10
NETZWERKVERBINDUNG
• WLAN
Klicken Sie im Menü des Startbildschirms auf die
Schaltfläche Network (Netzwerk) und wählen Sie
Connect to Wi-Fi (Mit WLAN verbinden)
• Ethernet
Schließen Sie ein Ethernet-Kabel an den RJ45-Anschluss an
Hinweis: Wenn Ethernet angeschlossen ist, wird die WLAN Verbindung automatisch
deaktiviert..
DE-3
(1) Cloud-Dienst auf DS310 aktivieren
(2) Registrieren/Anmelden
• https://www.novods.com
(3) Registrieren Sie Geräte in der Cloud
• Klicken Sie auf Register Devices (Geräte registrieren)
im Quick Actions (Schnellaktionen) Menü
(4) Erstellen und veröffentlichen Sie Playlists
1Klicken Sie auf die Schaltfläche
2Widgets hinzufügen
3Klicken Sie auf Save (Speichern) und Publish (Veröffentlichen)
Zwei Möglichkeiten zur Erstellung und
Wiedergabe von Signage Inhalten
• NovoDS Cloud
¾Kostenlose Anmeldung - www.novods.com
• NovoDS Studio (Windows/MacOS)
¾www.novods.com/resources/software
Cloud-Dienst und Studio Software
NovoDS Cloud
Scannen Sie den QR
Code, um weitere
Informationen zu erhalten

DE-4
(1) Playlists erstellen
1Klicken Sie auf die Schaltfläche + Playlist (+ Playlist)
2Fügen Sie Widgets hinzu und geben Sie die entsprechenden Informationen
ein
(2) Geräte hinzufügen
1Klicken Sie auf die Schaltfläche + Device (+
Gerät)
2Geben Sie die auf dem Display angezeigte IP-
Adresse ein
(3) Playlists veröffentlichen
1Wählen Sie die gewünschte Playlist aus dem Dropdown-Menü des Geräts
2Klicken Sie auf die „Verbinden“ Schaltfläche und Wiedergabe
NovoDS Studio
Hinweis:
1. Stellen Sie sicher, dass sich Ihr Computer im selben Netzwerk befindet wie Ihre NovoDS
Geräte.
2. Cloud Service (Cloud-Dienst) auf Ihrem Gerät muss deaktiviert sein.

ES-1
CONTENIDO DEL PAQUETE
NovoDS310
Antena
Cable HDMI a HDMI
Adaptador de corriente USB
1
5
2
4
Cable de alimentación USB a
entrada DC
3

ES-2
VISTA GENERAL DE NovoDS310
1 2
7119
312 45 6 8 10
1Puerto USB-A
2Ranura para tarjetas MicroSD
3RJ45 (Ethernet)
4ENTRADA HDMI
5SALIDA HDMI
6RS232
7Puerto Tipo-C
8ENTRADA DE AUDIO
9SALIDA DE AUDIO
10 RESTABLECER
11 Toma de CC
12 GPIO
CONEXIÓN DE RED
• Wi-Fi
Haga clic en el botón Network (Red) en el menú de
la pantalla de inicio, y seleccione Connect to Wi-Fi
(Conectar a Wi-Fi)
• Ethernet
Enchufe un cable Ethernet en el puerto RJ45
Nota: Si Ethernet está conectado, la conexión Wi-Fi será desactivada automáticamente.

ES-3
(1) Habilitar servicio en la nube en DS310
(2) Registrarse/Iniciar sesión
• https://www.novods.com
(3) Registrar dispositivos en la Nube
• Haga clic en Register Devices (Registrar dispositivos)
en el menú Quick Actions (Acciones rápidas)
(4) Crear y publicar listas de reproducción
1Hacer clic en el botón
2Añadir widgets
3Haga clic en Save (Guardar) y Publish (Publicar)
Dos maneras de crear y reproducir
contenido de señalización
• NovoDS Cloud
¾Registro gratuito - www.novods.com
• NovoDS Studio (Windows/MacOS)
¾www.novods.com/resources/software
Cloud Service y Studio Software
NovoDS Cloud
Escanee el código QR
para más información
ES-4
(1) Crear listas de reproducción
1Haga clic en + Playlist (+ Lista de reproducción)
2Añadir widgets y proporcionar información apropiada
(2) Añadir dispositivos
1Haga clic en + Device (+ Dispositivo)
2Introduzca la dirección IP mostrada en la
pantalla
(3) Publicar listas de reproducción
1Seleccione la lista de reproducción deseada del menú desplegable del
dispositivo
2Haga clic en el botón “Conectar” y Reproducir
NovoDS Studio
Nota:
1. Asegúrese de que el ordenador está en la misma red que sus dispositivos NovoDS.
2. Cloud Service (Servicio en la nube) de su dispositivo debe estar deshabilitado.

RU-1
КОМПЛЕКТ ПОСТАВКИ
NovoDS310
Антенна
Кабель HDMI—HDMI
USB-адаптер питания
1
5
2
4
Кабель питания USB-DC
3
RU-2
ОБЗОР СИСТЕМЫ NovoDS310
1Порт USB-A
2Гнездо карты MicroSD
3Порт RJ45 (Ethernet)
4Вход HDMI
5Выход HDMI
6RS232
7Порт типа-С
8Вход AUDIO
9Выход AUDIO
10 СБРОС
11 Питание (пост.т.)
12 GPIO
1 2
7119
312 45 6 8 10
ПОДКЛЮЧЕНИЕ К СЕТИ
• Wi-Fi
На главном экране нажмите кнопку Network (Сеть) и
выберите Connect to Wi-Fi (Подключение к Wi-Fi)
• Сеть Ethernet
Подсоедините кабель Ethernet к порту RJ45
Примечание: Если подключена сеть Ethernet, соединение Wi-Fi автоматически
отключается.

RU-3
(1) Включите облачный сервис на DS310
(2) Регистрация/Вход
• https://www.novods.com
(3) Регистрация устройств в облаке
• Нажмите Register Devices (Регистрация устройств) в
меню Quick Actions (Быстрые действия)
(4) Создание и публикация плейлистов
1 Нажмите кнопку
2 Добавьте виджеты
3 Нажмите Save (Сохранить), а затем Publish (Опубликовать)
Два способа создания и воспроизведения
контента на цифровой панели
• NovoDS Cloud
¾Бесплатная регистрация – www.novods.com
• NovoDS Studio (Windows/MacOS)
¾www.novods.com/resources/software
Программы Облачный сервис и Studio
NovoDS Cloud
Отсканируйте QR-
код для получения
дополнительных
сведений
Other manuals for NovoDS DS310
1
Table of contents
Languages:
Other Vivitek Media Player manuals


