VIVO HOME VH835 User manual
Instruction Manual
Ice Maker & Shaver ZBS-20A
Thank you for choosing our ice maker
Please read this Instruction Manual carefully before using this product so as to ensure proper use.
After reading this manual, please keep it in a safe place and refer to it when necessary.
USER'S MANUAL
SKU:VH835
2 in 1 Countertop
Ice Maker & Shaver Machine
Instruction Manual
Ice Maker & Shaver ZBS-20A
Thank you for choosing our ice maker
Please read this Instruction Manual carefully before using this product so as to ensure proper use.
After reading this manual, please keep it in a safe place and refer to it when necessary.
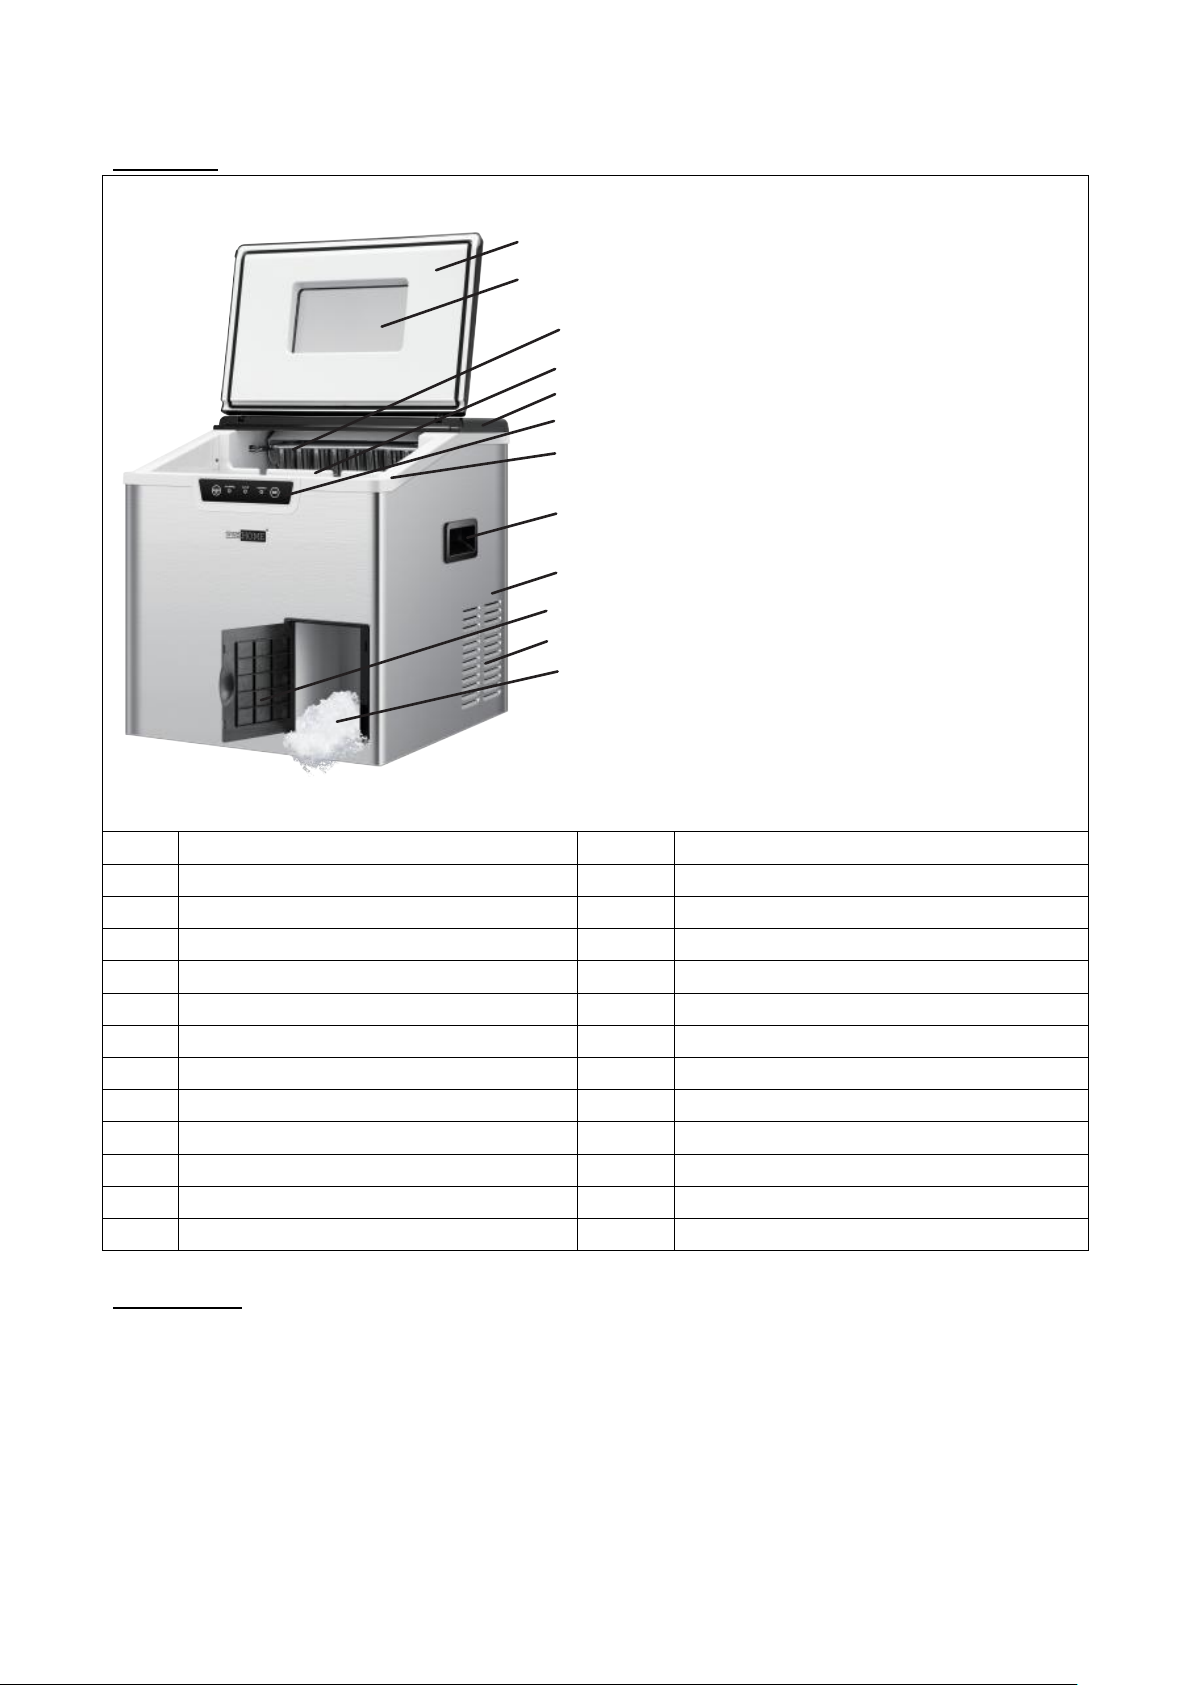
Description
1
Front top lid
14
Ice full sensor
2
Viewing window
15
Water buoy
3 Evaporator 16 Water suction hole
4 Ice basket 17 Drain plug
5 Back top lid 18 Max water filling line
6 Control Panel 19 Back cover
7 Middle Frame 20 Water Inlet Hole
8 Handle 21 Shaved ice bowl
9
Housing
22
Shaving paddle
10
Decoration door
23
Knife
11
Fan Cover
24
Bowl cap
12
Shaved ice outlet
25
Power Cord and Plug
13 Ice shovel
Specifications
Daily Ice Output:15-20kg/24h
Ice Storage Capacity:3kgs
Water Reservoir Capacity:3L
Refrigerant:R600a / R290
Ice Shape:Bullet
Dimension:378*398*420mm
Before/First Use of Your Ice Maker
1.During transportation, the incline angle of the cabinet should not be over 45°. Do not turn the ice
maker upside-down, as this may damage the compressor and sealed system.
2.Remove all packing material and carefully check your ice maker to ensure it is in good condition and
that there is no damage to the ice maker or power cord and plug.
3.The ice maker should be placed horizontally on a level surface—to ensure proper ventilation for your
Ice maker, allow 150mm of space at the top, the back, and on each side. Do not install the Ice maker
near an oven, radiator, or any other heat source.
4.Before using the Ice maker for the first time please wait 2 hours after positioning it and keep the front
lid open for at least 2 hours.
5.Ensure that the voltage indicated on the ice maker corresponds with the voltage in your home.
6.Purified water is not allowed to be used in this unit—spring water is recommended.
7.Please always keep the viewing window closed during ice-making.
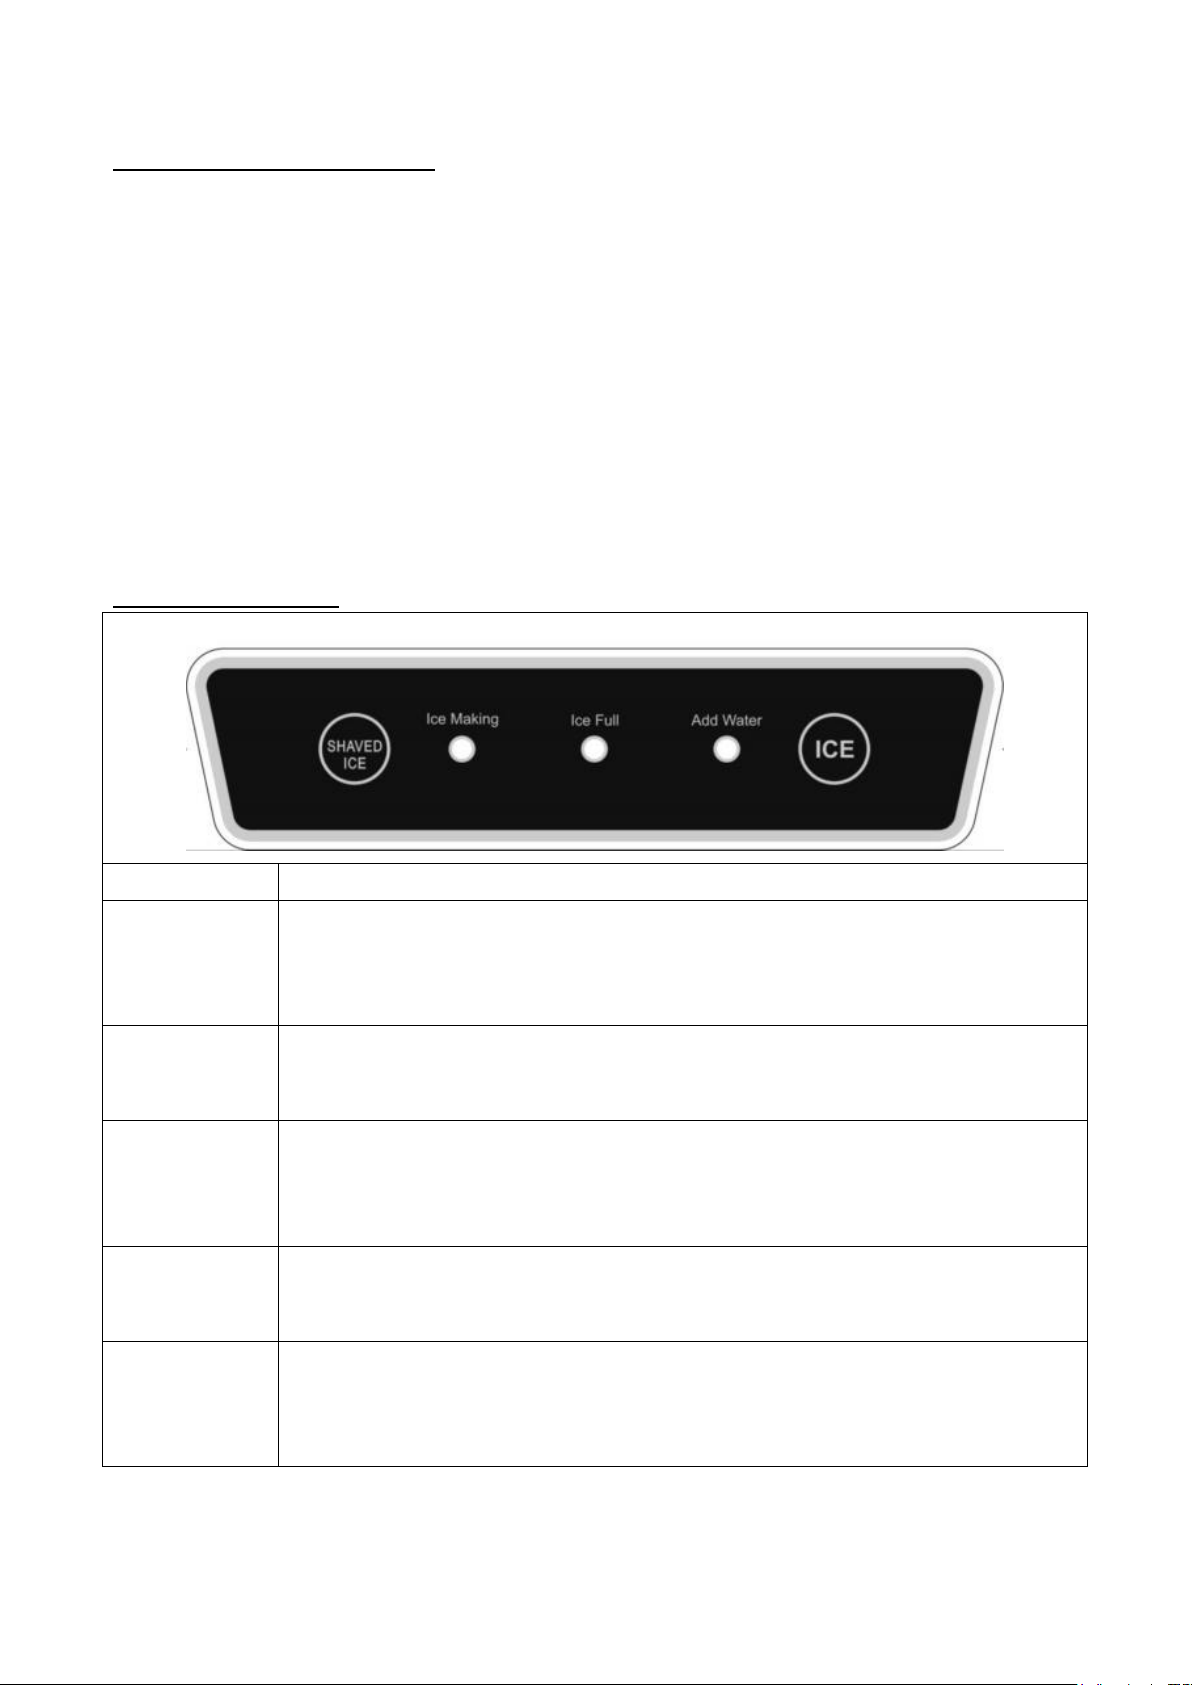
Control Panel Operation
Button/Indicator Explanation
Press this button to shave ice.
Before you press button, please put enough ice into the bowl and covers the bowl
cover well.
When this light illuminates in a solid color, the machine is making new ice.
This lights up when the ice basket is full.
This lights up when there is not enough water in the tank.
Press this button to start the ice making process.
Operation Instructions
Step 1.
Shaved ice may melt so it is strongly recommended to connect the drain pipe at bottom of the unit to
pool
Sketch for step 1 Sketch for step 2
Step 2.
Open the lid, take out of the ice basket and fill the water reservoir with water.
Note: Make sure the water is not over the bottom of the ice collecting tray.
If you prefer to fill the water automatically then insert the water pipe into the socket at back of the unit as
below.
Step 3.
Connect to the power.
Step 4.
Press button to turn unit on. The ice maker begins to work.
Note: For the first three cycles, the ice may be small and irregular in size, or even no ice.
Step 5.
If indicator lights up, please take out the basket, then add water as per step 1,
then press to
restart the ice maker
Step 6.
If indicator lights up, please take out the ice with the scoop.
Note: When the ice basket is full please remove the ice immediately, Do not allow
the ice collecting tray overfill.
Step 7.
Press button to shave ice.

Note: Before the press of this button, please put enough ice into the shaved ice bowl and cover
the bowl cap well.
Step 8.
Press button to stop the machine.
Step 9.
Put a tank in below the unit, then pull the unit a little forward, pull the drain plug at middle of the tank to
drain water.
Step 10.
If you want to take off the pipe, sketch as above: first, take off the blue ring A (if any), then press the
white ring (lock) at the outer side B. Finally take out the pipe.
Caring
1.Clean the inner liner, ice collecting tray, water box, ice shovel, and evaporator frequently. When
cleaning, unplug the unit and remove the ice cubes. Use a diluted solution of water and vinegar to
clean the inside and the outside surface of the Ice maker. Do not spray Ice maker with chemicals or
diluted agents such as acids, gasoline, or oil. Rinse thoroughly before starting.
2.Keep ventilation openings in the appliance enclosure, or in the built-in structure, clear of all obstruction.
Do not use mechanical devices or other means to accelerate the defrosting process, other than those
recommended by the manufacturer.
3.To ensure the cleanliness of the ice cubes, water in the water reservoir is suggested to be replaced
every 24 hours.
5.If the compressor stops for any reason such as water shortage, too much Ice, power off, etc... Do not
start the system right away, wait 3 minutes, and then re-start the Ice maker.
6.Always use fresh water before starting ice production either at initial installation or after a long shut-off
period.
7.This unit is for home use only, not for outdoor use. If it you need to use the device outdoors please
ensure that the view window is closed properly.
Safety Notice
In order to avoid any accidents, please refer to following operation:
1. Disconnect power before servicing.
2. Do not pull directly on wire when plugging or unplugging the unit.
3. If ice is abnormal, please call the seller.
4. It is normal for the compressor and condenser surface to reach temperatures between 70°C and 90°C
during operation and surrounding areas may be hot. Please do not touch the device.
5. Due to fast freezing, ice cubes may appear “Cloudy”. This is trapped air in the water and it will not
affect quality or taste of ice.
6. When out of use, please open the drawer at least 2cm to allow for air circulation and avoid any
metallic components becoming rusted.
7. If the supply cord is damaged, it must be replaced by the manufacturer or its service agent or a
similarly qualified person in order to avoid any hazards.
8. This appliance can be used by children aged from 8years and above and persons with reduced
physical, sensory or mental capabilities or lack of experience and knowledge if they have been given
supervision or instruction concerning use of the appliance in a safe way and understand the hazards
involved.
9.Children must not play with the appliance.
Cleaning and user maintenance shall not be made by children without supervision
10. WARNING: fill with bottled or good quality tap water only (Do not fill with fruit juices or other drink
types).
11. WARNING –Keep the air vents on the sides of the machine unblocked at all times.
12. WARNING –Do not use mechanical devices or other means to accelerate the defrosting process,
other than those recommended by the manufacturer.
13. WARNING –Do not damage the refrigerant circuit.
14. WARNING –Do not use electrical appliances inside the food storage compartments of the appliance,
unless they are of the type recommended by the manufacturer.
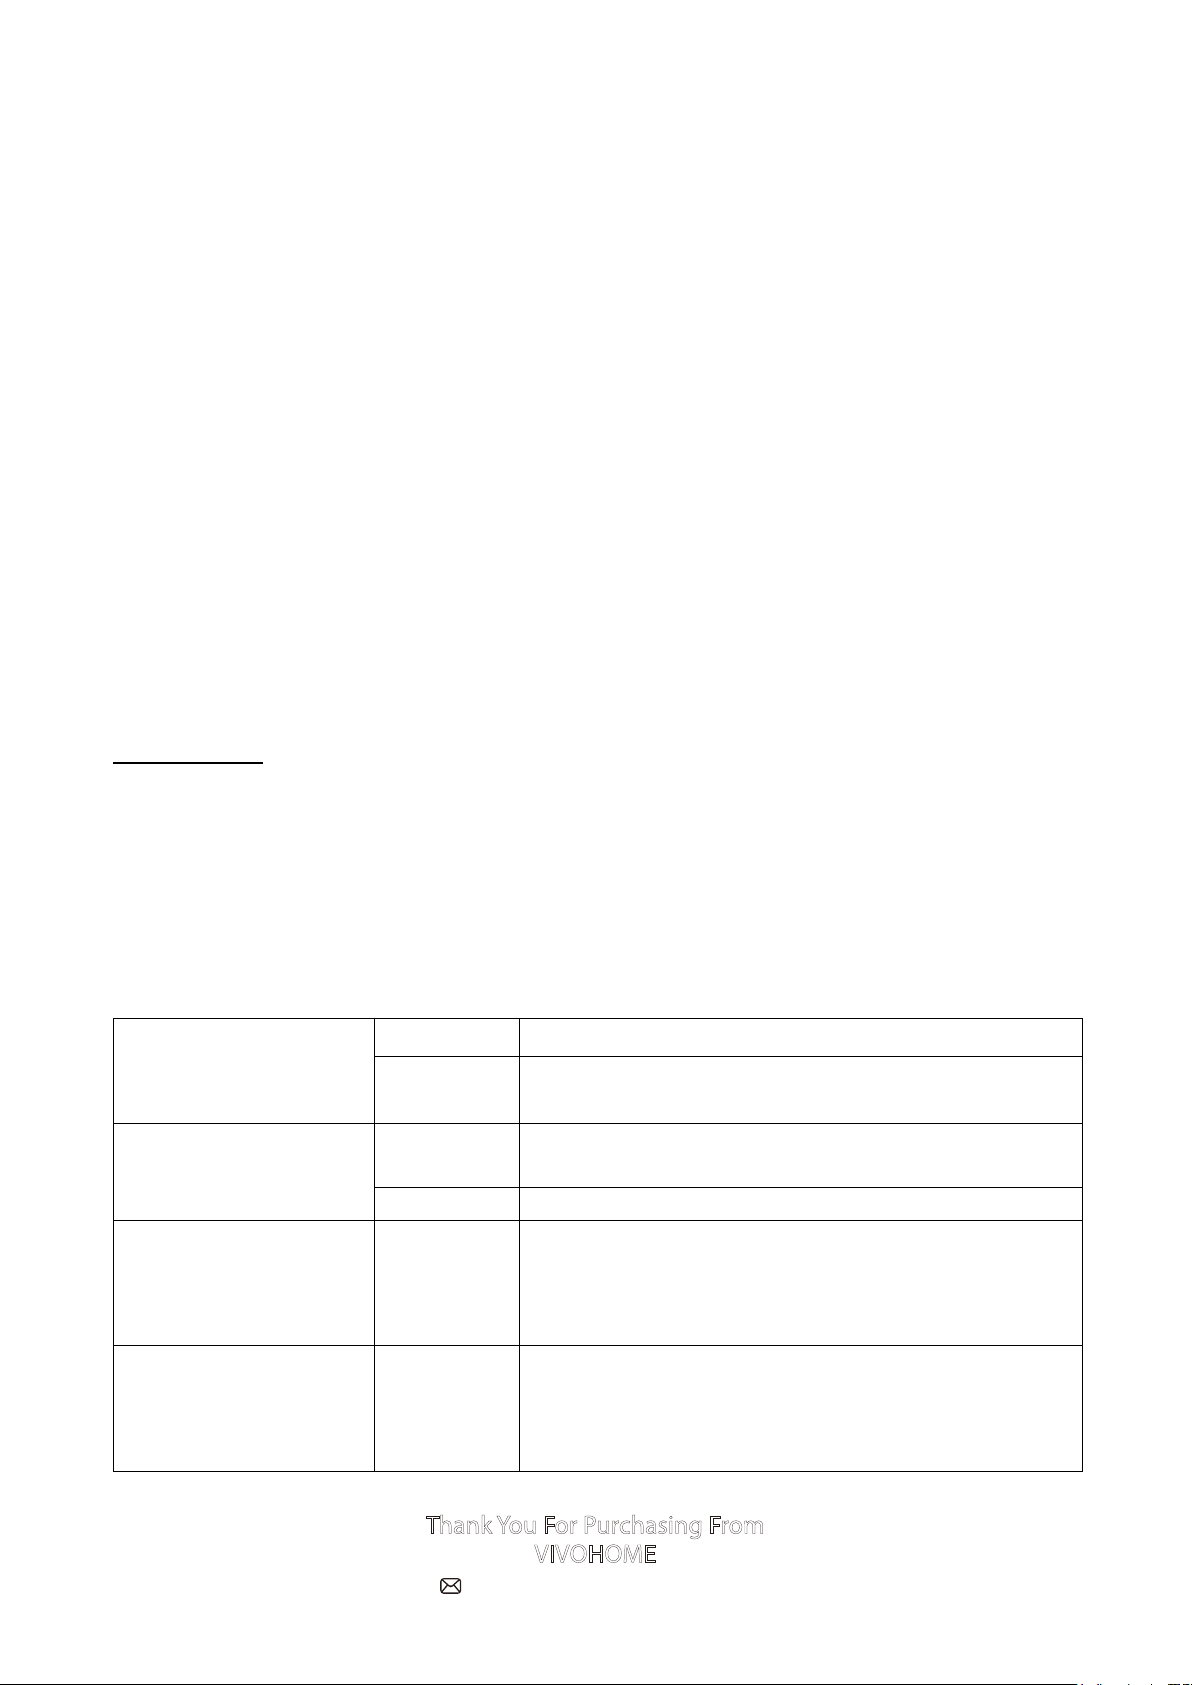
Troubleshooting
1. Please note, if a power failure occurs due to disconnection of the power cord, or the off power button
has been pushed off during an ice making cycle, small ice chips may formed and lodge in the automatic
shovel causing it to jam. If this occurs, the ice chips may be removed by disconnecting the power cord
and gently pushing the shovel to the rear of the cabinet and removing the ice chips, then restarting.
2. Please restart the ice maker by pressing Stop and then Start. If the Ice shovel does not push the Ice
into the Ice collector after the formed Ice drops from the evaporator finger while at the same time the M
light is on, check to see if the water tray is horizontal or balanced. If not then adjust by pressing the Ice
shovel lightly with your finger. Then re-start the Ice maker.
The compressor works
abnormally with a
Buzzing noise
Reasons
The voltage is lower than recommended
Solutions
Stop the Ice maker and do not restart until the voltage is
normal.
Conditions for Ice making
Cycle are right but no ice
is made.
Reasons Refrigerant leaks/ Sealed system is
blocked
Solutions
call for service
The lights of ice full and
add water come at in the
same time.
Water tray is
blocked by
ice cube.
Clear the ice cube under the ice shovel pull out the plug
and insert It again then press the button, 3 minutes
later the machine will restart automatically.
Machine keeps running,
but the water is warmer
than the normal water.
The
magnetic
valve is
broken.
Replace the magnetic valve.
suppor[email protected]
ThankYou For Purchasing From
VIVOHOME
www.vivohome.com
MADE IN P.R.C
Table of contents
Other VIVO HOME Ice Maker manuals

VIVO HOME
VIVO HOME VH1179 User manual

VIVO HOME
VIVO HOME HZB-12/H User manual

VIVO HOME
VIVO HOME HZB-12/SA User manual

VIVO HOME
VIVO HOME HZB-12/B User manual

VIVO HOME
VIVO HOME VH1043 User manual

VIVO HOME
VIVO HOME VH1032-SL User manual

VIVO HOME
VIVO HOME VH1180 User manual

VIVO HOME
VIVO HOME HZB-12/A User manual


