Vivobike M-VF19 Specification sheet

1/44
M-VF19
INSTRUCTIONS FOR USE AND MAINTENANCE
MODE D'EMPLOI ET D'ENTRETIEN
MANUALE D’USO E MANUTENZIONE

2/44
USER’S MANUAL FOR
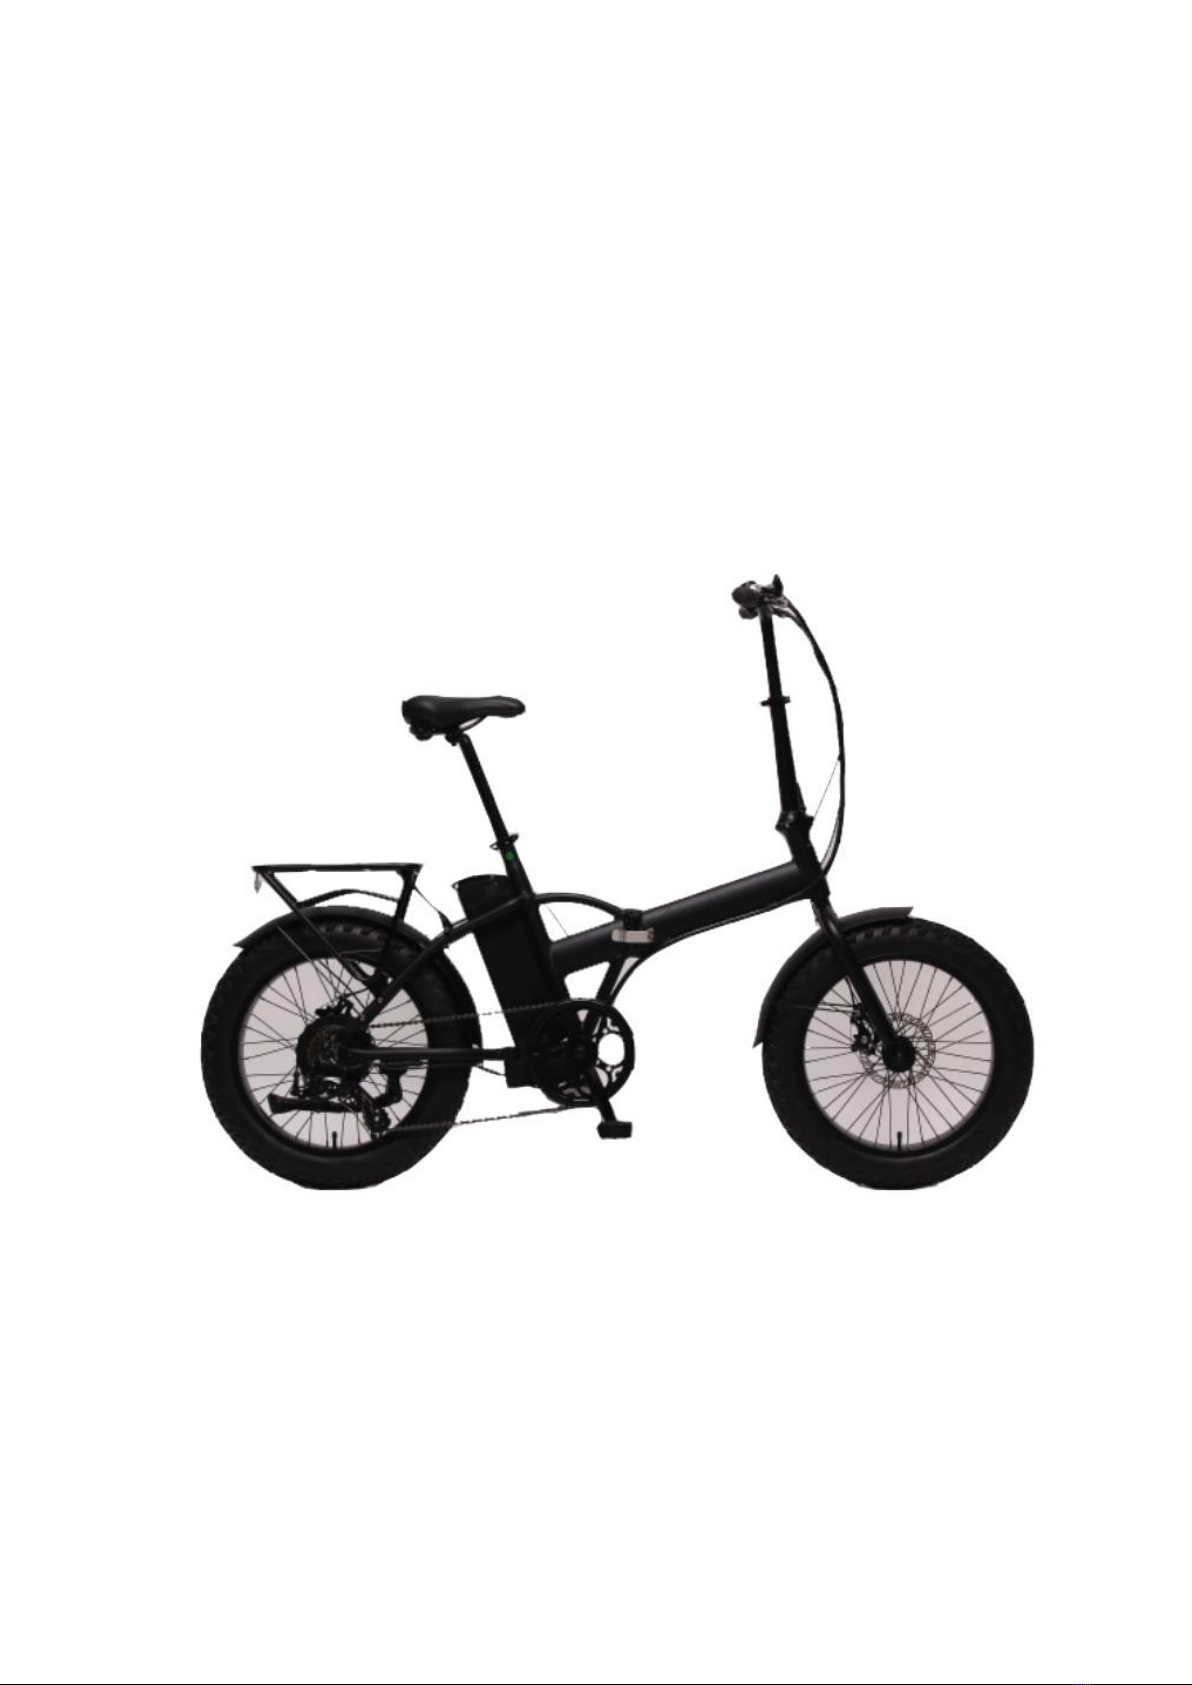
E-2500 RM
Indicative photo

3/44
Congratulations on your purchase of this E-bike E-2500 RM, it has been carefully designed and
manufactured according to the latest international quality standards, including:
EN 15194
Please read this instruction manual carefully and thoroughly before riding.
It contains important information on safety, and maintenance.
It is the owner’s responsibility to read this manual before riding.
Should any original component prove defective in terms of workmanship within its warranty period, we
will replace it. Warranty period for the electric bikes is as follows.
Frames and rigid forks: 5 years
Electrical components: 2 years with proper care and maintenance
All other components: 2 years with proper care and maintenance.
This warranty does not include labors and transportation charges. The company cannot accept any
responsibility for consequential or special damage. This warranty applies only to the original retail
purchaser who must have a proof of purchase in order to validate any claim. This warranty applies only in
the case of defective components and does not cover the effects of normal wear, for rental use, no
damage caused by accident, abuse, excessive loads, neglect, improper assembly, improper maintenance
or the addition of any item inconsistent with the original intended use of the bicycle.
No bicycle is indestructible and no claims can be accepted for damage caused by improper use, for rental
use, competition use, stunt riding, ramp jumping and leaping or similar activities. Claims must be
submitted through your retailer. Your statutory rights are not affected.
The company reserves the right to change or amend any specification without notice. All information and
specifications within this brochure are correct at time of printing.
Ⅰ. Conditions For riding this E-2500 RM
This E-2500 is designed for riding on road or riding on a paved surface where the tyres do not lose ground
contact. It must be properly maintained according to the instructions found within this book;
The maximum weight of the rider and load is required to be less than 100kg.
Safe Cycling and safety tips:
Before you ride your pedal electric assistance bicycle always make sure it is in a safe operating condition.
Particularly check that your:
•Nuts, bolts, quick-release and parts refastened tight and not worn or damaged
•Riding position is comfortable
•Brakes are operating effectively
•Steering is free with no excessive play
4/44
•Wheels run true and hub bearings are correctly adjusted
•Wheels are properly secured and locked to frame/fork
•Tyres are in good condition andinflated to correct pressure
•Pedals are securely tightened to pedal cranks
•Gears are correctly adjusted
•All reflectors are in position.
WARNING WHEELS: Every six months, your pedal electric assistance bicycle should be
professionally checked to ensure that it is in correct and safe working order. It is the
responsibility of the rider to ensure all parts are in working order prior to riding. It is very
important to check the rim wear monthly and monitor the rim wear line, if this groove
becomes invisible the rim is past its safe working life. A severely worn rim is very dangerous
and must be replaced.
REGULAR ATTENTION MUST BE PAID TO THE HUB MOTOR SPOKE TENSION.
Warning: You are warned that you assume the risk for personal injury, damage
or losses if you breach the above conditions and, the warranty will be void
automatically.
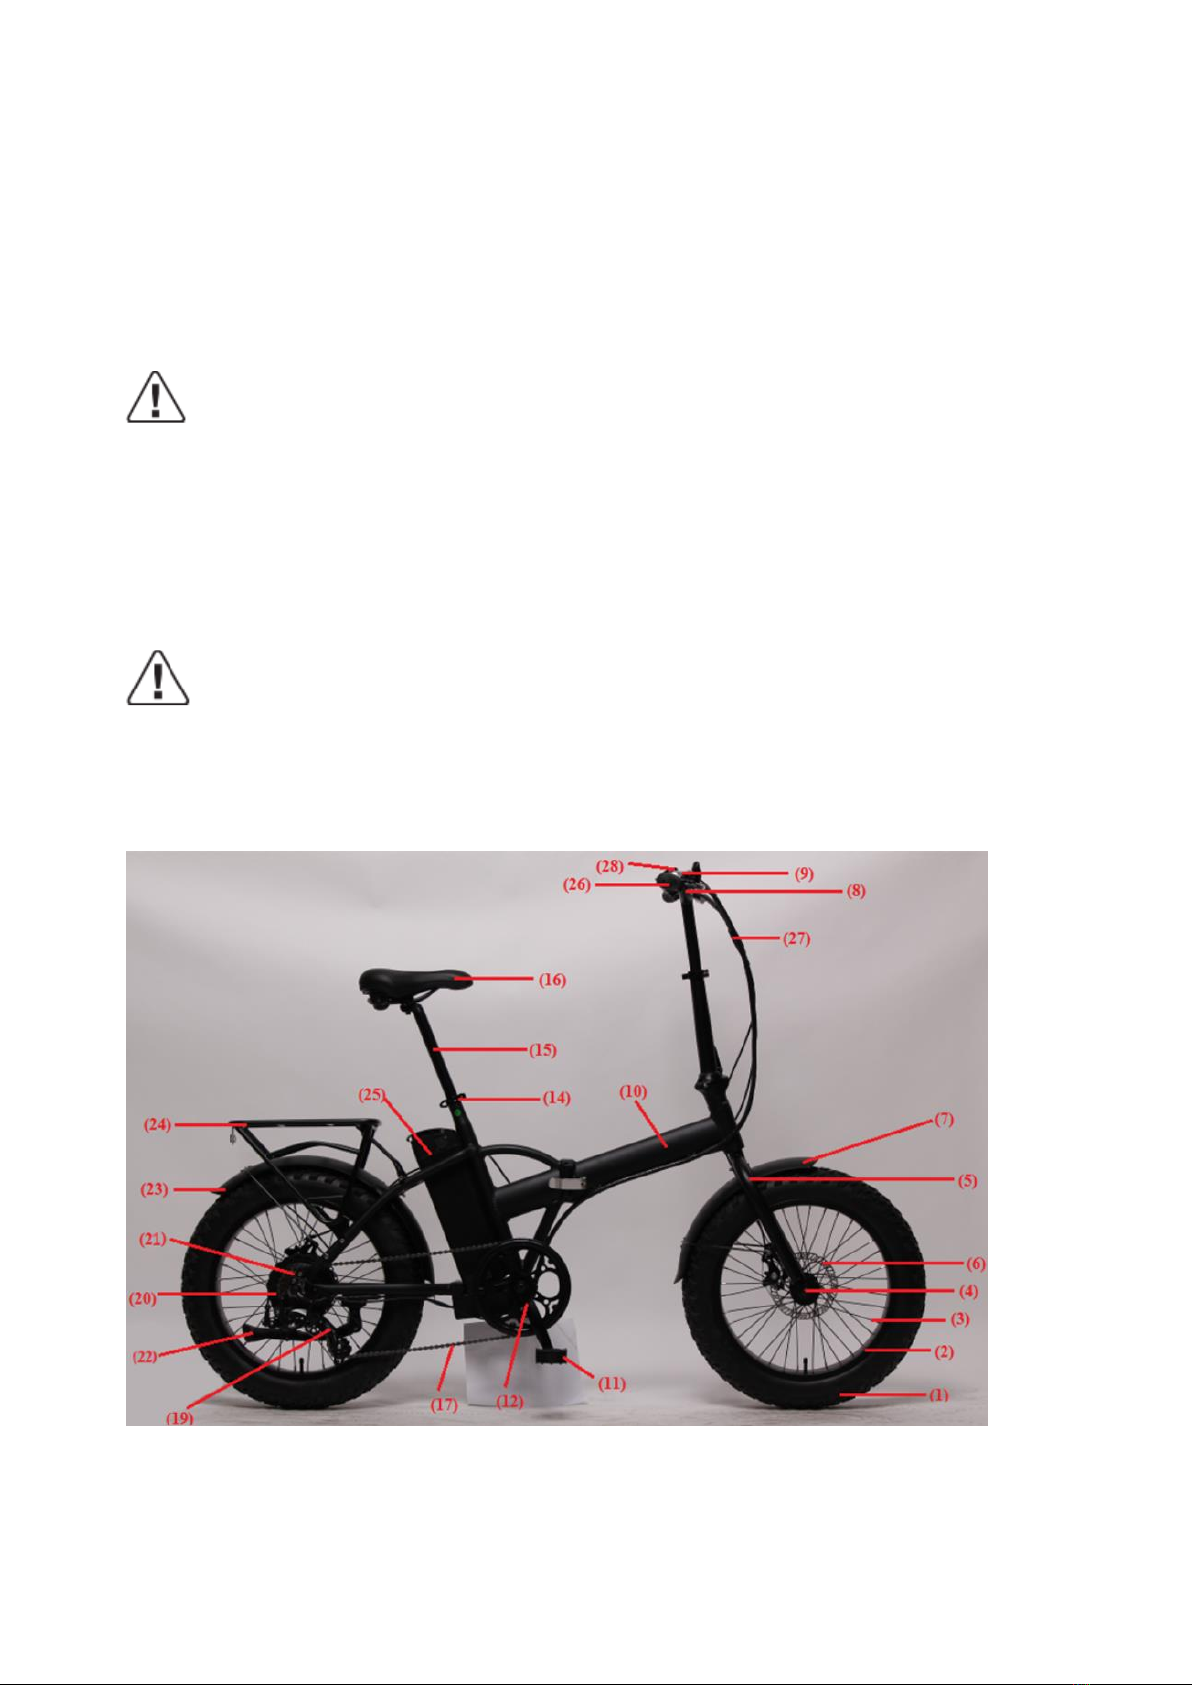
Ⅱ. Name of pedal electric assistance bicycle components E-2500 RM
(Fig. 1)

5/44
Instruction
THE "EXTRAORDINARY" MAINTENANCE OF THE MECHANICAL AND ELECTRICAL COMPONENTS MUST BE
PERFORMED BY A QUALIFIED TECHNICIAN.
Ⅲ. MANUAL FOR THE ELECTRIC PARTS
The rider must pedal forward to obtain any assistance from the motor. This is an important safety feature.
This electric pedal assistance bikes will provide assistance up to 25 Km/h, after that the motor will cut out.
You may go faster but must do so under your own effort without the electric assistance.
To start the bike turn on the main switch on the side of the battery, the LED on the handlebar panel will
light up. The motor will not work until you pedal one/two full revolution of the chain wheel. This feature
protects the motor and controller from damage and extends the service life of the electric components.
Contents
1. Structure of an electric assistance bike
2. Important safety cautions
3. Operation
4. Battery installation & usage
5. LED and function
6. Using and maintaining the battery
7. Using and maintaining the charger
8. Using and maintaining the electric hub motor
9. Maintaining the controller
10. Maintaining the Power-off control of the brake lever
11.. Simple troubleshooting
12. Electric circuit diagram and specifications
13. Main technical specification sheet
1. Tyre & tubes
2. Rims
3. Spokes
4. Front hub
5. Front fork
6. Front disc-brake
7. Front mudguard
8. Handlebar & stem
9. Bell
10. Frame
11. Pedal
12. Crank set
14. Seat clamp
15. Seat post
16. Saddle
17. Chain
19. Rear derailleur
20. Freewheel
21. Kickstand
22. Rear motor hub
23. Rear mudguard
24. Rear carrier
25. Battery
26. Grip, shift lever & brake lever
27. Brake, shift and display cables
28. Power display

6/44
1. Structure of electric bikes (See partⅠ.Fig 1.)
2. Important safety cautions:
• We strongly advise wearing an approved helmet, which meets local standards.
•Obey local road rules when riding on public roads.
•Be aware of traffic conditions
•The rider must be over 14 years old.
•Have your bike serviced only by authorized bicycle shops.
•Regular servicing will ensure a better and safe riding performance.
•Do not exceed more than 100kg loadon bicycle, including rider himself.
•Never have more than one rider on the bicycle.
•Ensure regular maintenance is carried out on the bike according to this owner’s manual
• Do not open or attempt maintenance on any electrical components yourself. Contact your local bicycle
specialist for qualified service and maintenance when needed.
•Never jump, race, perform stunts or abuse your bicycle.
•Never ride under the influence of intoxicating drugs or alcohol.
•We strongly recommend using lights, when riding in the dark, fog or poor visibility.
•When cleaning this bike, please wipe the surface with a piece of soft cloth. For very dirty areas you can
wipe it with a little neutral soap and water.
Warning: do not wash this electric bike direct with spraying water especially pressure washers.
Avoid water entering electric components as this may result in damage of the electric components.
3. Operation
Your new electric assistance bicycle is a revolutionary transport means, applying aluminum frame, Li-ion
battery, a super high efficiency electric hub motor and controller with electric pedal assistance system, to
support normal pedaling. The abovementioned equipment will ensure safe riding with excellent function
and performance. It is important for you to note the following guidelines to ensure getting the best
possible experience from your electric bicycle.
Checklist before Riding
3.1.1 Please ensure tyres are fully inflated as indicated on the tyre wall, before riding.
Remember, performance of the bike is directly related to the weight of the rider and baggage/load,
together with the stored energy in the battery;
3.1.2 Charge overnight, prior to riding the next day;
3.1.3 Apply chain oil periodically and clean if dirty or gummed up,- using a degreaser, then wipe clean and
oil bicycle chain again.
7/44
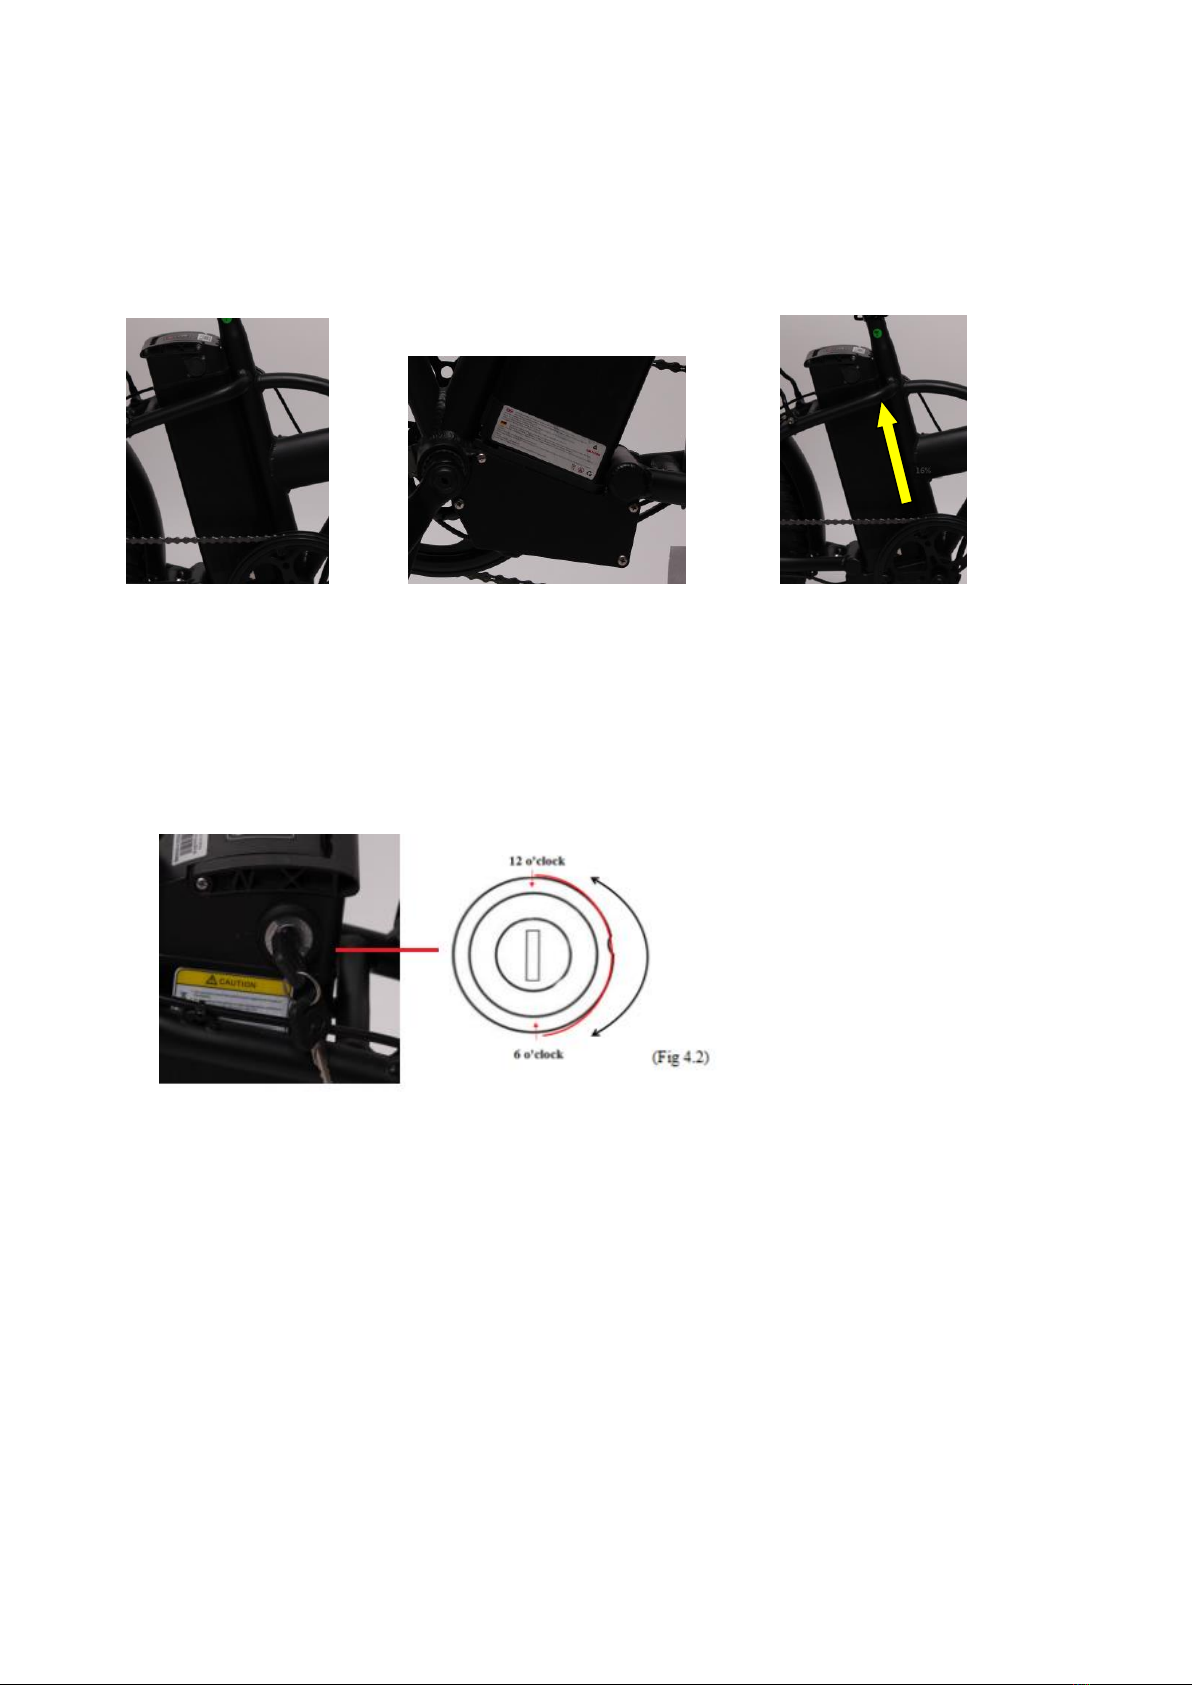
4. Battery installation & usage
The electric bikes have the battery positioned on the seat tube (Fig. 2), the battery box bottom is fixed on
the seat tube by screws (Fig. 2.1).
Then the battery case is locked by the key see the operation details below.
(Fig. 2) (Fig. 2.1) (Fig. 3)
Firstly, please put the battery case along this slider up direction (Fig. 3), then push it into and ensure a snug
fit. Second, make sure the battery pack is firmly pushed into the controller housing and its connector is
securely inserted inside the controller box.
Notice the battery lock (Fig.4.1,4.2)
From the initial position 12 o’clock (where the battery and carrier are unlocked), insert the key into the key
slot, press and turn it clockwise to position 6 o’clock (Then the battery is locked with the carrier). On the
contrary, you can unlock it.
Battery charge
If an AC outlet is available within reach of your bike, you can charge your bike directly with the battery still
attached to the bike. The charging port is covered by a plastic cap (Fig. 4.3). Pls open it then you charge the
battery directly.
Removing the battery is useful for charging in a location where the bicycle may not fit or when no reachable
AC power supply exists at the place where the bike is parked
Before removing the battery from the bike, you need to unlock as following steps:
* make sure the switch is off.

8/44
* Press the key and turn it anticlockwise from 6 o’clock to 12 o’clock position. (refer Fig. 4.2)
* Remember to take off and care about the key after you withdraw the battery from the carrier!!!
5. LED and Function:
5.1 6Km/h button with a red circle, see (Fig. 6):
The bike can be power-assistance at the speed
of 6 km/h when you keep pressing this button.
After the motor starts working and the bike
running, you could easily pedal and release the button.
5.2 Power display on handlebar panel:
Under normal state, turn on the power supply, the four LED lights will be displayed from low to high power
levels. When all LED lights are bright, this condition indicates that the electricity is full. If the last light has
been flashing, this is a warning, should be charged immediately before riding the battery.
4 LED light on: power is 100%
3 LED light on: power is 70%
2 LED light on: power is 50%
1 LED light on: power is 25%
1 LED light is on and flashing: power will be empty, the battery need to be charged immediately.
5.3 Select assistance level on handlebar panel:
When the power is on, you can shift to 3 assistance levels, low middle and high. Press the button “+” and
“-”, to shift the assistance level (Low middle and high). Here is the way how to set the assistance level:
When the power is on, the “middle” LED is on which means the power-assistance is in the 2nd grade. Then
you can press the “+” and “-” buttons to choose the Low, Middle and High.
When selecting the high assistance level, meaning more electric power and less human propulsion are
applied to the bike. This level is suitable for uphill, head wind or heavy load riding.
When shifting to middle assistance level, it means electric and human propulsion almost fifty/fifty applied
to this bike. We suggest you select this assistance level, when riding on regular flat paved road.
(Fig. 4.3)
(Fig. 5)

9/44
When shifting to low assistance level, it means less electric and more human propulsion being applied to
the bike. Therefore, this is an electric saving level (or economical level). We suggest you select this level
when you ride this bike for leisure sports or fitness.
Moreover, this power display function can also alert users through these four LED lights, as shown below:
If the user forgets to turn off the battery switch after five minutes of stopping the ride, the lights of the four
LED will turn one after another. In this way to remind the user to turn off the power immediately to save
energy.
Warning: Please turn off the main switch on the battery, if you stop riding the bike. This is very
important for saving the electric energy, stored in the battery.
6. Using and maintaining the battery
Advantages of Li-ion battery
this electric assistance bicycles are supplied with high quality Li-ion batteries, which are light and create no
pollution to the environment, as a typical green energy source. As well as the above features, the Li-ion
batteries have the following advantages:
• charging without memory effect
• big electric energy capacity, small volume, light in weight, with large current output, suitable for high
power vehicles.
• long life
• a wide working range of temperature: -10°C to +40°C
To ensure a longer battery life and protecting it from damage, please use and maintain it according to the
guideline below:
6.1 During your riding, when you find the power decreased on
the display LED, the battery must be charged in short time!
6.2 Remember to charge the battery full before you will ride
for a long trip!
Press the button on the end of battery case, when
3 LED are green color, it shows the battery is full of
power, when the LED red shining, it means you
need to charge it. (Fig. 6.1)
6.3If the bike is ridden less frequently or stored for quite a long time, it must be fully charged
every month.
(Fig. 6.1)

10/44
Warning:
1) The battery life may be reduced after long storage without regular charging as instructed above, due
to natural discharge;
2) Never use any metals directly to connect the two poles of the battery, otherwise, the battery will
be damaged due to short circuit.
3) Never put the battery near to fire or heat source.
4) Never strongly shake, punch and toss the battery.
5) When the battery pack is removed from the bike, keep it out of reach of children, to avoid any
unexpected accident.
6) The battery is forbidden to be disassembled.
7. Using and maintaining the battery charger
Before charging the battery, please read the owner’s manual and the charger manual accompanied with
your bike, if any. Also, please note the following points regarding battery charger.
* Do not use this charger in an environment of explosive gas and corrosive substances.
* Never shake, punch or toss the battery charger, to protect it from damage.
* Always protect the battery charger from rain and moisture!
* Charge the battery in a dry place indoors.
* This battery charger should be normally used under temperature, ranged between 0°C to +40°C
* The charger is for bidden to be disassembled.
* You should only use the charger provided with the electric bike, otherwise damage could occur to your
battery and void the guarantee.
* When charging, both battery and charger should be minimum 10cm away from the wall, or under a
condition of ventilation for cooling. Place nothing around the charger, while in use!
Procedure for charging
Please charge the bike battery according to the following procedure:
7.1 The battery can be charged by the AC, the switch is not necessary to be turned on.
7.2 Insert the charger output plug into the battery securely and then, plug the main cable of the charger
into a reachable AC outlet;
7.3 When charging, the LED on the charger will become red, showing the charging is on. When it
becomes green, you can finish charging the battery.
7.4 To finish charging, you must disconnect the charger input plug first from the AC outlet, and after that,
disconnect the charger output plug from the battery pack. Finally, close the cover on the charging
socket of the battery pack and check the socket, is covered

11/44
8. Using and maintaining the electric hub motor
8.1 Our intelligent e-bikes are programmed to start with the electric assistance after rotation of the chain
wheel.
8.2 Do not use the bike inflood waters or thunderstorm. Do not immerse the electric parts in water.
Otherwise, the electric components may be damaged.
8.3 Avoid any impact towards the hub motor, otherwise, the casting alloy aluminum cover and body may
break.
8.4 Make regular checks on the screws on both sides of the hub motor; fasten them even if they are just a
little bit loose.
8.5 It is necessary to check the cable connection to the motor.
9. Maintaining the controller
For our electric bikes the controller is usually equipped inside the battery pack holder.
It is very important to take care of this electronic component, according to the following guideline:
9.1 Pay attention to protect from ingress of water and immersion in water, which may damage the
controller. Note: If you think water may have got into the control box, please switch off the power
immediately and pedal without electric assistance. You can pedal with electric assistance as soon as the
controller has dried out.
9.2 Pay attention to protect from any strong shaking and punching, which may damage this controller
9.3 The controller should be used in normal working temperature range from -15°C to +40°C
Warning: Do not open the controller box. Any attempt to open the controller box,
modify or adjust the controller will void the warranty. Please ask your local dealer or
authorized service specialist to repair your bike.
10. Maintaining the Power-off control of the brake lever*
This is a very important component for riding with safety. First, you should pay attention to protect it from
impact and avoid any damage. Second, make regular check on all bolts and nuts, and fasten them securely.
11. Simple trouble shooting
The information below is for purpose of explanation, not as a recommendation for user to carry out repair.
Any remedy outlined must be carried out by a competent person who is aware of the safety issues and
sufficiently familiar with electrical maintenance.

12/44
Trouble Description
Possible Causes
Trouble shooting
After the main battery
switched on, the motor
does not generate
assistance when
pedaling.
1)the motor cable (waterproof
connection joint) is loose; 2)brake
lever did not return well, which keeps
the switch in “power off” position;
3)battery fuse is broken; 4) the speed
sensor
is too far away from the magnetic
ring on the B.B. axle; 5) the
connection between the sensor
and the controller is loosen or not
connected well.
First of all, please check the battery if it is
empty. If yes, charge the battery immediately.
1) check if the connection is securely fixed. If
loose, joint them tightly. 2) make the brake
lever come back to its normal position with
care, without braking; 3) open the battery
pack top, and check if the fuse is broken. If
yes, please visit your vendor or authorized
service for installing a new fuse; 4) adjusting
the distance between the magnetic ring and
the sensor, to make sure the distance is
within 3mm; 5) fix tight the connection
between the sensor and the controller.
The distance per charge
becomes short (Note:
performance of the bike
battery is directly
related to weight of the
rider and any
baggage/load / wind /
road / constant
braking ).
1) charging time is not enough; 2) the
environment temperature is so low
that it affects the battery working. 3)
frequently going uphill, or riding with
head wind, or on poor road
condition, 4) the tyres have low
pressure (to be inflated); 5)
frequently braking and starting. 6)
battery has been stored without
using for quite a long time.
1) please charge the battery according the
instruction (chapter 7.3); 2) in winter or
under 0°C, you’d better store the battery
inside the house; 3) it will be normal if the
riding conditions are improved as regular; 4)
pump the tyres and ensure tyres are fully
inflated to 45psi for your bike; 5) it becomes
normal when the riding situation will be
better. No worry about such a trouble; 6)
make regular charging according to this
instruction manual (refer to Chapter 6.3) If
the above has no effect, please contact your
vendor or authorized service.
After plugging the
power outlet, no charger
indicator LED is lit.
1) trouble from the power outlet;
2) poor contact between charger
input plug and power outlet;
3) the temperature is too low.
1) check and repair the power outlet.
2) check and insert the power outlet tightly.
3) charge it in house.
If the above has no effect, please contact your
vendor or authorized service
After charging over 4-5
hours, the charger
indicator LED is still red,
while the battery is still
above not full (Note: it is
very important to charge
your bike strictly
according to this
instruction stated in
Chapter 7, to avoid any
trouble and damage
occurred to your bike.
1) environment temperature is 40°C
and above.
2) environment temperature is under
0°C.
3) failed to charge bike after riding,
resulting in over discharge.
4) the output voltage is too low to
charge the battery.
1) charge the battery in an area under 40°C,
or according to this instruction chapter 7;
2). charge the battery inside the house, or
according to this instruction chapter 7;
3) please well maintain the battery according
to the Chapter 6.3 to avoid natural
over-discharge;
4) no charging when the power supply is
lower than 100V.
If the above has no effect, please contact your
vendor or authorized service.
13/44
There is no speed/KM
show on the LED
The magnetic ball point on the wheel
spoke is in too far away distance from
the wheel speed sensor (fixed to
frame chain stay or front fork), which
make the sensor cannot get any
signals of the revolving wheel.
Check the distance between the magnetic ball
point and the wheel speed sensor, and make
sure the distance should within 5mm.
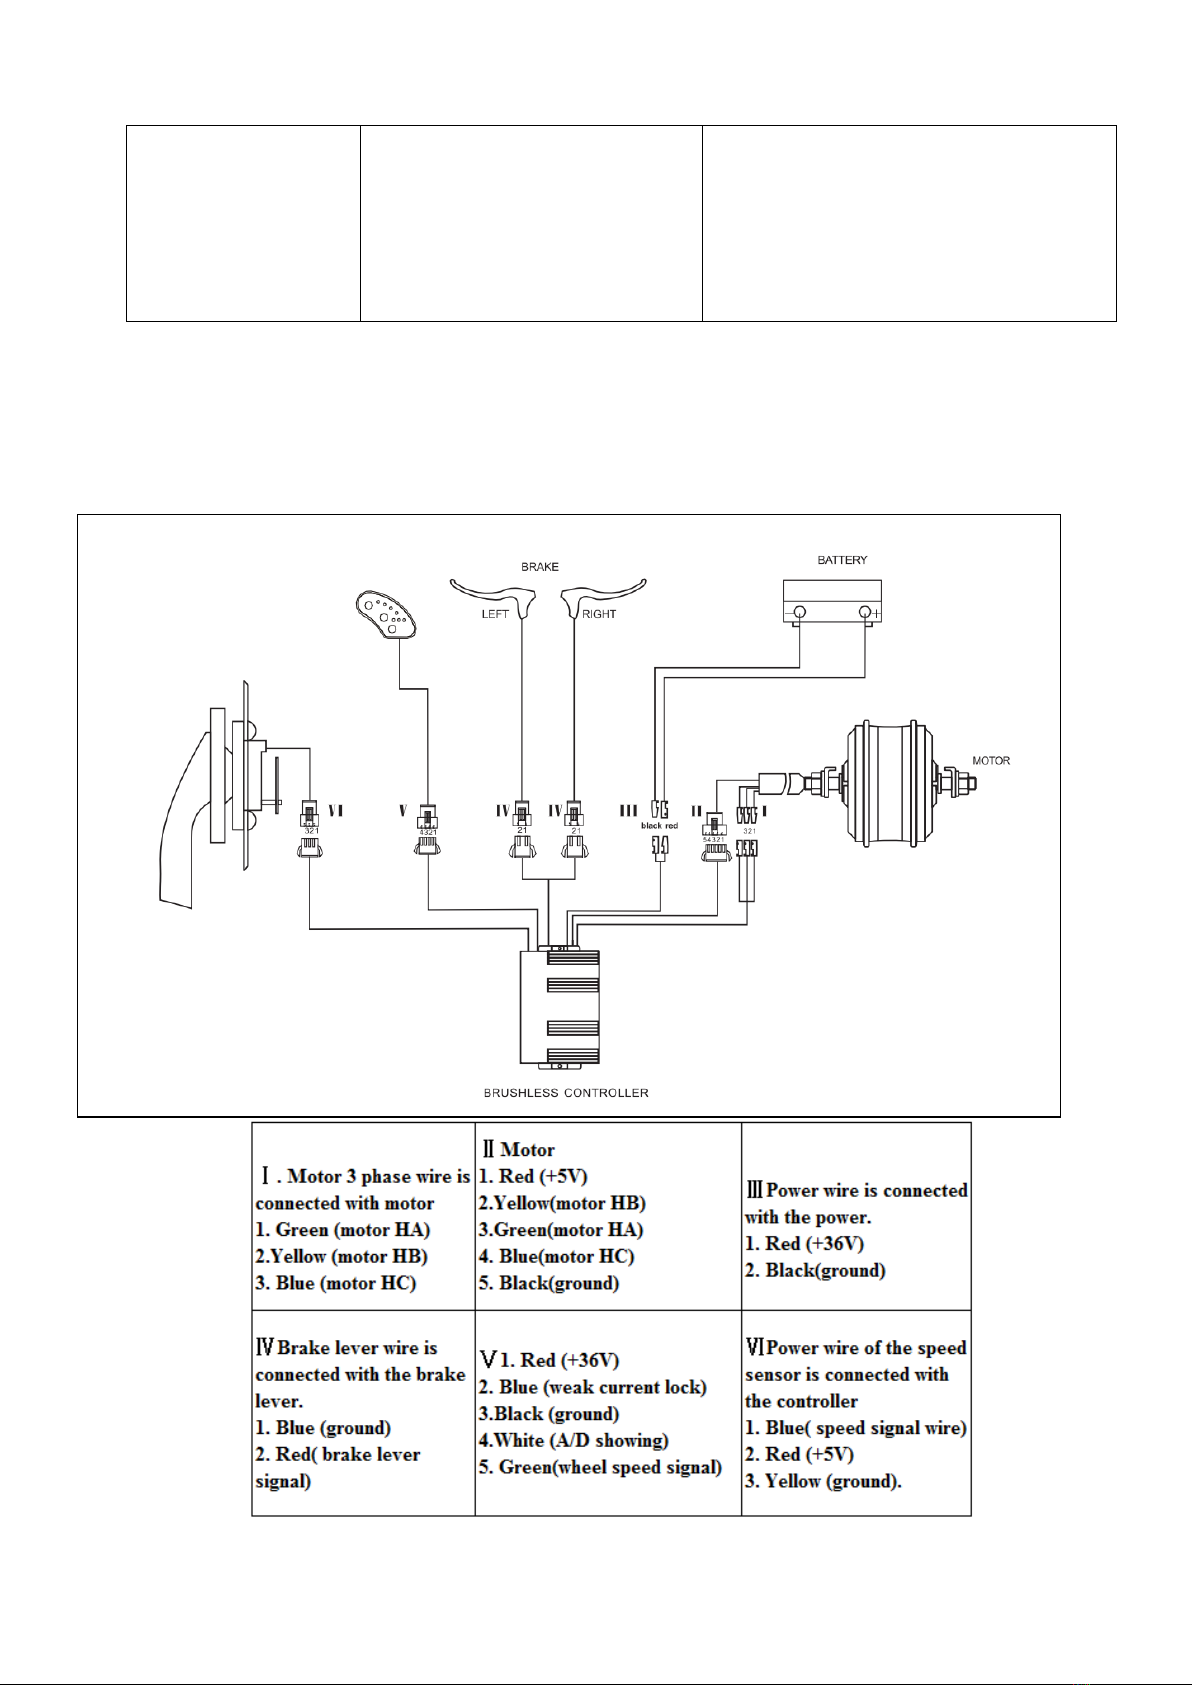
12. Diagram and Specification
We reserve the right, without further notice, makes modifications to the product. For further advice, please
contact your vendor.
14/44
13. Main technical specification sheet
Please find model name of your bike below:
Model
Remark (for reference)
E-2500 20” FAT
E-2500 RM
Here is some of the general technical Data for this electric bike:
Maximum Speed with Electric Assistance:
25km/h ±10%
Distance per full charge:
36V: 40~50km (total loading ≦75kgs)
Weight e-bike:
29 Kg
Over Current Protection Value:
13±1A
Under Voltage Protection Value:
31.5V ±0.5V
Please find the crossed technical data regarding the bike motor below:
Motor Type:
Brushless with Starry Gears_ with Hall
Maximum Riding Noise:
<70db
Rated power:
200W
Maximum output power:
250W
Rated voltage:
36V
Please find the crossed technical data battery and charger below:
Battery Type:
Lithium
Voltage:
36V
Capacity:
10.4Ah
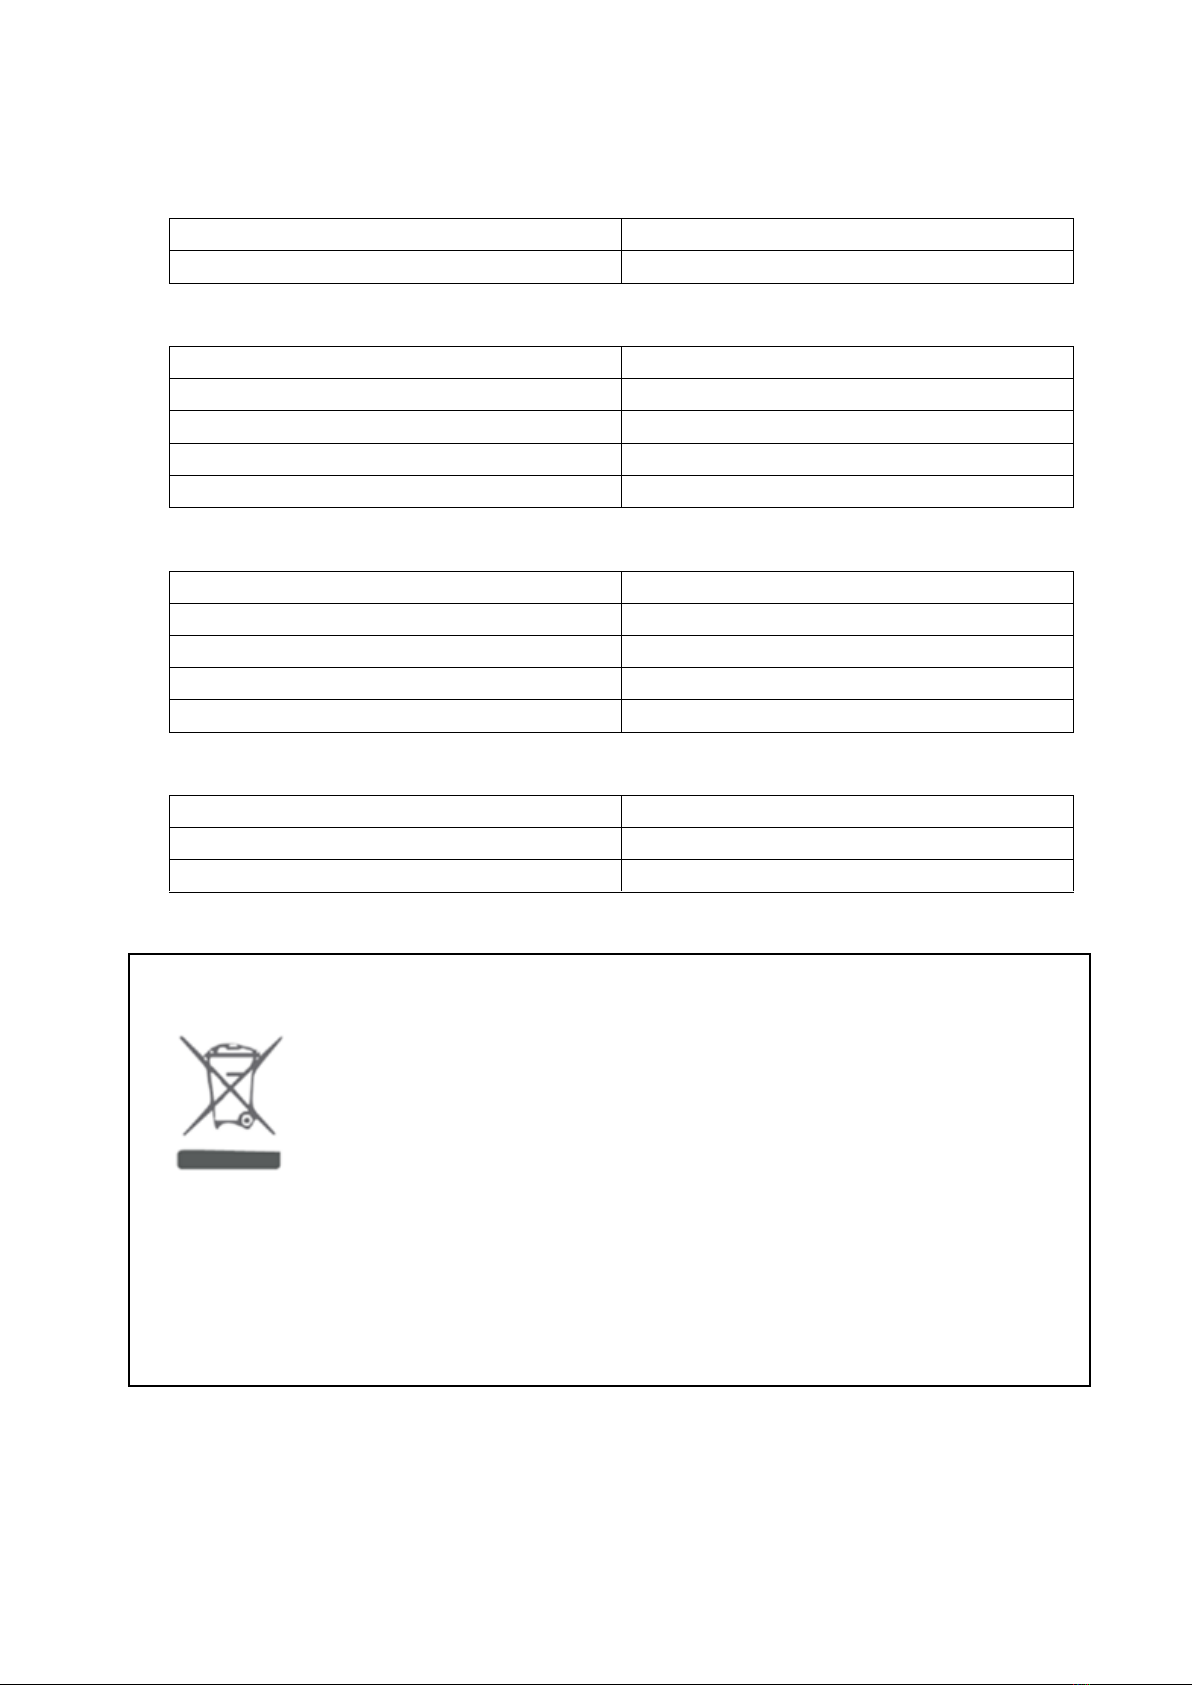
Safety warnings
Disposal of electrical-electronic devices:
this symbol indicates that the product must not be disposed of as unselected waste but
must be sent to separate collection facilities for recovery and correct recycling, supporting
the disposal of materials and helping to prevent potential negative consequences for the
environment and health general.
The WEEE marking must appear on all electrical and electronic equipment placed on the
EU market.
For all additional information regarding recycling and disposal, consult your municipality, specific structure or
authorized dealer.
This treatment is applicable to all countries belonging to the European Union.
It is essential to store used batteries in the appropriate space to ensure correct disposal and respect the
environment.
15/44
MANUEL DE L’UTILISATEUR
POUR E-2500 RM
Photo indicative

16/44
Nous vous félicitions d’avoir acheté ce vélo à assistance électrique E-2500 RM soigneusement conçu
et construit selon les dernières les derniers standards de qualité internationaux, y compris:
EN 15194
Veuillez lire attentivement et entièrement ce mode d’emploi avant l’utilisation du vélo. Contient des
informations importantes sur la sécurité et sur l’entretien.
C’est la responsabilité du propriétaire de lire ce manuel avant l’utilisation.
Au cas où les pièces originales présentent des défauts avant l’échéance de la période de garantie
nous les remplacerons.
La période de garantie pour le vélo à assistance électrique est la suivante:
Cadres et fourches rigides: 5 ans
Pièces électriques: 2 ans avec les soins et l’entretien approprié
Tous les autres composants : 2 ans avec les soins et l’entretien approprié.
Cette garantie ne comprend ni la main-d’oeuvre ni les frais de transport. La société n’assume aucune
responsabilité pour dommages indirects ou spéciaux. Cette garantie est applicable seule à l’acheteur
original de vente au détail possédant une preuve d’achat qui valide toute réclamation. Cette garantie
est applicable seulement en cas de pièces défectueuses et ne couvre ni les effets d’utilisation
usuelle, usage en location, ni les dommages causés par accidents, abus, charges excessives,
négligence, assemblage impropre, entretien impropre ou ajout d’objets incohérents avec l’utilisation
normale du vélo.
Aucun vélo n’est indestructible et aucune réclamation ne peut être acceptée pour les dommages
causés pour une utilisation impropre, usage en location, pour une utilisation en compétitions,
acrobaties, sauts sur rampe, bonds ou activités semblables. Les réclamations doivent être faites
auprès du revendeur. Vos droits légaux ne sont pas concernés.
La société se réserve le droit de changer ou de corriger tout détail sans avertir. Toutes les
informations et les précisions sur ce mode d’emploi sont corrigées au moment de l’impression.
Ⅰ. Conditions d’utilisation du vélo à assistance électrique E-2500 RM
Le modèle E-2500 RM à assistance électrique est conçue pour rouler sur les routes où les pneus ne
perdent pas le contact avec le terrain. Elle doit être maintenue correctement selon les instructions
contenues dans ce manuel;
le poids maximum du cycliste y compris le vélo et la charge doit être inférieure à 100 kg.
17/44
Conseils pour rouler en sécurité:
Avant d’utiliser votre vélo à assistance électrique toujours s’assurer qu’il est en bon état de
fonctionnement. En particulier s’assurer que:
• Écrous, boulons, blocages et toutes les pièces réinsérées soient serrées et non consommées ou
endommagées.
• La position de conduite soit confortable.
• Les freins soient efficaces.
• La direction soit libre mais sans trop de jeu.
• Les roues travaillent régulièrement sur les roulements de moyeu.
• Les roues sont correctement fixées et verrouillés sur la cadre/fourche.
• les pneus ne soient pas endommagés et qu’ils soient gonflés à la juste pression
• Les pédales sont bien serrées aux manivelles.
• Les vitesses sont correctement réglées
• Tous les catadioptres sont bien positionnés.
Attention aux roues - Tous les six mois, la bicyclette à assistance électrique doit être
vérifiée professionnellement pour s’assurer que le fonctionnement est correct et en
sécurité. L’utilisateur a la responsabilité de s’assurer que toutes les pièces puissent
garantir un fonctionnement correct. Il est très important de vérifier mensuellement l’usure des
jantes et de contrôler la ligne d’usure des jantes et si cette crénelure devient invisible alors la jante
ne travaille plus en sécurité. Une jante devient très dangereuse si excessivement usées et doit être
donc remplacé.
PORTER UNE ATTENTION PARTICULIÈRE à LA TENSION DES RAYONS DES
MOYEUX DU MOTEUR
AVERTISSEMENT : Veuillez noter que l’utilisateur s’assume le risque des lésions personnelles, des
dommages ou des pertes en cas de non-respect des présentes conditions générales, la garantie
sera automatiquement annulée.

18/44
Ⅱ. Noms des composants de vélo à assistance électrique E-2500 RM
(Fig. 1)
1. Pneus & chambres
2. Jantes
3. Rayons
4. Moyeu avant
5. Fourche avant
6. Frein disc avant
7. Gardeboue avant
8. Guidon & potence
9. Sonnette
10. Cadre
11. Pedales
12. Manivelles & pedaliers
14. Blocage selle
15. Tige de selle
16. Selle
17. Chaine
19. Derailleur arriere
20. Moyeu moteur arriere
21. Roue libre
22. Bequille
23. Gardeboue arriere
24. Porte-bagages arriere
25. Batterie
26. Poignees, manettes & leviers de frein
27. Cablage freins, display, manettes
28. Display

19/44
Instructions
L'ENTRETIEN "EXTRAORDINAIRE" DES COMPOSANTS MÉCANIQUES ET ÉLECTRIQUES DOIT ÊTRE
EFFECTUÉ PAR UN TECHNICIEN QUALIFIÉ.
Ⅲ. Mode d’emploi pour les composants électriques
L’utilisateur doit pédaler en avant pour obtenir l’assistance du moteur électrique. Il s’agit d’un dispositif
de sécurité important. Ce vélo à assistance électrique fourni une assistance jusqu'à 25 km/h, d’après le
moteur s’arrête. Vous pouvez aller plus vite, mais seulement avec vos propres efforts sans l’assistance
électrique.
Pour actionner le vélo, appuyé sur l’interrupteur principal sous la batterie, l’écran LED sur le guidon
s’allumera. Le moteur ne fonctionnera pas jusqu'à ce que vous alliez faire un tour complet de la
manivelle. Ce dispositif protège le moteur et le contrôleur et augmente la durée des composants
électriques.
Contenus
1. structure d’un vélo a assistance électrique
2. avertissement de sécurité
3. fonctionnement
4. installation et utilisation de la batterie
5. LED et fonctions
6. l’utilisation et l’entretien de la batterie
7. utilisation et entretien du chargeur
8. l’utilisation et l’entretien du moteur électrique dans le moyeu
9. l’utilisation et l’entretien du contrôleur
10. entretien et utilisation des leviers de frein avec « Power off »
11. Résolution problèmes simples
12. Caractéristiques techniques générales
1. Structure du vélo assistance électrique (voir la partieⅠ. Fig. 1).

20/44
2. Avertissement sur la sécurité:
• On conseille de porter un casque homologué, qui correspondent aux standards locaux.
• Respecter les normes du code de la route locales quand on pédale sur des routes publiques
• Être conscient des conditions de la circulation
• Faire contrôler régulièrement votre vélo par des magasins autorisés.
• Un entretien régulier garantit une meilleure utilisation et plus de sécurité.
• Ne dépassez pas 100 kg de charge sur le vélo, le poids du cycliste inclus.
• Ne jamais monter à plusieurs sur le vélo.
• S’assurer que l’entretien est effectué en accord avec le mode d’emploi de l’utilisateur.
• Ne pas tenter tout seul de réparer les composants électriques. Contactez votre spécialiste de vélos pour
avoir une assistance qualifiée.
• Ne faites pas de sauts, de courses, de cascades ou d'usage non conforme à celui prévu avec votre vélo
• Ne jamais rouler sous l’influence de drogue ou alcool.
• Nous conseillons vivement l’utilisation des phares, lors de la conduite dans l’obscurité, dans le brouillard
ou dans des conditions de mauvaise visibilité.
• Lors du nettoyage sur ce vélo, nettoyez la surface avec un chiffon mouillé. Pour les endroits très sales
nettoyez avec un peu de savon neutre et de l’eau.
Avis : NE PAS LAVER LE VÉLO ÉLECTRIQUE DIRECTEMENT AVEC DES JETS D’EAU,
SURTOUT À PRESSION. ÉVITER QUE L’EAU N’ENTRE DANS LES PIÈCES VU QUE LES
PIÈCES ÉLECTRIQUES POURRAIENT ÊTRE ENDOMMAGÉES.
3. Fonctionnement
Votre nouveau vélo à assistance électrique est un véhicule de transport révolutionnaire, avec un cadre en
aluminium, une batterie lithium-ion, un moyeu moteur de haute qualité et une centrale avec système
d’assistance électrique pour faciliter le pédalage normal. Il est important pour vous de noter les
recommandations suivantes afin d’avoir la meilleure expérience possible avec votre vélo.
Liste de vérification avant de conduire
3.1.1 Assurez-vous que les pneus sont gonflés complètement comme indiqué sur le coté du pneumatique.
N’oubliez pas, la performance du vélo est directement liée au poids du cycliste et de la charge, ainsi que
l’énergie stockée dans la batterie ;
3.1.2 charger la batterie pendant la nuit, avant de l’utiliser le lendemain ;
3.1.3 périodiquement nettoyer la chaîne à l’aide d’un dégraissant et puis la lubrifier avec de l’huile pour
chaînes.
This manual suits for next models
1
Table of contents
Languages:
Other Vivobike Scooter manuals


